Showing posts with label avocado. Show all posts

ROAD // Zucchini Noodle Salad

>> Thursday, May 11, 2017

My first recipe is what inspired this whole series. And you don't need a pricey spiralizer to make it either. Of course, I've seen the ones that attach to KitchenAid mixers, but they come at a premium (may make a nice gift, though -- I doubt my cheapie can make beet noodles). One of the most popular tools on Amazon is around $20; it has a handy handle and makes very neat looking noodles. I, on the other hand, have a bare bones model. You hold it in your hand and twist. It makes large and small noodles and costs around $12.

However you slice it, this is what you want in your life:


RAW ZUCCHINI NOODLE SALAD


What you'll need . . . 

  • Half a bell pepper, sliced
  • Half a large zucchini, spiralized
  • Half an avocado
  • Few tablespoons water (or kombucha*)
  • Couple tablespoons almond meal
  • 1 clove garlic
  • Salt, pepper 

* I added some ginger kombucha because I happened to be drinking it when I made this dish. If you use plain water, consider adding a bit of apple cider vinegar just to give the sauce a little extra flavor.

Method . . .
  1. Toss your veggies into a medium bowl. You can add more variety of veggies if you like, too. I just happened to have these on hand.
  2. Then put your avocado, water or kombucha, garlic, and almond meal in a food processor. You want to get a thick sauce, so play around with the ratios until you reach your desired consistency. Mine was like lowfat yogurt.
  3. Toss everything together and top with the salt (I'm loving pink sea salt lately) and black pepper to taste.

This meal took about five minutes to prepare from start to finish. It serves just one person, which is how I'll approach all meals in this series. It's best served fresh or else your avocado sauce may brown.

And if you want to read more about Raw Once A Day, check out yesterday's post.

Read more...

GF Black Bean Avocado Brownies

>> Wednesday, January 21, 2015

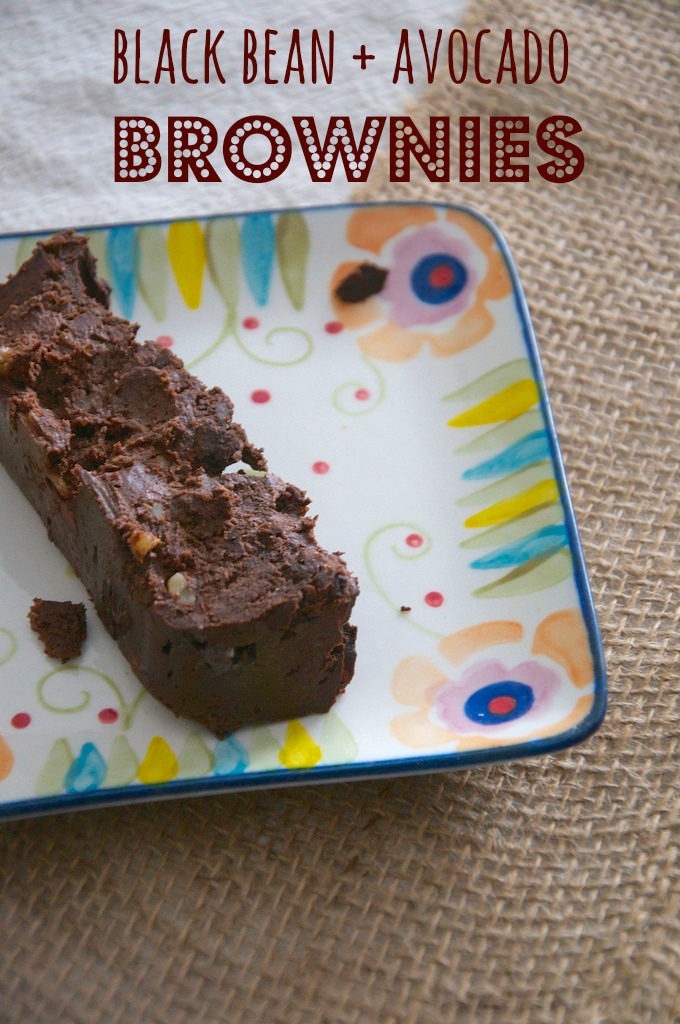
Here’s a sweet treat for your Wednesday. This recipe is a modification of the Healthy Chocolate + PB Brownies and Peanut Butter Blondies I posted last summer. What makes these guys different is that I used avocado in place of banana and made them super dark chocolate. Adding walnuts also made them taste even more legit. Please let me know if you try this recipe! The first ones were a huge hit, so I’m hoping this one’s a new favorite.

In pictures:


BLACK BEAN AVOCADO BROWNIES 

Flourless, gluten-free, vegan, etc.

What you’ll need . . .
  • 1 can black beans, drained and rinsed 
  • 1 medium-large avocado, ripe 
  • 1/3 cup pure maple syrup 
  • 1/3 cup smooth peanut butter 
  • 2 teaspoons vanilla extract 
  • 1/3 (heaping) cup unsweetened cocoa powder 
  • 1/4 teaspoon baking powder 
  • 1/4 teaspoon baking soda 
  • pinch sea salt 
  • 2 Moser Roth chocolate bars, 70% dark (from Aldi)
  • (or big handful dark chocolate chips)
  • 1/3 cup walnuts 

Method . . .
  1. Preheat oven to 350 degrees F. Grease a loaf or square baking pan with coconut oil and set aside.
  2. Place all ingredients except the chocolate and walnuts in a food processor and combined until smooth.
  3. Then pulse in the walnuts and chocolate until well incorporated but chunky.
  4. Pour mixture into your prepared pan and distribute evenly, flatten with a spatula.
  5. Bake for 20-25 minutes. Let cool before serving.

Enjoy!

Like what you just read? You can subscribe to the feed of these posts or follow us on Twitter or Facebook to be the first to know what the (never home)makers are up to. And we’ll love you forever!

Read more...

Hatch Chile Grilled Cheese

>> Wednesday, September 10, 2014

Fancy grilled cheese is quickly becoming my new favorite meal. I can't get enough of the Blueberry + Brie Grilled Sandwich -- I've made it with a variety of fruits, including the 10-Minute Ground Cherry Jam I made last week. And I'm sure you guys know after yesterday's homesteading post that I've started using homemade bread for most of my recipes, too.

Delicious times a gazillion.


So, I'm a pepper lover, but I have never head of Hatch chiles until this year. There was this huge sign at Wegmans, so of course they piqued my interest. I looked them up and discovered that this uniquely tasty pepper was originally grown in the Hatch Valley of New Mexico. People have entire Pinterest boards devoted to them. I picked up a bag (great marketing, Wegmans, right?) . . . and then couldn't figure out what to do.

After asking a few friends, roasting was the universal suggestion. I set my oven to broil, put them in whole and roasted on all sides until they were slightly charred. Then I placed them in a bowl, covered with a plate (you can use plastic wrap, etc.) until they were cool enough to slice, remove seeds, and peel the skins. If you plan to do all of this, too, just wear gloves or something. Big mistake on my part -- burning on my hands all day!

After that:


This sandwich is far from being local fare. (And I didn't even make the bread -- it was leftover from a dinner out the night before.) Still, it was certainly delicious and worth the effort. I slapped on a good helping of the roasted chiles. Used some tasty Colby cheese. Sliced avocado for good measure. I think I even tossed in a couple of Stephen's Homemade Pickles after that.

Oh: You can easily make this same type of sandwich using roasted red peppers, etc.

Anyway, I placed the rest of my roasted Hatch chiles in an airtight container and used them in soups, Veggie-Loaded Quesadillas, hummus, etc. Mine were gone pretty quickly, but I've heard they freeze well. Here are some specific instructions for freezing them whole and otherwise.

Have you tried Hatch chiles? What's your favorite recipe?

Like what you just read? Browse more of our posts + recipes on Pinterest. You can subscribe to the feed of these posts or follow us on Twitter or Facebook to be the first to know what the (never home)makers are up to. And we’ll love you forever!

Read more...

Guacamole Deviled Eggs

>> Monday, July 7, 2014

Our 4th of July kicked off a whole new season in our lives. Though we still didn't technically own our new home, we hosted our first "big" party with family and a few friends. It was one of those totally last minute deals where we were literally buying a gas grill hours before we lit it up . . . and I was in need of some majorly tasty party food -- and fast.

PS: I need a major post-move makeover, people!


Deviled eggs are an all-time favorite of mine. I could seriously eat an entire batch myself. And keeping with my Avocado Egg Salad theme, I thought to try them with some guacamole we had leftover from a Veggie-Loaded Quesadillas dinner the night before.

Let me tell you, these eggs are !!!


GUACAMOLE DEVILED EGGS

What you'll need . . . 
  • 12 eggs, hard boiled 
  • A couple tablespoons to Vegenaise or mayo*
  • 1/4 cup homemade guacamole (or store bought), more if desired
  • Dried dill, paprika, etc.
* Optional, but I love the tangy taste it adds to this recipe!

Method . . .
  1. Hard boil your eggs on the stove. The best instructions I have ever run across for this process are from Martha Stewart. Works perfectly every time -- cover eggs with 1 inch of cold water, bring to a rapid boil, take off from heat + cover, and let sit for 12 minutes before putting in a bath of cold (or icy) water to stop the cooking.
  2. Slice eggs in half -- carefully -- and place hardened yolks in a small bowl. Arrange on a plate for future filling.
  3. Then add the Vegenaise or mayo and guacamole and mix until well incorporated. You may add more mayo or guac, depending on your desired flavor and texture.
  4. Then scoop a generous amount into each egg 
  5. Then top with generous sprinklings of dill and smoked paprika, etc. I also added some fresh grated black pepper and sea salt for good measure.

I will definitely be making another batch (for myself only!) ASAP. There's just something about that avocado + egg mixture that gets me every time. Oh, and if you're vegan, you can always tried the Tofu Avocado Salad recipe we posted last year. It's another winner!

Happy Monday -- and I hope you all had a great holiday! Here are some more photos from our party. I'd say this recipe is certainly a strong move toward making more of my clean eating goals a reality.

Like what you just read? You can subscribe to the feed of these posts or follow us on Twitter or Facebook to be the first to know what the (never home)makers are up to. And we’ll love you forever!

Read more...

The Automatic Meal

>> Monday, June 30, 2014

We're hopefully moving this year week (more here). But I want to try and keep forging on with some stuff I've been meaning to share. Like my favorite breakfast (or lunch) (or dinner). It's pretty basic, but it's one of the most satisfying meals I make.


Really, I could eat this mix every day, every week. It's pretty darned healthy, too.
  • Fry two whole eggs in virgin coconut oil
  • Toast bread (sourdough!) or cook a sweet potato in your microwave
  • Add some avocado via pre-made guacamole or simple slices
  • Toss some salsa and/or hot sauce in the mix
  • Slice some fruit or even add more veggies on the side
  • Finish off with tea or water or whatever you're drinking these days
What's your favorite all-day sort of meal?

I'm actually off to make this one right now! I think what makes it best is that it doesn't require much planning. I almost always have the ingredients. And it comes together in a flash. Now that's what I think is a recipe for automatic healthy eating!

MORE TIPS TO EAT HEALTHY

#1: Stock up on frozen veggies 
#2: Buy greens and actually USE them 
#3: Create simple, go-to meals
#4: Learn to love alternatives
#5: Prep, Make, and Store
#6: Add In: Convenience to your advantage
#7: Eliminate Food Waste
* 20 Ideas for Make-Ahead Meals

Like what you just read? Browse more of our posts + recipes on Pinterest. You can subscribe to the feed of these posts or follow us on Twitter or Facebook to be the first to know what the (never home)makers are up to. And we’ll love you forever!

Read more...

Some Assembly Required

>> Friday, May 30, 2014

Continuing with a sandwich theme this week, I thought I'd share my most recent bagel shop re-creation: The Mexican Bagel. There's been a variation of this "recipe" at almost every lunch spot with bagels I've ever been to. So, I figured making it at home would be easy and less expensive. Especially now that our house sale/purchase is actually moving forward!

YAY!

Anyway, I posted a poorly lit photo of this sandwich last night on Instagram. I had all the right ingredients to make it again today for lunch.


THE MEXICAN BAGEL

What you'll need . . .
  • Your favorite type of bagel
  • Your favorite type of cream cheese
  • Your favorite sliced cheese (cheddar, Jack, Colby-Jack, etc.)
  • Your favorite salsa
  • Avocado
  • Your Favorite hot sauce
Method . . .
  1. Slice the bagel and toast until lightly brown. 
  2. Spread a layer of cream cheese on both halves.
  3. Top with your sliced cheese and then broil until melted.
  4. Scoop on a couple spoonfuls of salsa. Then top with avocado slices.
  5. Dash liberally with the hot sauce + enjoy!

*     *     *     *     *

Tonight's plans include going to our mortgage bank and signing some papers. Then we're taking Ada to the park + both going to try to fit in a brief run.  (I'll share more of my marathon training plans next week.) Then we're making these sandwiches for dinner and drinking some trail mix beer from Saranac. I think we'll also indulge in renting the movie Her because I've been dying to see it.

Do you have any fun weekend plans? I'd love to fit in a yard sale one of these weeks!

Like what you just read? You can subscribe to the feed of these posts or follow us on Twitter or Facebook to be the first to know what the (never home)makers are up to. And we’ll love you forever!

Read more...

Pesto + Avocado Sauce // Cooking Video

>> Thursday, February 27, 2014

Sauces can make or break a dish, am I right? For example, we've been making a lot of quesadillas with beans, peppers, onions, zucchini, etc. -- but without the salsa and Greek yogurt (which we use instead of buying additional sour cream to save $), it's just not as interesting.

I think you've gathered by now that pesto is my all-time favorite spread. Plus, it's so easy to make. I used to go with more complicated recipes, but over the years, I've discovered that the simpler the better.


I gave you guys a similar recipe for pesto in our Lentil + Quinoa Burgers post, except that time I had used baby kale versus spinach. Today I wanted to simplify it even more -- seriously, this recipe takes just 5 minutes to mix together and will spice up a variety of meals from burgers to pizza to pasta.

Here's how it's made -- no cooking or roasting, just blending:


// 5-MINUTE SPINACH PESTO

Combine the following ingredients in your food processor until smooth.

  • 2 (heaping) handfuls fresh spinach
  • 1/4 cup almond meal
  • 1/4 cup Parmesan cheese or nutritional yeast
  • 2 large cloves garlic
  • 1/4 cup olive oil
  • 1-2 tablespoons water
  • salt + pepper, to taste

// CREAMY AVOCADO PESTO SAUCE

Then I took half of that pesto and blended it even more with the flesh of one avocado and a few more tablespoons water until I made this creamy, alfredo-like sauce. It's great spread onto some toast or on the side with homemade quesadillas (I literally just licked some off my fingers before typing this post).

Or you can just coat a bit of pasta in it.

Maybe serve with a fried egg.

Definitely some salsa.

And Sriracha?


// GREEN PASTA WITH EGG

  • Cook pasta to the package directions. These shells boiled for 30 minutes. Then I drained and rinsed them so they cooled off a bit.
  • Then scoop a couple tablespoons of your green sauce onto them and mix around until well coated.
  • Fry an egg (or make it any style you like best) and place atop the pasta.
  • Top with salsa and Sriracha sauce, or whatever other condiments you want on there.
  • Enjoy!

Basically, this Avocado + Pesto mix is your new favorite sauce.

Period.

If you'd like to make the pesto first -- I'd even freeze half of it (so 1/2 cup of pesto for later use) by either placing it in a plastic bag and freezing flat or even putting it in an ice cube tray for smaller chunks.

OTHER PESTO RECIPES

Pumpkin Pesto Rolls
Garlic Scape + Swiss Chard Pesto, 2 Ways
Steamed Pesto Dumplings
Pesto Pizza Dough
Baby Kale Pesto
Walnut Basil Pesto
Basil-Pesto French Toast
Pesto French Toast, II -- with Avocado Butter
Pesto Quiche with Oatmeal Crust
Pesto Garlic Knots
Pesto Portabella Sandwiches
(Pesto) Smothered Mother

Like what you just read? You can subscribe to the feed of these posts or follow us on Twitter or Facebook to be the first to know what the (never home)makers are up to. And we’ll love you forever!.

Read more...

Tofu Salad Cups

>> Wednesday, May 29, 2013

So, instead of a Tofu-Avocado Salad sandwich or wrap . . .


Make a mini phyllo bowl!


Obviously you won't have time or the desire to make something snazzy like this for lunch every single day. But once in a while, a delicious phyllo dough crust is just right. Especially in summer, when light finger-type foods are preferred over gigantic, heavy submarine rolls.

HOW TO:
  • If you use store bought phyllo, which I'll get to in a moment, you'll need to thaw in the refrigerator overnight or follow the instructions on the box. So, make sure you do that before proceeding. 
  • Preheat your oven to 375 degrees F. Grease a muffin tin with olive oil or butter/Earth Balance and set aside. 
  • Make up a batch of the Tofu-Avocado Salad (or even Avocado-Egg Salad) and set aside // refrigerate.
  • I used frozen phyllo dough for this recipe because making my own seemed far too daunting. However, if you're interested, here's a recipe for phyllo dough
  • The secret to making phyllo cups is being liberal with olive oil or butter/Earth Balance. When it gets too dry -- even just sitting uncovered for a minute -- it breaks apart, and there's no returning from it. There should be information on the package about keeping everything moist and pliable.
  • Lay down a large sheet of phyllo, brush it with olive oil, lay down another sheet, brush, another sheet, brush, and yet another sheet with more oil. That's 4 layers total. You could do 3 as well.
  • Cut into 5 - 6 inch squares and press them -- gently -- into a (again, greased) muffin tin to form a mini-bowl or cup. 
  • Bake for 10 minutes or so, until golden brown. Be careful not to over-bake.

Then all you need to do is let them cool and scoop in the salad . . .


It's crisp. It's light. It's fun. We have a Greek food festival coming up this weekend where we live, so I guess phyllo is on the mind. I have already decided I'm going to try and make my own spanakopita over the weekend.

And if you haven't tried it yet, the Tofu-Avocado Salad and Avocado-Egg Salad recipes are simple + tasty + quick to prepare. We eat one of them at least once a week over here.

What's your favorite light meal for summer? Or have you used phyllo in cooking before? How?

Like what you just read? Browse more of our posts + recipes on Pinterest. You can subscribe to the feed of these posts or follow us on Twitter or Facebook to be the first to know what the (never home)makers are up to. And we’ll love you forever!

Read more...

Brunch Sandwich

>> Monday, May 27, 2013

If I ever open a restaurant, it will be called Brunch.

And I will serve only brunch.

And this sandwich will be the signature item on the menu.


It sounds a lot more complicated than it actually is.

Let's break it down:

  • First you'll need to roast one large portabella per sandwich you intend to make. (You can find some handy instructions in this post all about the merits of mushrooms for runners.)
  • You'll need slices of tomato and avocado, too. As well as some cream cheese or Tofutti, which is what we had in the fridge.
  • The french toast is just slices of sourdough bread soaked in an egg mixture and then cooked over medium-high heat on both sides until browned.
  • = 2 whole eggs + 1 tablespoons Chipotle Vegenaise + 1-3 tablespoons almond milk. Whisked.
  • (That should be enough to soak 6 to 8 slices of bread or make 3 to 4 sandwiches.) 

Sandwich assembly is quite easy.

Slice everything up nice + thin, then pile on to your liking.

Fold into a sandwich and cut.

You may remember back in my last waffle post that I had intended to give you a waffle sandwich recipe that was of the savory variety. Well, yes. But I never took photos. Anyway, this is pretty much THAT sandwich.

But there's more sandwich deliciousness where this came from.

Stay tuned . . .

Like what you just read? Browse more of our posts + recipes on Pinterest. You can subscribe to the feed of these posts or follow us on Twitter or Facebook to be the first to know what the (never home)makers are up to. And we’ll love you forever!

Read more...

Breakfast Rut

>> Monday, May 20, 2013

The word "rut" has such a negative connotation, doesn't it? Maybe I should use a different term. Basically: I've been eating the same thing for breakfast for the last five or so days. I feel like I've found a good groove -- because when I first started keeping my meal diary, I was being far too skimpy on this important meal.

Here she is!


THE MEAL:
  • Egg friend in coconut oil sprinkled with black pepper + paprika
  • Two slices of Ezekiel toast (7 sprouted grains) 
  • 1 cup chopped strawberries
  • 1/2 sliced avocado

BREAKDOWN:


You guys had some great suggestions to not get too hung up in the numbers counting when I track what I eat. Instead, paying attention to my macros is going to probably be the best thing for me to do. This meal looks pretty balanced to me. And coming in at 426 calories versus the 250 (a trap I fell into while looking too much at the calorie #), is much more sustaining.

So, I'll happily fall into this breakfast rut if it means I get the right mix of what will keep my satiated and energized with drippy goodness . . .


Do you have go-to meals like these? Any suggestions?

Like what you just read? Browse more of our posts + recipes on Pinterest. You can subscribe to the feed of these posts or follow us on Twitter or Facebook to be the first to know what the (never home)makers are up to. And we’ll love you forever!

Read more...

A Healthier Chocolate Pudding

>> Thursday, March 7, 2013

Yesterday I wanted pudding for breakfast. I had this intense chocolate craving, which happens to me from time + time. Most girls can relate, I'm sure. It's not really the sweetness I'm after, just the deep, bitterly dark chocolate flavor. (I want to write flavour here because it seems more fitting to dwell in those delicious letters a bit longer.) But I'm trying my best not to sub extra dairy or sugar in for all the bread I'm missing these days.

What to do? I have seen several pudding recipes on Pinterest recently -- but they either involve raw eggs or too much sugar. I've made Avocado Chocolate Pudding in the past. And I was pretty surprised with how great it tasted. I've also experimented with chickpeas, making a Chocolate + Peanut Butter Hu-Mousse . . . or dessert hummus.

What would be high in protein, sweetened relatively naturally, and still have good texture?


BLACK BEAN + AVOCADO CHOCOLATE PUDDING
vegetarian + vegan optional, gluten-free

What you'll need . . . 

  • 1 ripe avocado
  • 1 can black beans, drained and rinsed
  • 2 to 3 tablespoons honey or maple syrup (or 1 to 2 tablespoons agave)
  • 1 tablespoon cocoa powder
  • 1/2 cup chocolate chips, melted on the stove
  • 1/4 cup almond milk + (I used vanilla flavored because we had some)
  • 1 teaspoon vanilla extract
  • 1 tablespoon flax meal


Method . . .

  1. In a food processor, blend together the avocado and rinsed black beans, adding the milk a tablespoon at a time. (1/4 cup = 4 tablespoons.)
  2.  Prepare the rest of your ingredients, including melting the chocolate on the stove over low heat, mixing constantly to avoid burning.
  3. With the motor still running, add in the rest of the ingredients. Blend until smooth.
  4. Add more almond milk to adjust the texture to your liking. I actually prefer mine thicker, more like a mousse.
  5. Eat immediately or chill before serving.


Yeah. Black beans. Remember my Red Velvet Black Bean Brownie recipe last month? They were a hit, so -- I thought -- why not?

NOTE: I think adding three tablespoons of honey was too much for me, so next time I'll be trying just two, which is why I suggested the range in the ingredients. Making recipes like these requires a bit of flexibility and catering to your specific likes/dislikes.

Go slow when you add things in. Avocados are like gold in this house, so you don't want to waste them. You can always add more, but you can't take away. With a little tweaking, you'll get it jjjjjjjjjjjjust right.

I promise!


Some of you have been asking about how I edit my photos, specifically of Ada. I wrote up a very basic tutorial on Writing Chapter Three, if you wanted to check it out.

Like what you just read? You can subscribe to the feed of these posts or follow us on Twitter or Facebook to be the first to know what the (never home)makers are up to. And we’ll love you forever!

Read more...

Tofu-Avocado Salad + GF Day 1

>> Tuesday, March 5, 2013

One of the most popular recipes on this blog is Avocado-Egg Salad. And for good reason -- that sandwich is dynamite. Now, as I look back on the most recent recipes I've been giving you guys, almost all of them are for cookies, scones, breads, or some other flour-heavy concoction. One-track mind, I guess.

So, in the spirit of St. Patrick's Day, here's something GREEN!


TOFU-AVOCADO SALAD
vegan alternative to Avocado-Egg Salad

What you'll need . . . 

  • 1/2 block of extra firm tofu, drained and ripped into chunks 
  • 1 ripe avocado, sliced out of skin in chunks
  • 1/2 white onion, diced
  • 1 tablespoon grainy mustard 
  • 1 tablespoon dill, fresh or dry
  • Juice of 1/2 to a whole lime, depending on your preference
  • Salt + pepper
  • 2 to 3 tablespoons Vegenaise (you can also try Tahini!)

Method . . .

  1. Put all ingredients in a medium-sized bowl. 
  2. Note: You can play around with the seasonings to fit your specific preferences. We never make it the same way twice.
  3. Then just blend all ingredients together using a knife. More about this technique, check out my Easy Guacamole recipe. I learned it from one of my writing professors in college. 
  4. Then eat on its own or use it to top crackers, toasted bread or inside wraps, etc.

I didn't get a great photo of the finished product, but it really just looks a mess like in that last process picture. Makes two gigantic servings or four "normal" ones. We ate ours in Mission Wraps, which I've said goodbye to in this gluten-free adventure.

GLUTEN-FREE

Tofu's gluten-free, right? I mean, I know it is -- I think? -- but I feel like everywhere I look, gluten is lurking. In oats of all places (though we have a package of Bob's Red Mill GF), soy sauce (really???), malt vinegar, some dairy products, etc. Crazy. Just crazy.

I'm going to do the best I can for the next 28 days, but I would like to note that I do not think I have a gluten sensitivity. I got a couple emails urging me not to "self-diagnose" -- which I'm certainly not doing. This period away from gluten is purely to get myself off eating TOO much of a good thing.

Overindulging in chocolate or alcohol or carrots or anything, for that matter, wouldn't be a good thing either . . .

I would say almost all our meals revolve around bread in some capacity. If you go back a few pages in the archives, you'll see what I mean. Naan buns for veggie burgers, pizzas, dinner rolls, scones + waffles for breakfast, the list goes on. Truth is, I got lazy with my cooking. It's easier to grab a slab of crusty bread than it is to take time stir-frying up some veggies.

I will not be going totally gluten-free at the end of the short experiment, I'm just hoping to gain some fresh perspective and start thinking OUTSIDE the bread box.

I'm also seeking . . .

  • Better digestion. My stomach is upset a lot of the time and I feel bloated constantly. Maybe from the inflammatory properties in gluten, maybe not. I think this might also have to do with too much salt intake. 
  • Beer, too. I have a beer a day -- but I'd like to swap that for wine or cut out alcohol entirely more nights of the week and see if my stomach feels better. (However, any suggestions on good GF beers? I hear Dog Fish makes one.)
  • Brighter skin + aura of health. Yes. I just wrote that. I feel dull inside and out. Like the bread soaked the life-juice out of me. 
  • Alternative carbohydrate sources to fuel running. I don't need to eat half a large pizza the night before a race, eh? There's got to be other, high-quality foods that can help my running performance.
  • More variety in the foods my family eats. I still want to eat pizza every week, but I think we could mix it up a bit and try cauliflower crust and other swaps every now and again. More veggies = more nutrients = healthier family with or without bread.
  • Energy. I guess this is an overarching thing -- but my energy levels aren't, well, level at all. I go through lots of peaks and valleys, and I think sugar consumption is also to blame. Of course I can still eat sugar without the gluten, but I think it will be at least slightly more difficult, thereby making me think twice before baking a huge chocolate cake.
  • Fewer cravings. Apparently "Eating grains makes you crave grains and sugar since grains break down into sugar, they create a rise in insulin levels when those levels fall you crave more grains and, thus, the vicious cycle continues" (Source).

A lot of how I'll be "measuring" the results of this experiment is by feel. I won't necessarily do measurements or weight because that's not my primary goal. Also, I've started weight training and have been simultaneously getting fitter and heavier with the added muscle, so I don't think it'd be an accurate gauge anyway.


I suppose I'll update you guys a little bit after most of my posts. I hope you enjoyed the Tofu + Avocado Salad recipe. It's a sign of more vibrant, healthy foods to come this month and beyond.

Like what you just read? You can subscribe to the feed of these posts or follow us on Twitter or Facebook to be the first to know what the (never home)makers are up to. And we’ll love you forever!

Read more...

Beet + Goat Cheese + Avocado = Salad

>> Monday, August 13, 2012


We roasted more beets over the weekend. This time, a double batch filled two of our cast-iron dishes. I definitely prefer this method to using foil. An no matter how many times I follow it, I still marvel at the magenta hues they leave behind on my fingertips and in the sink.


Instead of toiling over a chutney, we decided to make a simple beet "salad." Roast, skin, slice, and eat. Beets alone? Doesn't sound like much of a salad at all. So, we rolled a log of goat cheese in some dill.

Added a generous helping of 5-minute naan. Yum.


But something was still missing. Then we found an avocado hiding out in the bottom of the produce bin in our refrigerator. Sliced it. Drizzled it all with some olive oil + salt and pepper. Balsamic would have been another tasty addition.


Ada enjoyed some beets, too!


Don't let that face fool you. She gobbled them all up. Almost as fast as she devoured her tofu the other night. Introducing foods to Ada is fun. Although, for the last couple days, she's been slowing down and refusing to eat solids. I doubt she's being picky just yet -- I think that's saved for toddlerhood.

Anyway, this was a fantastic way to use up our beets. I'm sure we'll get more soon, so I need to think of new uses for them.


What fun ways have you found to use up CSA produce? Our basket has been plentiful. It's a workout finding ways to eat it all.

Today on Writing Chapter Three, we've written up some way that we're moving forward with organics at the grocery store. And stay turned to this blog for a grocery/bulk bag review and giveaway!


PS: In my deals searching this morning I came across a deal for runners! The Garmin Forerunner 110 w/ heart rate monitor for $149.99 -- $80 off (Amazon.com's deal of the day). I often use Stephen's watch, the 210, but am considering getting this one for myself.

Like what you just read? You can subscribe to the feed of these posts or follow us on Twitter or Facebook to be the first to know what the (never home)makers are up to. And we’ll love you forever!

Read more...
Related Posts Plugin for WordPress, Blogger...

About This Blog

MyFreeCopyright.com Registered & Protected

© 2009-2014 by the (never home)makers
All content on this blog is copyrighted.

Want to publish our pics, tips, or tricks?
Contact us! [neverhomemaker@gmail.com]

We value transparency. Links on this page may contain affiliates. In addition, please see our disclosure policy regarding sponsored posts.

  © Blogger template Simple n' Sweet by Ourblogtemplates.com 2009

Back to TOP  

Blogging tips