Showing posts with label home. Show all posts

Airing My Dirty Laundry

>> Tuesday, January 16, 2018

My friend Taylor said something that really resonated with me last week. It was something to the effect of "organization doesn't need to be pretty" -- and she's absolutely right. I think I've been caught up in the past when I'd be trying to clean. Maybe all the stuff was put away, but the room I was left with wasn't exactly Pinterest-worthy. Despite the accomplishment of organizing, I was left with a sense of failure. And feeling negative about the experience didn't exactly help with motivation to keep it clean.

So, today I'm airing my dirty laundry, so to speak. Because there's actually no dirty laundry on my floors upstairs. After my marathon cleaning sessions this weekend, my ENTIRE upstairs is organized and tidy. Better yet, MOST closets and drawers are organized as well. The exception is that 4th bedroom closet. We don't have much basement storage, we have no attic storage, and the garage is tight this time of year. This is our only space to keep extras. I'm hoping that will change sometime soon.

So, my rooms aren't all painted or decorated, but I'm proud of this progress.


Eloise even has her own tiny capsule wardrobe!


I think this is the first time in years I would have photographed every room in the upstairs at the same time. They have never all been clean at once. Now, I want to organize that 4th bedroom closet better than it is now and relocate the last of the boxes in that room. But this is HUGE progress. And, no. I don't think these rooms look great. Maybe Ada's. Poor Eloise deserves a painted room already. She's 19 months old!

One thing at a time. More soon!

Related:


Minimalist Kid's Room Tour
Eliminating the Maybe
7 Clutter Categories
Cleaning Week Snapshots
Wannabe Minimalists

Read more...

DIY Bathroom Refresh

>> Tuesday, October 24, 2017

This is the story of our bathroom renovation.


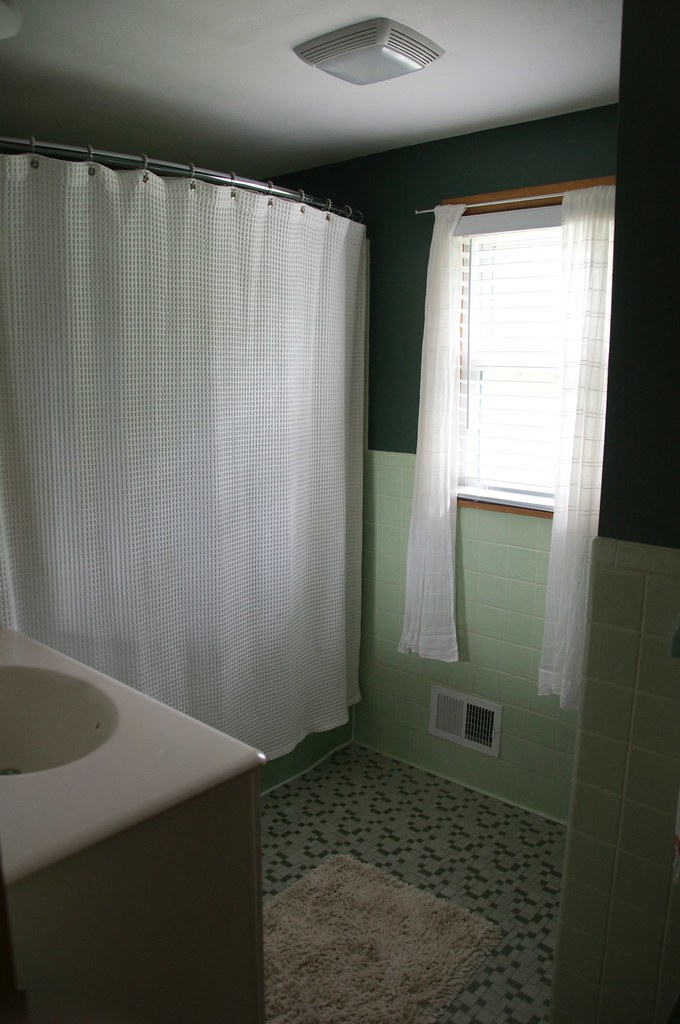
I don’t have many photos of our upstairs bathroom to serve as a before. Regardless, it’s the main bathroom for all our showering/bathing. We do also have a shower in the basement, but it’s a bit of a dive. We left the old green tiles from the 1960s these last several years because they were in great condition. We also knew we eventually wanted to knock down this little half wall that divided the space, and it would definitely destroy the tile.

Anyway, here’s a before from the day we moved in.


We didn’t have a ton of cash to spend on this project, but I was getting sick of trying to clean all the grout on the floor . . . and I also just get bored without a project. We allotted ourselves $350 to do the work, knowing we also had some materials left over from previous projects.

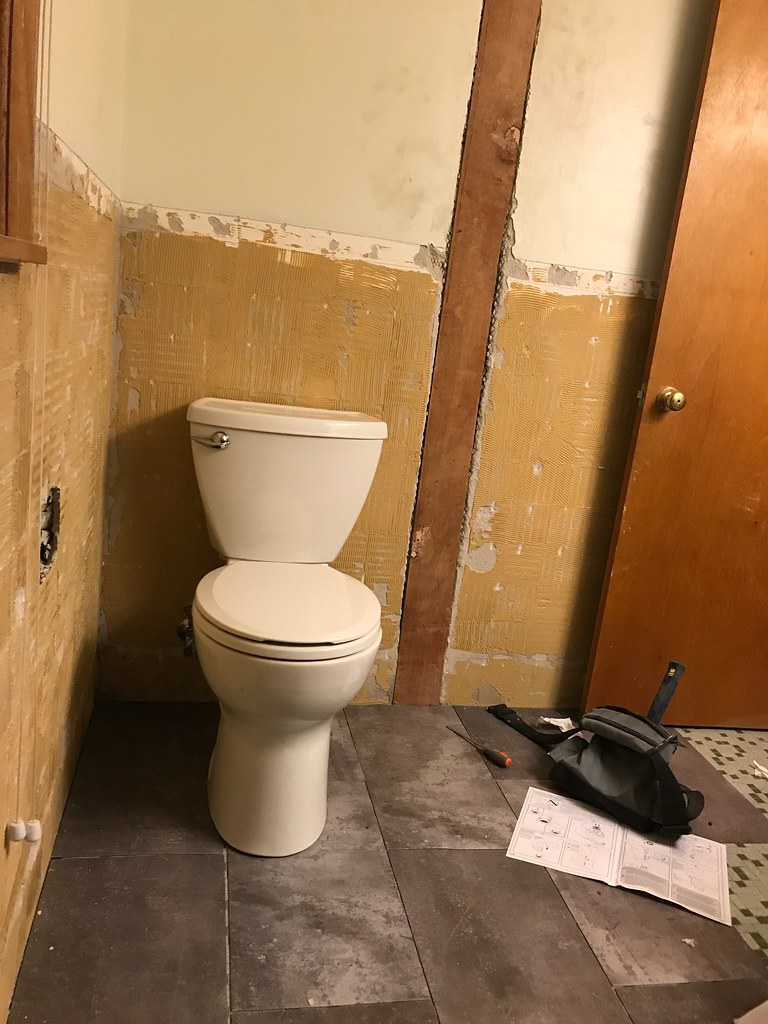
The first step was knocking down the wall. Then came tearing out the tile. In the process we accidentally knocked the toilet tank, cracking it. We decided to keep our current vanity.

Progress photos:


That last one still gives me the chills. There was plaster and tile . . . EVERYWHERE. Three huge garbage cans full of the stuff. It took a long time to clean up and get a blank slate to start with the new stuff.


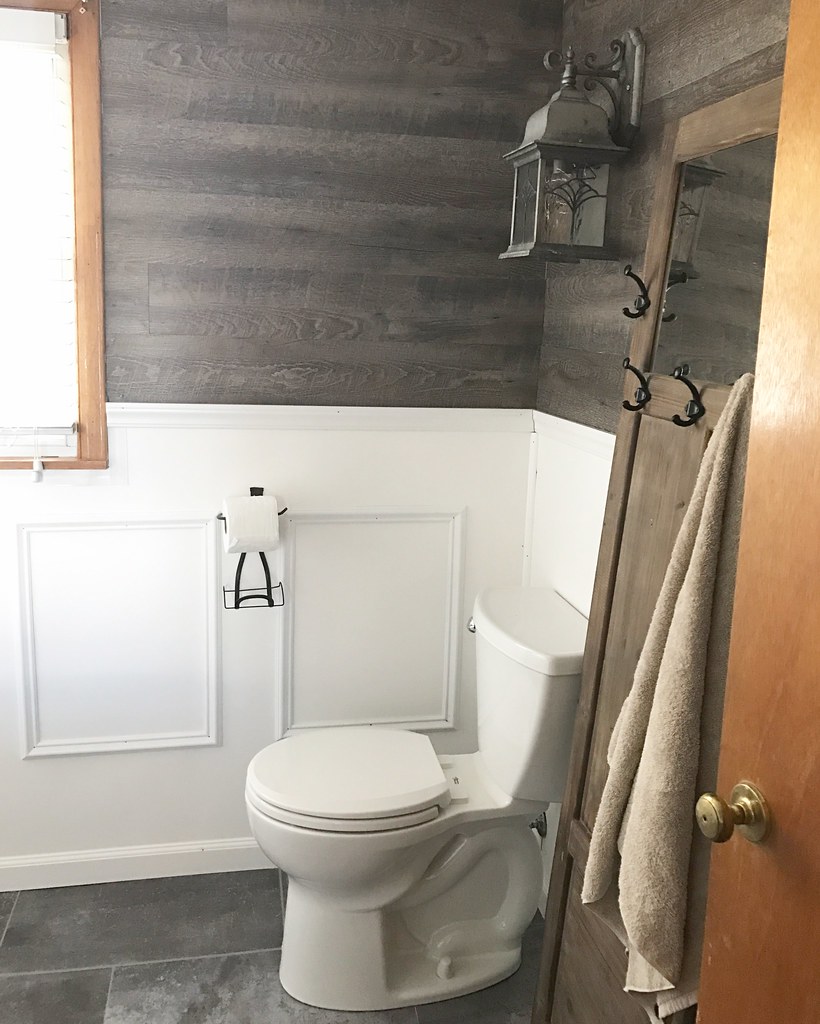
We put down the flooring first and then installed the new toilet. Then we got to the walls. We had some vinyl tile leftover from a project I did in the master bedroom, and I knew I wanted to put it to use. We also bought some plastic/vinyl wall coverings for the bottom half of the walls, as well as a few decorative pieces to dress it all up.

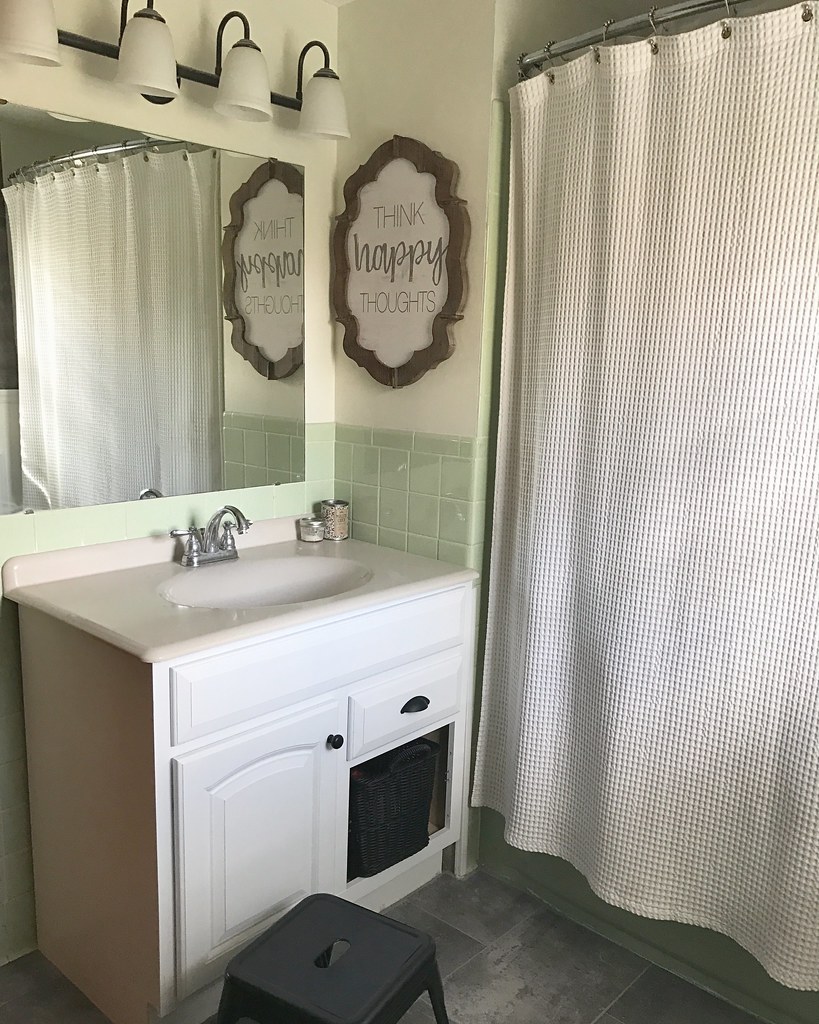
From there, I got a couple knobs for the vanity, a piece of artwork, and a cool door with hooks for towels. I also got a nice sturdy bench to stand or sit on. We left the tile behind the vanity and in the tub area (as well as the tub) the original green color. We eventually want to get it reglazed white. I’ve done a lot of research on this DIY reglazing kits, and it looks like a lot of work that doesn’t really hold up. The tile and tub are in good condition, so I’d rather wait and have it done the right way.

I realize I’m skipping lots of details, but I don’t want this post too long. So, I’ll just post the AFTER photos here. If you have questions, let me know. I estimate this project ended up costing around $400 if you don’t count the stuff we already owned (mostly some adhesives, grout, and the vinyl “wood” wall tiles).


My favorite part is how much space we gained by knocking out the wall. And how clean everything is now! It’s all vinyl basically, so you can just wipe it down with some homemade vinegar cleaner and a rag -- done! I also like the grey and wood tones. I am a huge fan of the vinyl floor tiles -- we also have them throughout our main floor . . . and they have help up well to high traffic.

I’m thinking I may do another post with more details on how we did different things, a cost breakdown, and answering any questions you guys have. Leave a note in the comments!

Read more...

Past Peak

>> Monday, October 24, 2016

This morning while Ada and I were waiting for the bus, we saw the most incredible rainbow. Many of the leaves have now fallen, but the colors looked amazing next to what's left of the fall foliage. Have you ever seen a rainbow in autumn? I hadn't. Definitely high up there on the experience list. I didn't snap a photo or anything. Some things just need to be experienced in the moment.

As the title suggests, we are now past the peak with all the leaves. Our backyard looked like this before the rainy, cold weekend. Now? Most of these leaves are waiting on the ground to be raked. But it's soggy outside, so I'll wait a while to even think about doing that sort of work.


In other news, the end of fall means the beginning of some home improvement stuff for us. Hooray! Stephen only has a couple weeks left of coaching until track starts in the spring. The outdoors will be calling us far less often when the cold and snow kick in. (Oh, please let there be snow this year. Please!)

And -- YES -- I know how trite shiplap walls have become. Or have been since like 2014. I know, I know. But guess what! We're installing them in our dining room right now (with the hope of extending to the living room by Christmas or so). I am immensely excited for this project. Our home is great for so many reasons, but it doesn't have much inherited character.

Here's the start:


Stephen went out and got everything at Home Depot, but I'm doing most of this project myself. The plywood "planks" are light enough for me to hold myself while I nail. And I'll have to let you know how it goes. So many tutorials instruct people to sand the planks impossibly smooth and to cover all the nail holes with putty.

When I look at the Gaines abode, I like their rustic look much better. Obviously what they have is original and well-worn. But I like to pretend. Plus, it'll be less work. That's always a plus.

See? Nobody was spacing those intricately with a nickel. Nope.


I'm sure shiplap will be the pine paneling of our time. In 40 years, it will look like the equivalent of this living room to all the younger folk. But I don't mind. I think it's fabulous. I can't wait to share the progress as we make our way through the first level.


Are you as obsessed with Fixer Upper as I am?

I know I've brought it up from time to time on this here blog. But the love is real. I bought the journal. I am buying the book. I am looking forward to my nursing sessions so I can catch up on last season. I even plotted a road trip to Waco, TX. I mean, we'll see on that last one. It's quite literally a day away (24 hour drive -- and I don't feel like flying after watching Sully. LOL!).

Hope you're having a great day. I'm off to finish some freelancing work before Eloise wakes from her first nap. More soon!

Read more...

Our Hand-Painted Backsplash

>> Tuesday, September 20, 2016

This is one of my favorite DIY projects. So, I'm re-posting it for those of you who might be interested in doing the same thing in your home. I'll hopefully get an updated kitchen tour up soon, too. We have done a lot more since two years ago!

I mentioned in my last kitchen post that I was thinking of jazzing up our tiles with some painted designs. And after we started getting up all the white doors, the white tile was looking rather plain and ordinary.

First, let’s take a look at where we started.


And in progress:


Let me back up. Our tile backsplash was painted white by the previous owners. It was plain Jane. I knew eventually we’d want to liven it up. And when was browsing around, I found all these cool Moroccan-inspired tile prints. I liked the ones most where they’d mix and match the tiles for a crazy sort of look. And since I like taking risks, I figured a few tubes of craft paint and hours of my time would be worth the experiment. If I totally hated it, I thought, I could always just cover it over with metal backsplash like we did in our previous kitchen.

So, I started. And immediately I thought I made a mistake.


Several hours of work -- and over 130 tiles later -- it really came together. At least in my opinion. I think once I can get full kitchen makeover photos up, it’ll look even better. All the clutter and crap is just out of frame in these photos, but the impact the print has on the room with tying together all the colors is big.

And with so many patterns together, you can’t tell quite as well that I’m not at all an artist. At all. Instead, it’s a beautiful chaos.


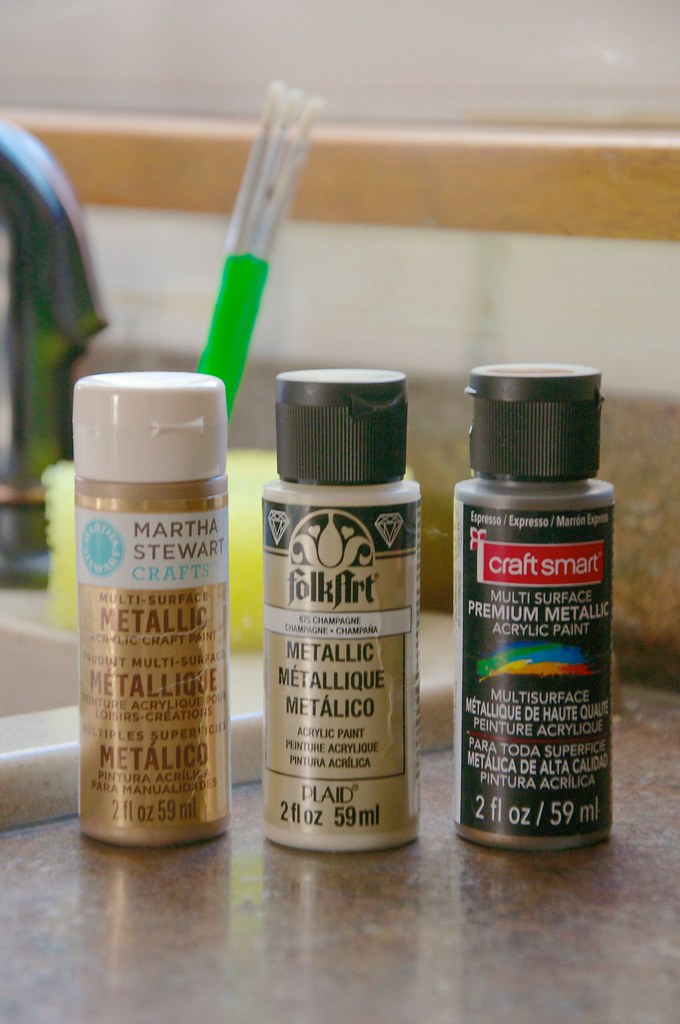
I started by copying a few of the prints I liked on this backsplash, but soon decided to go rogue and create my own. I used the following metallic craft paints (paint + brushes cost less than $10 for this project) -- one in a color that went with the trim, another with the counters, and the other with the cabinets. I would have loved to do bright, vibrant colors -- but since the counters and sink are earthy tones, I didn’t think it would go as well.

I tried three different brands of paint and you really do get what you pay for. The Martha Stewart Paint colors were the best, it was the easiest to work with. The Folk Art and Craft Smart was kind of runny. But they all did just fine in the long run. I think after I let them dry fully, I’ll probably cover with some clear topcoat for extra durability.


I know this look isn’t for everyone.

It’s fun, though, and fit well within our budget.


Looking forward to sharing more of the transformation. Initially, I know that our ultimate goal has been achieved -- the white cabinets make the space a lot brighter despite the lack of windows in the room. That’s the biggest help! The fun tile is just the icing on the cake.

What risks have you taken with your home decor?

Like what you just read? Browse more of our posts + recipes on Pinterest. Chat with us on Twitter or Facebook. And you can always email us with your questions and comments.

Read more...

How We Purged // Spring Clean

>> Friday, April 1, 2016

There's really no secret tip or trick for the best way to actually go through your stuff. For us, it made the most sense to touch everything -- or at least get our eyes on each item. Tedious? Indeed. But this way we could ensure that we weren't parting with anything that was actually important or critical (which is particularly key when going through old paperwork!).


Our Method


Here's what we did. It may or may not make sense in your situation:

  • First cleared out the main house from anything -- like extra furniture -- we didn't want. This uncovered all sorts of stuff that had been hiding in nooks and crannies. We created a few "miscellaneous" bins and put them in the garage for further investigation.
  • We also went through closets, drawers, and cabinets for the same reason. More misc. boxes came out to the garage to be staged for the next step.
  • Then we went bin by bin in our garage (it was helpful to have an outdoor space so close to our car) and started sorting things by where we intended to take it. (You can read more about that below.)
  • As we got enough stuff to take to a certain place, we'd clear some of it out. For example, we took two trips to the Salvation Army in one day to make room for more organization. Then later that day, we decided to take a trip to the trash place with our construction waste, again, to make more room to continue on.
  • Anything we were keeping was promptly put into it's right place in the house. In the case of sentimental stuff, we did put it back in labeled bins that went down to the basement. 
  • And then we just kept at it. We took more trips to the drop-offs and kept clearing out. After not too long, the space was clearing and we could breathe again.
  • We saved our paperwork for last. We took our time on this one because we didn't want to get rid of any documents that might be important in the long run. 
  • Then we decided to go through the house just once more to make sure there wasn't anything left that we could part with. We actually got another van load from our second go-through. I think it's because once we got started, we realized how freeing it is to purge. And it helped put the stuff in perspective . . . so we were ready to just let go.

Where Stuff Went


Salvation Army

The majority of things went to our local donation center. We even called a number the person at the checkout gave us for some furniture pickup that's scheduled for next Tuesday. Always make sure to get a receipt so you can write off your donations next year at tax time.

Once Upon a Child

This is a store in my area (and I think in other areas) that buys gently used and good quality kids stuff from toys to clothing. We sold a bunch of things we know we won't need with baby #2 here. And you know how I found a brand new BOB stroller at Target on clearance a few months ago? We sold our old one (it was in OK condition) for $75! I think that's a great return on that. With everything we sold (which was only a small box), we made out with nearly $200 without having to host a yard sale.

thredUP

I sent some of my nicer clothing to thredUP and am waiting to see how much $$$ I'll get. It's always worth a try to send clothes off (or go to your local consignment shop) to see if you can get anything for them before donating.

Waste

We had a lot of construction waste, like old boards with rusty nails, etc. We took all this stuff to our local center to dispose of it properly. In addition, we took some trashed computers and other recycling there because they know what to do with it. Just make sure you've cleared off any information that could potentially be taken. You never know.

Friends, etc.

We did find some things we thought our friends could use, so we asked and gave as the opportunity arose. I like the idea of having clothing swaps and the like. We have done that even with kitchen things in the past. It takes a village.


What did we do with Ada?


So many people have asked where Ada was during all this cleaning. Well, I estimate that we spent around 4 hours a day actively sorting and taking trips. We used Stephen's spring break versus doing something fun, so it was a big sacrifice. But we did the bulk of it during nap time (Ada slept 2 hours most days). Now that she's four, though, she was able to hang around us and even help. Her favorite part was taking small boxes to the van for donation.

In other words: It wasn't hard. I don't know what it would be like trying to do this with more kids, but we've always been able to do house projects and stuff with Ada right alongside us. Don't let it be an excuse!

OK. It's Friday, so next week I'll start off with a post I'm calling "why simple organizing doesn't work." We're getting close to the end, so if you have any more questions about this process -- let me know!

And don't forget to catch up on this series:

Eliminating the Maybe
7 Clutter Categories
Cleaning Week Snapshots
Wannabe Minimalists

Read more...

Eliminating the Maybe // Spring Clean

>> Wednesday, March 30, 2016

So, let's back up for just a minute. Did you know that there's a mental cost to clutter? Like, it has the power to make or break your daily life? I suppose I knew this on some intuitive level, but after doing more research + purging of my own -- I can truly tell you, it's true! For example, I'm a very visual person, and seeing lots of stuff around is actually quite over-stimulating and distracting.

And think of it this way: If you have lots of crap in your attic, you literally have weight hanging over your head. Then come the feelings of guilt or even embarrassment when, say, you can't open your garage door without everyone on your block seeing your mess. Oh, yeah, and it's nice to finally know where my birth certificate is because, well, I didn't know for the bulk of the last year -- talk about stressful.

I mulled over all this during our spring cleaning escapades last week. How did we have so much stuff? Why did we have so many bins of things I wasn't quite sure if I could part with? And why -- after having major cleanings before -- did the things keep piling up year after year?

Then it clicked. I wasn't truly letting go.


When I've organized and cleared out in the past, I've approached it by creating piles.
  • Trash
  • Donate
  • Sell
  • Keep
  • Maybe 
The thing is, that maybe pile kept getting carried over and over again every time I'd go to organize. (And, seriously, this whole minimalism thing is about so much more than just material objects. I'll get to that in my feelings post.) We schlepped a lot of maybe things from our college days to apartments. We schlepped a lot of things from old apartments to our first house. We then schlepped even more maybe things from our first house to our current house.

The maybes kept piling up and up and up.


What was in these boxes? Clutter -- in this order -- from these categories.
  • Clothing
  • Someday Stuff
  • Gifts
  • Forgottens
  • Sentimentals
. . . Maybe someday those size 2 jeans will fit me again.

. . . Maybe I'll find a use for that fancy vase I've still not taken out of the box.

. . . Maybe I'll want those hundreds of photos of people I can't remember.

. . . Maybe we'll start entertaining outdoors more and need that patio dining set.

. . . Maybe that stained chair can be reupholstered if we save our pennies.

. . . Maybe I'll want two different baby gyms for Baby E.

I think you see where this is all going. It's a clutter purgatory of sorts. So, when we did cleaning this time, we eliminated the maybe category and had to get a lot more decisive about all this stuff we had been carrying around from place to place for the last decade or more. Mostly, the answers became:

NO.
Get rid of it.
I haven't looked at that in years.
I totally forgot about that.
No, I have no desire to exercise and diet to fit into all these old clothes.
We have too many dishes already.
Etc., etc., etc.

For our clothing, we tried a modified KonMari approach -- both of us -- where we simply held the item, decided if it "sparked joy" (not necessarily if it was practical to hold onto or anything like that), and said a hard YES or NO from there. And now my seasons of clothing fit neatly into narrow sliding containers. I have 25 items in my closet currently -- but I won't delve too deeply into this part because I'm pregnant and it's not the best time to talk about a capsule wardrobe.

There was no special trick to letting go. It was more of a mentally ready moment. And this idea can actually carry over into other areas of your life. I mean, how often do we say MAYBE when we really mean yes or no? Whoa. That gets deep!

This post got much longer than I intended. I have had such great feedback with sharing about our journey to wannabe minimalism, I may add a few posts to my original plan. (Like -- tomorrow will now be that post on how we got rid of everything.) I hope that's alright! If you have questions or comments -- leave them down below. I'm happy to answer anything and everything.

Happy Wednesday!

Read more...

7 Clutter Categories // Spring Clean

>> Tuesday, March 29, 2016

When we set out to start our spring cleaning, we were dealing with a lot of different obstacles. We just didn't know where to start. So, we decided to think about the different categories of stuff we had cluttering up our house on the inside and out. It helped us get in the right mindset to go through whatever we encountered and -- then -- to bust through.

Once we got a handle on all that, our plan of attack became much more clear.


Clothing


Of everything, clothing seems to suck up the most space in our house. For me, it's from my ever-changing body. I was one size before I had Ada. Another size afterward. And another size last year. Now I'm pregnant and have two general sizes of maternity clothing. That's just me. Ada had WAY TOO MANY CLOTHES to even pass along to Baby E. The way we could tell our clothing was out of control? We had bins upon bins of it in the garage. We also had quite a laundry pileup on the daily.

Someday Stuff


This is stuff we were hanging onto for one reason or another. Like, just in case we might need a random chair someplace in the house. Or that extra tricycle someone found at a garage sale. Basically, this category is really broad and showcases our mini hoarding from either getting deals on stuff, buying multiples, or generally over-consuming.

Trash


Then there were boxes of papers and documents that we were hold onto because we didn't know what to do with them. Or they needed shredding and we hadn't gotten around to it. Stuff like old checkbooks, tax returns from the early 2000s, mortgage paperwork from our first house, computers that hadn't been hooked up since college, etc., etc., etc. We had several bins full of this stuff we were simply too afraid to throw away. On top of that, we found a bunch of items that were broken beyond repair that we were holding onto thinking maybe someday we'd figure out how to salvage them.

Gifts


Well, not necessarily gifts . . . but stuff we came into possession of whether we wanted to or not. We're talking bags of clothing from friends and family. Random toys or other items that were either duplicates or just never used. And a lot of this stuff we had said YES to accepting, etc. This category is really tricky, guys. Because we're always thankful at the generosity of others. A lot of times, we can all benefit from sharing things. But there are other times when the influx of stuff is just overwhelming. Then there's guilt for getting rid. Right?

Sentimentals


Yearbooks. Photos. Albums. Old sheet music from sophomore choral and band festivals. Video tapes, CDs, and DVDs from life events, college papers. I mean, you name it -- we have it. This is a category we are still dealing with because we didn't want to purge and regret. I'll get more on this in my next post.

Demo Remnants 


We work on our house. A lot. So, in the winter, we tossed demo materials in the garage for spring cleaning only to find out that our trash collection no longer takes these items. In all, we had the leftovers of a huge tool bench from the basement, several doors that we had replaced in the house, and other odds and ends of splintery, nail-poked wood.

Forgottens


Last, there were boxes of things we would open and be like -- WHAT? I don't even remember this stuff? And you know what we did with those boxes? We sort of looked through them, just to make sure nothing important was mixed in. But if it had been out of sight and out of mind long enough for us to forget -- we donated them immediately.


Stay tuned! In tomorrow's post, I'm going to talk about how we dealt with these categories from a letting go perspective. How we decided what to keep, what to give away, and how we were able to make $200 from selling a few things.

Read more...

Snapshots // Spring Clean

>> Monday, March 28, 2016

Stephen's spring break was all last week. And, no. We didn't jet off to some tropical location for a vacation. Instead, we decided to dedicate most of this chunk of time to our wannabe minimalist + organization goals. After over 4 hours each day (about 36 hours total!) of dedicated cleaning, fixing, and tooling around in the house -- we're probably 90 percent of the way done.

Ninety percent! It feels SO GOOD.

I have decided to dedicate this week on the blog to spring cleaning. Today I am going to show you a few teaser photos from our progress. Another day, I'll be sharing some tips we found handy for dealing with the various types of clutter we encountered. Yet another day, I'll go over some of the methods we used to clear everything out. I'll try to get an updated house tour up to show the before and afters. And then there will probably be some reflection on how this all makes us feel (surprisingly, it's had a huge impact already).

Sound like a plan, friends?


The garage was our main area of focus. These photos aren't current -- it was actually WORSE than this. We had 23 bins of random stuff that we either hadn't gone through since our move or that were disorganized. And a lot of these items were things we were just holding onto for some reason. Oh, we also hadn't put a car in the garage in like a year. (Nothing like airing our dirty laundry nooks + crannies, eh?)

We were especially lazy with old paperwork and things that needed shredding.


Anyway, here's a few progress shots.


But this is only the tip of the iceberg. I have so much to share! You don't need to dedicate an entire week of time all at once to cleaning your spaces. You can split it up. We decided on this intensive boot-camp approach because Stephen's track schedule is about to go wild with late night and all day meets -- before Baby E comes, we didn't see any other opportunity.

Have you made headway on organization goals recently? What's your method?

I'll be back tomorrow with some practical tips we learned along the way.

(PS: I'm 27 weeks! Anxiously awaiting my gestational diabetes screening results today...)

Read more...

Spring Cleaning // Wannabe Minimalist

>> Tuesday, March 8, 2016

The weather has taken a major turn toward spring this week. Today's high should reach close to 60 degrees! Though I'm sad and frustrated we didn't get a single snowstorm this year, I'm ready for change and sun and warmth and, well, spring cleaning.

Because this year? I think we're ready for the big purge.


No, this isn't my junk. I took this photo several years ago outside a Salvation Army after we had donated some things post move. Honestly, this photo stresses me out to the max. Though I'm not the tidiest person ever, I very often get overwhelmed with the sheer amount of stuff we have in our house, our garage . . . and with how much that stuff just continues to accumulate year after year despite our efforts to pare down.

Seriously -- how does this happen when we have good intentions? With a baby on the way, the stuff issue has been even more at the forefront of our minds. We want to get a handle on this before she arrives in June.

I don't want to utter the word minimalism, but -- yes -- OK I do. I just went there. I rolled my eyes a bit, too. It's so darned trendy . . . but I think we might be ready to adopt some of those principles. They simply make sense!

We're asking ourselves some questions inspired by this great post on Zen Habits.
  • Is all this stuff important? (Obviously the answer is no.)
  • What can we get rid out without regret?
  • How can we stop attaching regret to things anyway?
  • What are our family's core goals and how does paring down fit in? (Definitely ease of cleaning our home to make it more calm is a big one these days.)
  • Can we purge without replacements? (We've tried editing down several times in the past only to end up replacing the old with new, defeating the entire purpose)
  • How can we bring these ideas to other parts of our lives? (Simplifying our meals, social calendars, etc.)
With the home stuff, we're hoping to use Stephen's spring break to go room by room to start clearing out. We have some pieces of furniture that do little more than collect stuff and dust. Then I'll probably go through this Guide to Creating a Minimalist Home for the rest. Hopefully I can blog about it along the way.

Like I said, we've tried this whole idea many times. I think this time it might work better because Stephen is really on board this time around. It takes the commitment and energy from the whole family to get this sort of thing going, eh? Stay tuned for an update later in the month.

What are your spring cleaning goals? 

Have you successfully adopted a minimalist home or gotten close? 

What are your tips for making work -- especially if you have kids!

PS: Congrats to Andrea, winner of our PinkBlush giveaway. I'll be in touch soon about your $75 prize!

Read more...

Half Bath Mini Makeover

>> Thursday, February 18, 2016

I have to admit in the nearly two years we've been in our "new" home, the novelty of having more than one bathroom has certainly not worn off. Our first house had a tiny, window-less bathroom on the second floor. One toilet. One sink. One tub and shower. And it was fine . . . until it wasn't. I remember dragging my huge pregnant self up the stairs in the final weeks before Ada was born and, ugh, it was pure torture.

So, this has been amazing:


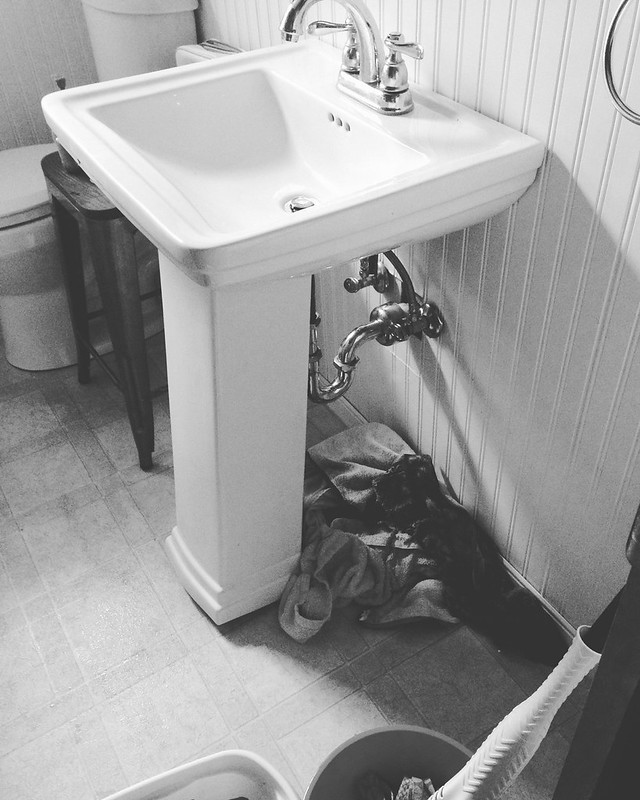
The one thing we never liked about the bathroom off the kitchen was the pedestal sink. (Well, and the impossible-to-clean flooring.) I mean, it was lovely looking. But it was always unstable because it wasn't installed properly. Then we had the whole matter of a four-year-old hanging all over it. We tightened and tightened and secured. It'd never fail, though. A couple weeks or months later, everything would be loose again. This time? The plumbing connections started to fail.

Leaks -- we had enough.


Ah, that's better:


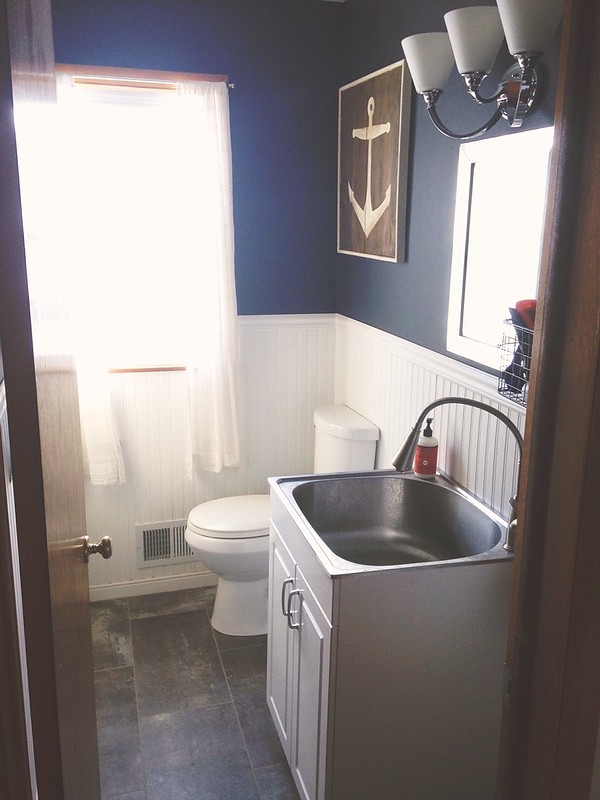
All the while, we've really wanted to expand the use of the bathroom and make it more utilitarian. We wanted a nice, deep sink for soaking or spraying off muddy shoes, dirty scrub brushes, (maybe bathing baby?), etc. A good cabinet as a place to store all our homemade cleaning supplies. Most of all, we wanted it to be sturdy.

I've been eyeing laundry sinks for the space, but most of them were too deep to fit. When we decided we wanted to change the sink, like, NOW -- I was thrilled to discover that Home Depot now carries a laundry sink cabinet that is under 22 inches deep with lots of storage and an AWESOME spray thing.

We rushed right over to pick it up along with some new vinyl tile flooring we've been meaning to install.


Stephen installed the sink in a matter of an hour. We love it. Stainless steel is perfect. The sprayer is already getting good use. The sink itself is 9 inches deep, so I definitely think we'll be bathing the baby in here often. And, like I mentioned, while we were at it, we changed the flooring by getting some of those 12 inch by 24 inch vinyl tiles and using grout to make them look more like real stone.

It totally transformed the space:


On the other wall, we have many of our cleaning tools hanging around on a simple accordion rack:


Overall, it's made us love this bathroom. It's the one our guests use when they're visiting, so it's nice to have it looking sharp. It's also nice to have a super messy craft project with Ada and have a great place to stick all the paint and goo until we can clean it. I can't believe I'm so excited about a simple sink.

Our house has come a long way since we moved in. And even since I did the updated tour in June. I guess it's time to do another tour. Maybe a video idea! My biggest project goal is to install a sliding or French door in the living room (in place of an existing window) that will lead into the backyard. We're thinking of getting a few quotes soon just so we have a number in mind so we can save. (I'm clueless on how much something like that would cost.)

Happy Thursday!

Like what you just read? You can subscribe to the feed of these posts or follow us on Twitter or Facebook to be the first to know what the (never home)makers are up to. And we’ll love you forever!

Read more...
Related Posts Plugin for WordPress, Blogger...

About This Blog

MyFreeCopyright.com Registered & Protected

© 2009-2014 by the (never home)makers
All content on this blog is copyrighted.

Want to publish our pics, tips, or tricks?
Contact us! [neverhomemaker@gmail.com]

We value transparency. Links on this page may contain affiliates. In addition, please see our disclosure policy regarding sponsored posts.

  © Blogger template Simple n' Sweet by Ourblogtemplates.com 2009

Back to TOP  

Blogging tips