Showing posts with label carpet. Show all posts

Our Tiny, Carpeted Kitchen

>> Friday, November 20, 2009


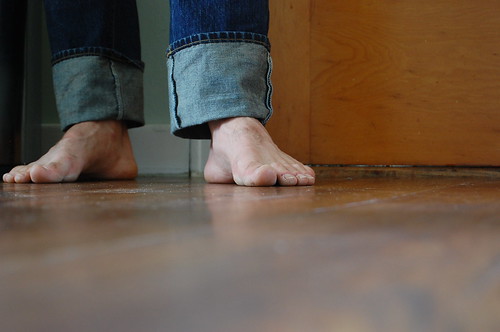
Some of you who join us from my METHOD days have already celebrated our kitchen floor transformation. This project still has us grinning from ear to ear. So, I just have to share it with the new crew. First, I know you all don't read the blog to marvel at a picture of Stephen's dirty feet . . . or a dirty floor. BUT that dirty floor just happens to belong to -- yes -- our beloved kitchen. Shortly after this photo was taken, we tidied up a bit . . . vacuumed, mopped, etc. . . . and for the first time ever enjoyed cooking in our carpet-less kitchen.

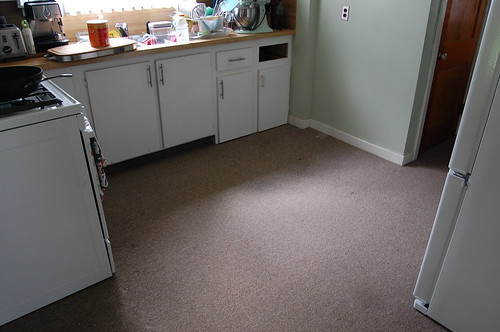
That's right! Our kitchen was carpeted by the previous owner. When we bought the house last June (2008), we had grand plans to gut the little room (which is only about a 10' x 11') -- foremost on the to-do list was hard-surface flooring. Here's a glamor shot of the old, low-pile carpet that was impossible to clean, ??? years old, and probably full of funk, gunk, and countless allergens.


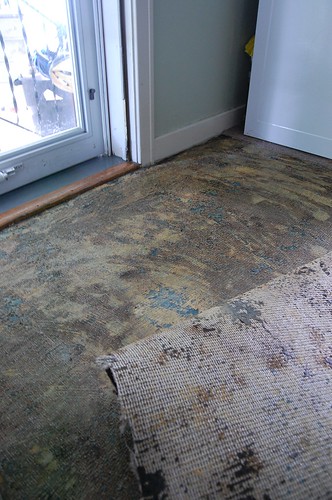
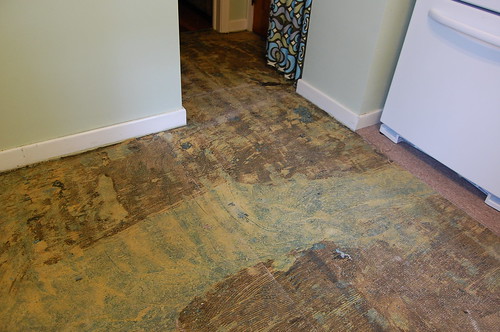
Sexy. Now, here's a shot of what was beneath all this . . . (the carpet was glued to ancient vinyl flooring, which we lifted up to expose a smoother, less-sticky underlay).


Initially, we wanted to replace this mess with hardwood or tile. We also wanted to buy new cabinets. New countertops. Oh yeah, and a sink, etc. We wanted a lot of things, really. I have a food blog, for goodness sake! Kitchens are important! So, we planned to start this work this summer . . . paying for it all with my teacher-husband-camp director extraordinaire's summer money. Enter swine flu -- which canceled his camp geared toward Tiwanese exchance stduents -- and we're not doing so well, at least not renovate-your-entire-kitchen well, financially right now.


Plan B: We prioritized. The carpet just HAD to go -- and ASAP. But we didn't want to spend lots of money installing a temporary hardwood or expensive tile floor (because we do need new cabinets when we can afford them). We've used some of those vinyl flooring tiles in our tiny bathroom, so my first idea was to find two colors of that (thinking like a beige and lighted beige . . . or just two variations, slightly, slightly different colors) and create a subdued checkerboard style -- with class.

When we got to Home Depot, we discovered a product that still blows my mind: Trafficmaster Allure Resilient Flooring. It's vinyl plank flooring that looks like wood (or tile). Now, I'm as skeptical and picky as all get out, but honestly . . . there are several "wood-types" in their collection that can trick even a discerning eye like mine. Not all are created equally, so if you go and check it out, keep this in mind (yes, some look very tacky, I'm sorry to say). We decided to go with the Hickory color, because it was relatively close to the other real wood floors in our house. Planks come in boxes that cover 24 square feet, and each square foot is only $1.99! We snatched six (heavy!) boxes, changed into our working clothes, and spent the next six hours on the floor.


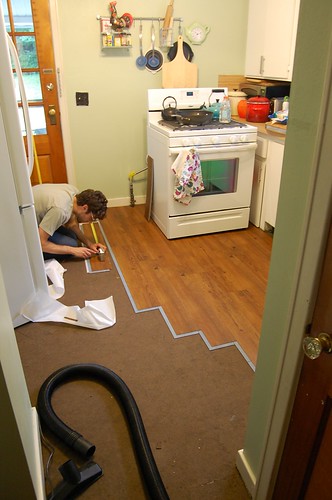
Result: It was the perfect solution for our temporary flooring needs (I see us keeping this down for maybe 2-3 years), it looks GREAT (see photos below), it's extremely water (dropped eggs, milk, random sauces, etc.) resistant, and it was easy to install! The tricky part was finding a good staggering effect, but thanks to some crafty internet searching -- we went with 1st plank was full length, 2nd was 2/3 length, third was 1/2 length, fourth was 1/3 length, then back to the full length, and so on.

Here's one last before photo:


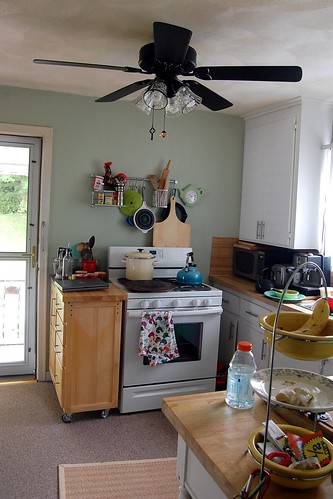
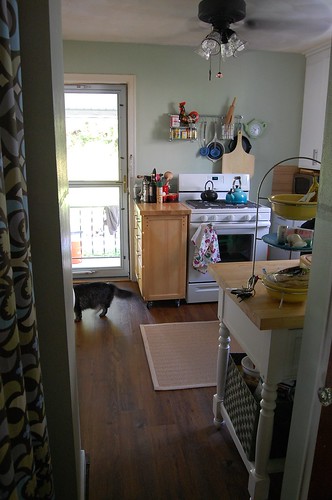
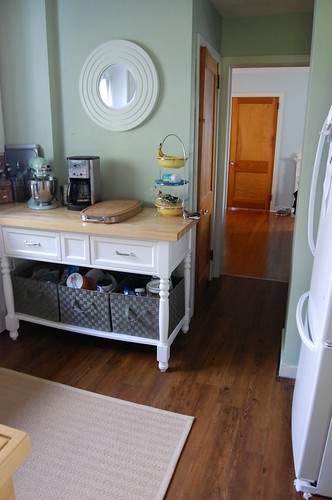
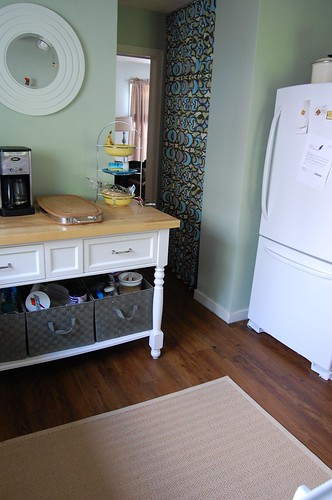
And some pretty afters:


Like what you just read? You can subscribe to the feed of these posts or follow us on Twitter or Facebook to be the first to know what the (never home)makers are up to. And we’ll love you forever <3

Read more...

DIY: How to Rip Up Old Carpeting

>> Friday, November 13, 2009

Wood floors are all the rage these days. They're easy to clean, fancy looking, and lend themselves well to ever-changing decor (rugs, etc.). But what do you do when you have old, smelly, puke-green carpeting that has been stuck on your floor since the 1960s? Easy! Assemble the following tools, as well as a small work crew, and follow the steps below.

What to do before you start:

Pull up a small section of the carpeting in a corner of a room to see what the condition of the floor is underneath. This can make or break your project. This HOW TO simply covers how to take carpet up and get it out of your home. Floor refinishing is a whole different story.


What you'll need . . .

  • Several hours -- a whole afternoon, even (you never know what might happen)
  • Hammer or crow bar, or both
  • Utility knife or two
  • Needle-nose pliers (for nasty staples)
  • Twine
  • Garbage bags
  • Gloves
  • Broom and dustpan
  • Face masks (if you don't want dust mites cramping your style)
  • Vinegar and water (or your favorite all-purpose cleaner . . . and it's best if you have a spray bottle)
  • Rags (for cleanup)
  • Wood floor polish (like Orange Glo)


Method . . .

  1. Assemble materials and put on your mask and gloves
  2. Continue to pull carpet up from where you did your "test area" at the corner of the room
  3. When you have a 3-4 foot section free, simply cut the carpet into a strip using the utility knife (just go across the length of the room and cut in a straight line)
  4. Continue following this process until the carpet is up. You may need to do a lot of tugging and pulling . . . and ripping, etc.
  5. Roll strips up and bind using twine or whatever other kind of rope you have around the house. It's also good if you contact your local waste organization to see if there are special procedures to follow at the curb. And if you can, recycle your carpet.
  6. If you're lucky, you can follow the same directions to rip out the padding. If you're not so lucky (like us), you may find that the padding is either glued or almost cemented to the floor.
  7. For our rooms, we gently chipped away at the floor to get up the old padding. Slowly with a wooden kitchen utensil (as shown below). This took a lot of patience . . . and a lot of time, but was ultimately worth it.
  8. For glued-on carpet, visit your local hardware store and consult with them as to the best de-gluing method. They have lots of options, and you can decide which is right for you.


Most people I've spoken with have been able to roll up their padding, so I'll keep this going . . .

9.) This is the FUN part. Taking up the tack strip along the side and the staples that are scattered throughout your floor. My husband used the hammer to gently pry under the strip and pull up. It took a lot of time to go around the room this way . . . but it's better to go slowly and cause as little damage as possible.


10.) Next, walk around the room with the pliers and pull up all the carpet staples. Those little buggers are hard to spot, so it's helpful if you go around more than once.
11.) After everything is swept up and taken out, spray a mixture of half vinegar and half water around the room and get down on your hands and knees to wash. Remember: It's hard work, but you will soon have gleaming, beautiful floors.
12.) To shine things up -- use your favorite wood polish.


And . . . last, but not least, ENJOY.

NOTE: All floors are different. You may find you need fewer steps to complete your project . . . or far more. And please feel free to leave a comment if you have suggestions!

Like what you just read? You can subscribe to the feed of these posts and be the first to know what the (never home)makers are up to. And we’ll love you forever <3

Read more...
Related Posts Plugin for WordPress, Blogger...

About This Blog

MyFreeCopyright.com Registered & Protected

© 2009-2014 by the (never home)makers
All content on this blog is copyrighted.

Want to publish our pics, tips, or tricks?
Contact us! [neverhomemaker@gmail.com]

We value transparency. Links on this page may contain affiliates. In addition, please see our disclosure policy regarding sponsored posts.

  © Blogger template Simple n' Sweet by Ourblogtemplates.com 2009

Back to TOP  

Blogging tips