Showing posts with label snack. Show all posts

All Aldi // Almond Butter Oat Bars

>> Friday, February 8, 2019

So, you guys all know my issues with Aldi lately. It's not them, really, it's me. I figured rather than whine about it, I'd start trying to cook more from scratch again -- using all Aldi ingredients. This particular snack is highly adaptable. You can use most any nut butter you like and add in whatever sounds good. It's also kid and toddler approved, hence the llama in my photo.


ALMOND BUTTER OAT BARS


What you'll need . . .

  • 2 cups rolled oats
  • 1-1/2 cups crispy rice cereal
  • 1/3 cup dried cranberries
  • 1/2 cup almond butter
  • 1/2 cup honey
  • 2 tablespoons coconut oil
  • 1 teaspoon vanilla extract
  • Salt, for sprinkling

Method . . .

  1. Spritz a 9x13 inch pan lightly with oil. Set aside.
  2. Melt the almond butter, honey, and coconut oil together on medium heat. Whisk it until smooth and take off heat once incorporated, being careful not to burn the almond butter.
  3. Using a spoon or spatula, stir in the oats, cereal, and cranberries. You can also add chocolate chips (they'll melt), pepitas, or anything else that sounds good to you!
  4. Spread into your prepared pan, sprinkle with a little salt, and refrigerate until firm. Cut into 16 bars.
  5. Alternatively, you can roll loose "dough" into balls for energy chunks.


More Aldi:


Aldi Foods for Picky Toddlers and Kids
$93 Aldi Weekly Grocery Haul
$400 Monthly Food Budget
18 Vegetarian Grocery Staples at Aldi
All Aldi content this way . . . 

Read more...

Almond Butter Energy Balls

>> Wednesday, March 29, 2017

I'm not a huge fan of dates. I feel like food bloggers, especially those who do the plant-based or raw thing, use them in many recipes. The texture creeps me out (I'm not a fan of raisins either), if I'm being entirely honest. That said, I found myself sticking them in the cart on my short shopping trip the other day. Why? I wanted to make some energy bites that are low in Weight Watchers points.

I didn't end up doing very well with those trials -- so that recipe is still in development. It's actually getting really close. But I did come up with these guys, which are around 4-5 points each, depending on how you scoop them (flat tablespoon versus heaping).

Immediately after eating them, I get a boost in energy. They're perfect for before or after workouts. That's for sure. I have a 7-miler on the schedule tonight, so I'll definitely be packing a few of these in before I lace up my shoes.


ALMOND BUTTER ENERGY BALLS


What you'll need . . .

  • 1 cup dates, pits removed
  • 1/4 cup smooth almond butter
  • 1 cup rolled oats
  • 1 tablespoon vanilla extract
  • Handful or two chocolate chips (optional -- highly recommended)

Method . . .

  1. Pulse the dates in your food processor until they come together into a ball. 
  2. Then tear that ball up into small pieces (to distribute more evenly in your processor) and combine with the rest of the ingredients.
  3. Pulse until you get a sticky dough. It may not pull together, but it should stick together when you press on it.
  4. Then scoop tablespoon amounts into your palm and roll into a ball. Repeat until you have 12-16 balls.
  5. Keep in an air-tight container in your refrigerator.


I wanted to thank you guys for your amazing feedback and sharing with my whole Real Life // Being Happy post. It's nice to know I'm not alone in how I think and feel. It's nice to know I'm not alone is just being happy with where I am in this world. I am hoping to get some time to respond more personally to your comments today. Nap strike + looming work deadline hasn't been helping in this area!

Related:


Chocolate + Nut Butter Energy Chunks
Chocolate Chunk Energy Cookies
Cocoa + Nut Butter Energy Balls
Cacao Nib Energy Chunks
Chocolate Peanut Butter Energy Bars
Automatic Healthy Eating // Learn to Love Alternatives 

Read more...

No-Rise Pumpkin Cinnamon Rolls

>> Monday, October 12, 2015

I’ve wanted to make cinnamon rolls for breakfast for like six months now. Every time I think to get out my mixing bowls, I get discouraged when I see all the rising time in different recipes. So, I came across a tasty pumpkin cinnamon roll recipe on Sally’s Baking Addiction (after all, I love our pumpkin pizza dough -- I figured it’d be a similar thing).

And then I asked myself . . . what if I just didn’t wait?

Well, I first made the recipe vegan because I didn’t have eggs or butter or milk in my pantry. I also didn’t wait for anything to rise much at all. They turned out w.o.n.d.e.r.f.u.l.l.y and this recipe will be a staple in our house for the holiday season to come.


PUMPKIN CINNAMON ROLLS

Adapted from this recipe -- made vegan + for the impatient among us.

What you’ll need . . . 
  • 1/3 cup canned coconut milk
  • 2 tablespoons Earth Balance
  • 1/2 cup pumpkin puree
  • 2 tablespoons brown sugar
  • Pinch salt
  • Ener-G Egg Replacer for 1 egg*
  • 2-1/4 teaspoons active dry yeast
  • 2-1/2 cups bread flour
* It’s 1-1/2 teaspoon replacer + 2 tablespoons warm water. You might also try a flax egg.

For filling . . . 
  • 1/2 cup + 2 tablespoons brown sugar
  • 2 teaspoons ground cinnamon
  • 1/4 cup melted Earth Balance

Method . . . 
  1. Preheat your oven to 350 degrees F. Generously grease an 8 x 8 baking dish (I ended up using glass) and set aside.
  2. Melt the 2 tablespoons of Earth Balance on your stovetop. Whisk together with the coconut milk, pumpkin puree, brown sugar, and salt. Then take it off the heat (you don’t want it HOT, just warm), prepare your Ener-G egg, and whisk that in until smooth.
  3. While this mixture is still warm, transfer to a large mixing bowl and add in the yeast. Wait a couple minutes to dissolve.
  4. Then add in the flour. I started with just 2 cups and then kept adding until my mixture didn’t stick to my fingers. Don’t add TOO much flour. The dough should be somewhat loose.
  5. Drizzle your dough with a bit of olive oil and cover while you prepare the filling.
  6. Simply combine the brown sugar, cinnamon, and Earth Balance in a small bowl. Set aside.
  7. I think because I was occupied with cleaning that I let my dough rise a grand total of maybe 10 to 15 minutes. That’s all.
  8. Then generously flour a work surface and roll your dough with a rolling pin into a rectangle that’s about 16 inches by 10 inches (yes -- I measured).
  9. Spread the filling over the entire thing and then roll so it’s a long tube. Cut into 10 to 12 cinnamon rolls.
  10. Arrange the rolls in your pan. Then bake for 15 minutes. That’s right! I didn’t let them rise at all before putting them in the oven.
  11. Cover with foil and bake for another 10 to 15 minutes. You’ll likely notice they’ve puffed quite a bit. Also: I found mine took a bit longer in the oven, and I think it’s because I used a glass pan, so keep and eye on the rolls to see when they’re golden. The foil is to keep them from burning, but I did remove it in the final couple minutes.
  12. Let cool before devouring. You can also top them with icing or cream cheese, etc. But I found them sweet enough as is, especially because I increased the filling a bit from the original recipe.

ENJOY!

Like what you just read? You can subscribe to the feed of these posts or follow us on Twitter or Facebook to be the first to know what the (never home)makers are up to. And we’ll love you forever!

Read more...

100 Calorie Cookie Dough Bites

>> Tuesday, April 28, 2015

I could eat cookie dough for hours (forever?). In fact, I’ve been snacking on quite a bit of it after creating my new favorite cookie recipe of all time, Maple Pecan Oatmeal Chocolate Chippers. But all that sugar, all that fat, all that dessert-y type stuff, I know it’s not good for me, especially in high doses.

Not surprising: I’ve been struggling with sugar and food in general due to stress. Now that I have a few months to really focus on myself, I’ve decided to start by keeping a food diary for a short period of time. I’m not into long-range calorie-counting. In fact, it makes me crazy and isn’t good when you consider my disordered past. But I do think the exercise of writing eats down can be a good one to just see a.) what you’re eating in general and b.) how much of it you’re consuming versus activity, etc.

So, this is how these 100 calorie cookie dough bites came to be. I won’t go nuts and call them “healthy” -- they contain less than 2 grams of protein per serving -- however, they are somewhat toned down from the ingredients in my usual cookie recipes. And they’re portioned out . . . versus the hugely rounded gobs I usually spoon into my mouth. It’s something in the right direction.


100-CALORIE COOKIE DOUGH BITES


What you’ll need . . . 
  • 2 cups GF rolled oats
  • 2 tablespoons coconut flour
  • 3 tablespoons Earth Balance
  • 1 tablespoon coconut oil
  • 1/3 cup maple syrup
  • 2 tablespoons flax meal
  • 1/4 cup chopped pecans
  • 1/4 cup semi-sweet chocolate chips

Method . . . 
  1. In your food processor, pulse oats into flour and mix with the coconut flour. Set aside in a large bowl.
  2. Put the Earth Balance, coconut oil, maple syrup, and flax meal in the food processor. Pulse into well incorporated.
  3. Add the wet ingredients to the dry and mix with a spatula until everything is moistened.
  4. Fold in the pecans and chocolate chips. Then portion out by tablespoonfuls onto a plate.
  5. Place in the fridge to firm up, then store there for the week.

// This recipe makes 18-20 tablespoon-sized balls. Between 95-105 calories.


Like what you just read? You can subscribe to the feed of these posts or follow us on Twitter or Facebook to be the first to know what the (never home)makers are up to. And we’ll love you forever!

Read more...

Simple Strawberry Smoothie

>> Monday, March 23, 2015

Here’s my new favorite smoothie. I’ve had it for breakfast the last 12 days. TWELVE! Seriously, I cannot wait to get my appetite back. I have also developed an intense love of need for salt + vinegar kettle chips. We don’t buy chips often, but I polished off a whole bag over the weekend. Oops. Whatever keeps my stomach happy these days, though.

Speaking of food aversions and all that stuff, I’ve been quiet because I’m still in limbo. Grueling, awful, absolutely inhumane and unimaginable limbo. Like I know what’s coming, but it’s not happening, so I’m stuck. I made another appointment for Wednesday (the soonest I could get in) because the waiting is getting beyond difficult. I hope to have answers and more finality after this appointment. Anything but this blind waiting will do.


SIMPLE STRAWBERRY SMOOTHIE


// You need:
  • Large handful frozen strawberries
  • 1/2 frozen banana
  • 1 cup Siggi yogurt*
  • Coconut (or other) milk to achieve consistency
// Blend everything together until smooth and creamy.

* I have no affiliation with Siggi's, it’s just my favorite yogurt (thick, protein, awesome) and I’ve been splurging lately because our grocery budget is sort of out the window temporarily. I like the mixed berry + acai, the pomegranate + passionfruit, and the plain. You can substitute in 1/2 cup of whatever yogurt -- dairy or not -- you like best.

** Also! Feel free to toss in a handful or more of greens. I think spinach and kale would blend beautifully. I hope to start doing this again soon. Such an easy way to get more nutrition without even thinking about it.

Like what you just read? You can subscribe to the feed of these posts or follow us on Twitter or Facebook to be the first to know what the (never home)makers are up to. And we’ll love you forever!

Read more...

Cookie Dough Balls + Thoughts

>> Wednesday, March 18, 2015

A lot of my energy chunk recipes incorporate either raisins or dates into the mix. I can’t handle even looking at either of those ingredients right now (ugh), so I decided to come up with a tasty treat recipe that’s packed with other good stuff. Eat these guys instead of dessert or while you’re on the run. They’re tasty with breakfast or whenever you need a quick pick-me-up.

And they come together fast!


COOKIE DOUGH BALLS


What you’ll need . . .
  • 1-1/2 cups rolled oats
  • 1/3 cup almonds or other nuts
  • 1/4 cup peanut butter*
  • 1 tablespoon coconut oil
  • 2-3 tablespoons maple syrup or honey
  • 1 tablespoon vanilla extract
  • 1-2 tablespoons flax meal
  • Handful unsweetened coconut flakes
  • Pinch salt
  • Handful chocolate chips

* I’m sure other nut butters and substitutes would work great too. Maybe Nutella?

Method . . . 
  1. Place rolled oats (uncooked, of course) and almonds in your food processor and blend until smooth (almost like a flour). 
  2. Then add the rest of the ingredients -- except the chocolate chips -- and pulse until well combined.
  3. Fold in the chocolate chips. If you’d like your mix less wet, consider adding more oats or coconut flakes to taste.
  4. Spoon in heaping tablespoonfuls into your palm and roll into balls.
  5. Store in an airtight container in your fridge for a week or more.

Ada climbed up on our footstool and took some photos of these bites with her Kidizoom Camera. We got it for her a couple months ago because she was starting to show an interest in photography (hmmm, I wonder where she get that from?). Anyway, it’s adorable to see her frame out her shot and excitedly look at the images she gathers throughout the day.

Click!


I’ll admit it feels somewhat disingenuous to post a recipe right now. But I don’t know what else I should be doing. It’s hard to deal with what’s going on while home alone most days, but I don’t really think I’d feel much differently otherwise. I mean, it’s universally difficult no matter what. I have had a lot of support from friends and family, and I’m so grateful for the love from this community. So, I’ve been throwing myself into taxes and freelance stuff while also allowing myself time to plan the next steps and mourn. I keep wondering what the right thing is I should be doing or feeling.

I’m sort of astounded at all the things I’ve dealt with in the last several years. I’ve blogged about most of them, which I’m sure can make this space seem like a drag (sorry) -- but it’s LIFE. Not always the life I imagined living. Sure, we’ve dealt with our fair share of stuff that not many people we know can relate to, but still. I’ve been learning more to take it all day by day, though it’s not always possible.

I get down on myself every now and again for having some anxiety and being negative (realistic to a fault?), but when I look at everything I’ve experienced, I realize I need to give myself a pass on some of it. Why wouldn’t I feel this way sometimes? Is there even a “normal” way to deal with some of these situations? And I wasn’t sure if I wanted to share the play-by-play of all that’s going on now, but I’m so glad I did. It’s been helpful to know that so many have gone through it and come out the other side. I hope my own experience can help someone else not feel so alone.

While I don’t always cope in the most textbook perfect sort of ways, I’m learning everyday that I’m stronger than I think I am.

More soon.

Like what you just read? You can subscribe to the feed of these posts or follow us on Twitter or Facebook to be the first to know what the (never home)makers are up to. And we’ll love you forever!

Read more...

Chocolate + Nut Butter Energy Chunks

>> Wednesday, January 28, 2015

It’s been a while since I posted a good energy chunk recipe. I’m actually working on one that’s GORP-based, so keep your eyes peeled for that soon. In the meantime, I needed something to snack on before my workouts. I love the instant jolt of energy I get from these little balls. Yet, I don’t experience a huge sugar crash because the sweetness is naturally derived.

These energy chunks are great for snacks and dessert. Especially when you’re doing a Weekends-Off Diet approach. Ada loves them, too. If you’d rather let the nut butter steal the show, leave out the cocoa powder. Toss in chocolate chips, nuts, seeds, and anything else your heart desires.

Whatever you do, enjoy!


CHOCOLATE + NUT BUTTER ENERGY CHUNKS

Makes 20-24 balls. Gluten-free and vegan.

What you’ll need . . . 
  • 12 pitted dates
  • 4 heaping tablespoons nut butter (I used PB)*
  • 4 tablespoons unsweetened cocoa powder
  • 1/4 cup maple syrup
  • 1 tablespoon vanilla extract
  • 2 cups GF rolled oats
  • pinch sea salt
* Would also work with sunflower butter, soy butter, etc. -- any kind of substitute you like!

Method . . . 
  1. Pulse dates in your food processor until they break up a bit. 
  2. Then add the rest of the ingredients minutes the maple syrup and vanilla extract and pulse. 
  3. Add in the maple syrup and vanilla extract until your mixes well incorporated and sticks together. You may wish to add more/less maple syrup depending on your sweetness and/or texture preference.
  4. Scoop out in heaping tablespoons onto wax paper. Then roll into balls.
  5. Keep refrigerated in an airtight container for up to a week.

// SIMILAR RECIPES

Like what you just read? You can subscribe to the feed of these posts or follow us on Twitter or Facebook to be the first to know what the (never home)makers are up to. And we’ll love you forever!

Read more...

Morning Glory Muffins

>> Monday, January 19, 2015

A friend of mine shared a recipe for a delicious morning glory loaf on Facebook last week. And immediately, I just had to make them. I’m being serious. I put the computer down and started getting out all my baking pans to find the muffin tin. But, I set out to change a few things with this recipe. First, I was out of eggs and typically bake things vegan out of habit. And I wanted to include less oil. And no refined sugar.

So, I modified and mixed and even tossed in some freshly squeezed clementine juice for natural sweetness. What resulted from these efforts is a truly amazing breakfast muffin that’s also gluten-free, vegan, and full of fruits and veggies.

Ada ate half the batch herself.


MORNING GLORY MUFFINS

Adapted from this awesome recipe on Imagine Childhood.

What you’ll need . . . 
  • 1 cup GF rolled oats processed into flour
  • 1/2 cup GF rolled oats, whole
  • 1 teaspoon baking soda
  • 1 teaspoon cinnamon
  • 1/4 cup maple syrup
  • 1/4 cup olive oil
  • 2 tablespoons flax meal + 6 tablespoons hot water (2 flax “eggs")
  • 1 teaspoon vanilla extract
  • 1/2 orange (or 1 full clementine) -- just the juice
  • And also the zest, if you like it!
  • 2 large carrots, shredded (around 1 cup)
  • 1 large apple, shredded (around 1 cup)
  • 1/3 cup walnuts, pulsed to crumble
Method . . . 
  1. Preheat your oven to 350 degrees F. Grease a muffin tin with Earth Balance or coconut oil.
  2. In a large bowl, whisk together the oat flour, oats, baking soda, and cinnamon. Set aside.
  3. In a smaller bowl, combined the maple syrup, olive oil, flax eggs, vanilla, orange juice, then pour this mixture into the dry ingredients.
  4. Add the carrots, apples, and walnuts, and mix until well incorporated.
  5. Then divide evenly among your pan -- 12 muffins in all -- and bake for 20-25 minutes. Until golden brown and set in the center.
  6. Let cool on a rack for a few minutes before consuming. I am sure you can also freeze once they are totally cooled, but they didn’t last that long in our house!


You’re going to love these muffins. 

Just a note that the batter will definitely be shaggy, if that makes any sense. It might not seem like you have enough oat covering to go over all those shredded apples and carrots. I assure you, it will all bake up beautifully. And these are incredibly healthy if you consider they’re mostly just oatmeal baked into muffins.

Enjoy!

Like what you just read? You can subscribe to the feed of these posts or follow us on Twitter or Facebook to be the first to know what the (never home)makers are up to. And we’ll love you forever!

Read more...

Bake Better Kale Chips

>> Thursday, January 30, 2014

We make kale chips about once a week. Over the years, we've certainly refined our process quite a bit. The very first batches we made were either too crispy and burner or too soggy and limp. As with any cooking method, mastery takes time, but GOOD NEWS! I have a few shortcuts to share if you're scrambling.

Here are 5 ways to make better kale chips -- tonight!


// Use Tuscan (Dinosaur) Kale

I had never even heard of different varieties of kale. Silly me, but I thought the packaged stuff was pretty much it. Enter our CSA share, and we were up to our elbows in thick, hearty Dinosaur Kale. We first made chips using this variety back in 2012, and we've been hooked ever since!

// Dry Leaves Well

A big mistake I made for the longest time was rinsing off my kale and not drying it properly. Water plus heat equals steam. And steam doesn't exactly crisp kale chips to the desired texture and crunch. After rinsing and chopping kale, I always press a clean tea towel onto the batch before adding my oil and spices. I get those suckers as dry as possible.

// Massage That Oil 

I used to be more of a drizzle and toss kind of gal, but now I get down and dirty with my olive oil. After drying kale leaves, I use around 1-2 tablespoons of oil and spend a good minute rubbing it onto the leaves and into all the little crevices, making sure to get everything well coated. More oil means more flavor and crisp.

// Use More Toppings

After that, it's time to go to flavor country. For us, this usually means salt, pepper, and a scoop of nutritional yeast. But adding more exotic spices, like curry, smoked paprika or other flavor enhancers like soy sauce, or lemon juice or zest surely kicks this up a notch.

// Crank the Heat

Oven temperature surely have an impact on the initial shock, and therefore, crunch, the kale gets in the oven. I actually crank mine all the way to 400 degrees (20 minutes) for a near-burnt result, but whatever temperature you use from 350 to 400, make sure to check on your kale every 10 minutes and stir around to get all areas baked evenly.


If you've never made kale chips -- now's the time to start. If you're looking for an excellent food to fuel your exercise, kale has lots of nutritional benefits to boast.

Here's the first recipe I ever made and the best recipe I follow to this day.

Have any tips to share of your own?

Like what you just read? Browse more of our posts + recipes on Pinterest. You can subscribe to the feed of these posts or follow us on Twitter or Facebook to be the first to know what the (never home)makers are up to. And we’ll love you forever!

Read more...

Zesty Orange Ricotta Muffins, etc.

>> Monday, January 13, 2014

Our new favorite pizza topping is ricotta cheese. Thing is, we usually have quite a bit leftover after using only a few dollops . . . a couple nights a week. Anyway, I was making Ada chocolate chip pancakes for breakfast on Friday, it's sort of our tradition, and I got this idea to give them a dose of protein with ricotta.

I made myself a few, too, but added adult flair with orange zest and honey.

Whoa. Good decision.


We don't have time for pancakes everyday. So, with our Juice Pulp Muffins // Bread fresh in my mind, I experimented + discovered this recipe works very well as pancakes, waffles, and muffins. It just requires a simple tweak. More or less almond milk. More for thinner batter for pancakes, a moderate amount for thicker waffle batter, and less for these muffins.

Or, should I say, your new favorite muffins?


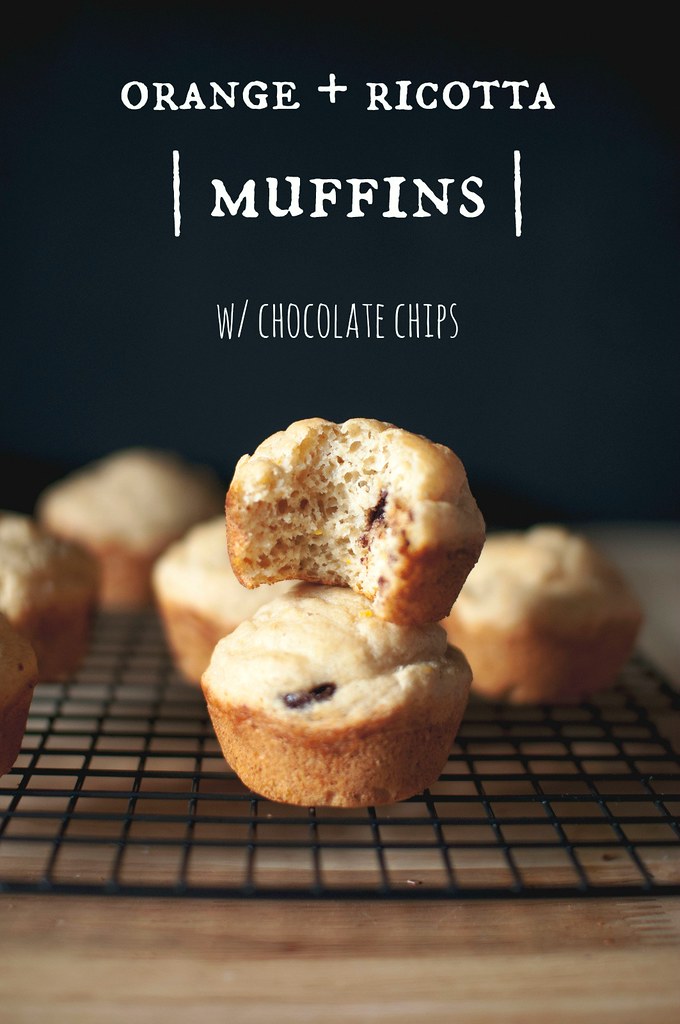
ZESTY ORANGE RICOTTA MUFFINS
Or pancakes. Or waffles. Best with dark chocolate chips.

What you'll need . . .
  • 1-1/2 cups white whole wheat flour 
  • 1 tablespoon baking powder 
  • 1/4 teaspoon salt 
  • 2 tablespoons honey 
  • Zest one large orange 
  • Juice of large orange (hand-squeezed works great)
  • 1 tablespoon flax meal + 3 tablespoons hot water 
  • 1/2 cup part-skim ricotta
  • 3/4 to 1 cup almond milk (or other milk)***
  • 1 teaspoon vanilla extract 
  • Handful or two chocolate chips, dark chocolate
Method . . .
  1. Preheat your oven to 350 degrees F. Lightly grease a standard muffin pan with oil or butter or substitute. Or line with muffin papers. Alternatively, skip this step if you want to make pancakes or waffles. 
  2. In a large bowl, whisk together the flour, baking powder, and salt. 
  3. In another bowl, mix together the rest of the ingredients (starting with 3/4 cup milk) -- except the chocolate chips. 
  4. Combine the wet and dry ingredients and mix until just  combined. Batter should be thick, but not like bread dough. Add more liquid, depending. 
  5. Fold in chocolate chips + portion equally into the muffin tin.
  6. Bake for between 18-22 minutes, until golden brown. Let cool on a cooling rack to avoid sogginess.


*** To make pancakes or waffles, thin out batter with almond milk until familiar textures start to happen. Honestly, I'd make waffles with the muffin batter so they are extra thick. Pancakes tend to work better with a full cup of milk + be sure not to flatten while cooking.

ALSO: Make sure pan or waffle iron is well greased. And for pancakes, set heat to medium, as the juice and honey will tend to make them brown/burn a bit quicker.


The texture is almost like baked doughnuts. I was really surprised by all the airy lightness these guys pack. I'm not used to that happening when not using eggs. It was one of those lucky "mistakes" where -- instead of it being in the plan, it just happened that way. I'm pretty sure it's because I used just one flax egg. Or, again, just luck.

You may also substitute maple syrup in for the honey. You'll notice there isn't refined sugar in the recipe, as I'm trying to moderate how much gets in Ada's diet. It's funny how turning two opens up this new world of junk food, whether we intend for it to happen or not!

We do what we can.
We eat what we love.
It's a delicious balancing act.

Like what you just read? Browse more of our posts + recipes on Pinterest. You can subscribe to the feed of these posts or follow us on Twitter or Facebook to be the first to know what the (never home)makers are up to. And we’ll love you forever!

Read more...

One-Bowl Juice Pulp Bread // Muffins Recipe

>> Sunday, January 5, 2014

As with any new toy, the juicer has certainly consumed my attention this past week. And I'm already learning so much about certain fruits and veggies. Likes and dislikes. Opportunities to save and interesting flavor combinations. So far, I really like apples, romaine lettuce, carrots, and lemons + limes. They are all tasty, easy to clean, and yield a lot of juice.

The kale in this photo, on the other hand, probably gave up 2 drops of juice total . . . and mostly just ran through the machine into the pulp drawer. I don't think, necessarily, all kale in general is like this -- but ours was particularly dry.

Live an learn.


But I figured this folly was an opportunity to experiment with using pulp in fun ways. So, I made bread! And, then again today, I made this same bread recipe -- doubled it -- and baked muffins. The pulp gives baked goods flavor, any residual nutrients, and lots of fiber. This mix includes beets, carrots, oranges, limes, and celery.

(PS: Don't have juice pulp? Sub in shredded carrots, apples, or other fruits/veggies 1:1 ratio!)

(Also: I promise not all recipes going forward will involve juicing. But some will. I'm hooked!)


JUICE PULP BREAD/MUFFINS
(makes 2 loaves or 24 muffins -- use any pulp)

What you'll need . . .
  • 3 cups white-whole wheat flour
  • 1/4 cup flax meal
  • 1/2 teaspoon salt
  • 1 tablespoon baking powder
  • Heaping teaspoon ground cinnamon (or other spice)
  • 2 cups (fluffed, not packed) fruit/veggie pulp 
  • 1/2 cup olive or canola oil
  • 1/2 to 3/4 cup unsweetened almond milk (or other milk, even water)
  • 1/2 to 3/4 cup maple syrup (depending on sweetness desired)
  • 1 teaspoon vanilla extract 
Method . . . 
  1. Preheat your oven to 350 degrees F. If you've baking bread, lightly grease your bread pans; muffins grease muffin tins.
  2. In a large bowl, combine the flour, flax meal, salt, baking powder, and cinnamon together. Then mix in the pulp and follow with the oil, almond milk, and maple syrup. 
  3. Mix until just combined. Batter should be like normal quick bread or muffin batter, so if it is too thick, add more liquid -- milk.
  4. Then divide into half for bread or portion out into individual muffin tins. 
  5. Bake for 40 to 45 minutes for bread or 20 to 25 minutes for standard muffins.
  6. Repeat with rest of batter -- bread is done when set in middle and lightly golden brown. 
  7. Let cool before serving or storing in your refrigerator (or freezing!).

We made our bath of muffins this morning, and I'm happy to report that we have a great centerpiece for our breakfasts this week. Ada loves this bread. It's sweet without being overly so. The pulp really just injects it with flavor. Oh, and it goes great with . . . juice. So, more pulp.

What to do next?

Have you tried/made pulp bread, crackers, or other baked goods?


And don't miss our 90 healthiest recipes of 2013! Lots of delicious, wholesome foods for breakfast, lunch, dinner, and beyond. Includes both vegan and vegetarian recipes to please the entire family -- even toddlers!


Like what you just read? Browse more of our posts + recipes on Pinterest. You can subscribe to the feed of these posts or follow us on Twitter or Facebook to be the first to know what the (never home)makers are up to. And we’ll love you forever!

Read more...

Recipes of 2013

>> Thursday, January 2, 2014

I always like to start the new year by making mention of all our recipes -- for new readers and old friends alike! Cooking is probably 75 percent of the focus here on the blog. In 2012, we gave you a grand 79 recipes in all (if you'd like to see my Top 12 favorites, be sure to check out that recap).

This year? Well, we outdid ourselves. Here are all 90 recipes we posted in 2013!


WAFFLES

Zucchini + Carrot Waffles
Summer Market Waffles
Gluten-Free Waffles
Peanut Butter + Banana Waffles
Spinach Green Waffles/Pancakes
Basic Homemade Freezer Waffles

EGGS

Overstuffed Mushroom Omelet
Soft Boiled Eggs Atop Toast
Fried Egg + Avocado Sandwich
The ULTIMATE Brunch Sandwich
Breakfast Quiche w/ Rosemary Crust

FRUIT + JUICE

Roasted + Herbed Citrus Fruit
Chocolate Green Bean Smoothie
Freshly Squeeze Grapefruit Juice
Carrot Juice in the Ninja Blender
Blackberry Lemonade for 2
Roasted Apple for 1

SAUCES, PESTO, HUMMUS, ETC.

Tangy Freezer BBQ Sauce
Grilled Kalamata Tomato Sauce
Blueberry Jam, Canned
10-Minute Heirloom Tomato Sauce
Garlic Scape + Swiss Chard Pesto, 2 Ways
Spinach Pumpkin Seed Pesto
Roasted Veggie Hummus
Boozy + Bold Chunky Tomato Sauce
Basil Hummus
Butternut Squash Pizza Sauce

COOKIES + BARS

Half Dozen Peanut Butter Cookies
Half Dozen Chocolate Chippers
Half Dozen Brownie Cookies
Sprouted Vegan Chocolate Chippers
Breakfast-Friendly Peanut Butter Cookies
Chocolate-Peanut Butter Energy Bars
Half Dozen GF Chocolate Chippers
Chocolate Peanut Butter Swirl Cookies
Chocolate Almond Butter Energy Chunks
Red Velvet Black Bean Brownies
Pinterest Brownie + Cookie Layer Bars, Made Healthier

CAKES + PIES + OTHER DESSERTS

Blueberry Applesauce Cakes
No-Bake Chocolate Pie w/ Lime
Chocolate Coconut Frozen Yogurt
Chocolate Cake w/ Chocolate Frosting
Incredible No-Bake Layer Bars
Homemade Peanut Butter Cups
Chocolate Pumpkin Pie
Baked Chocolate Doughnuts
Vegan Cinnamon Buns for 2
Tart Cherry Frozen Yogurt
Black Bean + Avocado Chocolate Pudding
Lemon Cornmeal Cakes

SWEET + SAVORY BREADS, ETC.

One Bowl Corn Muffins
Cheesy Old Bay Biscuits
Vegan Curried Cornbread
Chai Scones
Best Ever Banana Bread
Beautiful Sourdough Bread
Cinnamon Raisin Applesauce Bread
Honey WW Raspberry Scones
Sweet Chocolate Quick Loaf
Sourdough Soft Pretzels
Baked Blueberry Oatmeal

PIZZA + GARLIC KNOTS/ROLLS

Brie-Stuffed Pumpkin Garlic Rolls
Pumpkin Deep Dish Pizza
Pesto Pizza Dough
Veggie-Topped Pizza, Lightened Up
Cornmeal + Flax GF Pizza Crust 
Pumpkin Pesto Rolls

PASTA, ETC.

Spinach Mac 'n Cheese
Curried Mac 'n Cheese w/ Delicata Squash
Vegan Freezer Lasagna
Skillet Baked Cappellini Pomodoro

SOUPS

Carrot Soup w/ a Kick
Simple Slow Cooker Soup
Broccoli + Sweet Potato Soup

SIDES

Coconut Lime Rice w/ Peas
Beer-Soaked Sweet Potato Fries
Baked Sweet Potato Fries
Tangy Roasted Veggies
Red Curry Kimchi
Stephen's Annual Pickles
Maple Roasted Fingerling Potatoes

LUNCH + DINNER FAVORITES

Green Curry Tofu Stir-Fry
Tofu Avocado Salad
Veggie Beet Burgers
Tofu + Avocado Salad Cups
Tofu Scramble Hack
Steamed Pesto Dumplings
5-Minute Bruschetta Toast
Baked Veggie Pockets
Veggie Burgers in Bulk + Frozen


+   +   +   +   +   +   +   +   +   +   +   +

Looks like we munched on homemade waffles, tomato sauces, pesto, and garlic rolls above all else. This year I'd like to do more with soups and bread baking. My sourdough starter ate itself early last year and I haven't made a fresh one since -- so that's high on the list of priorities.

We hope you enjoyed our year of food! We'll be incorporating these recipes into the larger recipe archive. And if you'd rather browse via photo, check out our Pinterest board, which has most everything from the past year.

Now off to bake bread with leftover juicing pulp!

Like what you just read? Browse more of our posts + recipes on Pinterest. You can subscribe to the feed of these posts or follow us on Twitter or Facebook to be the first to know what the (never home)makers are up to. And we’ll love you forever!

Read more...

Pesto Pizza Dough

>> Tuesday, July 9, 2013

I told you I'd be back with more pesto-riffic ideas for you. I'm pretty sure this is my favorite way to use homemade pesto in bulk -- and it works no matter what ingredients (think GREENS) you end up using. This basic pizza dough works great for, well, pizzas + calzones, but also a sweet modification of one of my favorite recipes: Pumpkin Pesto Rolls.

Now make some PESTO garlic rolls!


PESTO PIZZA DOUGH
Vegan optional, depending on your pesto.

What you'll need . . .

  • 2-1/4 teaspoons yeast
  • 1 cup warm water
  • 1 tablespoon sugar or honey/maple syrup
  • 2 tablespoons olive oil
  • 1 cup Garlic Scape + Swiss Chard Pesto
  • 3+ cups bread flour
  • pinch salt


Method . . .

  1. If you haven't already, make your pesto. As I've said in the past, you can sub in most leafy greens you have around your kitchen -- so feel free to get creative. We've used anything from swiss chard to kale, etc.
  2. Then in a large bowl, combine the warm -- not hot -- water, yeast, and sugar. Stir and let sit until frothy -- around 5 to 10 minutes.
  3. Add the pesto and olive oil. Stir well.
  4. Then add in the bread flour + salt -- at first just 2-1/2 cups. Knead and add more flour 1/4 cup at a time until the mixture forms an elastic ball. Not sticky. Cover with plastic wrap and let rise for 2 hours until doubled in bulk. 
  5. Then punch down and divide into two balls. Store one and divide the other again -- but into between 6 and 8 balls. Then follow the instructions in the Pumpkin Pesto Rolls post for the rest.

Like I said, making a simple + satisfying pizza is always great, too. Tomorrow I'll share this beauty with you -- homemade kalamata tomato sauce and all!


Have I convinced you to eat pesto with every meal yet?

What's your favorite use for the gorgeous, surprisingly healthy green spread?

MORE THINGS PESTO:

Steamed Pesto Dumplings
Garlic Scape + Swiss Chard Pesto
Pumpkin Pesto Rolls
Spinach Pesto
Vegan Walnut Pesto
Basil-Pesto French Toast
Pesto French Toast, II -- with Avocado Butter
Pesto Quiche with Oatmeal Crust
Pesto Garlic Knots
Pesto Portabella Sandwiches
(Pesto) Smothered Mother

Like what you just read? Browse more of our posts + recipes on Pinterest. You can subscribe to the feed of these posts or follow us on Twitter or Facebook to be the first to know what the (never home)makers are up to. And we’ll love you forever!

Read more...

Healthy Peanut Butter Cookies

>> Monday, April 29, 2013

Ada has reached the age where she's interested in all the food on OUR plates versus her own. As if  you all didn't know it already, I have a cookie habit. "What's that?" she asks me, ignoring her peas. "Cookie," I say -- hoping to distract her with a book or puzzle.

"Cookie. Cookie. CoooooooooOOOOOOOOOkie!" she cries.

And that's how Ada's cookie habit began. But what she doesn't know is what I give her is actually pretty tame on the sweets spectrum. So, young or old -- this one's sure to please. The chocolate topping is optional (those ones are mama's cookies!)


HEALTHY PEANUT BUTTER COOKIES 
makes just over a dozen

What you'll need . . .
  • 4 tablespoons honey or maple syurp
  • 1/2 cup crunchy or smooth peanut butter (homemade to really control sugar + salt content)
  • 4 tablespoons Earth Balance
  • 1 tablespoon flax meal
  • 3 tablespoons hot water 
  • 1 tablespoon vanilla extract
  • 1/2 cup whole wheat flour*
  • 1/2 cup coconut flakes
  • 1 cup rolled oats, uncooked
  • 1 teaspoon baking powder
* I imagine a gluten-free substitute or other flours -- spelt, buckwheat -- would work well, too, since it's such a small amount.


Method . . . 

  1. Preheat your oven to  375 degrees F. Lightly grease a baking sheet and set aside.
  2. In the bowl of an electric mixer fitted with the paddle attachment, cream together the peanut butter, Earth Balance, and honey/maple syrup.
  3. In a separate, small bowl, combine the flax meal with the hot water and let sit for a couple minutes. Then add the mixture + vanilla extract to the bowl and mix until well incorporated.
  4. Add the rest of the ingredients and mix until just combined. Then scoop heaping tablespoons onto the cookie sheet.
  5. Bake between 9 and 11 minutes, depending on the sweetener you used (honey tends to brown sooner). Let cool before serving.

I make these cookies naked for Ada and she easily polishes off half of one at a sitting. I, on the other hand, could eat quite a few.

To make it a mommy (or daddy) cookie, just melt 1/4 to 1/3 cup dark chocolate or bittersweet chips with 1/2 teaspoon Earth Balance on the stove, stirring constantly. Then use a spatula to haphazardly drip chocolate on top. Or artfully, whatever you think it is.

YUP. I'll probably be one of those moms who brings chocolate-tofu pie to snack time at preschool. I'm owning it. Honestly, I'll do anything to get my kid to eat, even if it means crafting low sugar or seemingly strange concoctions. But they taste great, so who cares what's in them?

Happy Monday!

Like what you just read? You can subscribe to the feed of these posts or follow us on Twitter or Facebook to be the first to know what the (never home)makers are up to. And we’ll love you forever!

Read more...

Honey + WW Raspberry Scones

>> Thursday, February 28, 2013

As part of our winter CSA share, we get bags of frozen berries that were plucked during the summer. I love eating fresh berries right out the carton at summer market and atop yogurt or in fruit salads, but when it comes to using them up in pies, muffins, and other goods -- I'm often uninspired.

Or maybe stumped is a better word. Anyway, I've been making an effort to use them in new + different ways. Here's my latest creation.


HONEY + WHOLE WHEAT RASPBERRY SCONES
vegans can substitute maple syrup for honey

What you'll need . . . 

  • 1 cup unbleached all purpose flour
  • 1/2 cup wheat flour
  • 1/4 cup honey
  • 1/4 cup Earth Balance
  • pinch salt
  • 2 tablespoons ground flax
  • 1 teaspoon baking soda
  • 1/2 cup + 2 tablespoons almond milk
  • 1 teaspoon vanilla extract
  • 1 cup frozen raspberries
  • 1/4 cup unsweetened coconut flakes (optional)

Method . . . 

  1. Preheat oven to 400 degrees F. Lightly grease a cookie sheet with olive oil or Earth Balance.
  2. Place the flours, Earth Balance,  and honey in a food processor and pulse until fully combined. 
  3. Then pulse in the salt, flax, and baking soda. Pour these dry ingredients into a bowl.
  4. Add the almond milk and vanilla extract; mix until just moistened. Do not over-mix.
  5. Fold in the raspberries and coconut flakes. Let sit for a few minutes until chilled by the berries.
  6. Scoop the dough onto a clean, but well-floured work surface. Loosely shape into a circle and pat down.
  7. Cut into wedges and then place on a cookie sheet. 
  8. Bake for 20-22 minutes, until deep golden brown. Let cool before serving.

Honestly, of all the scones I've made, these are the lightest and fluffiest. Maybe it's because I usually use baking powder and -- since I'm out of that at the moment -- subbed in the baking soda. Or it could be that I fluffed the flour a bit before I put it in the mix. I tend to pack it in, which I've realized is making my baked goods ever-dense.

Whatever happened, they're delicious.

I'm sure Stephen will be thrilled to find a few waiting for him when he gets home from work today. That is, if Ada doesn't eat them all. She munched on one for breakfast and I couldn't give it to her fast enough.

Thursdays are my favorite -- how about you?!

Like what you just read? You can subscribe to the feed of these posts or follow us on Twitter or Facebook to be the first to know what the (never home)makers are up to. And we’ll love you forever!

Read more...

Chocolate Loaf

>> Tuesday, February 19, 2013


Not much talk of exercise on this blog lately, which is funny because I'm doing all sorts of things with cross-training and strength while getting in a steady 25-30 miles a week. I ran a frigid 10-miler with my friend Ariana on Sunday. Gusts of 30MPH blew against us for probably 3/4 of the way.

I'll have a running post for you tomorrow -- promise.

Today, we'll eat cake.


Technically I'm calling this recipe a chocolate loaf because I baked it in -- you guessed it -- a loaf pan. It's really just a nice, dense chocolate cake that you can slice and top with peanut butter or whatever else you like to spread on sweet breads.

CHOCOLATE LOAF
vegan recipe, don't skip the coconut milk

What you'll need . . .

  • 1 cup wheat flour
  • 1 cup unbleached white flour
  • 1/3 cup cocoa powder
  • 1 cup organic sugar
  • 1 teaspoon salt
  • 1 tablespoon baking powder
  • 1 can full fat coconut milk
  • 6 tablespoons Earth Balance
  • 1 teaspoon vanilla extract

Method . . . 

  1. Preheat your oven to 350 degrees F. Grease a loaf pan, 9" x 5", with Earth Balance and set aside.
  2. In a large bowl, whisk together the dry ingredients -- flours, cocoa powder, sugar, baking powder, and salt. Set aside.
  3. On the stove, heat a small pot over medium-low heat and melt the Earth Balance and coconut milk together. Let cool until warm, not hot.
  4. Pour the wet mixture -- including the vanilla extract -- into the dry and mix until incorporated fully.
  5. Pour into the loaf pan and bake for 45 to 55 minutes. Until a toothpick inserted into the center of the bread comes out mostly clean.
  6. Let cool a while before removing from loaf pan and placing onto a drying rack.
  7. Let cool entirely before slicing. Or not. It will just fall apart more if you don't wait.


I bet Elvis would have enjoyed this "bread" with some honey-glazed bacon on top.

I enjoyed mine straight out of the oven (no, I didn't wait for it to cool -- but do as I say, not as I do!) with peanut butter and sliced banana. I'm going to toast some later and spread some coconut butter on it. I'll let you know how it turns out.

Prediction: Incredible.

You can read about why we switched Ada from hemp milk to organic whole milk on Writing Chapter Three. Even if you don't have kids, you might be surprised at the not-so-friendly ingredient that's hiding in your favorite organic products.

Like what you just read? You can subscribe to the feed of these posts or follow us on Twitter or Facebook to be the first to know what the (never home)makers are up to. And we’ll love you forever!

Read more...
Related Posts Plugin for WordPress, Blogger...

About This Blog

MyFreeCopyright.com Registered & Protected

© 2009-2014 by the (never home)makers
All content on this blog is copyrighted.

Want to publish our pics, tips, or tricks?
Contact us! [neverhomemaker@gmail.com]

We value transparency. Links on this page may contain affiliates. In addition, please see our disclosure policy regarding sponsored posts.

  © Blogger template Simple n' Sweet by Ourblogtemplates.com 2009

Back to TOP  

Blogging tips