Showing posts with label tart. Show all posts

Chocolate + Coconut Tartlets

>> Tuesday, May 13, 2014

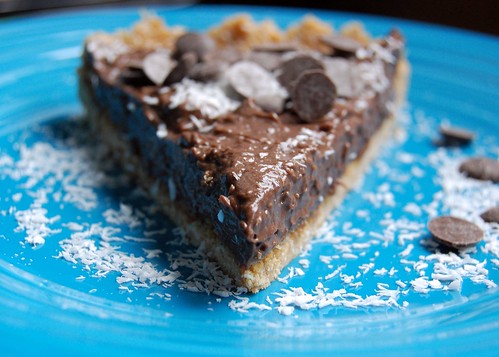
Hey, guys -- a recipe! Please know I'm not being lazy by illustrating this post with iPhone pictures. I still can't find my camera charger, so I'd rather post something delicious than nothing at all. Consider it Insta-gratification, right?

Now, full disclosure: I had a little difficulty with the execution, as you'll see. I didn't grease my muffin tin enough or perhaps I should have used cupcake liners. Initially, I thought the whole thing was a failure since only half my tartlets came out. But I decided to make a "deconstructed" version. Though they are essentially the same thing, I like the mashed up guys better. Learn from my mistakes.

Which will you try?


HAZELNUT CRUST
Vegan, gluten-free, and adapted from this macrobiotic recipe!

What you'll need . . . 
  • 1-1/2 cups hazelnut or almond meal (I used Bob's Red Mill)
  • 1/4 teaspoon baking soda
  • Pinch sea salt
  • 3 tablespoons Earth Balance or coconut oil
  • 1 tablespoon maple syrup
  • 1 tablespoon water
  • 1 teaspoon vanilla extract
Method . . .

  1. Preheat your oven to 350 degrees F. Lightly grease a muffin tin -- you could also line with wrappers if you're concerned with sticking, which I'll get to in a moment.
  2. In a small bowl, whisk together the hazelnut meal, baking soda, and salt.
  3. Then add the rest of the ingredients and mix well.
  4. Then divide evenly among the muffin tins and press down as you would for a larger pie crust.
  5. Bake for 15-20 minutes, until golden brown. 
  6. Let cool completely before removing from pan. If they stick -- or you just want to make the mashed up version -- crush with a fork to loosen and leave in the pan.


COCONUT-CHOCOLATE FILLING
Vegan, simple, and delicious.

What you'll need . . .
  • 1/2 cup coconut oil, melted
  • 1/2 cup semi-sweet chocolate chips
  • 1/2 cup cocoa powder
  • 1/2 cup coconut flour
  • Pinch sea salt
Method . . .
  1. Melt your coconut oil in a small pan over low heat on your stovetop. 
  2. Then take off the heat and add in the chocolate chips and mix until everything is incorporated.
  3. Whisk in the cocoa powder and then the coconut flour. Add the sea salt and let cool for 5 minutes or so (just so it isn't HOT) before pouring into your tartlet crusts. 
  4. If you're making the mashed up version, simply pour the chocolate overtop of the crushed pie crusts.
  5. Either way, place in your refrigerator to cool for at least an hour.
  6. You'll want to store these in the fridge too -- though they also taste good with some ice cream when melty.

What do you think? I hope a few crude, grainy images of these tasty tartlets is enough to inspire you to make them . . . right now!

Check out Writing Chapter Three for a recap of my Mother's Day weekend. I may have also gotten ALL of my hair chopped off. Still getting used to it, but I certainly like the change! I also recently wrote part I of my experience selling clothes to thredUP, I'm excited to see how it turns out because I'd love to get some cash for my clothing and Ada's as well.

Like what you just read? You can subscribe to the feed of these posts or follow us on Twitter or Facebook to be the first to know what the (never home)makers are up to. And we’ll love you forever!

Read more...

Chocolate + Coconut Frozen Yogurt

>> Sunday, June 23, 2013

In the past year, our area has gained two frozen yogurt places + an ice cream joint within walking distance of our home. So, I don't know why-oh-why it's taken me eons to make a frozen treat in our ice cream maker. Maybe it's rebellion. After all, I'm sort of anti-Pinterest food trends.

But guys, this is so worth jumping on the bandwagon.


What kept me from mixing up a batch at home was -- in part -- my own impatience. After all, you need to freeze that mixing drum for a good 15 hours. I never plan ahead. If I want dessert, I want it in the moment, which is probably why I make so many cookies.

Saturday afternoon, we realized we had an entirely uneaten container of low-fat yogurt that we needed to use. Fast. So, I crept into the basement, blew the dust off the ice cream maker box, and let the thing chill overnight. Today, I hastily mixed together what I had on hand.

I think it might be impossible to mess up frozen yogurt.
This recipe is great for beginners that want a chocolatey, yet distinctly tart.
Go!


CHOCOLATE + COCONUT FROZEN YOGURT 
nothing fancy here, just delicious homemade goodness

What you'll need . . . 

  • 32 ounces low-fat yogurt
  • 1 cup full fat coconut milk*
  • 1/2 cup cocoa powder
  • 3/4 cup raw sugar**
  • 1 tablespoon vanilla extract
* I imagine if you want to stay with the low-fat theme, you could use reduced fat coconut milk. All we had was the real stuff. And I'm not talking the kind in the refrigerated section -- use the canned kind that's nice + thick.
** Feel free to also experiment with other sweeteners and using less, which is what I'm going to try later in the week. Yup -- more frozen recipes soon!


Method . . . 
  1. In a large bowl, mix together all the ingredients. Then chill for 3 hours -- covered, in the refrigerator.
  2. Then prepare according to your ice cream maker's instructions. Ours instructed us to pour in the mixture and let churn for 30 minutes. 
  3. Then we let it freeze in an airtight shallow container for another 6 hours.

If you don't have an ice cream maker, there are a few kinds to choose from. You can get one that hooks right onto your KitchenAid mixer -- the Ice Cream Maker Attachment makes up to 2 quarts at a time. If you don't have a mixer, check out this economical Cuisinart Frozen Dessert Maker.

I'm sure ours will pay for itself if we can resist all the goodies $$$ on our evening walk.

Have you made your own ice cream?

Even if you don't have a fancy machine, you can enjoy frozen desserts of your own making. Try out our Frozen Banana Bites (and the new FAQs about them) or even my favorite Ultimate Vegan Banana Ice Cream recipe.

Now to go clean the drips off my camera strap!

Like what you just read? Browse more of our posts + recipes on Pinterest. You can subscribe to the feed of these posts or follow us on Twitter or Facebook to be the first to know what the (never home)makers are up to. And we’ll love you forever!

Read more...

Our Recipes: Pies, Tarts, and Fruit

>> Saturday, February 26, 2011


PIES, TARTS, and FRUIT: * means VEGAN

BACK TO ALL RECIPES >>>

OR BROWSE BY CATEGORY:
GRANOLA & OATS PANCAKES, ETC. SMOOTHIES
SPREAD, SAUCES, DIPS SALADS SOUPS & STEWS
SNACKS & STARTERS SANDWICHES & BURGERS PIZZA, ETC.
STIR-FRIES, ETC. OTHER MEALS BREADS
CAKES & CUPCAKES COOKIES & BROWNIES PIES & TARTS
ICE CREAM & PUDDING DRINKS CONVERSIONS
Like what you just read? You can subscribe to the feed of these posts or follow us on Twitter or Facebook to be the first to know what the (never home)makers are up to. And we’ll love you forever!

Read more...

Deep Dish Veggie Tart

>> Friday, August 20, 2010


We shared with you some of the recipes we've been lusting over last Friday. For dinner yesterday evening, we finally got a chance to knock one of those items off the to-make list: the Lasagna Tart from 101 Cookbooks.

But since we rarely make recipes exactly as they appear online or in books, we changed it up a bit. What resulted was more of a veggie deep dish pizza than a lasagna tart. But that's OK -- even better than OK. I'm thinking some of you guys and gals who recently attended the Health Living Summit in Chicago might be feeling a little nostalgic. You may want to relive last weekend's events by making this healthy deep dish for dinner . . . tonight.

Am I right?


DEEP DISH VEGGIE TART

What you'll need . . . for the tart crust:
(original recipe is Clotilde's Easy Olive Oil Tart Dough)
  • 2 cups whole wheat pastry flour
  • 1 teaspoon coarse kosher salt
  • 1 teaspoon dill (or other dried herbs)
  • 1/4 cup olive oil
  • 1/2 cup cold water


What you'll need . . . for the filling:
(again, inspired by 101 Cookbooks)
  • 2 medium zucchini, sliced into thin "coins"
  • 1/2 can of black beans, drained and rinsed
  • 1-1/2 cups Monterrey Jack cheese
  • 3 cloves garlic, minced
  • 2 tablespoons olive oil
  • 1 teaspoon red pepper flakes
  • pinch of kosher salt
  • 1 14-ounce can fire roasted tomatoes


Method . . .
(don't let these EASY 20 steps scare you off!)
  1. Preheat oven to 375 degrees F. Lightly oil a tart pan and set aside.
  2. Toss the zucchini coins with 1 teaspoon of salt in a dish to extract some of the moisture. Set aside while you prepare your crust.
  3. Whisk together the flour, salt, and herbs. Add in the oil and water. Mix with a fork . . . and then give in and use your hands. The dough will be slightly sticky. You may add more water, if necessary.
  4. On a lightly floured work surface, roll out the dough so it'll fit your tart pan. We make ours about an inch in diameter larger. Quick rolls are best, you don't want to handle the dough too much.
  5. Very carefully transfer the tart dough to the pan. Fold over the excess dough to make the crust thicker. Cover with plastic wrap and let rest in your refrigerator for half an hour to an hour.
  6. Make your sauce: In a food processor, combine the garlic, canned tomatoes, 1 teaspoon salt, olive oil, and red pepper flakes. Stephen also added a pinch of cayenne for good measure. Heat over medium-low heat on stove to warm and let flavors mingle. However, you don't want the sauce scalding hot when you put it in the crust. Warm is the key word here.
  7. Prick the bottom of your tart crust with a fork a couple times. Bake on the middle oven rack for 15 minutes. Remove from oven and let cool (I waited 20 minutes).
  8. Lower your oven temperature to 350 degrees.
  9. Then let the layering begin!
  10. Start with 1/2 of your cheese on the bottom.
  11. Then 1/2 of your sauce. (A spatula helps spread.)
  12. Then pile your zucchini coins in a circular pattern (again, using 1/2 of them -- see photo above).
  13. Then add all the black beans.
  14. Then another layer of cheese. This time, only add about 2/3 of what is left.
  15. Then another layer of zucchini.
  16. Then the rest of your cheese.
  17. Then the rest of your sauce to top it all off.
  18. Smush your ingredients just so -- you don't want them toppling over the top of the tart pan.
  19. Get out a rimmed baking sheet -- you don't want juices wandering to the bottom of your oven -- and place your tart pan on it. Bake for 40 minutes.
  20. Let cool before serving (10 minutes or so).
Despite how long this recipe is, you go from this unbaked wonder . . .


To THIS beautiful deep disher in no time at all!


Have you ever made a recipe that didn't turn out exactly as you thought it would -- but you loved it anyway? This happens to us ALL the time. It's how a lot of our favorite meals are made. And that's what I love about the experimentation aspect of cooking and baking . . . even when we make the same recipe, use the same ingredients, etc. -- there's never a guarantee that it will come out the same way twice!

Like what you just read? You can subscribe to the feed of these posts or follow us on Twitter or Facebook to be the first to know what the (never home)makers are up to. And we’ll love you forever!

Read more...

Chocolate-Peanut Butter Fudge-Tart -- No Baking Required

>> Monday, February 15, 2010


Hey, everyone! Hope you all had a fabulous weekend. So far, mine's been relatively uneventful, which is good because I chose to take off the holiday. Need some quiet time before heading back to work (possibly through yet another snowstorm) tomorrow. Enough about work. This chocolate-peanut butter confection is one of my latest creations specifically for Stephen. I made it as an early Valentine's Day gift on Friday . . .

It's special because it's as healthy as I could possibly make it. Stephen isn't a huge fan of sweets -- so I had my work cut out for me. I didn't want to hear again how he'd rather not "waste [his] calories" on another cookie or cake of mine. But don't get me wrong -- though this vegan treat is rather "healthy" -- it's still packed with fierce chocolate-peanut butter flavor and an intensely rich texture. Almost like fudge, but with slightly less pudge.


The ingredients are simple: vegan chocolate chips, coconut oil, date "sugar" . . . natural creamy peanut butter, soy milk, and a special coconut-oat mixture that makes the bottom layer oh-so fantastic. Here's the story of how I tried to make the (what I'm calling a) fudge-tart personal. Stephen got me these dinosaur cookie cutters sometime within the first month of when we were dating. His all-time favorite is the velociraptor -- but I can't easily make cookies with it because the tail is too thin and the cookies burn.

I thought I'd make a design on the treat in sesame seeds to show my love . . .


But it fail miserably -- for when I went to remove the cookie cutter, I found it had sunk in too deeply, and all the seeds were either rolling away or sticking to the cutter. Boo.


Let's get back to the positives, though. Stephen LOVED the fudge-tart. His favorite part was the texture of the peanut butter layer, which as I mention above is a creative little oat-mixture I created just for him. Here's everything you need to make enough for this recipe -- as well as have some left over for whatever else you'd like to use it in . . .
  • 2/3 cup rolled oats
  • 1 cup raw walnuts
  • 1/3 cup coconut flakes
And your easy method for creating it . . . 
  1. Place everything in a food processor and pulse until well combined.


CHOCOLATE-PEANUT BUTTER FUDGE-TART (it's vegan!)

What you'll need . . .
  • 1/2 cup coconut oil
  • 3/4 cup creamy natural peanut butter (one that isn't oily -- we used Skippy Natural, but I would have liked to have used something with even less sugar)
  • 3/4 cup oat mixture (see above -- uncooked)
  • 2 tablespoons flax meal
  • 2/3 cup WHOLE rolled oats (uncooked)
  • 1/4 cup date "sugar" (or honey or agave or whatever sugar substitute you want to use)
  • 1 tablespoon vanilla extract
  • 1-1/2 cups vegan chocolate chips
  • 1/2 cup soy milk (or other milk substitute)
  • Sesame seeds (to garnish)


Method . . .
  1. Melt the coconut oil over medium heat in a medium saucepan on your stove. Once melted, add the peanut butter, oat mixture, whole rolled oats, flax meal, date sugar, and vanilla extract. Mix until well incorporated.
  2. Remove from heat, pour into a tart pan (or line a pie pan with plastic wrap and use that -- it's just easier to use the tart pan because the bottom is removable, and this thing sticks like the DICKENS!) and continue on to the chocolate mixture . . . 
  3. Put the chocolate chips and soy milk (or other substitute) into a small saucepan over medium heat and stir until all chocolate is melted. Pour gently in a circular motion over the peanut butter layer and then use a spatula to evenly spread it across the top. This part seems difficult, but if you go slow, your layers will stay intact.
  4. Sprinkle with sesame seeds if you like . . . and carefully transfer tart pan to your refrigerator and chill for at least two hours.
  5. Cut and serve -- just note that, again, it sticks like crazy. You'll need a spatula or other serving device so it won't break when you portion it out to your loved ones.
Like what you just read? You can subscribe to the feed of these posts or follow us on Twitter or Facebook to be the first to know what the (never home)makers are up to. And we’ll love you forever!

Read more...

Puddin' on the Ritz: Purple Sticky Rice Tart

>> Monday, January 25, 2010


This weekend's kitchen adventures were plentiful and quite varied. Take this vegan purple sticky rice tart, for example. In honor of National Pie Day (Saturday), I thought I'd make something with a crust . . . but I didn't quite feel like making a full-fledged pie. And I also knew I wanted to explore the Private Collection some more. (If you haven't already, check out last week's Richard Simmons-related post: Pie in the Sky: Vegan Coconut-Carob Pie.)

Richard doesn't say much about his recipe for Snow White Coconut Rice Pudding. There isn't some hilarious story about its origin . . . nor some wildly embellished description of its flavor.


This pudding is so pure, so white. About halfway through the classic movie, there's a scene where Snow White is making lunch for the Seven Dwarfs. Look carefully-you'll see the pudding on the table. (pg. 132)


But his version -- a Snow White pudding -- looked too, well, vanilla for my tastes. And pudding alone doesn't totally satisfy me . . . so I decided to add a tart crust made with a very special ingredient, something I've never baked or cooked with before: lavender! I think you'll agree, this tart topped with frozen raspberries does Richard's recipe justice . . . while also kicking it up a notch -- 2010-style.


What you'll need . . . (for the crust)

  • 1/3 cup raw cashews (or walnuts, pecans, or any other soft nut)
  • 1/2 cup rolled oats
  • 1/4 cup date sugar (or brown sugar)
  • 1/4 cup coconut oil (or margarine)
  • 1/8 teaspoon Salt (pinch)
  • 1/2 teaspoon lavender
  • 1 teaspoon vanilla


Method . . .

  1. Preheat the oven to 325 degrees F.
  2. In a saucepan, melt the coconut oil (or margarine). If you're using coconut oil, you don't need a ton of heat before it melts. So go relatively low.
  3. Add the vanilla and date sugar (or brown sugar); mix well.
  4. Simmer over a medium-low heat and allow to simmer for 2 -3 minutes. (I had to mix continually.)
  5. In a food processor, combine the cashews and half of the oats, until well ground. Add the remaining oats, lavender, and salt; pulsing to combine.
  6. Empty the dry mixture into a medium sized bowl and pour the hot syrup over it.
  7. Once the crust mixture is well combined, transfer to an 8 inch tart pan.
  8. Spread out and evenly press the mixture along the bottom and up the sides of the pan. (I found it was helpful to press with a piece of plastic wrap so it didn't stick to my hands.)
  9. Bake for 5 minutes. Then put in the refrigerator to set, about 20 minutes or just while you prepare the filling.


What you'll need . . . (for the rice pudding filling)

  • 2 cups water
  • 1 cup uncooked purple rice (or black rice or regular rice, if you can't find any)
  • 1/3 cup maple syrup
  • 1 (14-ounce) can regular coconut milk
  • 1/3 cup unsweetened coconut flakes


Method . . .

  1. Pour water into medium saucepan and bring to a boil.
  2. Add the rice and cover, reduce the heat to low, and simmer for 35 minutes or until all of the water has been absorbed.
  3. Add the remaining ingredients, stir well to combine, and continue to cook the mixture over low heat until all of the liquid has been absorbed (about 15 to 20 minutes).
  4. Transfer the mixture to a bowl and place the pudding in the refrigerator to chill.
  5. When chilled (but not SUPER chilled or it'll be hard to pour), gently pour into your pie crust. Top with frozen raspberries (or mango, I just didn't have any) and sesame seeds.


Psssst: Welcome to neverhomemaker.com! Your surfing should be relatively unaffected, but if you aren't receiving updates in your favorite feed reader, you may want to re-subscribe.

Like what you just read? You can subscribe to the feed of these posts or follow us on Twitter or Facebook to be the first to know what the (never home)makers are up to. And we’ll love you forever!

Read more...

Happy 1-Month Birthday to (never home)maker!

>> Friday, December 11, 2009


(never home)maker has been rocking your world for exactly one month today! And what a month it has been. The holidays mean good food and crafty projects -- and they aren't in short supply on this site. We thank those of you who have joined us on our blog journey (there are nearly 170 of you as of this morning). We're all for celebrations -- so we'd like to announce that when (never home)maker reaches 250 subscribers, we're hosting our very first giveaway!


Feel like reminiscing with us? Why not check out our very first post . . . or browse through last month's highlights below (we're happy to report we've been featured in CRAFT, Serious Eats, and One Pretty Thing).


Chocolate-Blueberry Tart
:
In my opinion, this recipe yielded more of a pie than a tart . . . and I attribute this result to my inexperience with baking either treat. Regardless of what you call it technically, it's VERY good. I'm talking amazed-because-it-tastes-like-something-I-would-order-at-a-fancy-restaurant good. Keep reading . . .


Pumpkin Soup
& Pumpkin Loaf: Craft's Goli Mohammadi gave us an official blog love nod by writing that (never home)maker has "so many mouth-watering recipes to offer" that is was "hard to pick which one to share" -- w00t! Keep reading . . . (or learn how to make your own Pumpkin Puree for use in these recipes).


Chocolate Chip Coffee Cake: I must add chocolate to just about everything, it seems. And this vegan coffee cake is no exception. Great for a chilly Sunday morning (or just whenever the mood strikes), this treat is sure to please most anyone in your home. Keep reading . . .


Crafty Yarn Ornaments
: Feeling festive? So were we when we made these pretty little ornaments that are currently adorning our tree. The story goes: I was browsing the net, drooling over Anthropologie, as usual, when I came upon their holiday decor section. Among the many (many, many) pretty things to bling out your tree where these artful, felt & yarn ornaments. Problem was, they were like $50 each. Keep Reading . . .


So there you have it.
One month of crazy blogging cut down into one easy post. Remember to check out December's Blog Love Fest if you haven't already. And stay tuned for more great tips and tricks (including one crazy DIY project we're planning to complete on our first FREEKEND) to come very soon!


Like what you just read? You can subscribe to the feed of these posts or follow us on Twitter to be the first to know what the (never home)makers are up to. And we’ll love you forever <3

Read more...

Chocolate-Blueberry Tart

>> Thursday, November 19, 2009

In my opinion, this recipe yielded more of a pie than a tart . . . and I attribute this result to my inexperience with baking either treat. Regardless of what you call it technically, it's VERY good. I'm talking amazed-because-it-tastes-like-something-I-would-order-at-a-fancy-restaurant good. The shell is modified from a recipe in Martha Stewart's Baking Handbook. The filling is something I concocted using various recipes from books and the web.

If you want to make a true tart, don't do what I did and 1.) freak out because the dough is, at first, crumbly . . . 2.) add more liquid (and, sigh, butter) to compensate . . . and then 3.) relish in its sticky glory thinking you've done something to help the situation. The dough should NOT be sticky. As Martha explains on page 225 of her book: "It's very important not to overprocess . . . the texture of the dough should be crumbly and just hold together."

But, if you freak out like I did . . . add a bit more soy milk . . . butter . . . it's not the end of the world. You'll just get a (brag worthy) pie-tart hybrid.


What you'll need . . .


For the tart:

  • 6 tablespoons unsalted butter, room temp.
  • 1/2 cup confectioners' sugar
  • 2 large egg yolks
  • 3/4 cup wheat pastry flour
  • 3/4 cup coconut flour (or all-purpose will do)
  • 1/4 teaspoon salt
  • 2 teaspoons soy milk (original calls for heavy cream, which I never have)

Method . . .

  1. In the bowl of an electric mixer fitted with the paddle attachment, combine butter and confectioners' sugar. Mix on low speed until combined (2 minutes).
  2. Add egg yolks, and mix until incorporated (1 minute). Add 1/2 cup wheat pastry and 1/4 cup coconut flour and mix on low speed until the flour is just incorporated (30 seconds).
  3. Add the rest of the flour -- along with the salt and soy milk. Mix until the flour is no longer visible (1 minute).
  4. Turn out dough onto a piece of plastic wrap. Shape into a flattened disk.
  5. Wrap in plastic and refrigerate for at least 2 hours (or overnight). The dough can be frozen for up to 1 month -- but thaw overnight in the refrigerator before using.

To bake you'll need a tart pan -- preferably with the movable bottom. It's early, and I can't think of a better term.

  1. Just before your two hours are up . . . preheat the oven to 375 degrees F.
  2. Roll out dough to its proper dimension (about 1 inch bigger than your tart pan) and drape over the pan.
  3. Press the dough into the pan to fit and then use a rolling pin to trim the dough by gently rolling it over the top.
  4. Prick the dough all over with a fork . . . and bake for about 10 (to 15) minutes . . . or until edges are golden brown.
  5. Cool on wire rack. (But quickly proceed to make the filling -- you don't need to wait for the tart to completely cool to continue the process.)


Filling ingredients . . .

  • 1 cup soy milk
  • 2 teaspoons sugar
  • 2 tablespoons coconut flour (or all-purpose)
  • 9 ounces bittersweet chocolate (chips or chunks)
  • 1/2 cup frozen or fresh blueberries
  • 1 egg

Method . . .

  1. You'll want to lower the oven temp to 350 degrees F once the tart has initially baked.
  2. In a small saucepan (on high heat) -- whisk together the soy milk, sugar, and coconut flour. Bring to a boil.
  3. Pour hot mixture over the chocolate chunks and blueberries. Whisk together until smooth.
  4. Right before you pour the filling into the tart, whisk in the egg (again until smooth).
  5. Pour mixture into the tart.
  6. Bake for 10 (to 15) minutes -- or until the edges have begun to set.
  7. Move to cooling rack. Drizzle with melted milk chocolate. And have a fantastic day!


Like what you just read? You can subscribe to the feed of these posts and be the first to know what the (never home)makers are up to. And we’ll love you forever <3

Read more...
Related Posts Plugin for WordPress, Blogger...

About This Blog

MyFreeCopyright.com Registered & Protected

© 2009-2014 by the (never home)makers
All content on this blog is copyrighted.

Want to publish our pics, tips, or tricks?
Contact us! [neverhomemaker@gmail.com]

We value transparency. Links on this page may contain affiliates. In addition, please see our disclosure policy regarding sponsored posts.

  © Blogger template Simple n' Sweet by Ourblogtemplates.com 2009

Back to TOP  

Blogging tips