Showing posts with label tips and tricks. Show all posts

How to Clean Your Kitchen

>> Friday, May 24, 2019

I wrote recently on Instagram about the radical idea that cleaning my kitchen is a form of self-care. To me, this was kind of embarrassing and even seemed a bit silly. Cleaning. Self care? Seriously? I'm not a neat or tidy person by nature, so getting fire under my behind with organizing my house has been difficult. What I've found is a sense of serenity when thing are in order. And it's this feeling that seems to be filling me up with good vibes, even when everything else in my life seems a bit out of control.

So, I figured I'd share the quick things I'm doing each day to keep this particular space shiny and fresh. Now that I've got a system going, cleaning the kitchen when it's super messy/dirty only takes 10 minutes or so. And that includes getting dishes going AND steaming the floors.

What? I steam the floors? YES, and it's the best feeling ever.


Start with the 5-minute rule


I didn't invent the concept that you should do tasks that take just 5 minutes instead of letting them pile up. But now I'm the biggest cheerleader to this way of living life. Previously, I'd wait on the dishes and counters. They'd get beyond my ability to see the light. And I would feel like cleaning was a hopeless endeavor.

Things that only take 5 minutes or less:

  • Putting dirty dishes into the dishwasher and pushing START
  • Putting everything on the counters in the "right" home
  • Wiping down the counters and appliances
  • Vacuuming and steaming the floors (really! 5 minutes!)
  • Tidying open shelving and dusting containers
  • Taking out the garbage and putting a new bag in the can

Get the right tool and supplies

I use eCloth microfiber cleaning cloths on all surfaces. The company claims you can clean using only water, but I usually use some kind of spray. The advantage with these types of cloths is that they really seem to wipe up well.

I'm also a sucker for pretty and good-smelling cleaning supplies. I've recently become obsessed with anything Method -- especially the Sea Salt and Lime All-Purpose Spray. Their Stainless Steel Spray has also given me life. It's not that vinegar doesn't work. But to get inspired to clean, I needed something a bit flashy, if you will.

And my favorite floor cleaning supplies include my Bissell PowerFresh Steam Mop and Shark Stick Vacuum. Again, you only need to use the steam to clean floors, but the Method Spearmint/Sage Floor Cleaner is divine.

Decant your groceries


This is an idea I got from Erica Flock (who, in turn, got it from another blogger). My pantry tends to be this black hole of craziness. The simple act of pouring my snacks and other foods into clear containers allows me to see how much is left, what exactly we have, and it keeps garbage from piling up. I can't tell you how many times I'd clean the pantry and have like two gigantic bags of trash/recycling to contend with.

Then all you need are flip-top containers. Try getting a set of clear containers that offers different size options, like this set of EAGMAK Food Storage Containers. Another favorite are the tiny containers that have flip-tops you can find at the Dollar Tree. They're similar to the smallest container in this awesome 10-piece Food Pantry Container set. In fact, I think those are the same exact containers I found at my dollar store. 10 pieces for $15.

I also use open baskets to separate out things like applesauces, granola bars, and instant oatmeal. And my bamboo bread box is my new favorite thing.

Clear out pantries and refrigerator weekly


Overwhelming, right? Stay with me.

Once you do an initial purge and start decanting, this step is very easy. When I do my meal planning for the week (or when I simply take a look at what we have before making a mad dash to the store), get rid of anything that is either past its prime (yogurt, I'm looking at you!) or that you don't think you'll ever use.

Example: We're not a pasta-eating family. My mother-in-law kindly gave us a gigantic bulk box of edamame pasta. It was sitting and taking up tons of space for months -- and we're just not going to use it. Stuff like that can go to a food pantry or even a friend.

When you clear stuff out, there's more space for the stuff you use OR there's just more space for your things to breathe.

Move stuff around


You need to make your cabinets work for you. Efficiency is key if you want to keep your kitchen clean and you want to do it FAST. If you don't have specific homes for everything, it's hard to unload the dishwasher in a timely manner. If you have some food in this cabinet and similar food in another cabinet across the room, it's hard to figure out where to put stuff.

Spend some time really mapping out your ideal zones.

Examples:
  • We have a pantry where all the non-perishable food goes. 
  • We have a coffee/tea bar on the counter and right above it, I have the coffee/tea stored away along with Eden's formula (the bottle warmer is right there) and bottles. 
  • I have glass food storage in one drawer and in the drawer beside it are the lids. Separating them made everything so much easier.
  • I have a whole drawer that's down low dedicated to our kid dishes. This allows me to store all the stuff together AND gives my kids some independence.

Think about non-kitchen items


If things are living in your kitchen that don't belong in your kitchen, take them out and distribute to where they belong. It's that simple. Alternatively, if you regularly do non-kitchen things in your kitchen, consider making a special home for those things.

Example: I always do my girls' hair at the kitchen island. So, I now have a little bin of all their hair supplies (hair ties, bows, combs/brushes, detangler) right above the refrigerator. That way, I don't have all that stuff scattered on my countertops.

While you're at it, embrace the junk drawer. It's OK to have a junk drawer. I just polled my Instagram followers and 86 percent of people shared that they have this chaotic space. I recently went to the dollar store and purchased some organizing containers (similar to these) so we can at least categorize the junk. This has been especially helpful for charging cords and batteries. 

Reevaluate your stuff


We had beautiful Fiestaware dishes that we got for our wedding. I did hold onto some pieces, but they were bulky and heavy and annoying to deal with on the daily. So, I replaced them with simple white Corelle Dishes. They are super lightweight, they stack nicely in the dishwasher, and they take up very little space in our cupboard.

We use Ball Jars for food storage and drinking glasses. This is one of the best switches we've made because they can be used interchangeably to suit our needs.

If you aren't using certain appliances much, store them away or get rid of them. I actually don't use my KitchenAid mixer much anymore. I have it stored away in a lower cabinet and pull it out maybe twice a month.

BONUS: When you remove appliances from the countertops, they're easier to clean. (And there's less stuff to wipe down in general.)

Stay on top of it


Once you make some changes, just stay on top of cleaning. That sounds easier said than done, but once you get things organized and start doing 5-minute tasks . . . the momentum starts. And some of those quick tasks become even quicker. Before you know it, you'll be cleaning your entire kitchen in just 10 minutes.

Bigger jobs can come at your convenience. But do them regularly!

For example, I clean the stovetop once a week . . . and it actually only takes 5 minutes but is a bit harder because I have to remove all the grates. I used to just not clean it . . . and then everything would get burned onto the top and take FOREVER.

I try to deep clean the refrigerator monthly. That may not seem like a lot, but I used to only do it maybe twice a year. In fact, that's on my list of things to do this weekend. Monthly makes those stuck-on messes a bit easier to lift.


Anyway, these are some basics that have helped me transform the way I deal with our messy kitchen. I hope you find them helpful. If you have anything to share, please leave it in the comments!

Read more...

Sharing 20 of YOUR Tips for Healthy Eating

>> Tuesday, February 5, 2019

I'm getting a slow start to 2019 with regard to health and fitness goals. And if you've read here for a while, you know that I often struggle with healthy eating (despite loving healthy food!). I get caught up in my hobby of baking and end up in a cycle of homemade sweets, bread, and -- now -- sourdough bread. I don't want to give up on baking entirely, but I do need to find a way to get back to healthier eating. Not so much for the number on the scale . . . but because I just feel so full and sluggish.

Here are the tips you guys sent me yesterday. My criteria was that I don't want to go all or nothing when it comes to food. I don't want to label foods "good" or "bad" . . . and I want to continue doing some of my baking. You guys delivered some great tips, and here are the 20 that were most shared.


Start the day with a huge glass of water

Resist eating sugar -- even fruit sugar -- at breakfast

Read the book Intuitive Eating

Eat way more protein

Skip alcohol for a while

Choose one meal to focus on and go from there

Only bake bread + desserts on weekends

Drink more water throughout the day, especially before meals

Prep meals on weekends for the whole week

Pack lunch the night before to resist daytime snacking

Stop buying all processed foods

Eat meals on smaller plates

Split lunch up to avoid crashing mid-afternoon

Fill half your dinner plate with vegetables

Roast a large pan of veggies and refrigerate for easy grabbing

Stop eating at 7PM and don't eat again till 7AM

Try sweet potatoes + other whole carbs vs. bread

Eat more healthy fats

Choose fruits that are lower glycemic (cherries, apples, etc.)

Even if it's hard, stick with it for 21 days to make a habit


THANK YOU for all your advice. 

If you, too, are struggling, I hope these tips are helpful to you. I'm sure many of you are in the same place I am . . . we KNOW what to do, it's just a matter of actually getting back into the rhythm. I'm going to check back with you all in 21 days to see how things are going. My main goal is to get in more protein, drink WAY more water, and fill most meals with vegetables. 

(But I also hope to expand my sourdough baking skills this month. I'll just try saving that activity for weekends only. Also: Image source.)

Read more...

6 Sneaky Ways to Fill Your Freezer

>> Wednesday, September 17, 2014

When I wrote all about our vegetarian month of freezer meals last year, I focused on a single bulk cooking weekend as the means to an end. This year, I've taken a much different approach, and it's one that I think you guys might be into. Instead of overwhelming myself with meal after meal after meal to freeze, I've built up our stash slowly over the course of a month (or thereabouts).

Here are some sneaky ways to fill your freezer. I also plan to share some of the recipes I've made this time around, including a new and improved veggie burger, amazing squash-filled waffles, and more. Feel free to share your own tips + tricks in the comments below!


#1: Make Double


Whenever you cook this month, make a double, triple, or bigger batch. Slow cooker soups are excellent for this idea, since a full pot is often enough for at least two meals for two or three people. My favorite Freezer-Friendly Veggie Burgers are another great option, since you can make some for dinner tonight and still have a good stash for next month. Just eat whatever you want immediately and freeze the rest. Portion out into individual sizes whenever possible for the fastest re-heating.

#2: Utilize Leftovers


Make a huge dish of lasagna? Or too much of whatever else? If you didn't eat all your meal tonight, you're in luck. Rather than eating the leftovers for lunch tomorrow, freeze for future consumption and pack a PB+J instead. We often store leftovers in the fridge with good intentions to gobble them up, and they go to waste anyway. If you freeze straight away, there's no risk! Do this for two or three meals each week, and it adds up fast.

#3: Use It Up


If you have time on the weekend, dig deep into your refrigerator to find the ingredients that will soon go bad. Lay them out in front of you and figure out what you can make. Consider whatever you create a bonus meal -- and freeze it up! We often have half blocks of cheese, a couple cups of almond milk, half of an onion or pepper, a limp head of broccoli, super ripe bananas, etc. I most often use our tips to Eliminate Food Waste and some of the recipes on that page. Otherwise, I -- again -- use the slow cooker. Here are some tips for making awesome crockpot meals without recipes.

#4: Think Part vs. Whole


You don't need to make dinner from soup to nuts to take advantage of freezer cooking. Think about the different parts of a meal you can make easily the day of . . . and make the rest for freezing. Pasta cooks up simply with little cleaning required. So, make + freeze just the homemade tomato sauce or perfect pesto to accompany and thaw the night of.

#5: Freeze Ingredients


When we went blueberry picking, I used up a lot of them making jam + brie grilled cheese, muffins, and other goods. I still had a good number left that I rinsed, dried, and froze whole. We've been getting gazillions of tomatillos, so -- along with making tomatillo salsa -- I've washed them well, cut in half, and frozen on a baking sheet before stashing into a container. I also freeze cooked beans (here's how) that we end up using all month long.

#6: Plan Ahead


You can also just choose a list of solid vegetarian make-ahead meals and pick a couple days each week to crack away at them. No need for an intense bulk cooking experience. Just make an extra dinner here and there and watch them pile up. Before you know it, you'll be cooking and cleaning far less and enjoying the fruit of your efforts much more.


Here are some more tips + recipes:


Like what you just read? You can subscribe to the feed of these posts or follow us on Twitter or Facebook to be the first to know what the (never home)makers are up to. And we’ll love you forever!

Read more...

10 Steps for Slow Cooker Perfection

>> Thursday, January 16, 2014

I make a soup or stew in our crock pot at least once a week. Yet, we don't have a lot of crock pot-specific recipes here on the blog. That's because I usually toss in whatever is available at the time and season accordingly. I thought I'd share some tips with you for creating a delicious result from this seemingly sloppy way of cooking.

Recipe independence is really your best weapon in the kitchen. It allows you to use your ingredients up without having a specific plan. It encourages you to eat a more varied diet and not shy away from foreign foods. In other words, it makes healthy eating more automatic.

Heck, it makes cooking more enjoyable and satisfying -- empowering -- too.


10 STEPS TO SLOW COOKER PERFECTION
Follow these steps and create your own tasty crock pot creations!
// 1: Use (32 ounces) of low sodium vegetable broth as a base.
  • adds fuller flavor
  • adds nutrition
  • regulates salt (if you don't add more!)
// 2: Add puree or other base enhancer.
  • canned tomatoes chopped, whole, or even sauce
  • pumpkin, squash, or other veggie purees
  • miso paste, curry paste, coconut milk, roux, even tahini!
// 3: Toss in at least one or two cans of (rinsed) beans for protein.
  • kidney beans
  • chickpeas
  • black beans
  • black-eyed peas
  • canelli beans 
  • lima beans
  • edamame
  • pinto beans
// 4: Use 1/2 to 1 full cup of a grain or grain-like filler.
  • white or brown rice
  • quinoa of all colors
  • couscous -- my favorite is Israeli
  • wheat berries  
  • bulgur wheat
  • dry lentils
// 5: Chop veggies small or use canned/frozen + 2-4 cups, 1 each, depending. 
  • carrots
  • celery
  • potatoes or sweet potatoes
  • broccoli
  • kohlrabi
  • zucchini or summer squash
  • onions + garlic
  • kale or other chopped greens
  • bell peppers
  • parsnips
  • butternut or acorn squash, etc.
  • corn
  • peas
  • green beans
// 6: Add a tablespoon or two of oil for healthy fat.
  • Olive oil for mild flavor.
  • Chili oil for some spice.
  • Sesame, truffle, walnut, etc. oil for complex, exotic taste.
// 7: Pinch in salt and pepper for basic seasoning.
  • Don't forget salt is in the stock you already added, if you're regulating.
  • You can always add more, not take away.
// 8: Scoop other seasonings in 1 teaspoon at a time. 
  • Oregano
  • Smoked paprika
  • Curry powder
  • Cayenne pepper (start 1/4 teaspoon at a time!)
  • Saffron
  • Fenugreek
  • Dried basil
  • Rosemary
  • Thyme
  • Turmeric 
  • Red pepper flakes
  • Ginger
  • Cinnamon
// 9: Add water (if necessary) + stir until the mixture reaches the top.
  • Evaluate your liquid to veggies ratio. 
  • More liquid, soupier soup.
  • Less, more like stew.
  • Don't forget items like rice will absorb liquid.
  • You can remove veggies/add liquid if ratio doesn't please you.
// 10: After cooking for several hours on high, I season again -- to taste. 


While writing this post, I tested these tips and slow simmered a delicious soup, including the following ingredients:
  • 32 ounces veggie broth
  • 28 ounce can whole tomatoes + juice
  • Black beans
  • Chopped carrots
  • Chopped celery
  • Israeli couscous
  • Olive oil
  • Water to fill the pot
  • Salt + pepper
  • Paprika, cayenne, and basil
Not ready to go it on your own? Take it slow. The worst that can happen is you eat lots of veggies that aren't seasoned perfectly. Plus, with mistakes comes learning. Just try again!

Here are more slow cooker recipes:
Like what you just read? You can subscribe to the feed of these posts or follow us on Twitter or Facebook to be the first to know what the (never home)makers are up to. And we’ll love you forever!

Read more...

Automatic (Healthy) Eating // Tip 6

>> Monday, December 9, 2013

I've received such positive feedback on the automatic healthy eating tips, I thought I'd continue on with a few more this week. I'm planning to do a similar series on realistic fitness to help kick off the new year, so be sure to keep an eye out for that one.

Some days just don't work out when it comes to time for cooking or desire to eat healthy foods. Maybe you're traveling for work and all those fast food joints and convenience stores are coming up short. Maybe you're not feeling well and want to retreat to comfort foods. Maybe you're craving pizza because you're just cravings pizza.

Whatever the case may be, you still have time to inject some health into that meal.

 // TIP 6: Cheat + Add In


This tip is sort of two-fold, isn't it?

// On the one hand, time is a factor that impacts our ability to find or create healthy food sources. This is when all those canned soups, highly salted freezer meals, trips through the drive-through, and stops at the vending machine come into play. Or sometimes we just skip meals, creating an ever bigger issue altogether.

// On the other, our desire and gravitational pull toward that junkier food is strong. At least for me it is. I could subsist on beer and plain pizza (and chocolate chip cookies) if I had to. And I've even done just that for long stretches out of laziness.

Whatever you vice, eating like an adult isn't always easy.

Thankfully, there are some easy fixes for both these cases can be made using last week's tips.

Most of it is planning and making ahead, while the rest is learning to love those alternatives or adding something healthy to whatever you're eating that isn't. Not all fast food or convenience or prepackaged foods are inherently bad. (Some definitely are, but not all!)

Oftentimes, they're just empty -- void of nutrition that keeps our bodies healthy.

Here are some ideas to get you started.
  • Add a large helping of frozen veggies + protein to instant soup/noodle mixes.
  • Same goes w/ other convenience foods (frozen pizza?). Add fresh stuff when possible.
  • Make pizza crust w/ vegetable purees and top w/ more roasted veggies than cheese.
  • Add purees from squash to spinach -- to comfort favorites like Mac 'n Cheese.
  • Keep a fresh fruit bowl at work + eat that apple before the vending machine crap.
  • Freeze healthy meals for a month so all you need to do is reheat them.
  • Investigate fast food (many websites have complete nutritional info) for best choices.
  • DIY trail mix = nuts, dried fruit, + chocolate for quick, healthy snacking.
  • Portion lunches/snacks + put them in office refrigerator on Monday (labeled, of course!)
  • Make up for poor eating the next chance you get, it's never too late to start fresh.
  • Stock up on portable whole foods (apples, avocados, bananas, anything w/ nature's packing).
  • Pack homemade food (sandwiches, energy bars) for business trips to eat on the go.

Basically, you don't have to avoid all "bad" foods to eat healthfully. Keep yourself in check, yes, but enjoy food foremost. For those times when there are no other options (or you mind just tells you that there aren't), keep these tricks in mind. When I "fall off the wagon" or have some big holiday binge, sometimes it's difficult to feel the whole day week month of eating isn't ruined.

But drink a tall, cold glass of water and start fresh with the next meal.

How do you cheat the system? Do you use convenience foods to you advantage? What are your tricks?
Like what you just read? You can subscribe to the feed of these posts or follow us on Twitter or Facebook to be the first to know what the (never home)makers are up to. And we’ll love you forever!

Read more...

Prepping for Winter

>> Friday, October 25, 2013

Those bright, sunny, and unseasonably warm days we were having decided to abruptly go elsewhere. In fact, snow showers are in the forecast and my back is aching from raking. Last night the temperature was around 40 degrees when I headed out on my 6-mile run. It was also dark + I could just smell the winter in the air.

You know the smell, right?

So, I put on my tights, a long-sleeve tech shirt, and my trusty fleece vest and jumped in.


I've written a lot of survival guides for the cold months, so I thought it might be nice to put them all in one place. Whether you're a seasoned runner who just don't like the seasons OR if this is your first winter running, you can enjoy frigid temperatures (or at very least, learn to love the treadmill).

Overall, my best tip for learning to love the cold weather is to just DO IT. (Any maybe bring a friend for emotional support.) Usually by 10 minutes into a run, I'm not shivering anymore. The blood is pumping and I feel much better being outside than stuck indoors. The key, though, is to start now, before it's too much of a shock. It takes some getting used to . . . even if it's only a few miles at a time.

How do you overcome the deep freeze?

Like what you just read? You can subscribe to the feed of these posts or follow us on Twitter or Facebook to be the first to know what the (never home)makers are up to. And we’ll love you forever!

Read more...

Reheating Frozen Foods + One-Bowl Corn Muffins

>> Thursday, September 12, 2013

So here we are nearing the halfway point for the month of vegetarian freezer meals. Having most of our dinners decided and already made is crazy amazing. Though the cooking process was intense, I'm already thinking about what we'd like to put on next month's monster menu.

I must say, though, being a rookie at all of this freezer stuff, I underestimated the sort of knowledge I would need with regard to reheating our meals and making them the tastiest they could be (especially related to texture). It's been trial by fire, so I'm picked up some tips pretty quickly and continue to find new ways to make the best of these make-ahead meals.


#1: Don't Cook Completely.

What I should have mentioned in my cooking tips + tricks is that before you freeze, don't cook your meal to mush. I did a pretty good job with this at least with the lasagna and chili (the burgers weren't pre-cooked), but our stuffed peppers are pretty mushy when they're re-heated.

If I could do it over again, I'd cook everything only 3/4 of the way through. Think more al dente (tender/crisp) than done.

#2: Leave Time for Thawing.

I was so excited our first night of eating the freezer meals. I went down to the freezer and put the lasagna in the oven to bake for a while at 350 degrees F, only to discover that I really, REALLY should have thawed the lasagna for a while first. We ate dinner at around 9 PM the first night because the inside of those suckers was ice cold. Literally ice in there after 30 or more minutes of cooking.

Now I take my meals out either the night before (and place in the refrigerator -- when using the pre-made pizza crust) or by noon the day we're eating it (and place on the kitchen counter). That way, it's still cool, but not rock hard in the center. With my soups and chili, I leave it in the airtight container and place it in a bath of hot water to aid with thawing. And as a general rule, I try to use whatever I've thawed within 2 days. I don't know if this is necessary, but I'm weird about food going bad.

#3: Use Your Oven or Stove.

We banished our microwave to the basement long ago, which is another story entirely and definitely an issue of personal preference, but to keep the best texture and flavor, etc. -- I think it's best to take the time to re-heat meals in the oven or on the stove. Yeah, this means time for pre-heating and extra cook time, but it's worth it.

You can use your microwave successfully, just note that the machine tends to cook meals unevenly, leaving hot and cold spots in random places throughout your dish. I have had mouth-burns and just weird reactions in the past. With the microwave it's also hard to guague when something is over-cooked before it's too late.

#4: Be Patient.

Basically, there's no standard rule for all frozen dishes, so you need to go on a case by case basis. We learned a lot in the first week what works best for the meals we specifically made. We also learned that tofu is great in lasagna, but watery in stuffed peppers. I learned that I really should wait past the second rise before freezing pizza dough (a frozen EXPLOSION!).

Be patient with yourself and with the process. It takes time to learn any new technique, and freezing and entire month's worth of dinners is no different from mastering the perfect crepe or something equally difficult. I'm sure I'll discover new tricks along the way -- but it takes time.

#5: Make Something Fresh. 

To keep from getting the blahs with the same meals week after week, I like to make at least some aspect of the meal fresh that night. I know this sounds counter to one of the main reasons I decided to freezer cook this month (saving time + dishes), but even a quick one-bowl corn muffin can really liven up a meal.

We also budgeted to get some sweet potato fries to have on hand on burger nights. The pizzas themselves aren't premade, just the dough, so that meals also seems semi-fresh and we customize with whatever CSA veggies are in the basket that week.

Here's a quick recipe that goes wonderfully with stuffed peppers, chili, and other soups!


ONE-BOWL CORN MUFFINS
loosely based off our Olive Oil Skillet Cornbread recipe

What you'll need . . .
  • 1 cup Greek yogurt
  • 1/3 cup applesauce
  • 1/4 cup olive oil
  • 1/4 cup almond milk
  • 2 tablespoon maple syrup
  • 1 cup cornmeal
  • 1 cup bread flour
  • 1 tablespoon baking powder
  • couple pinches salt

Method . . . 
  1. Preheat oven to 400 degrees F. Generously oil the tins of a standard size muffin pan and set aside. 
  2. Mix together the Greek yogurt, applesauce, oil, almond milk, and maple syrup. 
  3. Then toss in the rest of the ingredients and mix until just combined.
  4. Scoop out evenly in your muffin tin.
  5. Bake for 20 to 25 minutes, until edges brown and a toothpick inserted into the center comes out clean.
  6. Let cool before turning over pan and serving.
If you're just catching up, be sure to check out these posts!


Like what you just read? You can subscribe to the feed of these posts or follow us on Twitter or Facebook to be the first to know what the (never home)makers are up to. And we’ll love you forever!

Read more...

Freezer Month: 8 BIG Cook Tips + Tricks

>> Thursday, September 5, 2013

I love tooling around in the kitchen. I have also been known to spend entire afternoons baking with a few glasses of cheap champagne. So, I was completely surprised when this "big cook" for the vegetarian freezer month got the best of me.

At one point, I just stood back and marveled at the mess and the many, many things going on at once. "This is far more intense than Thanksgiving," I said, exasperated. I mean, that was a lot of recipes to make all at once. A lot.

Here's how I kept it from getting too out of control + kept my sanity.


#1: Familiarize yourself with your recipes. (Here are the meals I planned.)

If you can, try to cook meals you could make without looking in a book or on a webpage. If that's not possible, be sure to read over your plan a few times before diving in. Reading your recipes is a good practice to do normally, but when you're planning to make several simultaneously, it's almost a requirement.

#2: Simplify prep as much as possible. 

Look for parallels in your recipes (or plan them that way). If you know that recipes 1, 4, and 5 all have chopped or diced onions and peppers -- make those together and prep the onions/peppers at the same time. If you know you'll be plopping cans of beans or tomatoes, open them ahead of time so you're not fumbling around looking for the can opener. Basically, let your kitchen become a (contained) explosion with everything you need on hand.


#3: Use one large bowl for all kitchen waste. 

Whether or not you compost, catching all your organic food waste (and by that I just mean anything you can put in a composter) in a big bowl will help you clean up. Instead of pushing it to the side of my cutting board or making trips to the compost bin (because there would have been many), this seemingly simple tip really did help save time and keep things tidy.


#4: Utilize different cooking tools at the same time.

Again, try to plan your cook this way because it will allow you to make the most food in the least amount of time. I planned a slow cooker recipe (Indian stew), a stove-top one (pumpkin chili), an oven bake (veggie lasagna), one that require nothing but mixing and mashing together (burgers), and another that could be made + risen while the others cooked (pizza dough).


#5: Use your hands.

As much as possible, find ways to cut back on utensils, bowls, and other items needed to make your foods. I used my hands to blend together veggie burgers (I chopped all the ingredients into small bits instead of using a food processor), to mix pizza dough, and to create a tofu "ricotta" cheese.

Along these same lines, I used the same spatula to mix the pumpkin chili and Indian stew. And then again to prepare the sauce for my lasagna. Come to think of it, I did a quick rinse of the chili pot and used it to make that sauce as well. Less stuff equals less dishes at cleanup time.


#6: Find novel uses for your tools.

I ended up baking my stuffed peppers by placing them in the cups of my muffin tin. It helped me not have to fumble around when I filled up the cups. Then during bake-time I wasn't worried about dropping them all over the floor. And did you know you can make almost anything in a slow cooker? Yeah. I even found a sourdough bread recipe recently. Take a look at the things you have and think of new ways to use them to get the job done ASAP (and with minimal frustration).

#7: Don't sweat the small stuff.

If you forgot to get cumin for a certain recipe, just leave it out or supplement with some other spice. You aren't a contestant on Master Chef, so no one will be looking for certain flavor notes the day the meal is thawed and re-heated. Substitute other ingredients when you can, but if you're just missing something -- unless it's the main ingredient in the dish -- just leave it out.


#8: Make freezer favorites work for you. 

A not-so secret secret? I hate pasta. Especially gigantic, brick-like creations like lasagna. But you know what? Lasagna freezes famously well. So, instead of passing over this no-brainer, I decided to add it to my recipe list and make changes that appealed to me. There's no rule saying you HAVE to follow recipes exactly, so I lightened up the tomato sauce by adding lots of veggies and replaced all the cheese with a tofu ricotta.

Casseroles are another natural when it comes to freezing. Experiment with making one using your favorite ingredients. Spend some time researching the types of recipes that freezer well and thinking of special ingredients you like that would work with them.


If you're just catching up, be sure to check out these posts!


Like what you just read? You can subscribe to the feed of these posts or follow us on Twitter or Facebook to be the first to know what the (never home)makers are up to. And we’ll love you forever!

Read more...

Weekend Things

>> Friday, March 8, 2013


// Do you ACV? //
I don't mean to bragg*, but we've guzzled + used it for a few years.
(*Get it? Bragg? ACV humor . . . ha ha ha)

// Garden in a Box //
My MIL finds the best pins for the green thumb (which I don't really have, but wish I did).
We may make our own pallet garden this year. This upright variety is cool as well.

// Thai Time //
Somehow in my gluten-free adventures, I forgot about Asian food.
This vegan Pad Thai is top on my to-make list this weekend.

// ECOBAGS //
This set of colorful, woven cotton grocery bags is gorgeous.
Maybe pretty enough so I won't keep forgetting mine in the car?

// Carrot Top //
I was excited to learn there are tasty ways to use veggie castoffs.
Even more to discover the cookbook Roots: 225 recipes using root vegetables.

// Organize //
The temps are over 35 degrees F; it feels like the thaw has begun here in upstate.
I'm in full-on cleaning mode -- this smart use of a small bath space is great!

// StyleMint //
I picked up several amazingly inexpensive dresses yesterday.
I mean it, too $10-$12 each! I go for nice cuts/solid colors these days. C'mon, spring!

// Watch //
We're in the thick of to-be natural gas drilling country.
Remind me again why I hadn't watched GasLand until this week?
(We finally, finally, finally saw Argo, too!)

// DIY Hair Ties //
You know those awesome hair ties I got for Christmas?
This little tutorial shows you how to make 'em.

// Save the Peels //
We're going strong with our natural cleaning "initiative" -- yay!

// International Women's Day //
10 profiles of Fierce Women (Mother Jones) A Schedule Of Events (Washington Post)
New Faces of Women's Empowerment (Forbes) Women Explorers (National Geographic)

And here's what you may have missed on Writing Chapter Three.


Have a great weekend!

Psst: You can check out more Weekend Things here + here + here + here + here + here.

Like what you just read? You can subscribe to the feed of these posts or follow us on Twitter or Facebook to be the first to know what the (never home)makers are up to. And we’ll love you forever!

Read more...

Every Other Week Shopping Guide

>> Tuesday, February 12, 2013


When I go grocery shopping for two weeks, I focus on basic staples that can be turned into a variety of dishes for breakfast, lunch, and dinner. (I was hoping to just take a snapshot of our latest receipt, but I can't find it!)

I've discovered a lot. For example, oats can be used in almost everything.


Here's a sample shopping list.

  • 10 pounds potatoes 
  • 8 pounds apples
  • 5 pounds carrots
  • 2 bulbs garlic
  • Bag cooking onions
  • 4 broccoli heads
  • 2 containers tofu
  • 2-pack almond milk
  • 2 containers veggie broth
  • Large container rolled oats (42 ounces)
  • Bag of bread flour
  • 2 containers (32 ounce) plain low-fat yogurt
  • 2 large cans (28 ounce) whole tomatoes 
  • 2 large cans (28 ounce) kidney beans
  • 2 regular cans chickpeas
  • Large bag of frozen peas
  • 2 bags shredded mozzarella
  • 2 small cans tomato paste
  • Large carton (18) eggs
  • Large box of Kix cereal (treat for all of us!)
  • Bag of chocolate chips for cookie-making!
$$$ + MEAL PLANNING

With this type of list, the total generally comes in around $80, leaving me $30 for the following week's haul if we're sticking to a $60 budget. As I mentioned in my last post, we have $100/week total for groceries AND entertainment, so sometimes we spend it all on food, other times not. It's just good to flex it that way. Generally we are able to stay within around $65 a week average for food.

I look at meal-planning in a two-week stretch. The meals are repetitive, but don't necessarily need to be. It's just easier that way when getting used to buying large quantities of the same ingredients.


Here's what we are eating this week and likely next.

BREAKFAST

  • Muffins for breakfasts -- latest recipe tomorrow
  • Egg + 1/2 banana for Ada's breakfast everyday
  • Ashley + Stephen eats eggs w/muffins or oatmeal + banana
SNACKS/LUNCH
 
  • Sourdough bread or other loaf of bread, sometimes 2 loaves
  • Applesauce, lasts the whole week for a side-dish/baby food
  • Tahini-free hummus (just chickpeas pureed with water and lemon juice + salt/pepper)
  • Crock pot veggie soup, lunches Monday through Thursday
  • Ada eats veggies strained out of the soup w/ applesauce + cheese or tofu
  • Dinner leftovers to accompany lunch
  • Stephen gets a sandwich with a coworker one day a week for lunch
  • On that day, Ashley picks at what we can find in the fridge
DINNER/ETC.

  • Veggie burgers + oven-baked fries + 5-minute naan for "buns" -- 2 nights
  • Breakfast for dinner night (eggs + potatoes + side veggie)
  • Tofu Stir-Fry Dinner w/ Broccoli + Onions + Rice
  • Pizza Thursday -- we started making our own, we have lots of recipes, saves like $15
  • Ada eats beans, tofu, peas, bits of our dinner, etc.
  • Misc. Night for dinner depending on leftover ingredients.
  • We usually make a special dinner or go out one night a week
  • I also make dessert 2-3x/week. A half dozen cookies, usually -- I have been using olive oil lately versus Earth Balance

I do most of the meal prepping on Sunday afternoon for week 1 and will do the same for week 2. It's fun to watch a gigantic bag of potatoes get used up with each and every recipe. Almost like a challenge to see just how many ways I can use them.


SOME TIPS

// Stock up on items that don't go bad in a week's time.

Broccoli is hearty, green peppers are, too, and both last the full two weeks. On the other hand, squash can be iffy and go limp. Carrots are robust for longer than two weeks typically. Mushrooms -- not on your life. It's all experimentation.

// Have a plan for what you buy. 

I can't stress enough the importance of meal planning. Once you get more used to it, you just know in your head what meals work + what foods you'll need to make them. But until it becomes second nature -- write it out on a piece of paper and write you list from it.Try to choose meals that utilize the same ingredients, like how we have potatoes for fries AND put them in our veggie stew AND use them for a side on breakfast-for-dinner night.

// Invest in a good spice collection.

I don't know what we'd do without our spices. They can make two completely same meals taste entirely different. Our favorites are curry powder, cayenne pepper, paprika, thyme, dill, fenugreek, rosemary, and -- oh, who am I kidding? -- we like them all!


// Consider making your own bread. 

Sometimes I joke with Stephen that I feel like we have to mill our own grain for everything we eat. We make virtually everything from scratch, which sounds exhausting and possibly insane -- but it really pays off for us. Plus, it doesn't take nearly as long as it sounds. We have a basic 5-minute naan recipe that we use to make bread to accompany meals on-demand, and this way there isn't any waste -- moldy bread -- at the end of the week.

// Keep it in sight. 

The tendency I have with buying things in larger quantities is to put them in the back of the cupboard. Forget they are there. I have done it more times than I'd like to admit, even when I have had the best intentions. It can be helpful to write out a pantry list somewhere in your kitchen and cross off items as they dwindle -- because you'll also see what you still have!

// Freeze meals ahead. 

If you're worried something won't keep, make it into a soup or other meal you can freeze and reheat the next week or more into the future. I also think freezing might help us save even more money AND time -- because shopping every three weeks or even monthly for the big stuff could then be possible. This is something I'm currently working on and hope to write more about soon. We love our upright freezer. One of the best purchases we've made.

// Learn how to substitute ingredients.

This tip can be handy if you have more of something left over than you thought you would. In muffins, you can use applesauce in place of eggs or oil, for example. You can also swap ingredients out of veggie burgers like crazy to fit your taste and available ingredients. I will try to write a post specifically on swapping sometime soon. It's one of the most useful skills you can develop in the kitchen. An easy way to start is stick with similar ingredients (garbanzos for canelli beans) in similar rations.

// If you have babies + toddlers, skip the kid-specific stuff.

We got roped into buying the special yogurts and snacks for a while, but we have resisted since the beginning of the new year. IT IS SO EXPENSIVE! Ada eats what we eat generally, though I do try to make some meals more kid-friendly and appealing to her. And while we occasionally keep around a few packets of baby food, we are considering buying reusable pouches to fill with our own purees when we're out and about.


A couple of you have asked us about our organics-buying policy. We actually covered it on Writing Chapter Three around this time last year. Here's that series of posts:

Buying Organic: Weighing the Costs
Organic Grocery Haul: $112.72
Organics: Responding to Reader Comments
Organics: Moving Forward

If you have any other questions or suggestions, let me know! I also wanted to share a few things from the comments section in the last post.

  • Allison shared: Why You Should Shop with a Cart, Not a Basket
  • Kristina suggested "to boost frugalness, make stock instead of buying it. I usually make mine out of trimmings-- a few weeks' worth of saved carrot peels, potato skins, parsley stems, celery leaves (I save them in the freezer) plus leek greens or an onion or two, a teaspoon of peppercorns, some thyme and a bay leaf. Fill up your biggest pot with water, throw everything in, and simmer gently for about an hour. Then strain and freeze. It's essentially free this way, which is awesome."
  • Shannan shared: "I usually make a big list of meal options and then make a grocery list of what we need in order to make those meals. That way, when we get home from work, we don't have to try and think of something to make. I pull out the list and we decide what to eat from there!"
  • Kim added: "Usually the second week becomes a clean out the fridge, freezer and pantry week. I make a few big meals that I can freeze like pasta fagoli. Pasta is so cheap that is makes for good fill in meals. I also keep baked cookies and breakfast foods in the fridge and freezer all the time so we aren't tempted to buy many snacks."

Thanks as always for all your tips + tricks!

MORE RELATED POSTS

Shop for TWO Weeks
Ongoing Grocery Saga + YOUR Tips
How Low can we Go?
$60 Sweet Spot
Eating Well Need Not Cost a Fortune
Grocery Bills: Progress
Grocery Bills: Even More Progress
Grocery Bills: What's Up Now?
Slashing Grocery Bills: We're Going Strong
Grocery Bills: Major Fail!
How to Store Bulk Foods
Cooking and Baking on a Budget: How To
How to Bake It Vegan: Common Substitutions

Like what you just read? You can subscribe to the feed of these posts or follow us on Twitter or Facebook to be the first to know what the (never home)makers are up to. And we’ll love you forever!

Read more...

Grocery Savings: Shop for Two Weeks

>> Thursday, February 7, 2013


Confession: We fell -- hard -- off the wagon with regard to budgeting for food. We were doing better than we thought financially through the last half of 2012, so we didn't feel the pressure to pinch pennies. We were also busy with the holidays + traveling, so stuffing our faces with whatever tasted good was just . . . easy and comforting.

I'd say we were spending around $90 a week at the store.

Still "good" by most definitions. But now that we have to buy a new-to-us car, I'm back on the budget wagon. I have allotted $100 a week for groceries/entertainment with $65 going toward food and $35 otherwise. But, of course, these numbers can flex as necessary. Things are tight, but that doesn't mean we can't eat healthy, filling foods -- and even be creative with them!


It's taken me quite some time to put some of the grocery savings techniques you guys/gals gave me into practice. But now that I have some experience, I thought I'd tell the world: Shopping two weeks at a time is where it's AT for saving with grocery budget and wasting less food.

It's a trial I had been meaning to test myself with for months years . . . and finally got around to it in the last month, month + a half. And now I'm a convert and would like to try shopping for an entire month in the near future!

Shopping two weeks at a time (and possibly for longer periods) can be tricky, though. It requires meal-planning, awareness (to avoid wastefulness), and some serious practice. It's well worth the effort. Not only do we save money this way -- our last weekly bill figured to be $60 -- meal preparation is so much easier!

Some examples of items we buy in 2-week quantity . . .

  • Vegetable stock, 32 ounce carton x 2 -- sale
  • Plain low-fat yogurt, the 32 ounce container x 2 -- sale
  • Whole tomatoes, 28 ounce can x 2
  • Apples (comes in a gigantic 8 pound bag)
  • Carrots (another gigantic bag)
  • Onions (yup -- big bag)
  • Potatoes + sweet potatoes (same thing)
  • Cabbage
  • Beets
  • Almond milk x 2 cartons
  • Shredded mozzarella x 2 packages -- sale
  • Tofu x 2 packages -- sale
  • Peanut butter, 2 pack (lasts us longer than 2 weeks)
  • Bag wheat flour 
  • Bag bread flour
  • Frozen peas, bulk bag
  • Frozen strawberries, bulk bag
  • Beans, lots of beans
There are several items we do like to buy fresh each week. Bananas, for example, get pretty funky after a week in my experience -- but they are a staple for us year round. Spinach, kale, and other salad greens are also difficult to store for long periods of time.

And no matter how many eggs we buy, we always seem to be running out.


Here's where it gets confusing: Shopping two weeks at a time doesn't necessarily mean we won't go to the grocery store again next weekend. I know that sounds like it's defeating the purpose, but I assure you -- it isn't. It's just our happy compromise.

We go back armed with ONE of those baskets versus a cart and stick to the list. I also write down how much we have "left over" from the budget so I don't feel tempted to buy extras. Sometimes I write it in gigantic numbers colored in with bright markers. Whatever works, right?

Having meals prepped ahead of time is the key here -- because when I go back to the aisles, I have our stores fresh in my mind. I know, for instance, that I have some awesome pizza dough + everything we need to make it great already at home.

So, I keep walking past the temptations.


To make shopping every other week work for you:

  • Make your list. Identify which foods you normally buy and which ones would work with this method. Canned foods and dry goods are an obvious choice; produce can take some experimentation.
  • Simplify your shopping list in the process. Which foods are nutritional necessities and which are bonus?
  • Get creative. Try to find a multitude of ways to use the same foods. If you buy 8 pounds of apples, for example, you need to know how you're going to use them ahead of time. I'll be covering more about this in my next post either tomorrow or early next week.
  • Remember your budget. Buying times two can save a lot -- that's for sure. But if you're not careful, you might over-buy or buy the wrong things. The worst is when you just can't use up everything -- but that doesn't typically happen if you have a plan and cook ahead of time.
  • Make a 2-week meal plan + consider designating specific cook days. (That terminology makes me think of Breaking Bad.) I'll be writing more about this in my next post, too, but you could even go ahead as far as a whole month if you have the freezer space.
  • Shop around. Consider checking out bulk stores, but don't obsess. In my experience, the prices at Sam's club/BJs/etc. aren't dramatically better on the whole -- for some things, yes, but for others certainly not. 
  • Keep your eyes open. Instead, keep your eye on the sales at your grocery store. Often they have 2-for-less type deals, which is when we bulk up. Even better, figure out seasonal sales. My MIL recently scored a gazillion beans for us on the super cheap with a can sale.
  • And be flexible. Sometimes we go with a list, but end up seeing something else is on sale -- a similar ingredient or one that I could easily swap, like chickpeas for kidney beans.
Buying two weeks at a time has allowed me to spend just $60/week on food. Not only that, we have spent far less time scrambling around every night for dinner. Lunches are grab-and-go -- which is especially helpful with a half-the-time-hungry pre-toddler running around the house.

In my next post on this topic, I'll give you a sample of my two-week meal plan, as well as a specific shopping list, to show you how it all works. I'll even link to some of my favorite recipes. It may seem overwhelming, but meal prepping on the weekend is awesome.

Do you shop every other week?
Or even less frequently? 
How do you make it work?

RESOURCES

Grocery Produce that Lasts the Longest on Forbes
Buying in Bulk on Huffington Post
Two Week Grocery Plan on The Vanilla Tulip
Vegan Shopping Guide on PETA

MORE RELATED POSTS

Ongoing Grocery Saga + YOUR Tips
How Low can we Go?
$60 Sweet Spot
Eating Well Need Not Cost a Fortune
Grocery Bills: Progress
Grocery Bills: Even More Progress
Grocery Bills: What's Up Now?
Slashing Grocery Bills: We're Going Strong
Grocery Bills: Major Fail!
How to Store Bulk Foods
Cooking and Baking on a Budget: How To
How to Bake It Vegan: Common Substitutions

Like what you just read? You can subscribe to the feed of these posts or follow us on Twitter or Facebook to be the first to know what the (never home)makers are up to. And we’ll love you forever!

Read more...

What I Wore: Cold Weather Running

>> Tuesday, November 6, 2012


Ada and I bundled up early this morning to head to our polling place about a half mile away from home. It was only 27 degrees, so we wore sweaters, knee socks, and then I strapped Ada into the Beco carrier and silly snuggly Peekaru vest.

The walk was chilly, but well worth the purpose.


Did you vote yet today? Or did you take advantage or early voting? I keep seeing photos of people waiting in very, VERY long lines. Kudos to you! We got right in and cast our paper ballot (it was my first time not using a super old fashioned machine). Should be interesting to watch the results this evening.

And by "interesting" I mean nauseating because I have absolutely no idea how the country can be so 50/50 split. Really?!

WHAT I WORE RUNNING

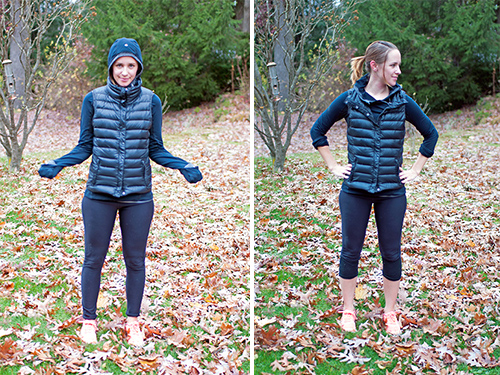
The chilly temps this weekend had me thinking of writing another cold weather running post, specifically related to dressing to stay comfortable. So, I thought I'd take a before/after photo from my long run on Sunday.

Temperature: 39 degrees
Precipitation: Spitting rain/snow and windy!
Distance & Duration: 8 miles in a bit over an hour


When it comes to winter weather, I don't always stick with athletic gear specifically. Here's a list of what I'm wearing from the bottom up. See if you can spot the not.

  • Nike Free Run + 3 w/o socks (I never run with socks unless it's like below 10 degrees F.)
  • Under Armour Cold Gear tights (I've had these for 9 years!)
  • Lululemon tank and jacket. (I can't find either one on their website because they are super old from the days when I worked full time and could afford such luxuries.)
  • Puffer Vest is from Gap. (OK. That's the not. I don't know why I started wearing this vest to run in, but it's lightweight, warm, and if it gets too warm, it folds into a little pocket pouch.)
About a mile into my run, I rolled up my tights to mid-calf. Another mile, I stopped to stretch and rolled up my sleeves. Depending on the wind direction, I had the hood on/off and the vest/hoodie neck zipped up/down.

This time of year is tough because 40 degrees FEELS really cold when you get outside. But once you get your body moving, it isn't so bad. At the Runner's World Half Marathon, for example, starting temperature was in the mid 40s, but I ran with a sleeveless shirt the whole time.

And I kept dumping water over my head at aid stations!


It was perfect (not so much with the glasses, but I'm working on getting my contacts to feel good again). Or. I guess what I'm saying is that what you wear as the temps plummet is highly individual, but also contingent on some factors.

  • Distance or duration of the run. I can deal with over-dressing if it's short, but longer runs require more layers and options.
  • Effort expended. A race tends to get you feeling warmer than normal, no?
  • Weather variables. 40 degrees with rain and wind is way different than 40 degrees with sunny skies. 
In all, it's good to dress in layers -- which I will write more about in my next post on this topic -- and plan to loop by your house to adjust above a mile in, if possible. Keeping pace on the pavement versus treadmill will keep you in better shape for spring races.

If you'd like to learn more about dressing for success and training in the cold months, check out these other posts!

Run Outdoors This Winter!
How to Train in the Cold Months
How to Suit Up to Set Out
Seasonal De-Motivation

Like what you just read? You can subscribe to the feed of these posts or follow us on Twitter or Facebook to be the first to know what the (never home)makers are up to. And we’ll love you forever!

Read more...

Tuesday Quick Tips

>> Tuesday, July 17, 2012


#1: Want a tasty, filling breakfast? Eat cottage cheese!


I am obsessed lately with fruit (in this case: nectarines and blackberries) and my favorite 1% small curds. A nice change from Greek yogurt and green smoothies. A piece of whole grain toast or two goes great, too.

#2: Too hot to run? It has been here . . .


Rather than skip my workout, I did this awesome and super challenging (for me, at least!) Squat Challenge followed by a mile jog. Then I returned home, drank a glass of water and sprayed myself with our hose.


I did another mile jog. Drank water, got the hose again (Silence of the Lambs?!). Then did another round of the Squat Challenge. Seriously, those squats had me in tears the second time around. Overall, half an hour well spent!

#3: Need a snack? Make kale chips!


We've already talked about all the health benefits of kale. If you missed how to make the chips, it takes a mere 10 minutes -- instructions are in this post. This afternoon we mixed our kale with some napa. Made 'em extra "cheesy" with a hefty dose of nutritional yeast.

#4: Need a laugh? Put your cat in a t-shirt!


OK. This "tip" is quite ridiculous and not a tip at all. Instead, it's an excuse for me to share that I bought what I thought was an infant t-shirt at the Salvation Army yesterday. I discovered after washing it that it was -- indeed -- a cat/dog t-shirt. With a cupcake on it. Seriously.

#5: Want to achieve something? Stop whining and start doing something about it!


This tip is sort of written specifically for me. I want to start strength training (again). I've been complaining about my loss of definition in my arms/back since pregnancy. I took a long, hard look around and realized it's been 8 months since I had Ada. There are no excuses. If I want to achieve my fitness goals, I need to start doing something.

So, after a long break from push-ups, hand weights, and discipline -- like you see with the 2010-me, above -- I'm going to start working toward my goal.

Have any quick tips to share with us? Anything fun you've learned lately to help with fitness, make for snacks, etc.? We'd love to hear 'em! Just leave a comment or email us at neverhomemaker [at] gmail [dot] com.


Today on Writing Chapter Three we're celebrating Ada's 8-month birthday. Check this post for an update on what she's eating, how she's sleeping, and how she's moving around these days.

Like what you just read? You can subscribe to the feed of these posts or follow us on Twitter or Facebook to be the first to know what the (never home)makers are up to. And we’ll love you forever!.

Read more...
Related Posts Plugin for WordPress, Blogger...
About This Blog

MyFreeCopyright.com Registered & Protected

© 2009-2014 by the (never home)makers
All content on this blog is copyrighted.

Want to publish our pics, tips, or tricks?
Contact us! [neverhomemaker@gmail.com]

We value transparency. Links on this page may contain affiliates. In addition, please see our disclosure policy regarding sponsored posts.

  © Blogger template Simple n' Sweet by Ourblogtemplates.com 2009

Back to TOP  

Blogging tips