Showing posts with label cornbread. Show all posts

Vegan Curried Cornbread

>> Tuesday, November 12, 2013

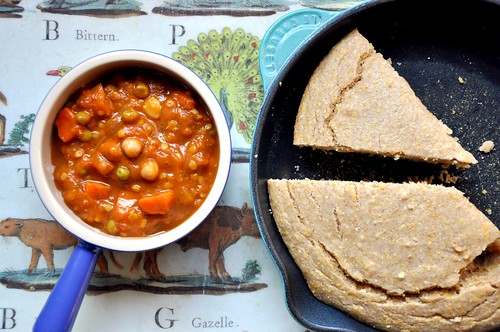
I didn't invent this combination: cornbread + curry. At least now I know I didn't. Boo. A quick Google search allowed me to discover that. But for a few minutes in my kitchen last night, I thought I was a culinary genius. Curry goes famously inside a lightly sweet cornbread. And with a hearty bowl of Super Simple Chili?

Well, I think we're starting this snowy season off right.


CURRIED CORNBREAD 
yields 8 wedges perfect for breakfast, lunch, dinner, or even dessert!

What you'll need . . . 
  • 1 cup yellow corn meal
  • 3/4 - 1 cup white-whole wheat flour 
  • 2 tablespoons golden flax meal
  • 1 tablespoon baking powder
  • 1 (heaping) teaspoon yellow curry powder
  • 1 cup unsweetened almond milk
  • 4 tablespoons maple syrup
  • 1/4 cup olive oil
 Method . . .
  1. Preheat oven to 400 degrees F. Grease a 8 to 9 inch cast iron pan with coconut oil (or olive, etc.). Let preheat in the oven.
  2. In a large bowl, whisk together all the dry ingredients. Then pour in the wet and mix until just combined.
  3. Pour mixture into preheated pan. Bake for 20 minutes, until lightly golden brown on edges. There's a fine line between being done and over-baked.
  4. Let cool before slicing into wedges and topping with butter or Earth Balance.


Between dinner last night and breakfast this morning (with poached eggs!), I definitely ate half the pan. The maple syrup makes this "bread" sweet enough to even pass as a cake. So, obviously, I need to make more soon to pair it with even more of my favorite soups and toppings.

I'm sure I'll be giving you even more great cornbread recipes (I already have quite a few) as the season rolls on. It's just that time of year. We already have a dusting of snow on the ground and the thermometer has yet to reach above 30 degrees this morning. We're in for it now . . .

Pssst: Don't forget to enter the Baked Doughnuts for Everyone! giveaway. You can win a copy of Ashley McLaughlin's new book!

Like what you just read? You can subscribe to the feed of these posts or follow us on Twitter or Facebook to be the first to know what the (never home)makers are up to. And we’ll love you forever!

Read more...

Reheating Frozen Foods + One-Bowl Corn Muffins

>> Thursday, September 12, 2013

So here we are nearing the halfway point for the month of vegetarian freezer meals. Having most of our dinners decided and already made is crazy amazing. Though the cooking process was intense, I'm already thinking about what we'd like to put on next month's monster menu.

I must say, though, being a rookie at all of this freezer stuff, I underestimated the sort of knowledge I would need with regard to reheating our meals and making them the tastiest they could be (especially related to texture). It's been trial by fire, so I'm picked up some tips pretty quickly and continue to find new ways to make the best of these make-ahead meals.


#1: Don't Cook Completely.

What I should have mentioned in my cooking tips + tricks is that before you freeze, don't cook your meal to mush. I did a pretty good job with this at least with the lasagna and chili (the burgers weren't pre-cooked), but our stuffed peppers are pretty mushy when they're re-heated.

If I could do it over again, I'd cook everything only 3/4 of the way through. Think more al dente (tender/crisp) than done.

#2: Leave Time for Thawing.

I was so excited our first night of eating the freezer meals. I went down to the freezer and put the lasagna in the oven to bake for a while at 350 degrees F, only to discover that I really, REALLY should have thawed the lasagna for a while first. We ate dinner at around 9 PM the first night because the inside of those suckers was ice cold. Literally ice in there after 30 or more minutes of cooking.

Now I take my meals out either the night before (and place in the refrigerator -- when using the pre-made pizza crust) or by noon the day we're eating it (and place on the kitchen counter). That way, it's still cool, but not rock hard in the center. With my soups and chili, I leave it in the airtight container and place it in a bath of hot water to aid with thawing. And as a general rule, I try to use whatever I've thawed within 2 days. I don't know if this is necessary, but I'm weird about food going bad.

#3: Use Your Oven or Stove.

We banished our microwave to the basement long ago, which is another story entirely and definitely an issue of personal preference, but to keep the best texture and flavor, etc. -- I think it's best to take the time to re-heat meals in the oven or on the stove. Yeah, this means time for pre-heating and extra cook time, but it's worth it.

You can use your microwave successfully, just note that the machine tends to cook meals unevenly, leaving hot and cold spots in random places throughout your dish. I have had mouth-burns and just weird reactions in the past. With the microwave it's also hard to guague when something is over-cooked before it's too late.

#4: Be Patient.

Basically, there's no standard rule for all frozen dishes, so you need to go on a case by case basis. We learned a lot in the first week what works best for the meals we specifically made. We also learned that tofu is great in lasagna, but watery in stuffed peppers. I learned that I really should wait past the second rise before freezing pizza dough (a frozen EXPLOSION!).

Be patient with yourself and with the process. It takes time to learn any new technique, and freezing and entire month's worth of dinners is no different from mastering the perfect crepe or something equally difficult. I'm sure I'll discover new tricks along the way -- but it takes time.

#5: Make Something Fresh. 

To keep from getting the blahs with the same meals week after week, I like to make at least some aspect of the meal fresh that night. I know this sounds counter to one of the main reasons I decided to freezer cook this month (saving time + dishes), but even a quick one-bowl corn muffin can really liven up a meal.

We also budgeted to get some sweet potato fries to have on hand on burger nights. The pizzas themselves aren't premade, just the dough, so that meals also seems semi-fresh and we customize with whatever CSA veggies are in the basket that week.

Here's a quick recipe that goes wonderfully with stuffed peppers, chili, and other soups!


ONE-BOWL CORN MUFFINS
loosely based off our Olive Oil Skillet Cornbread recipe

What you'll need . . .
  • 1 cup Greek yogurt
  • 1/3 cup applesauce
  • 1/4 cup olive oil
  • 1/4 cup almond milk
  • 2 tablespoon maple syrup
  • 1 cup cornmeal
  • 1 cup bread flour
  • 1 tablespoon baking powder
  • couple pinches salt

Method . . . 
  1. Preheat oven to 400 degrees F. Generously oil the tins of a standard size muffin pan and set aside. 
  2. Mix together the Greek yogurt, applesauce, oil, almond milk, and maple syrup. 
  3. Then toss in the rest of the ingredients and mix until just combined.
  4. Scoop out evenly in your muffin tin.
  5. Bake for 20 to 25 minutes, until edges brown and a toothpick inserted into the center comes out clean.
  6. Let cool before turning over pan and serving.
If you're just catching up, be sure to check out these posts!

Like what you just read? You can subscribe to the feed of these posts or follow us on Twitter or Facebook to be the first to know what the (never home)makers are up to. And we’ll love you forever!

Read more...

Spelt Cornbread

>> Wednesday, October 24, 2012


Guess who got a walk in yet again this morning!


We went a bit farther than yesterday, too. It feels so amazing to start in the day this way. We recently stopped Ada's 11 PM feed, and I'll write more about it on Writing Chapter Three later today. I'm just hoping her good sleep habits keep on going despite the change. This productivity kick has my mood way improved.

We ate dinosaur kale chips, chipotle tofu "steaks", and spelt cornbread for dinner last night. I'm having my usual eggs and some cornbread again for breakfast, and I'll have another green smoothie for a morning snack.


I vary my diet for obvious reasons, but if there are leftovers I like -- and there are few leftovers I actually enjoy -- I tend to gobble them up. This is the first cornbread recipe I've developed that doesn't have sugar or maple syrup in it. The flavor of the coconut oil and water gives it a light sweetness. However, you may also replace these ingredients with olive oil and plain water.

SPELT CORNBREAD

What you'll need . . .

  • 2 cups polenta/corn grits
  • 1-1/2 cups spelt flour
  • 1 tablespoon baking powder
  • Pinch salt
  • 1/3 cup virgin coconut oil
  • 1 cup coconut water
  • 1 cup warm water
  • 1 can corn kernels, drained and rinsed well (optional)

Method . . . 


  1. Preheat your oven to 350 degrees F. Spritz a 9 x 13 pan (I used a glass dish) with olive oil.
  2. Whisk together the corn grits, spelt flour, baking powder, and salt. Set aside.
  3. Melt the coconut oil in the microwave. Then add it to the warm water and coconut water. You need to make sure the water mixture is warm -- I learned the hard way that the coconut oil hardens on contact with cold.
  4. Then pour the wet mixture into the dry and mix until well combined. 
  5. Fold in the corn kernels and then spread into your baking pan.
  6. Bake for 30 minutes, then check the center. It will likely still be gooey. Bake for another 5 minutes and possibly another couple after that, depending on your oven. Bread is done when center is set, but still moist.

GOAL #3: To spin off last night's topic of negative versus positive, I'm trying now to stay positive in all areas, even those I didn't previously expect were getting me down. This includes focusing on the people, places, and things in my life that most matter and letting go of negative connections and influences.

It's a big goal, and something I'll probably write more about eventually.

Strangely enough, many of these mood suckers are related to the time I spend online. Whether it's rolling my eyes at random Facebook status updates, Googling medical issues (remember when the doctor said Ada's head is too big? Yeah. No good.), or stressing because I've let my inbox overflow beyond manageable. Computers are great, but they sure do complicate life.

I'm hoping to cull the loop of websites I visit on a daily basis and limit time online in general. Sitting in a dark corner at 9 PM and mindlessly surfing isn't benefiting me any -- even if I am reading news or useful information. We have an entire bookshelf teeming with books. I have a sewing machine that gets little use. I have a birthday party to plan.

I'd rather be productive with my time. You know, actually MAKE things instead of just pinning them on Pinterest. (Though I can't see cutting out Pinterest!) We'll see how it goes!

Like what you just read? You can subscribe to the feed of these posts or follow us on Twitter or Facebook to be the first to know what the (never home)makers are up to. And we’ll love you forever!

Read more...

Some Recipes and Other Stuff

>> Wednesday, September 5, 2012


I mentioned it on Twitter this weekend, but I finally had the opportunity to add a large group of recipes to the Recipe Page. I believe there were over 100 added in all. I still need to update the individual recipe pages per category, but if you go to the main page, they should be mostly there.

Tonight for dinner we had roasted Brussels sprouts, BBQ tofu, and skillet cornbread. A delicious, simple meal we managed to make while giving Ada dinner and then a bath.


To roast the sprouts, preheat oven to 400, pour sprouts onto rimmed baking sheet, toss in olive oil + salt + pepper. Bake in 15-minute intervals, stirring between each, until well browned. Likely 45 minutes.

This BBQ sauce is Stephen's baby. He's been perfecting the recipe for a couple weeks. Tonight, he got it JUST right. Once you make it up, you can use it for dipping.

We fried tofu and then cooked it in the sauce a bit until it thickened.


BBQ SAUCE

Combine the following . . .

  • 1 clove garlic, sliced sauted in 1 teaspoon olive oil 
  • 2 teaspoons brown sugar 
  • 1 tablespoon vinegar 
  • 1/4 teaspoon cayenne pepper 
  • 1 tablespoon chipotle seasoning 
  • Black pepper and salt to taste
  • 1 tablespoon yellow mustard 
  • 1/2 cup ketchup 
  • 1/2 cup pale ale

The cornbread is a variation on our original Olive Oil Skillet Cornbread. I wanted it to have a more unique flavor. And I wanted it to be fluffier.

Check and check!


PEPPERED SKILLET CORNBREAD

You'll need . . . 

  • 1/4 cup maple syrup
  • 1/4 cup olive oil
  • 1 tablespoon flax meal + 4 tablespoons water
  • 1 cup bread flour
  • 1 cup cornmeal
  • 1/2 cup whole wheat flour
  • Pinch salt
  • 1-1/2 teaspoon baking powder
  • 1 to 2 teaspoons black pepper
  • 1/2 teaspoon thyme
  • 1 cup beer of choice (or sparkling water)
To bake it up, preheat the oven to 400 degrees F. Spritz a cast iron skillet with some olive oil, let preheat in the oven. In a large bowl, mix together the wet ingredients except the beer or water. Then add in the dry. Then add in the beer or water. Mix until just combined.

Bake for 20 to 22 minutes. Until the middle is set and a toothpick comes out clean. Let cool before slicing.


Can anyone give me tips on keeping basil better longer? I feel like none of our tricks are working. If we put it in the fridge, it gets icky. If we put it in a bit of water, this happens. I need help!

And last, here are some dreamy cat photos. I'm tired, when I initially typed that out, I wrote "here are some KAT photos."


Also. If you're interested . . .


Today on Writing Chapter Three we've written up a list of our favorite board books, including classic literature favorites adapted for little ones. Like Romeo & Juliet, Jane Eyre, Alice in Wonderland, and more!

Like what you just read? You can subscribe to the feed of these posts or follow us on Twitter or Facebook to be the first to know what the (never home)makers are up to. And we’ll love you forever!

Read more...

Olive Oil Skillet Cornbread

>> Thursday, November 10, 2011

There are so many different ways to make, well, EVERYTHING. And just when we think we've found our favorite method, texture, taste . . . we discover a new twist. Cornbread is definitely one of those foods that lends itself well to experimentation.

We've made many different varieties and shared several recipes on the blog:

Spelt Cornbread
Pomegranate-Lavender Poppy Cornbread
Pumpkin Cornbread
Hot Pepper Cornbread

Today's recipe is a twist on the Spelt Cornbread -- without the spelt and made with olive oil. Baked in a cast iron skillet, it turned out to be our favorite mix so far. But, as always, that's subject to change with our next try at it.

Plus, simple is best in our book. We didn't add in anything (corn kernels, chopped peppers, etc.) for flair. Yea or nay? You can be the judge.


OLIVE OIL SKILLET CORNBREAD

What you'll need . . .
  • 1/4 cup maple syrup
  • 1 teaspoon salt
  • 1/4 (to 1/3) cup olive oil
  • 2 eggs (3 teaspoons Ener-G replacer with 4 tablespoons almond milk)
  • 1 cup whole wheat flour
  • 3/4 cup bread flour
  • 3/4 cup cornmeal
  • 1 cup milk (or almond milk)

Method . . .
  1. You'll need an 8 or 9 inch cast iron skillet. Lightly oil one with olive oil and set aside.
  2. Preheat your oven to 400 degrees F.
  3. In a large bowl, whisk together maple syrup, salt, olive oil, and eggs. We substituted Ener-G egg replacer, and it worked out great!
  4. Add the flours and cornmeal. Then the milk. Mix together until everything is moistened. But don't over-mix.
  5. Pour into prepared skillet. Then put in the oven for 20 to 25 minutes.

The skillet baked this bread i.n.c.r.e.d.i.b.l.y evenly, which is actually one of the annoying issues we commonly experience when making other types. The center of the bread -- when made in a loaf pan -- takes a while to set and usually isn't the same texture as the rest. If you have this problem, too, you may want to give this method a try.

Oh, and we never eat our cornbread naked. It goes so well with soups and stews.

This autumn stew recipe is coming soon . . .


Check out our to-do list progress today on (never home)maker, baby! . . . we're making our way, but have prioritized now that it's crunch time.

Like what you just read? You can subscribe to the feed of these posts or follow us on Twitter or Facebook to be the first to know what the (never home)makers are up to. And we’ll love you forever!

Read more...

Jazzed-Up Cornbread

>> Thursday, September 29, 2011

After drooling over Ashley's (Edible Perspective) awesome cornbread recipes last week, I had the stuff on my brain. For sure. And even without discussing it with Stephen, he must have picked up on it, too. Last night, he just HAD to have cornbread. He wouldn't stop talking about it.

Our favorite recipe is derived from one in some worn church cookbook I found second- or third-hand at a yard sale several years ago. But I had changed it to make it vegan and jazzed it up a bit by adding real corn and peppers when I was in college.


Problem: We're out of egg replacer, applesauce, AND flax right now because we skipped the grocery store this week.

Solution: Use an egg. Otherwise, this recipe is vegan.


JAZZED-UP CORNBREAD

What you'll need . . .
  • 1 cup whole wheat flour
  • 1 cup yellow cornmeal
  • 1 teaspoon salt
  • 3-1/2 teaspoons baking powder
  • 1/4 cup maple syrup
  • 1 egg or your favorite replacement
  • 3/4 cup almond milk
  • 1/4 cup vegetable oil
  • 1 can corn
  • 2 hot peppers, seeded and finely chopped


Method . . .
  1. Preheat your oven to 400 degrees F. Lightly grease a standard loaf pan with Earth Balance or butter.
  2. Whisk together the flour, cornmeal, salt, and baking powder.
  3. In a separate bowl, mix together the maple syrup, egg, almond milk, and oil.
  4. Add the wet ingredients to the dry and mix until everything is moistened. Don't over-mix.
  5. Fold in the corn and peppers. Pour mixture into loaf pan.
  6. Bake for 40 to 45 minutes. You may wish to cover the loaf with tin foil in the last 15 minutes or so to eliminate excess browning. Loaf is done with a toothpick inserted into the middle comes out clean.
  7. Baker beware: It's tricky to tell when the loaf is done. However, if you cut into it and still find the insides are goo-py, just return to the oven. No harm done.

Thanks again to Ashley for the inspiration. Now we just need to figure out what to do with all these peppers. Any ideas?

Hot sauce, maybe?


(On a side note, we've received a few emails from people frustrated at our recent lack of vegan recipes. I just wanted to remind trusty readers/let new readers know that we're not vegan. We love to bake and cook vegan foods, but our recipes reflect our everyday eating, which is primarily basic vegetarian. That being said, we'll make an effort to post more vegan stuff in the coming months!)

I love the fall weather. Leggings and flip-flops!


However, taking photos of the foods we're making is getting challenging and requires me to immediately get my camera out after work, head outside, and snap away. Most often, I head to our favorite spot:


Also: I finally got my butt into gear and posted a video post on (never home)maker, baby! If you're interested, it's a quick run-down of what's going on now that I'm 31 weeks pregnant. OK. As of today, though, I'm actually 32 weeks pregnant.

That's eight months. As in the start of eight out of nine months. Ahhh!

Like what you just read? You can subscribe to the feed of these posts or follow us on Twitter or Facebook to be the first to know what the (never home)makers are up to. And we’ll love you forever!

Read more...

Fish, Cornbread, and Jean Skirts

>> Tuesday, January 25, 2011

We've received some emails asking how my fish-eating experiment is going. And after posting my intentions and an Orange-Cayenne Baked Tilapia recipe . . . there's been absolutely no mention of it. At all. Sorry about that, peoples!


I do very much intend to give fish a chance. However, I don't want to go about it in the same way I set out to at the beginning of the year. My plan: 12 weeks. 12 types of seafood. Equals 12 times to evaluate if I want to move from vegetarian to pescatarian (like Stephen, though we don't love labeling our diets).

It's way too regimented -- at least for me. At this point, I don't find myself craving fish. I don't find myself sick at the thought of eating fish. And the way I feel -- if I don't feel particularly compelled to eat it, I don't want to force it. If I did, I think I'd develop some negative associations. Instead, I am open to the choice. I am open to trying. (Just like when I became un-vegan.) And I will be trying more, just not in a regularly scheduled format.


HEARTY CORNBREAD CASSEROLE
(Print this Recipe!)

What you'll need . . .

For the veggies:
  • 1 large green pepper, chopped
  • 1 large onion, chopped
  • 2 cloves of garlic, minced
  • 2 cups fresh baby spinach
  • 2 large tomatoes, chopped
  • 1 cup pumpkin puree
  • 1 (16-ounce) can kidney beans (or more, if desired)
  • A pinch or two of Kosher salt
  • Tablespoon (or so) of your favorite hot sauce
For the cornbread:
  • 1 cup cornmeal
  • 1/2 cup whole wheat flour
  • 1/4 cup all-purpose flour
  • A pinch or two of Kosher salt
  • Black pepper, to taste
  • 1-1/2 teaspoons baking powder
  • 1/2 teaspoon baking soda
  • 1 tablespoon maple syrup
  • 6 tablespoons canola oil
  • 2 large eggs, lightly beaten
  • 1-1/2 cups almond milk
  • 1/2 to 1 cup shredded cheddar cheese
  • 1 can of corn kernels, drained and rinsed


Method . . .
  1. Preheat your oven to 400 degrees F. Heat a tablespoon of vegetable (or other) oil in a large pan over medium-high heat. Toss in your onions, garlic, and green peppers.
  2. Cook until soft and lightly browned. Then toss in the tomatoes, spinach, and kidney beans. Cook for a few minutes until the spinach is wilting. Then stir in the pumpkin puree, hot sauce, and salt. Continue cooking for a couple more minutes -- until well combined.
  3. Then spritz a 9 x 13 baking pan (I used a glass one) with oil and pour everything into it.
  4. (Now make the cornbread): In a large bowl, whisk together the cornmeal, whole wheat flour, all-purpose flour, salt, black pepper, baking powder, and baking soda.
  5. Add in the canola oil, lightly beaten eggs, and almond mild. Mix until everything is moistened. (There will be some lumps. You may use an electric mixer, but hand mixing is also fine.)
  6. Fold the cheddar cheese and corn into the mixture. Pour this mixture over the veggies in the prepared pan.
  7. Put everything in the oven for 30 to 35 minutes. The cornbread will firm up and be slightly browned when done.
It may seem like a lot of effort and time. But the cooking/baking actually goes pretty quickly. Plus, the yield is enough for two meals for two -- minimum. We some for dinner last night, I'm eating some for lunch today, and we'll have more for dinner tonight. Done and done!

TUESDAY "STYLE"

Today's outfit is far from exciting. But at least it's a (jean) skirt. Right? Ugh. I lost some momentum with the dressing pretty thing this week. Blame it on the negative temps. Blame it on my unwillingness to get used to working 9-to-5 again (oh, how I miss getting out before dark!).

But, really, it's my laziness creeping up on me.


Sweater: TJ Max find
Shirt and skirt: Gap
Tights: DKNY
Flats: Earth Origins (biodegradable and SUPER comfy!)


I think the hardest part of this whole style journey has been so wildly opening myself up to criticism (some of it has been very helpful -- don't get me wrong!) based on how I look. Nevertheless: If you'd like to catch up on my style transformation, just click these links:
Like what you just read? You can subscribe to the feed of these posts or follow us on Twitter or Facebook to be the first to know what the (never home)makers are up to. And we’ll love you forever!

Read more...

Cornbread, Carrots, and Congrats

>> Thursday, August 12, 2010


We've been receiving a lot of feedback on our Healthy Living Celebration -- and, at least so far, all of it has been positive! So much, in fact, that we'd like to continue featuring your stories in the future. And of course, you can always submit material to us for consideration (How to? It's in our Reader Spotlight section). We still have many more stories to go. So many that we'll actually be featuring them until next week.

If you're new or would like to catch up, here's what we've posted so far:
  • Laura overcame her eating disorder to embrace exercise.
  • Josie quit being a quitter to get healthier and fitter.
  • Chrissy found her inner athlete and rolled her way to running.
  • The Nerdy Runner learned to love whole foods and marathons despite her busy schedule.
  • Ashley (yes -- that's ME!). Enough third person. I share part one of my healthy living story: How I understood health as a child and struggled to find my way.

So, more great stories to come later today, tomorrow, and next week. But now it's time to announce our lucky SHUTTERBUG giveaway winner: Mjirsch, who wrote us: "I am loving your blog! I'm a new reader and think your pictures are great! Hoping to try out some of your recipes and perhaps take a few pictures!"

Congrats! We'll send your pretty trivet out to you as soon as you can get us your mailing address.

If you didn't win -- don't fret. We're so close to reaching 2,000 subscribers that we can smell YET ANOTHER giveaway. Yup. That's right. Once we reach this milestone, be sure to check back for your way to win. Back to breakfast for a moment.


This morning I sauteed some carrots and peach slices in a cinnamon-maple-ginger sauce. Carrots for breakfast may sound strange, but they are sweet and soft. They also pack a dose of vitamins A, C, and K. I'm pretty sure we could ALL use a little more vitamin K in our diets. To make this dish for one, all you need are 2 carrots (peeled and chopped as shown), 1 peach (peeled and chopped as shown), 1 tablespoon maple syrup, 1/2 teaspoon cinnamon, and 1/4 teaspoon ground ginger.

Method . . .
  1. Heat a tablespoon of sunflower or canola oil over medium high heat.
  2. Toss in the carrots and cook until softened, but still slightly crisp -- about 6 minutes.
  3. Mix together the maple syrup, cinnamon, and ginger. Throw it in the pan and mix.
  4. Add in the peach slices and cook another couple minutes.
  5. I also tossed in a couple fresh basil leaves for good measure. (After the heat was off.)

I also made some vegan pumpkin cornbread last night. It was great for dinner, it was great for breakfast. It's really an all-day kind of cornbread. Not too sweet or savory. It's healthy, too.

PUMPKIN CORNBREAD

What you'll need . . .
  • 1 cup whole wheat flour
  • 1 tablespoon baking powder
  • 1 teaspoon salt
  • 1 cup stone-ground cornmeal
  • 2 tablespoons Bob's Red Mill egg replacer plus 6 tablespoons water (or two eggs)
  • 1 cup pumpkin puree (wanna make your own?)
  • 1/4 cup maple syrup
  • 1/4 cup canola oil
  • 1 cup corn kernels (we used canned no-sodium)

Method . . .
  1. Preheat your oven to 400 degrees F. Lightly grease a 10-inch pie pan (or 9-inch square baking pan) and set aside.
  2. Whisk together the flour, baking powder, salt, and cornmeal in a large mixing bowl.
  3. In a smaller bowl, whisk together the pumpkin, oil, maple syrup and egg replacement (or eggs).
  4. Punch your fist (ok, just lightly!) into your dry ingredients and pour the wet ingredients into the impression you make.
  5. Mix together until JUST incorporated with a spatula. Then fold in the corn kernels.
  6. Pour batter into your prepared pan. Bake for 25 to 30 minutes. The bread will be lightly browned and slightly firm to the touch.


In honor of the whole shutterbug thing, I'll share my secret photo-taking pose. Yes. The photo above shows how I take a lot of my photos. They're almost always taken over the kitchen sink (where there's a big window), atop my trusty wooden cutting board . . . while I'm teetering on a dining room chair.


Here's my question for you all: What's the strangest thing you enjoy eating for breakfast? Of course, we all think green smoothies are pretty crazy. But what other kinds of healthy foods do you consume? I'd (rather selfishly) love some ideas to spice up my mornings!

Like what you just read? You can subscribe to the feed of these posts or follow us on Twitter or Facebook to be the first to know what the (never home)makers are up to. And we’ll love you forever!!

Read more...
Related Posts Plugin for WordPress, Blogger...

About This Blog

MyFreeCopyright.com Registered & Protected

© 2009-2014 by the (never home)makers
All content on this blog is copyrighted.

Want to publish our pics, tips, or tricks?
Contact us! [neverhomemaker@gmail.com]

We value transparency. Links on this page may contain affiliates. In addition, please see our disclosure policy regarding sponsored posts.

  © Blogger template Simple n' Sweet by Ourblogtemplates.com 2009

Back to TOP  

Blogging tips