Showing posts with label basil. Show all posts

Pistachio Basil Pesto

>> Wednesday, July 29, 2015

We returned home to a bursting-from-its-seems garden. (Here’s what our garden is like this year.) And by that I mean we have a ton of tiny tomatoes and basil that we need to use up ASAP. Good thing those are two of my favorite ingredients -- right?

Now, you guys know all about my love affair with pesto.

Let’s review:


PISTACHIO PESTO


What you’ll need . . .

  • 1 cup clean basil leaves
  • 1/2 cup pistachios
  • 1/4 cup olive oil
  • 1/4 to 1/2 cup grated Parmesan cheese
  • 2-3 cloves garlic
  • Squeeze lemon juice
  • ground black pepper

Method . . .

  1. Combine all ingredients in a food processor and pulse until smooth.
  2. I used roasted/salted pistachios and took them out of their shells for this recipe. 
  3. Also: I didn’t add salt because the nuts were already salted.
  4. I also rinsed the basil and then pat it dry with paper towels. I didn’t cook the basil, though. Left it raw.
  5. You can play around with the oil to make your pesto dryer or runnier. It’s a preference thing.
  6. You might also have success using some nutritional yeast in place of the cheese.


Enjoy!

Like what you just read? You can subscribe to the feed of these posts or follow us on Twitter or Facebook to be the first to know what the (never home)makers are up to. And we’ll love you forever!

Read more...

Basil-Infused Lemonade

>> Monday, May 25, 2015

This weekend starts all our summer traditions of sorts. The carousels and pools open up for the season. Our backyard is usually primed and ready for outdoor enjoyment (we’re even thinking of creating a DIY home theater out there this year using a white tarp!). And I start making lemonade on the regular.

But not just any lemonade! I love using basil from the garden to infuse the drink with extra flavor. So, if you’re looking for a last-minute beverage to serve at your cookout today, try this classic lemonade recipe with a twist!


BASIL-INFUSED LEMONADE


What you’ll need . . . 
  • 1 cup freshly squeezed lemon juice*
  • 1/2 cup Sugar in the Raw
  • 1/2 cup water
  • Handful fresh basil leaves
  • 3 cups water

* You can also use other citrus fruits if you don’t have enough lemons. My tip is to have at least half of the juice from lemons, though. This batch was half lemons, half some limes and oranges.

Method . . .

  1. Squeeze your lemons to get your juice (I just use this old school juicer), then pour into a pitcher with the 3 cups of water. Set aside.
  2. In a small saucepan, combine the sugar and half cup of water. Toss in your washed basil leaves, then bring to a simmer over medium heat until all sugar has dissolved. Let cool and then take leaves out.
  3. Pour the syrup into your pitcher and mix well.
  4. Pour over ice to serve. Optional: Garnish with more basil leaves.

Happy Memorial Day, friends. Let us all remember the men and women who have died serving our country.

Like what you just read? You can subscribe to the feed of these posts or follow us on Twitter or Facebook to be the first to know what the (never home)makers are up to. And we’ll love you forever!

Read more...

An Ode to Sandwiches

>> Tuesday, May 27, 2014

Oh man, oh man. We were not expecting what we found in the house inspection last week. The place we had our hearts set on ended up being way more than we could handle with regard to DIY. In fact, it ended up being somewhat of an unsafe environment. So, we're waiting on pins and needles to hear the results of the inspection on our home to see if everything is going to run smoothly now that we've found yet another house we love.

Anyway, I have so much I want to share about food these days. But I also realize I'm going to have to buy a new camera charger because mine is long gone! Enough apologies. I have a goal.

By the end of the summer, I'd like to be able to make my favorite sandwich -- tomato, pesto, mozzarella on sourdough -- from scratch. I know I could likely do it sooner, but with everything going on right now, I'll wait to earn my badge in cheese-making.


Well, I also likely won't have tomatoes from my own garden this year, so maybe I'll use one from a friend's garden. But I'd say we eat this simple sandwich once a week. It's sort of our weekend treat. The one time we go to Wegmans.

And I'll tell you what -- after shopping (and saving!) at Aldi for so long, going to Wegmans is an out-of-this-world experience. With some time away, I can totally, TOTALLY see why I always over-spend there.

This sandwich will require:

#1. // Some simple sourdough bread, and I'll need to begin from scratch with a new starter. This time around, I'd like to use the wild grapes method.

#2. // A ball of homemade mozzarella cheese. I've been wanting to make my own cheese for quite some time. It's one of my favorite foods, and I've read that mozzarella is a great gateway cheese.

#3. // A batch of one of my many pesto sauces. Though for this sandwich, I'd probably go with a classic basil pesto. I can't wait to start getting all that basil in our farm share. I'm going to promptly make pesto and freeze. I swear we eat some every single day!


I guess I'll get bonus points if we can also make a batch of beer and some black and white cookies. Right? Stephen is itching to brew again -- especially now that we might potentially have more space to sprawl out and store his creations. (Have you checked out our homebrewing section yet?)

// SANDWICHES = AMAZING

Regardless, sandwiches are my favorite food:

* means VEGAN

Like what you just read? You can subscribe to the feed of these posts or follow us on Twitter or Facebook to be the first to know what the (never home)makers are up to. And we’ll love you forever!

Read more...

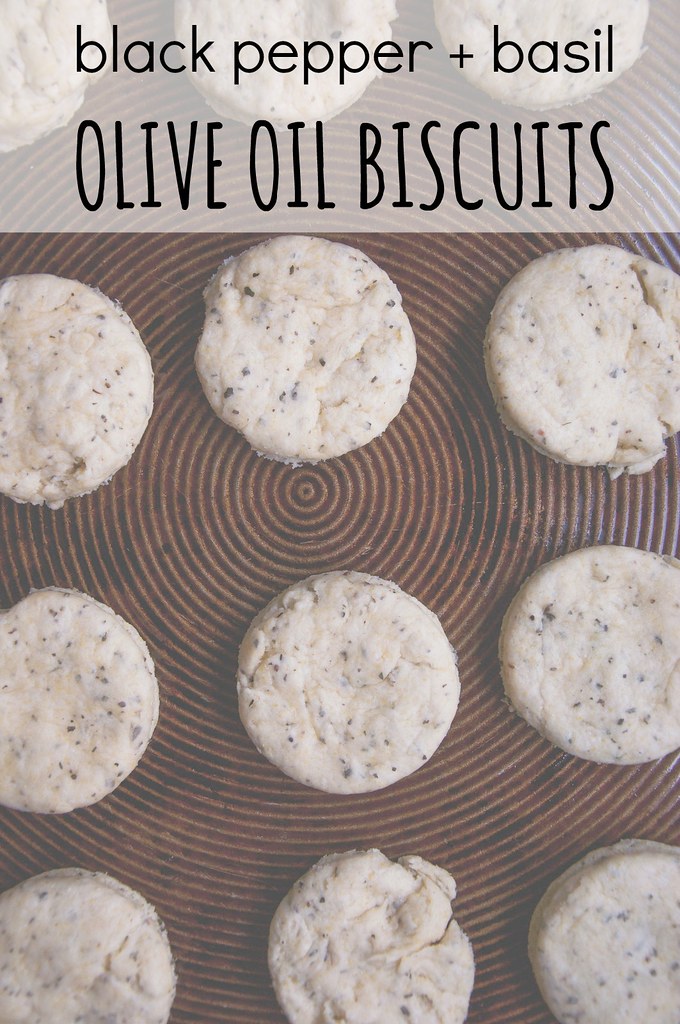
Black Pepper + Basil Olive Oil Biscuits

>> Tuesday, February 11, 2014

I've tweaked my biscuit recipe, and now I can't get enough! I've made variations of this batch three times in the past week, one of which is  sweet chocolate dessert biscuit -- so get ready for that recipe tomorrow! I love biscuits because they are simple enough to make and require only a few, inexpensive ingredients.

Plus, they go great with breakfast, lunch, and a Miso Split Pea Soup dinner. 


BLACK PEPPER + BASIL OLIVE OIL BISCUITS 

What you'll need . . . 
  • 2-1/2 cups bread flour
  • 1/2 cup cornmeal
  • 1-1/2 tablespoons baking powder
  • 1/2 teaspoon salt
  • 2 teaspoons black pepper
  • 1-2 tablespoons dried basil
  • 1/2 cup olive oil
  • 1/2 cup water
  • 1/2 cup soy or almond milk
Method . . . 
  1. Preheat your oven to 425 degrees F. Lightly grease a baking sheet or line with parchment.
  2. Whisk together the flour, cornmeal, baking powder, salt, pepper, and dried basil.
  3. Then pour in the wet ingredients and mix until dough forms. Knead a few times until everything is moistened.
  4. Lightly flour a work surface and roll with a pin or flatten with your palm the dough until it is around 1 inch thick. 
  5. Using a round cookie cutter (I used a Ball jar lid ring), cut dough into 12 biscuits.
  6. Bake for 11-12 minutes, until biscuits are lightly browned. Be careful not to over-bake or they will get dry.
  7. Let cool a few minutes before serving warm.

// MORE BISCUITS


// HENNA HAIR COLOR

I know some of you who don't normally read Writing Chapter Three said you are interested: I colored my hair with Henna and made a little video documenting the experience. I doubt I'll go back to chemical box dyes again. I love how it turned out!


And a big thanks to RedEnvelope for sending me this gorgeous monogrammed birthstone pendant necklace (in Ada's November birthstone -- maybe someday I'll pass it along to her!). I've been smitten with RE since I first got a catalog way back in college, and I now have several pieces of their jewelry in my collection. Whether you're shopping for a friend or yourself, their Favorites for Her is a great place to scope out pretty gifts. 

RedEnvelope sent me this necklace. I was not compensated otherwise. My opinions are my own.

ALSO: Don't forget to enter our Taste of Nature snack bar #giveaway!

Like what you just read? Browse more of our posts + recipes on Pinterest. You can subscribe to the feed of these posts or follow us on Twitter or Facebook to be the first to know what the (never home)makers are up to. And we’ll love you forever!

Read more...

Diet Thoughts + Basil Hummus

>> Wednesday, August 7, 2013

The process of eating well can be transformative. After all, we're continually told "you are what you eat." But what they don't tell you? It isn't the sole catalyst for lasting change. In the past, I thought modifying my diet would change my life. That eating clean meant not only a clean body, but also a happy mind and satisfied soul.

As I have found out through much trial + error, that's only half true . . . at best.


Still, I think a lot of us use our diets as our adult report cards. There aren't too many other ways to grade how our lives are going, how we're dealing with physical and emotional contentment or, in turn, turmoil. Diets are (somewhat) easy to change, track, and control, too. They allow us focus on something external -- food + drink -- to lay blame outside our inner selves. To celebrate successes or, ultimately, punish failures.

Unless there's a large amount of weight to lose or some other quantifiable, measurable goal, the changes a diet provides can range from significant to imperceptible. And that's where the focus on food fails to deliver. Even if we "eat like adults," we can remain in a funk. Unfulfilled in so many ways.

What's even more perplexing is how we can be privy to all of what I just wrote and still choose to harp on diet every time our lives get out of control or we desire big change. I'm writing to myself here, can you tell? Understandably, it's a kick-start. After, that's when the "lifestyle" component factors in, which I'll get into another time. What the term encompasses, though, we typically interpret to mean exercise only. There are still multiple pieces of the pie missing.

Enough food for thought.
Now time for some actual food.


BASIL HUMMUS

What you'll need . . .

  • 1 can chickpeas
  • 1/2 cup packed basil leaves
  • 1/2 cup water
  • 1 tablespoon tahini
  • Squeeze fresh lemon juice
  • 1 clove garlic
  • Salt and pepper to taste
//  Place all ingredients in your food processor and blend until smooth. Add more/less water depending on how you like the texture of your hummus to be. Then use as a dip or spread. I topped toast with it and added slices of heirloom tomatoes that looked quite a bit like lox, no?


Slice!


Have you been frustrated when a diet hasn't provided the change you needed?
Or perhaps quite the opposite?

Still, I believe taking the time to cook gives the mind more room to think. A critical slowing down that we're often taught to overlook (I skipped enough lunches while working my desk jobs, for example). And keeping recipes simple and full of nutrient-dense whole foods can help lead us in the right direction, wherever that may be.

Like what you just read? Browse more of our posts + recipes on Pinterest. You can subscribe to the feed of these posts or follow us on Twitter or Facebook to be the first to know what the (never home)makers are up to. And we’ll love you forever!

Read more...

Summer Market Waffles

>> Tuesday, July 16, 2013

Quick recipe today. We haven't had waffles in a while, so I've been itching to get out the maker again and mix up a batch. I don't know about you, but this time of year our fridge is bursting with local yellow squash and leafy green basil from our CSA share.

You see where this is going.


SUMMER MARKET WAFFLES 
vegan + veggie-filled; makes enough for 2-4 people, depending on hunger status

What you'll need . . . 

  • 1 cup shredded summer squash
  • 1/4 cup chopped basil
  • 1 cup all purpose flour
  • 1 cup water
  • 2 tablespoons olive oil
  • 2 teaspoons baking powder
  • pinch salt

Method . . . 

  1. Mix together all dry ingredients in a large bowl. Then add the squash, basil, and liquid ingredients. Mix until fully combined, but do not over-mix. 
  2. Preheat your waffle maker. When it's ready, generously grease the top and bottom with Earth Balance or spray oil. Then scoop heaping 1/4 to 1/3 cupfuls and cook as directed. 
  3. Eat immediately or follow the instructions in this post storage.

Sweet? Savory? So, here's the best part: This waffle can go either way, depending on your mood. Top it with peppery fried eggs + hot sauce, like Stephen did. Or some Earth Balance + maple syrup like I did. Both were absolutely appropriate and fantastic at the same time.

I love when recipes turn out to be so customizable!

Don't have a waffle maker? No problem. This recipe would work well for pancakes, too. You can get an adequate waffle machine for under $20, scratch that, under $10. It may not be fancy, but it does the job!

MORE WAFFLE GOODNESS

Homemade Applesauce Freezer Waffles
Green Egg-Topped Waffles
Gluten-Free Waffles
Peanut Butter + Banana Waffles

Like what you just read? Browse more of our posts + recipes on Pinterest. You can subscribe to the feed of these posts or follow us on Twitter or Facebook to be the first to know what the (never home)makers are up to. And we’ll love you forever!

Read more...

Rustic + Grilled Kalamata Tomato Sauce

>> Thursday, July 11, 2013

So, I've got my pesto pizza crust ready to go. But no sauce or tomato puree in sight. 
Oh, crap! No mozzarella either. 
A half container of ricotta left, but it'll go South starting tomorrow. 
Must use tonight. Hmm. 
Wait. What's this? I spy a sleeve of kalamata tomatoes! 
Looks like the basil plant is doing well from all the rain we've had lately, too.

Drip, drip.


Basically, you've all just taken a trip inside my head around dinnertime. I've been wanting to fire up the grill and take our pizza adventures to the great outdoors, but it seems like afternoon thunderstorms are always in my way. This weekend. It's going to be epic -- the grilled bruschetta pizza I'll make. Promise!

But in a pinch, using what we had on hand last Thursday allowed us to go beyond our usual roasted veggies and cheese-heavy pie.

BOOM!


RUSTIC (INDOOR) GRILLED TOMATO SAUCE 
goes great atop pesto pizza crust or on any other pizza recipe

What you'll need . . .

  • 6 to 8 kalamata tomatoes (you may use whatever tomatoes you have, though! the heartier, the better.)
  • 2 tablespoons olive oil
  • Salt + pepper
  • Pinch red pepper flakes
  • 1 teaspoon each dried oregano + rosemary


Method . . . 

  1. Chop your tomatoes head to toe into thick slices (about four per tomato). Toss into a large bowl with the olive oil and other ingredients. Toss around until well coated.
  2. Preheat your grilling pan* for about 5 minutes on medium-high heat. Then plan your tomatoes atop the grill and cook for 5 minutes.
  3. Flip and cook another 5 minutes. Flip again and continue until the tomatoes start to get grill marks and release their juices.
  4. Once they get goopy, start mixing the sauce around in the pan and take off the heat. Let cool and remove from pan and continue mashing until desire consistency (we left our tomatoes rather whole).
* A grilling pan isn't required to make this recipe, it will just give those nice blackened grill marks. You can also use a regular fry pan with similar results.


The sauce truly was the star -- majorly chunky + rustic -- and the dollops of ricotta were light. Almost sweet, lending perfectly well to the freshly picked basil I grabbed right before the afternoon's second deluge of rainfall.

To cook your pizza, just preheat your oven to 450 degrees F, preferably with a pizza stone preheating as well. Roll out your pizza dough and then cook it for about 4 minutes before taking out of the oven and flipping over. Put on your toppings -- including the basil and perhaps a shake or two of Parmesan -- and bake for about 15 more minutes. Until cheese is lightly browned and bubbly.

I gladly tackled this half myself.


Enjoy!

Like what you just read? Browse more of our posts + recipes on Pinterest. You can subscribe to the feed of these posts or follow us on Twitter or Facebook to be the first to know what the (never home)makers are up to. And we’ll love you forever!

Read more...

Coconut Jasmati® Rice: Review + Giveaway

>> Monday, April 15, 2013


Rice. I love rice. It's something I always want on the side but rarely make ahead of time. Of course I know there are (simple) ways around this, like cooking in bulk for the week, however -- to me, rice doesn't taste as good unless I make it on the spot.

So, when I was given the opportunity to try out RiceSelect™'s Jasmati rice, I had no excuses.


Jasmati is a "long grain American grown jasmine rice”. It has almost exactly the same sweet, enticing aroma and subtle nutty flavor of exotic Thai jasmine rice. The grains are "snowy white, soft and tender" -- perfect to accompany any stir-fry or even as a centerpiece to a meal of its own.

You can read more about this tasty grain on the RiceSelect website.

Here's what I made with it:


COCONUT-LIME JASMATI RICE
* would work with whatever is your favorite rice, too

What you'll need . . .
  • 1 cup RiceSelect Jasmati rice
  • 1 can (15 ounce) full fat coconut milk 
  • 1/4 cup water
  • 1/3 to 1/2 cup reduced fat coconut flakes (regular works, too -- this is all I had in the pantry)
  • 1 tablespoon dried basil
  • 1 to 2 tablespoons fresh lime juice, to taste
  • salt, to taste

Method . . . 
  1. Place the rice, coconut milk and water in a pot and bring to a boil (or, as Stephen always says, a "Susan Boyle").
  2. Reduce heat to a simmer and cover. Cook for 20. Let sit off the heat -- still covered -- for another 5 to 10 minutes.
  3. Fluff + then add in the other ingredients and mix until well incorporated.

I also added peas for some extra flair. About a cup -- and Ada absolutely loved this as part of her lunch the next day. Gobbled it right up!

Now, I'm not a rice expert, but I feel like a lot of the kinds we have around the house take at least 40 minutes to cook (brown rice, maybe? am I just doing it wrong?). I like that this cooks in about half the time and has so much flavor. It will really liven up our meals.

Have you tried Jasmati? How would you incorporate it into your dinnertime routine? Share your answer in the comments below and you could win a $100 Visa gift card.


\ \ \ / / / Sweepstakes Rules: No duplicate comments \ \ \ / / /


You may receive (2) total entries by selecting from the following entry methods:

a. Leave a comment in response to the sweepstakes prompt on this post
b: Tweet (public message) about this promotion; including exactly the following unique term in your tweet message: "#SweepstakesEntry"; and leave the URL to that tweet in a comment on this post
c: Blog about this promotion, including a disclosure that you are receiving a sweepstakes entry in exchange for writing the blog post, and leave the URL to that post in a comment on this post
d: For those with no Twitter or blog, read the official rules to learn about an alternate form of entry.

This giveaway is open to US Residents age 18 or older. Winners will be selected via random draw, and will be notified by e-mail. You have 72 hours to get back to me, otherwise a new winner will be selected.

The Official Rules are available here.

This sweepstakes runs from 4/15/2013-5/15/2013

Be sure to visit the sponsor's brand page on BlogHer.com where you can read other bloggers reviews and find more chances to win!


Read more...

Some Recipes and Other Stuff

>> Wednesday, September 5, 2012


I mentioned it on Twitter this weekend, but I finally had the opportunity to add a large group of recipes to the Recipe Page. I believe there were over 100 added in all. I still need to update the individual recipe pages per category, but if you go to the main page, they should be mostly there.

Tonight for dinner we had roasted Brussels sprouts, BBQ tofu, and skillet cornbread. A delicious, simple meal we managed to make while giving Ada dinner and then a bath.


To roast the sprouts, preheat oven to 400, pour sprouts onto rimmed baking sheet, toss in olive oil + salt + pepper. Bake in 15-minute intervals, stirring between each, until well browned. Likely 45 minutes.

This BBQ sauce is Stephen's baby. He's been perfecting the recipe for a couple weeks. Tonight, he got it JUST right. Once you make it up, you can use it for dipping.

We fried tofu and then cooked it in the sauce a bit until it thickened.


BBQ SAUCE

Combine the following . . .

  • 1 clove garlic, sliced sauted in 1 teaspoon olive oil 
  • 2 teaspoons brown sugar 
  • 1 tablespoon vinegar 
  • 1/4 teaspoon cayenne pepper 
  • 1 tablespoon chipotle seasoning 
  • Black pepper and salt to taste
  • 1 tablespoon yellow mustard 
  • 1/2 cup ketchup 
  • 1/2 cup pale ale

The cornbread is a variation on our original Olive Oil Skillet Cornbread. I wanted it to have a more unique flavor. And I wanted it to be fluffier.

Check and check!


PEPPERED SKILLET CORNBREAD

You'll need . . . 

  • 1/4 cup maple syrup
  • 1/4 cup olive oil
  • 1 tablespoon flax meal + 4 tablespoons water
  • 1 cup bread flour
  • 1 cup cornmeal
  • 1/2 cup whole wheat flour
  • Pinch salt
  • 1-1/2 teaspoon baking powder
  • 1 to 2 teaspoons black pepper
  • 1/2 teaspoon thyme
  • 1 cup beer of choice (or sparkling water)
To bake it up, preheat the oven to 400 degrees F. Spritz a cast iron skillet with some olive oil, let preheat in the oven. In a large bowl, mix together the wet ingredients except the beer or water. Then add in the dry. Then add in the beer or water. Mix until just combined.

Bake for 20 to 22 minutes. Until the middle is set and a toothpick comes out clean. Let cool before slicing.


Can anyone give me tips on keeping basil better longer? I feel like none of our tricks are working. If we put it in the fridge, it gets icky. If we put it in a bit of water, this happens. I need help!

And last, here are some dreamy cat photos. I'm tired, when I initially typed that out, I wrote "here are some KAT photos."


Also. If you're interested . . .


Today on Writing Chapter Three we've written up a list of our favorite board books, including classic literature favorites adapted for little ones. Like Romeo & Juliet, Jane Eyre, Alice in Wonderland, and more!

Like what you just read? You can subscribe to the feed of these posts or follow us on Twitter or Facebook to be the first to know what the (never home)makers are up to. And we’ll love you forever!

Read more...

Tomato-Basil Marmalade

>> Wednesday, August 22, 2012


We picked up literally two baskets full of tomatoes at the farmers market this past weekend. With one, I made another batch of Slow-Roasted Tomatoes. With the other, I wanted to do something different.

So, I did.


I feel like there's a lot of (self-imposed) pressure to constantly create new recipes. Reality is, nothing exists in a vacuum. I continually seek out other blogger, chef, family member, etc. eats. It's how I learn about new methods. It's how I learn about new foods, flavor combinations, and on and on.

And cooking all our CSA produce is certainly a workout.
I can use all the help and inspiration I can get!

This recipe, which I found on Serious Eats, is quite simple. Interestingly enough, it was posted exactly two years ago today! (For those of you curious about how marmalade differs from jam/jelly, check out this post.)


How we made it ours:

  • omitted the fennel 
  • omitted the leek, put more onion in its place 
  • used olive oil versus canola oil 
  • used white vinegar versus red wine vinegar
Oh, yeah. I got a little desperate to bounce some light for these photos. Out of paper-towels (so I couldn't do this photography trick) I used Ada's tambourine.


What else do you see?


They're bits of squash from a gigantic roast. I told Stephen it wasn't absolutely necessary to skin them first. But he did anyway.

Anyway, this marmalade is delicious. Sweet. Tangy. Savory. And it lasts for up to one month once refrigerated (the recipe author notes that you should discard the basil leaves before consuming -- they get funky).


I'll announce the winner of the mothering Mother bags tomorrow. Today on Writing Chapter Three, we're sharing our favorite baby & toddler fashion trends . . . and how to get the look on the cheap.

Like what you just read? You can subscribe to the feed of these posts or follow us on Twitter or Facebook to be the first to know what the (never home)makers are up to. And we’ll love you forever!

Read more...

Spicy Basil Stir-Fry

>> Tuesday, July 24, 2012


We got another load of basil in this week's CSA basket. Last week, we made a nice batch of Vegan Walnut Basil Pesto. This week, I wanted to do something different. One of Stephen's favorite Thai dishes is Spicy Basil with tofu.

Recreating this restaurant favorite was fun -- and perfect for what we had in the fridge. Don't be alarmed with all the ingredients you see listed. Many of them are just a dash of this and that required to make the sauce. If you don't have something, don't fret.


SPICY BASIL STIR-FRY WITH TOFU

What you'll need . . . for the stir-fry

  • 1 cake of tofu, extra firm -- drained well
  • 4 cups (loose) napa cabbage, sliced 
  • 1 white onion, sliced 
  • 3 cloves garlic, roughly chopped 
  • 1 large yellow squash, sliced thickly 
  • 1 cup red and green peppers, chopped 
  • Scant tablespoon chili oil 
  • Scant tablespoon olive oil 
  • 1 tablespoon low sodium soy sauce 
  • 1 teaspoon red pepper flakes 
. . . for the basil sauce

  • 1/2 cup fresh basil leaves, thinly sliced 
  • 2 to 3 tablespoons sesame oil
  • 2 tablespoons white vinegar 
  • 1 to 2 tablespoons maple syrup 
  • 1 tablespoon lemon juice 
  • 2 tablespoons low sodium soy sauce

Method . . . 

  1. Preheat your oven to 375 degrees F.
  2. When your tofu is well drained (here's how), cut into triangles or squares and then fry on all sides until golden. Set aside.
  3. Place all veggies on a rimmed baking sheet and top with the oils, soy sauce, and red pepper flakes. Roast for 15 minutes. Then stir. Repeat twice, until golden and caramelized.
  4. Heat a large, deep pan over medium-high heat on your stove-top. Heat all the basil sauce ingredients together -- EXCEPT the basil. Then toss in your veggies and tofu. Stir a few times, cooking maybe five minutes total.
  5. Then turn off the heat and sprinkle in the basil. Let sit for a few minutes until basil wilts.
  6. Serve immediately with brown rice.

Stephen always eats his stir-fries with chopsticks. Actually, he uses chopsticks for most any meal you can think of. I shovel mine in with a fork. (What do you do?) However you eat it, though. This is a dish you'll want to make over and over again.

A couple notes: If you don't have sesame oil, use another Asian-y flavored oil, like peanut, perhaps. If you don't have chili oil, use a teaspoon or so more red pepper flakes. No white vinegar? Apple cider vinegar will do the trick. Or maybe more lemon juice instead. And feel free to play around with which veggies you use.

Basically, this recipe isn't pretending to be authentic. At all. I tweaked it as we were making it to see what tasted most like what we've had out.


While we ate our dinner, Ada noshed on some pureed green beans and soft brown rice. She laughed as she ate it, too! PS: If you'd like to check out photos from our 4-day music festival camping adventure, I just posted 'em on Writing Chapter Three!

Like what you just read? You can subscribe to the feed of these posts or follow us on Twitter or Facebook to be the first to know what the (never home)makers are up to. And we’ll love you forever!.

Read more...
Related Posts Plugin for WordPress, Blogger...

About This Blog

MyFreeCopyright.com Registered & Protected

© 2009-2014 by the (never home)makers
All content on this blog is copyrighted.

Want to publish our pics, tips, or tricks?
Contact us! [neverhomemaker@gmail.com]

We value transparency. Links on this page may contain affiliates. In addition, please see our disclosure policy regarding sponsored posts.

  © Blogger template Simple n' Sweet by Ourblogtemplates.com 2009

Back to TOP  

Blogging tips