Showing posts with label dinner recipe. Show all posts

Baked Autumn Samosas

>> Wednesday, October 3, 2012


I ate Indian food at least twice a week when I was in college. I would pick it up on my way home from the bus stop at this amazing joint in the Commons (I think it's Sangam -- they have a location in Collegetown, too). I call it a "joint" because it was almost like fast food, just way better.

I always bought two samosas with my plate of to-go veggie curry and rice. I'd eat one right away and save the other for later. Potatoes, peas, fried dough, spices. So good. My favorite part of the meal.

This recipe is far from traditional and is baked, not fried. Still satisfies my nostalgic craving, though. I know I'll be making these again soon!


BAKED AUTUMN SAMOSAS

Filling

  • 2 to 3 cups butternut squash 
  • 1 head cauliflower 
  • 1 white onion 
  • 3 large cloves garlic 
  • Olive oil 
  • Salt 
  • Pepper 
  • Curry powder 
  • Smoked paprika 
Crust

  • 1 cup whole wheat flour
  • 1 cup unbleached bread flour
  • Pinch salt
  • 1/2 cup Earth Balance (cold)
  • 1/4 cup olive oil
  • Water (cold)


Method for veggies . . .

  1. Preheat your oven to 375 degrees F. Get a rimmed baking sheet ready.
  2. Chop all veggies coarsely -- into approx. 1-inch cubes. Then place them on your rimmed sheet.
  3. Drizzle with olive oil (a few tablespoons) and then sprinkle with your salt, pepper, and spices. Use as little or as much as you like. I kept ours relatively tame since I wanted to give Ada some of the filling for dinner.
  4. Roast in oven for an hour, stirring every 20 minutes. Then refrigerate until you're ready to make your samosas. If that's right away -- proceed to making the crust.

Method for crust . . . 

  1. In a food processor, combine the flours and salt. Pulse.
  2. Then add in the butter in chunks and the olive oil. Pulse until the mixture resembles coarse meal.
  3. Add water 1 tablespoon at a time -- pulsing again -- until the dough starts to form together.
  4. Then roll into a ball and store in the fridge until you're ready to bake.


Putting it all together . . . 

  1. Preheat your oven to 400 degrees F. Lightly spritz a baking sheet with olive oil. Set aside.
  2. Basically, you roll out the dough between two pieces of wax paper, cut it into a circle using a pot top, cut that in half, fold, fill, and press shut. See this video tutorial for details (as well as for a gluten-free and more traditional samosas recipe). It's exactly how I did it.
  3. Then arrange samosas on baking sheet and prick each with the tines of a fork.
  4. Bake for 15 to 20 minutes. Until the crust is golden.
  5. Let cool and serve with your favorite barbeque sauce.


These photos of the finished samosas aren't really my best, but you might be interested to know I shot them in total, complete darkness. Yeah. We're at that time of year when dinner is eaten long after the sun goes down.

I used my DIY light box to photograph in the past. But now I'm using my bounce flash. Stephen bought it for me for Christmas two years ago, and I'm only now getting around to using it. Not too shabby at all.

Today on Writing Chapter Three, I wrote about the magic hour when Stephen gets home from work. I feel like Ada merely tolerates me all day until she can see daddy again.

Like what you just read? You can subscribe to the feed of these posts or follow us on Twitter or Facebook to be the first to know what the (never home)makers are up to. And we’ll love you forever!

Read more...

Spicy Basil Stir-Fry

>> Tuesday, July 24, 2012


We got another load of basil in this week's CSA basket. Last week, we made a nice batch of Vegan Walnut Basil Pesto. This week, I wanted to do something different. One of Stephen's favorite Thai dishes is Spicy Basil with tofu.

Recreating this restaurant favorite was fun -- and perfect for what we had in the fridge. Don't be alarmed with all the ingredients you see listed. Many of them are just a dash of this and that required to make the sauce. If you don't have something, don't fret.


SPICY BASIL STIR-FRY WITH TOFU

What you'll need . . . for the stir-fry

  • 1 cake of tofu, extra firm -- drained well
  • 4 cups (loose) napa cabbage, sliced 
  • 1 white onion, sliced 
  • 3 cloves garlic, roughly chopped 
  • 1 large yellow squash, sliced thickly 
  • 1 cup red and green peppers, chopped 
  • Scant tablespoon chili oil 
  • Scant tablespoon olive oil 
  • 1 tablespoon low sodium soy sauce 
  • 1 teaspoon red pepper flakes 
. . . for the basil sauce

  • 1/2 cup fresh basil leaves, thinly sliced 
  • 2 to 3 tablespoons sesame oil
  • 2 tablespoons white vinegar 
  • 1 to 2 tablespoons maple syrup 
  • 1 tablespoon lemon juice 
  • 2 tablespoons low sodium soy sauce

Method . . . 

  1. Preheat your oven to 375 degrees F.
  2. When your tofu is well drained (here's how), cut into triangles or squares and then fry on all sides until golden. Set aside.
  3. Place all veggies on a rimmed baking sheet and top with the oils, soy sauce, and red pepper flakes. Roast for 15 minutes. Then stir. Repeat twice, until golden and caramelized.
  4. Heat a large, deep pan over medium-high heat on your stove-top. Heat all the basil sauce ingredients together -- EXCEPT the basil. Then toss in your veggies and tofu. Stir a few times, cooking maybe five minutes total.
  5. Then turn off the heat and sprinkle in the basil. Let sit for a few minutes until basil wilts.
  6. Serve immediately with brown rice.

Stephen always eats his stir-fries with chopsticks. Actually, he uses chopsticks for most any meal you can think of. I shovel mine in with a fork. (What do you do?) However you eat it, though. This is a dish you'll want to make over and over again.

A couple notes: If you don't have sesame oil, use another Asian-y flavored oil, like peanut, perhaps. If you don't have chili oil, use a teaspoon or so more red pepper flakes. No white vinegar? Apple cider vinegar will do the trick. Or maybe more lemon juice instead. And feel free to play around with which veggies you use.

Basically, this recipe isn't pretending to be authentic. At all. I tweaked it as we were making it to see what tasted most like what we've had out.


While we ate our dinner, Ada noshed on some pureed green beans and soft brown rice. She laughed as she ate it, too! PS: If you'd like to check out photos from our 4-day music festival camping adventure, I just posted 'em on Writing Chapter Three!

Like what you just read? You can subscribe to the feed of these posts or follow us on Twitter or Facebook to be the first to know what the (never home)makers are up to. And we’ll love you forever!.

Read more...

CSA Sandwich Greens

>> Tuesday, June 12, 2012


This weekend we picked up the first installment of our CSA farm share for the season. We've been looking forward to it for so long, we almost missed the pickup! It's 12:45 Saturday afternoon. Ada had just gone down for a nap. We tend to completely unplug on weekends, but Stephen had to check his email.

Thank goodness he did -- there was a reminder from the farm to bring baskets to fill full of their fresh produce. (Sort of like: Oh, YEAH. That's right! THE CSA! And the farmers' market closes at 1 . . .)


Obviously the crisis was averted. Stephen booked it to the market and got our stuff as they were closing.

Here's what's inside this week's basket:


So many fresh, organic greens. We had to put them to use ASAP. I think you may have noticed that we like to eat big sandwiches on weekends. Actually, it's sort of a dream of ours to own a sandwich shop. Not one that I think we'll ever indulge. But we enjoy coming up with new creations and combining new flavors. The eating part is the best.

This is by far one of the best ones we've ever made.


Mozzarella cheese marinated in balsamic vinegar.
Just cut a few thick slices, drizzle the vinegar, and coat. Let sit in the fridge for an hour.


Homemade seitan, thinly sliced and pan-cooked to brown with horseradish-mayo.
Well, we splurged on some Vegenaise. It's one of our shared food quirks. We don't like real mayo. 3 tablespoons mayo to 1 tablespoon horseradish. Or to taste.


Avocado slices and a thick layer of CSA greens.
I drizzled the leftover balsamic on this layer. Delicious.


All of this in between two substantial (and toasted) slices of rosemary salt bread from Wegmans.
We made our own loaves once, but didn't think ahead of time for this sandwich.


As Stephen put it, it was the "perfect combination of hot/cold, crispy/crunchy, and buttery/creamy" that he's ever had. Seriously. He would not shut up about this sandwich. We made it again with the leftover bread the next day. We didn't have seitan left, so we each replaced it with a fried egg.

Overall, a great start to our relationship with the CSA. I wonder what next week's haul will be! If you have any great sandwich combinations you'd like to share with us -- please do. We're always looking for something new to try!

OTHER SANDWICH FAVORITES:

Vegetarian Juicy Lucy
Open-Faced Asparagus & Tofu Sandwich
Vegetarian Reuben
Veggie Behemoth: The LOVER

And today on Writing Chapter Three, I answer some more personal questions about my new job as a Stay At Home Mom (SAHM). And I invite you all to ask anything you're curious about as well!

Like what you just read? You can subscribe to the feed of these posts or follow us on Twitter or Facebook to be the first to know what the (never home)makers are up to. And we’ll love you forever!

Read more...

Potato Rolls

>> Thursday, June 7, 2012

As I mentioned yesterday, this is supposed to be the post about 10 things that have changed in my 10 years of running. I'm almost done with that one. Tomorrow, for sure. Tonight? Potato rolls.


But first: You should see my desktop. Having a baby isn't my excuse for for everything. Especially not my shoddy filing system. I do regular photo dumps onto my desktop, yes -- always my desktop, and have absolutely no organization system in place.

Look! It's embarrassing. (Equally embarrassing: That is a photo of Win Butler as my computer background. Not Ada or Stephen. Win Butler.)


I name my folders random things that pop into my head because I usually dump photos of all different topics into one folder (Ada, dinners, outdoor shots, house things, family, etc.). A folder with images of all sorts might get a title of something inane like: "Boogie" simply because Stephen may have said it to Ada while I was transferring.

You know. Making it nearly impossible to find stuff when I need to. Ada isn't my excuse, but I'd say that things got 10,000 times worse when she got here. I think I take a million photos of her each month.

Anyway, it's clear I need to get better at organization as it relates to the blog. A couple weeks ago I promised I'd be posting some recipes (I mentioned them in passing in photos) and I never got around to it. Here's just one of them!


MASHED POTATO ROLLS

What you'll need . . .
  • 1-1/2 to 2 cups mashed potatoes (see notes below***)
  • 1 tablespoon maple syrup
  • 2-1/4 teaspoons active dry yeast
  • 1 cup warm water
  • 2 cups whole wheat flour
  • 2 cups bread flour, plus more for kneading
  • 2 tablespoons olive oil
  • 1 teaspoon salt (if you don't have any in your mashed potatoes -- otherwise, omit)
  • 1 tablespoon flax meal mixed with 3 tablespoons hot water
***NOTE: If you already have mashed potatoes (or other puree, like pumpkin) on hand, you can use it. Otherwise make mashed potatoes for this recipe. I actually peeled and cubed mine, then put them in a large, shallow baking dish, poured a 12-ounce beer over top of them, salt, pepper, and olive oil, too. And let roast until soft. Then mashed. Delish.


Method . . .
  1. Combine the 1 cup of warm water with the yeast and let sit for five minutes. Until frothy. 
  2. Pour your flour and salt into the bowl of a stand mixer fitted with a dough hook. (You can do it by hand, too -- but I've been lazy lately.) Then pour in your yeast mixture, maple syrup, mashed potatoes, olive oil, and flax mixture. Mix well -- adding more flour or mashed potatoes as necessary.
  3. Then turn out onto a lightly floured work surface and knead until smooth and elastic. 
  4. Spritz some olive oil in your original mixing bowl, return the dough ball to it, and cover with a damp towel or plastic wrap. Let rise for 1 hour. 
  5. Preheat oven to 350 degrees F. Spritz a baking sheet with olive oil and set aside. 
  6. Atop a lightly floured surface, divide the dough into 12 to 16 large portions, depending on how large you want your rolls. Alternatively, you may freeze some of the dough for use at a later time. 
  7. Take each piece of dough and shape it into a round, tucking under the excess to make the roll appear more roll-like (I can't think of a better way to describe it. Look at the first photo of this post!)
  8. Then bake for 20 to 25 minutes, rotating baking sheet halfway through. 
  9. Rolls are done when they are lightly browned. You can also cut into one to see if it's still too moist/dense. 
  10. Let cool before slicing/serving.
You can eat these rolls on their own. But we used ours for tofu burgers. Sort of the same setup as when we made this Open-Faced Asparagus-Tofu Sandwich. Just burger-ized and slapped together with some Vegenaise (a big splurge for us), basil, ketchup, and mustard.


SITE UPDATES: The banner is back by popular demand. The sliding features option is gone. The "read more" is gone for good. And I think we're getting better. I do have goals to make a new banner this summer to reflect more current times. But I can't do everything at once as much as I'd like to.

PS: Today on Writing Chapter Three I share my first real victory as a new mom. And it wasn't facilitated by anything I read in books, blogs, or other websites. Nor was it advice from friends or family. Score one for the home team!

Like what you just read? You can subscribe to the feed of these posts or follow us on Twitter or Facebook to be the first to know what the (never home)makers are up to. And we’ll love you forever!

Read more...

Peppery Polenta Bites

>> Wednesday, April 25, 2012

Thing about that ratatouille recipe is that it doesn't fill us up on its own. That's why I made up these peppery polenta bites to accompany dinner. They were definitely an afterthought. We hadn't made polenta in a while, so I mixed up a batch because I thought it'd go well with all the veggies. Then Ada got fussy/tired/cranky right when I was about to pour it into a large baking dish and chill in the fridge. Her impending nap meant I had some more time to put it into our mini-muffin tin.

(My life is exciting, right?)


Anyway, if you haven't made polenta before, it's quite easy. 

PEPPERY POLENTA BITES

What you'll need . . .
  • 4 cups water 
  • 1 cup yellow cornmeal 
  • Pinch of salt 
  • 1 tablespoon olive oil 

 Method . . . 
  1. Just add the salt to the water and bring to a boil.
  2. Turn heat down to a simmer and whisk in the cornmeal 1/4 cup at a time. Stir vigorously to prevent lumps and bumps. 
  3. Add in the olive oil and keep stirring for around 5 minutes.
  4. Then pour into a baking dish -- in this case, a mini muffin tin -- and chill in the refrigerator for a couple hours.

All you need to do to make them crispy and peppery is to preheat your oven to 400 degrees F. Spritz a baking sheet with olive oil. Then place your chilled polenta bites on the sheet. Spritz each with a bit of olive oil and then generously top with pepper. Bake for 30 to 40 minutes -- until crisp. Serve with dipping sauce of your choice. Or ratatouille goes great with them, too!

In other news, I finally bought a new pair of running shoes last night. For the first time in a year, in fact -- and I desperately needed them. I don't pay attention anymore to the specific mileage guidelines for when to get rid of shoes. Instead, I take each run as it comes and evaluate how my legs feel afterward.

These shoes felt dead these past couple weeks.


I tried on many different shoes, as a few of you wrote me to say the Nike Run + 2 and + 3 didn't feel the same as the type I'm used to. Stephen had me try on the Brooks Pure Connect (my heel felt so wobbly and lower than my toes -- didn't like it at ALL!), Saucony's Kinvara (eh...), and a few other more minimal types.

I tried on the Run + 2s and HATED them. Something about the decorative side plastic-y things didn't feel right on my feet. But when I slipped my foot into the +3s, I fell in love. Too bad the store only had the most obnoxious, neon color known to man. I edited to to mute it out. If you have sunglasses handy, here's the true color.


OK. Secretly -- and I guess now NOT-SO secretly -- I enjoy having a really bright, loud shoe. Makes me feel like I'll seem faster than I actually am when I lace up at races. I completed my first run in them yesterday (a blustery 5.5-miler) and they were glowing. But so was I. I get so anxious switching models of my favorite shoes. I've had bad experiences in the past, but I think I'm in the clear with this one. (PS: Thanks to the ladies who wrote me to help with making up my mind!)

Oh, yeah! And with several coupons and store credits (from using the store's loyalty card), I didn't spend the $100 retail price. Closer to $60. Nice.

Today on Writing Chapter Three I wrote a longer-than-it-needed-to-be post about our toy storage and cleaning situation. I'd love for fellow parents to let me know what they do to wrangle all their loot. My entire house looks like this one corner does right now.

Like what you just read? You can subscribe to the feed of these posts or follow us on Twitter or Facebook to be the first to know what the (never home)makers are up to. And we’ll love you forever!

Read more...

Roasted Sweet Potato Stew

>> Friday, January 13, 2012

You're in luck. Today, you get TWO recipes all for reading ONE post. These days, I don't often get time to roast veggies. Taking the time was totally worth it in this case. The oven temperature made our kitchen warm and cozy. The time those sweet potatoes, onions, and peppers spent in the oven gave them tons of flavor.

This hearty winter stew lasted two nights in our household. That's a lot of delicious dinner.


ROASTED SWEET POTATO STEW

What you'll need . . .
  • 2 medium sweet potatoes, peeled and chopped into 1 inch cubes
  • 1 green/yellow/orange/OR red pepper, chopped (I used a frozen bag mix of all -- about 1/2 cup)
  • 1/2 large white onion, sliced
  • 3 large cloves of garlic, minced
  • 3 tablespoons olive oil
  • 1 teaspoon coarse Kosher salt
  • 1/2 teaspoon ground black pepper
  • 1 teaspoon Fenugreek
  • 1 can (15 ounces) Canelli beans, drained and rinsed
  • 1 can (15 ounces) low sodium veggie broth
  • 1 large can (32 ounces) whole tomatoes, drained and rinsed
  • 1 tablespoon cilantro (I only had dried on hand, I would have preferred fresh)

Method . . .
  1. Preheat your oven to 450 degrees F. Line a large cookie sheet with aluminum foil. Set aside.
  2. In a large bowl, pour in your olive oil, salt, pepper, and Fenugreek.
  3. Once you have your sweet potatoes and peppers chopped, your onions sliced, and your garlic minced, toss all these ingredients into the bowl with the oil mixture. Toss to coat well.
  4. Pour veggies onto your prepared baking sheet. Put in your preheated oven for about 10 minutes. Then take out, stir around a bit, and return to the oven for another 15 to 20 minutes. Until well roasted.
  5. In a food processor or blender, blend together the tomatoes, vegetable broth, and cilantro. Make sure to drain and rinse the tomatoes first. If you use the juice, the dish will be too tomato-y.
  6. Place the broth in a large, oven-safe stock pot. When the veggies are done roasting, turn off the oven heat. Mix them -- AND the Canelli beans -- into the broth and place in the oven for 15 minutes. (This allows the flavors to mix without making the roasted stuff bloated and soggy.)
  7. Serve with buttermilk biscuits (recipe below).

VEGAN BUTTERMILK BISCUITS

What you'll need . . .
  • 1/2 cup whole wheat flour
  • 1/2 cup bread flour
  • 1 teaspoon baking powder
  • 1/2 teaspoon baking soda
  • 1 teaspoon honey or maple syrup
  • 1/2 teaspoon salt
  • 1/4 cup Earth Balance
  • 1 tablespoon golden flax meal
  • 1/2 cup almond milk
Method . . .
  1. Preheat your oven to 450 degrees F. Line a cookie sheet with parchment and set aside. (I made the stew and biscuits at different times of the day -- but you could easily make these first and have the oven all preheated for the stew!).
  2. Toss all your ingredients -- EXCEPT the almond milk -- into a food processor. Pulse until well incorporated and mealy.
  3. Pour into a medium bowl and then add the almond milk. Fold with a spatula a few times. Don't over-mix. Just fold until everything is moistened.
  4. Scoop 1/4 cup amounts of the mix onto your baking sheet. Should make 6 biscuits.
  5. Bake for 10 to 12 minutes. Then let cool before serving.

Read all about Ada's 8th week of life today on (never home)maker, baby! We're amazed at how she's grown in just two short months. Very much looking forward to her well baby checkup next week!

Like what you just read? You can subscribe to the feed of these posts or follow us on Twitter or Facebook to be the first to know what the (never home)makers are up to. And we’ll love you forever!

Read more...

Veggie Pizza and Sacrifices

>> Wednesday, December 7, 2011

I knew having a child would mean sacrifice in many areas of my life. I quit drinking beer and enjoying my champagne-baking Sunday afternoons for nine months (and beyond). Now, I'm heading to bed around 8:30 PM and waking several times a night to screaming and crying. Going to the mall has become an ordeal involving an hour of preparation and then maybe two hours out -- tops. I'm scarfing down my meals -- in thirty seconds flat -- in order to give my baby the food she needs.

And worst of all -- I've had to cut out dairy because it isn't agreeing with her delicate digestive system. Sigh . . .

Whenever I've had to cut something out of my diet (or life, in general), I feel like it's all I can focus on. All. I. Want. Is. CHEESE. You all know we frequently eat pizza or garlic knots for dinner. I'm unwilling to give that up.

What to do?


(Another sacrifice is of my time snapping food photos. As in -- this photo and the one below are embarrassingly bad and I refuse to apologize. The pizza? Ridiculously good. Use your imagination, please.)

VEGGIE PIZZA SANS CHEESE

The toppings below are mere suggestions. The point is: Get wild with it. If you can't have cheese or simply choose not to, top pizza with as much tastiness as possible.

For us, this has meant piling on the following . . .
  • Sweet potato fries
  • Avocado
  • Mushrooms
  • Corn kernels
  • Leeks
  • Sliced tomato
  • Wheat germ

When the cheese is missing, the bread is the key. Stephen has yet again tweaked his favorite crust recipe!

CARROT-INFUSED PIZZA DOUGH
  • 1 cup warm water
  • 1-1/2 teaspoons active dry yeast
  • 1 cup carrot puree
  • 2-1/2 cups whole wheat flour
  • 1 cup bread flour
  • pinch of salt
Method . . .
  1. Combine warm water and yeast. Let sit until frothy -- five minutes.
  2. Stir in carrot puree (just steam carrots and process until smooth). Or another type of vegetable puree would work fine.
  3. In another bowl, whisk together the flours and salt. Make a divot in the flour and pour in the wet ingredients.
  4. Mix well and knead. Dough will be moist and slightly sticky.
  5. Place dough in well oiled bowl. Let rise for 2 hours in a warm spot.
Note from Stephen: Each recipe yields two large pizzas. Second-day crust is always better (crispier). Dough works equally well as a garlic knot base.

To put it all together, just preheat your oven to 430 degrees F. If you have a pizza stone, use it. If not, a regular cookie sheet works fine. Flatten and work your dough into a round. Pre-bake for 5 minutes. Then flip over and pile on the toppings. Return to oven for 12 to 14 minutes -- until golden brown. If you've decided to add sweet potato fries, you'll want to bake those ahead of time and add them in the last couple minutes of baking.

Enjoy! And if you can eat real pizza -- please scarf down a piece for me. (Though, this veggie-crazy version is quickly becoming a new favorite.) If you'd like to read about more sacrifices we've made so far as parents, check out our current sleep situation on (never home)maker, baby!

Like what you just read? You can subscribe to the feed of these posts or follow us on Twitter or Facebook to be the first to know what the (never home)makers are up to. And we’ll love you forever!

Read more...

A New Autumn Stew

>> Sunday, November 13, 2011

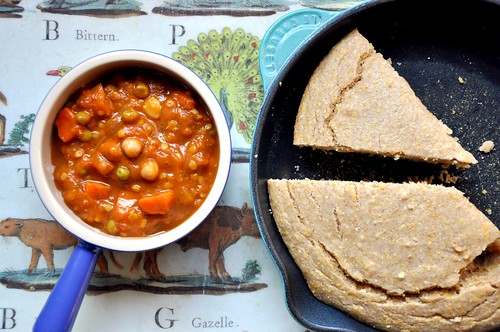
I couldn't wait till tomorrow to share this amazing autumn stew recipe. Probably because we're making it again today -- it's just that good. Now, I'm sure this mix may make some recall our Smoked Pumpkin Chili recipe . . . but I assure you, its flavor is entirely unique.

Oh, and this particular recipe makes enough stew to serve two hungry people four hearty dinners. We froze two meals and ate two last week. If you missed 'em, we wrote up some handy freezing instructions in this post.


AUTUMN STEW -- 2011-Style

What you'll need . . .
  • 1 large white onion, chopped
  • 2 large carrots, peeled and chopped
  • 28-ounce (large) can whole, peeled tomatoes -- with juice
  • 29-ounce (large) can of pumpkin
  • 2 cans low-sodium vegetable broth
  • 1/2 cup red lentils
  • 1 can chickpeas
  • 1 cup frozen green peas
  • 1 cup autumn spiced beer of your choice (or water)
  • 1 teaspoon ground coriander
  • 1 teaspoon ground cumin
  • 1/4 teaspoon ground thyme
  • 1 teaspoon chili powder
  • 1/4 teaspoon ground cloves
  • 1/4 teaspoon cayenne pepper
  • Salt and pepper to taste


Method . . .
  1. In a large stock pot, heat a tablespoon or so of olive oil over medium-high heat. Add onions and cook until glassy.
  2. Toss in the carrot, tomatoes (with juice), pumpkin, and vegetable broth. Bring to a boil.
  3. Then add in the lentils. Cook for a few minutes -- stirring often and mashing up the tomatoes a bit -- and lower heat just a bit. Add the peas, chickpeas, beer, and spices.
  4. Lower to a simmer and let cook for 30 minutes to an hour.
  5. Serve with Olive Oil Skillet Cornbread.

So, happy Sunday!

If you have a an hour or so, toss a pot of this autumn stew on the stove. You certainly won't regret it. I'm off to do weekend things -- though, our day is looking a lot more like this (than anything more exciting):


Poor teachers. Always working on the weekends! Thankfully, we have a date with Dexter tonight.

Pssst: Don't forget to enter our Little Old Lady Recipes cookbook GIVEAWAY. And if you're interested in all-things-pregnancy, we organized all 9 months of posts in one convenient spot on (never home)maker, baby!

Like what you just read? You can subscribe to the feed of these posts or follow us on Twitter or Facebook to be the first to know what the (never home)makers are up to. And we’ll love you forever!

Read more...

'Tis the Gift to be Simple

>> Wednesday, October 26, 2011

These days, we're favoring simple, fast meals over those that require more time and attention. One of our favorites? Burritos.


We just toss anything we have in them. It uses up our leftovers and makes use of long-forgotten cans of beans and veggies in the pantry. Add some cheese, avocado slices, and salsa (or not -- anything goes), and the meal is complete.

What's inside this one? It could be ANYthing!


OK. Here's a clue. We used the overflow on the side salad.


Pinto beans
Corn
Salsa
Cheddar cheese
Avocado slices
And we did hide some tofu in there, too!


How can you ensure you are always able to throw together this simple meal? Buy tortillas versus sliced bread for your lunches. We make peanut butter and jelly on these guys -- but they are so versatile! We slice and toast for dipping in hummus. We also make simple Breakfast Burritos with 'em.

Keep salsa and canned beans, etc. on hand as well.


The good news is that these ingredients keep well and are cheap. When you want to make the burritos, just gather your ingredients. Heat a pan over medium-high heat. Then get creative. Season as desired and cook until everything is warmed.

I know I don't need to tell you how to make a burrito. But sometimes it's fun to feature the simplest meals. I tend to get caught up (and happily so) in overwhelming recipes -- so it's refreshing when a meal comes together in less than 10 minutes.

Enjoy!


And if you're following our pregnancy running posts, today on (never home)maker, baby! I answer Kathleen's heart rate tracking question.

Like what you just read? You can subscribe to the feed of these posts or follow us on Twitter or Facebook to be the first to know what the (never home)makers are up to. And we’ll love you forever!!

Read more...

Summer Squash Pancakes

>> Thursday, September 22, 2011

Third trimester exhaustion is REAL, people. Granted, it's been a busy few days . . . but I can't seem to keep my eyes open this morning. Dinners have been fast and easy as a result -- more time for napping. Or not.

These summer squash pancakes are made with squash from our garden. They also come together in less than five minutes.


You need not use summer squash if you have another type on hand. Zucchini would work beautifully. Or you could even get exotic with it. Remember the opo squash we bought last year?


It was HUGE!


Anyway, I love making savory pancakes on nights when I just don't have time to whip up a more proper dinner. And it's easy to adapt your favorite breakfast/sweet recipe for this purpose. This one, for example, is a variation on our Wheat and Oats Pancakes.


SAVORY SUMMER SQUASH PANCAKES

What you'll need . . .
  • 2/3 cup wheat flour
  • 1/2 cup white flour (or you can use all wheat)
  • 1 teaspoon baking powder
  • 1 egg
  • 3/4 cup almond milk
  • 1 teaspoon (or more) black pepper
  • 1 cup shredded summer squash (rinsed and peeled first)

Method . . .
  1. Whisk together the flours and baking powder. Add in the egg and almond milk. Mix well.
  2. Fold in the summer squash shreds and black pepper.
  3. Heat a pan over medium-high heat. Grease a bit with some olive oil.
  4. Drop half cup to three-quarters cup amounts of batter on the pan. Cook on each side until browned.
  5. Top with cheddar cheese, sauteed onions, or savory jelly. Blame pregnancy, but I even added a little maple syrup!
  6. You'll also notice that we added some tomato slices -- also from the garden -- during the cooking process.
WHY NOT TRY . . .


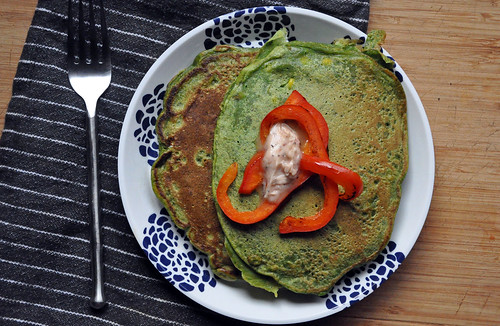
Leafy Green Pancakes


Corn Pancakes and Pan-Browned Brussels Sprouts

Like what you just read? You can subscribe to the feed of these posts or follow us on Twitter or Facebook to be the first to know what the (never home)makers are up to. And we’ll love you forever!

Read more...
Related Posts Plugin for WordPress, Blogger...

About This Blog

MyFreeCopyright.com Registered & Protected

© 2009-2014 by the (never home)makers
All content on this blog is copyrighted.

Want to publish our pics, tips, or tricks?
Contact us! [neverhomemaker@gmail.com]

We value transparency. Links on this page may contain affiliates. In addition, please see our disclosure policy regarding sponsored posts.

  © Blogger template Simple n' Sweet by Ourblogtemplates.com 2009

Back to TOP  

Blogging tips