Showing posts with label whole wheat flour. Show all posts

The Best Homemade Bagels

>> Monday, October 27, 2014

Bagels. They’re my favorite bread-y thing. I’ve been making my own bagels for years -- except the actual occasions when I take the time to make them are few and far between. Since I stopped buying sliced bread, I’ve been making more of an effort to continue that trend with other baked goods as well. And if you make them in bulk and freeze, this process is well worth the effort.

The recipe I follow for homemade bagels is always the same with a few exceptions, mostly with regard to add-ins and toppings. It’s modified from the bagel recipe you’ll find in the Martha Stewart Baking Handbook. I’m hoping to make a few batches of this recipe over the week to freeze (just slice before putting bagels into freezer bags!).


HOMEMADE BAGELS


Recipe originally posted a while back. Thought it was worth resurrecting.

What you'll need . . .
  • 3/4 teaspoon active dry yeast
  • 1-2/3 cups warm water
  • 3 tablespoons sugar
  • 3 tablespoons honey (see notes)
  • 3 cups unbleached all-purpose flour
  • 1-1/2 cups whole wheat flour
  • 1-1/2 tablespoons table salt
  • Poppy seeds, sesame seeds, coarse salt, etc. 
  • Vegetable oil (for bowl)
  • Plastic wrap
  • Parchment paper 
Mixing + prepping the dough . . .
  1. In a large bowl, whisk together the yeast and water, sugar and honey. Let stand fo 5 minutes. 
  2. Toss in the flours and salt. Knead for about 1 minute (until a slightly tacky -- but not sticky -- dough forms). You may need to add more flour or water depending on what you find. If so -- just add in 1 tablespoon amounts. Continue to knead dough by hand for about 5 more minutes -- then transfer to a lightly oiled bowl and cover with oiled plastic wrap.
  3. Let rise in a warm place for 2 hours (until doubled in bulk).
  4. Divide dough into 8-10 equal pieces. Cover with a damp kitchen towel. Let rest for a half hour.
  5. Line two unrimmed baking sheets with parchment paper and set aside.
  6. Roll each piece of dough into a 6-inch rope. Form a circle around your hand and then press the two ends (rather, roll them) together to seal. In short: Make a bagel shape and be sure to fuse the ends together.
  7. Place the bagels 2 inches apart on the prepared baking sheets. Cover with a piece of oiled plastic wrap (I used the same one from earlier in the process), and let rest while your oven preheats.
Boiling + baking the bagels . . .
  1. Preheat the oven to 500 degrees F (260 C) -- with racks in the upper and lower thirds.
  2. Fill a large stockpot with water and bring to a boil.
  3. Gently drop bagels into the water (as many as will comfortably fit without touching each other). After 30 seconds, use a slotted spoon to gently flip the bagels over -- simmer for yet another 30 seconds. (I boiled 3 at a time.)
  4. Then return the bagels to the parchment-lined sheets. Top them with the seeds or salt -- you must do this when the bagels are still wet so everything sticks to them. 
  5. When you've finished this process with all to-be bagels, immediately place sheets in the oven. Bake for 5 minutes and then rotate the sheets and reduce the temperature to 350 degrees F. Bake until golden brown, about 10 minutes.
  6. Then use a spatula and flip bagels over. Continue baking for another 5 minutes -- or until the back-sides are golden brown as well.
  7. Transfer bagels to wire rack to cool. 

// NOTES

  • Sometimes I used honey or maple syrup versus molasses.
  • Sometimes I use white sugar versus brown.
  • Sometimes I do all white bread flour or just all-purpose and WW, etc.
  • Sometimes I omit the flax meal entirely.
  • I’ll do plain toppings like just salt, poppy seeds, or sesame.
  • Whatever I toss in, the boiling + baking process is exactly the same.

// FREEZE

  • Let bagels cool completely. 
  • Slice in half. 
  • Cover each bagel with foil or plastic wrap.
  • Place inside a zip freezer bag. Freeze
  • Toast on low to defrost.
Like what you just read? You can subscribe to the feed of these posts or follow us on Twitter or Facebook to be the first to know what the (never home)makers are up to. And we’ll love you forever!

Read more...

Chocolate Chip Zucchini Bread // Vegan

>> Monday, April 14, 2014

Don't let the long ingredients list fool you. This slightly sweet bread comes together in a flash -- and it's mega-healthy. I mixed up + baked a loaf Saturday morning and we continued to enjoy this treat for breakfast today.

Tastes delicious toasted with a simple spread of Earth Balance on top. Pleases and toddler crowd. I think it'd also work well with shredded carrots. You guys know how much I love carrots, as evidenced by last week's explosion of recipes.

So, anyway. Zucchini. Get shredding!


CHOCOLATE CHIP ZUCCHINI BREAD
Vegan. Sweetened (lightly) naturally. Delicious.

What you'll need . . . 
  • 1/2 cup almond meal
  • 1/2 cup cornmeal
  • 3/4 cup whole wheat flour
  • 1/2 cup rolled oats (uncooked)
  • 2 teaspoons baking powder
  • 1 teaspoon cinnamon 
  • 2 tablespoons flaxmeal
  • 2 tablespoons chia seeds
  • pinch salt
  • 1/2 cup unsweetened almond milk
  • 1/4 cup pure maple syrup
  • 1/4 cup olive oil
  • 1/4 cup unsweetened applesauce
  • 1 tablespoons apple cider vinegar
  • 1 teaspoon vanilla extract
  • 1-1/2 cups grated zucchini
  • 1/2 cup semi-sweet chocolate chips
Method . . . 

  1. Preheat your oven to 350 degrees F. Lightly grease a standard loaf pan and set aside.
  2. In a large bowl, whisk together the almond meal, cornmeal, flour, oats, baking powder, cinnamon, flax meal, chia seeds, and salt. Set aside.
  3. In a small bowl, whisk together the almond milk, maple syrup, olive oil, applesauce, ACV, and vanilla extract.
  4. Add wet ingredients to the dry and mix until just combined. Then fold in the zucchini and semi-sweet chocolate chips.
  5. Pour batter into prepared loaf pan and flatten with spatula until top is even.
  6. Bake for 50-60 minutes, until center is set and edges are golden brown. 
  7. Let cool for 10-20 or so minutes before removing from pan and slicing.

Off to paint over our chalkboard wall. Grr.

Like what you just read? Browse more of our posts + recipes on Pinterest. You can subscribe to the feed of these posts or follow us on Twitter or Facebook to be the first to know what the (never home)makers are up to. And we’ll love you forever!

Read more...

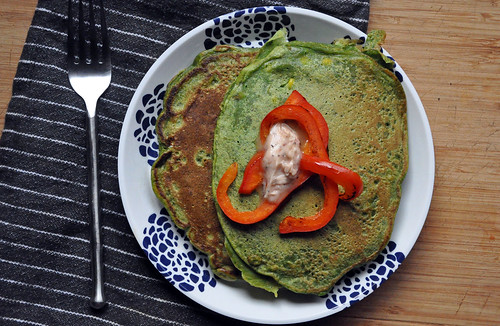
Green Breakfast, 2 Ways

>> Tuesday, January 22, 2013


I'm fanatical about using foods before the sell-by date. To a fault, I admit. I imagine much of what I toss is still perfectly OK -- and I really do hate wasting food. Still, if I see anything slimy in a package of greens + the date is yesterday or even TODAY, it's gone.

Unless Stephen eats it, which he usually does. Anyway, these green breakfast recipes started with a package of almost-expired spring mix.


GREEN WAFFLE/PANCAKE MIX

What you'll need . . .

  • 1 cup whole wheat flour 
  • 2 cups spinach or spring mix 
  • 1 tablespoon baking powder 
  • 2 tablespoons flax meal 
  • pinch salt
// Pulse all ingredients together in a food processor until fully combined. Use immediately or store in the refrigerator for up to 2 days.


Full disclosure: I originally intended to give you TWO waffle recipes, but what I ended up doing to the sweet version didn't jive so well with the waffle maker. These recipes are both vegan if you like, but vegan waffle making can be tricky, as I've discovered these past several weeks.

Also, if you don't have a waffle maker, you can certainly just do pancakes. But something I didn't know is that you can get an adequate waffle machine for under $20, scratch that, under $10. It may not be fancy, but it does the job every Sunday.

First, a savory recipe . . .


GREEN WAFFLES w/ EGGS, IF YOU LIKE

// Combine half the flour mixture with 3/4 to 1 cup almond milk. How much you use depends on the consistency. It should be thick, but not like pizza dough -- certainly not runny, though

// Preheat your waffle maker + when it's good, scoop onto it 1/3 to 1/2 cup batter (depending on the size of your maker). Cook as directed + serve with peppery fried eggs and oranges.

Now for something sweet . . .


GREEN PANCAKES w/ BLUEBERRIES

// Combine half the flour mixture with 1 small mashed banana + 1/2 cup almond milk and a tablespoon brown sugar. Add in 1/2 cup frozen or fresh blueberries.

// Heat a pan over medium-high heat and grease it a bit with some Earth Balance or olive oil. Scoop heaping 1/4 cupfuls of batter onto it and cook on each side until golden and the middles set.

(I think the reason this didn't work in the waffle maker is because there was too much moisture with the banana and blueberries. I might try it again without banana and substitute another 1/4 cup almond milk.)

MORE GREENS FOR BREAKFAST:

Leafy Green Pancakes
Green Eggs -- errr -- Banana Scramble
Avocado Green Smoothie
Not-So Green GREEN Smoothie
Protein-Packed Green Smoothie
Light on the Greens Smoothie

Like what you just read? You can subscribe to the feed of these posts or follow us on Twitter or Facebook to be the first to know what the (never home)makers are up to. And we’ll love you forever!

Read more...

Mega-Bread with Plums

>> Tuesday, August 14, 2012


I bumped up this recipe a bit in the posting schedule. It's that good. Thing is, I'm having trouble coming up with a good name for it. It's a sweet bread, much like banana bread, made with whole wheat flour, flax, coconut flakes, cinnamon, maple syrup, and plums.

Maple-Cinnamon Whole Wheat-Flax Loaf with Coconut and Plums? That just sounds ridiculous. Mega-Bread it is! The base loaf is vegan and mind-blowing. There, I said it. And you can really add in any type of fruit you like.


I should also mention that I experimented with using a new ingredient in baking for the first time ever: Sparkling water! While we were on vacation, I was reading an article in some magaine, maybe it was Family Circle, that suggested using it in all types of things. Even in scrambled eggs.

I have yet to try that method, but I'm intrigued.


Why? I guess sparkling water adds fluffiness. To everything. I did some hunting around and found that -- indeed -- sparkling water can be used as a "substitute for other liquids, such as plain water or alcohol, to create a fluffier batter or dough." (Source)

So, with that new tip in mind, I set out to modify/improve my Banumpkin Bread recipe.


MEGA-BREAD with PLUMS

What you'll need . . .

  • 2 cups whole wheat flour 
  • Pinch salt 
  • 1/2 teaspoon baking soda 
  • 1 teaspoon cinnamon 
  • 1/2 cup coconut flakes (unsweetened) 
  • 3 tablespoons flax meal + 1/2 cup warm water 
  • 1/2 cup sparkling water 
  • 3/4 cup maple syrup 
  • 1/4 cup olive oil 
  • 1 teaspoon vanilla extract 
  • 1 cup chopped plums 

Method . . .

  1. Preheat your oven to 350 degrees F. Grease a 9" or 8" loaf pan and set aside.
  2. In a large bowl, whisk together the whole wheat flour, salt, baking soda, cinnamon, and coconut flakes. Set aside.
  3. In another large bowl, whisk together the flax meal and warm water. Let sit for a couple minutes. Then add in the sparkling water, maple syrup, olive oil, and vanilla extract. Mix well.
  4. Add the dry ingredients to the wet and mix until combined.
  5. Fold in the plums (we skinned them first and diced).
  6. Pour batter into loaf pan. Spread evenly. Bake for 1 hour. Check every half hour or so. 
  7. Note: Ours needed 1 hr and 5 minutes to cook fully. Check done-ness by inserting a toothpick into the center of the loaf.

Top with some Earth Balance or butter and enjoy. Bread should last in an air-tight container -- preferably in the fridge -- for up to a week. However, ours is almost gone and we made it yesterday afternoon.

Verdict on the sparkling water?

It worked surprisingly well. I've followed recipes and created many of my own for vegan sweet breads. They have all had something in common: the goop-factor. Undesirably dense and moist no matter how long they stay in the oven. This one cooked the whole way through and didn't sit in my stomach like a brick.


Today on Writing Chapter Three we're writing about protein and Our Vegetarian Baby. Be sure to check out the mothering Mother GIVEAWAY we have going on. And stay tuned tomorrow for a fitness-related post about Pushing Yourself. How far is too far? What isn't enough?

If you haven't yet, consider visiting the main site to check out the improvements we've made to the look/feel. We took your suggestions to heart and think things are running much more smoothly these days.

Like what you just read? You can subscribe to the feed of these posts or follow us on Twitter or Facebook to be the first to know what the (never home)makers are up to. And we’ll love you forever!

Read more...

Blueberry Cornmeal Scones

>> Friday, December 16, 2011

These days, it's hard to get to the grocery store. It's even harder to make our way through the aisles without tons of well-meaning strangers stopping us to sneak a peek of Ada. Our refrigerator shelves have never been so bare!

I spy mostly condiments. How about you? Thank goodness we picked up our CSA farm share last night. At least our freezer is stocked with tasty produce.


Harder yet is finding time to make meals during the day and then actually finding time to eat them. Despite Ada's incredible crankiness yesterday, I made scones. Baking as therapy, I suppose. Bonus is that this morning I could just grab my breakfast. You know, change a dirty diaper with one hand and eat with the other.

It's getting that bad. (But I'm being dramatic. Overall, she's a fantastic baby. And she turns 1 month today!)


BLUEBERRY CORNMEAL SCONES

What you'll need . . .
  • 1 cup whole wheat flour
  • 1 cup fine grain cornmeal
  • 2 tablespoons maple syrup
  • 1/3 cup Earth Balance (or butter)
  • 1-1/2 teaspoons baking powder
  • 1/4 teaspoon baking soda
  • 1/2 teaspoon salt
  • 1/4 teaspoon ground cloves
  • 3/4 cup almond milk (or regular/soy/etc. milk)
  • 1 Ener-G egg replacer plus 2 tablespoons water (or egg/other substitute)
  • 1 cup frozen blueberries
  • 1 teaspoon cornstarch

Method . . .
  1. Preheat your oven to 425 degrees F. Line a cookie sheet with parchment paper and set aside.
  2. In a food processor, pulse together the flour, cornmeal, maple syrup, Earth Balance, baking powder, baking soda, salt, and cloves. Mixture will be crumbly.
  3. In another bowl, whisk together the almond milk and egg replacer (with water). Add the dry-ish ingredients to the wet and mix until just moistened. Do not over mix or you risk the scones being tough.
  4. In another bowl, toss the frozen blueberries with the cornstarch. Fold them into the scone batter.
  5. Using a 1/4 cup measure, scoop heaping mounds (10 to 12) onto your cookie sheet.
  6. Place in the oven for 15 to 20 minutes. Until golden brown on edges.

And that reminds me. We still haven't done our Christmas shopping. This weekend should be interesting as we make our way to all the stores. I was thinking we could skip it. Maybe I could just frame this abstract art the scones left behind on the parchment?

If you've been following our family happenings, today on (never home)maker, baby! I've written all about week 4 postpartum. I'm feeling much more like my old self again, despite some scary sleep happenings.

Like what you just read? You can subscribe to the feed of these posts or follow us on Twitter or Facebook to be the first to know what the (never home)makers are up to. And we’ll love you forever!

Read more...

Summer Squash Pancakes

>> Thursday, September 22, 2011

Third trimester exhaustion is REAL, people. Granted, it's been a busy few days . . . but I can't seem to keep my eyes open this morning. Dinners have been fast and easy as a result -- more time for napping. Or not.

These summer squash pancakes are made with squash from our garden. They also come together in less than five minutes.


You need not use summer squash if you have another type on hand. Zucchini would work beautifully. Or you could even get exotic with it. Remember the opo squash we bought last year?


It was HUGE!


Anyway, I love making savory pancakes on nights when I just don't have time to whip up a more proper dinner. And it's easy to adapt your favorite breakfast/sweet recipe for this purpose. This one, for example, is a variation on our Wheat and Oats Pancakes.


SAVORY SUMMER SQUASH PANCAKES

What you'll need . . .
  • 2/3 cup wheat flour
  • 1/2 cup white flour (or you can use all wheat)
  • 1 teaspoon baking powder
  • 1 egg
  • 3/4 cup almond milk
  • 1 teaspoon (or more) black pepper
  • 1 cup shredded summer squash (rinsed and peeled first)

Method . . .
  1. Whisk together the flours and baking powder. Add in the egg and almond milk. Mix well.
  2. Fold in the summer squash shreds and black pepper.
  3. Heat a pan over medium-high heat. Grease a bit with some olive oil.
  4. Drop half cup to three-quarters cup amounts of batter on the pan. Cook on each side until browned.
  5. Top with cheddar cheese, sauteed onions, or savory jelly. Blame pregnancy, but I even added a little maple syrup!
  6. You'll also notice that we added some tomato slices -- also from the garden -- during the cooking process.
WHY NOT TRY . . .


Leafy Green Pancakes


Corn Pancakes and Pan-Browned Brussels Sprouts

Like what you just read? You can subscribe to the feed of these posts or follow us on Twitter or Facebook to be the first to know what the (never home)makers are up to. And we’ll love you forever!

Read more...

Hearty Pecan-Chip Micro-Muffins

>> Friday, June 17, 2011

The microwave has been disinfected -- twice (to clean out those nasty forgotten collards). So, I can finally post that recipe I've been dreaming up.

But first, feast your eyes:


HEARTY PECAN-CHIP MICRO-MUFFINS

What you'll need . . .
  • 4 tablespoons whole wheat flour
  • 2 tablespoons rolled oats (uncooked)
  • 1/2 teaspoon baking powder
  • Pinch salt
  • 1 large banana (about 1/2 cup) mashed
  • 1 tablespoon almond milk
  • 1 tablespoon coconut oil
  • 2 tablespoons crushed pecans
  • 2 tablespoons chocolate chips
  • 1 tablespoon peanut butter
  • 1 tablespoon almond milk
  • 1/2 teaspoon vanilla extract

Method . . .
  1. In a cereal bowl (or other small bowl), whisk together the flour, oats, baking powder, and salt.
  2. Add the mashed banana, almond milk, coconut oil, pecans, and chocolate chips. Mix well.
  3. Use a bit of the leftover oil to lightly grease a mug. Then pour in your mixture.
  4. Cook for between 2-1/2 and 3 minutes. Then let cool for a minute in the microwave.
  5. In the meantime, make your peanut butter sauce: Mix together the peanut butter, almond milk, and vanilla extract.
  6. Carefully take your mug out of the microwave (it'll be hot) and tip it over onto a plate. Cut the large muffin in half.
  7. Then serve with the peanut sauce.

Breakfast be messy -- you may even need to change your shirt before work. But you'll make these muffins over and over again. They take five minutes to prepare! Experiment with different add-ins, too. Or try some of our other micromuffin recipes: Mighty Green and Pumpkin-Chocolate Chip.

Don't forget to check out our Tazo Iced Chai Giveaway. And if you're catching up on baby-related reading, I posted about last night's preggo 5K PR on (never home)maker, baby!

Like what you just read? You can subscribe to the feed of these posts or follow us on Twitter or Facebook to be the first to know what the (never home)makers are up to. And we’ll love you forever!

Read more...

Common Flour Types: Demystified

>> Tuesday, September 14, 2010


Justine writes:

Hey, Ashley and Stephen! I'm getting ready to try your vegan challah recipe, and I guess before I start, I have a question: Do I need to use the two different flours you have in the recipe, or could I use all regular bread flour? I'm confused about all the different kinds and what they are used for. Thanks!"

Great question, Justine! We're definitely not experts, but through our baking adventures, we've become familiar with various types of flours and their "best" uses. We've come up with this quick guide to help you distinguish between the 5 kinds we use most often in our recipes . . .
  • Wheat Pastry Flour is likely familiar to you all. We make a lot of cookies, cakes, brownies, and other dessert-y (and breakfast-y) items . . . and in most of those recipes we either totally or partially use the stuff. Wheat pastry flour is just a light form of whole wheat flour made -- here's that word again -- lighter for fluffier results. I like using wheat pastry flour instead of regular pastry (or white) flour because it add nutrition to baked goods. A slight heartiness, along with fiber, vitamins and minerals and other heart-healthy goodness.
  • Wheat Flour is something we mostly use when baking bread. If we want to add all that goodness we listed above (instead of simple bulk that white bread flour provides), we mix in some wheat flour with unbleached bread flour. It adds extra texture, weight, and protein as well. Again, our use of this type is mostly for health reasons.
  • Bread Flour is great for yeasted baked goods (like breads and pizza crusts, etc.), and though we very much like the health benefits of wheat (and even whole wheat bread flour), there's just something about the white stuff that has us coming back again and again. Bread flour has a high gluten content, which is essential to the bread baking process. Even if you're making a "wheat" bread a little unbleached will do your recipe some good -- it allows the yeast to rise to its highest.
  • All-Purpose Flour is really just as the name suggests: it's for all purposes. It's a good type to have around in a pinch because you can use it for cookies, breads, and -- again -- pretty much anything if you need to (think thickening agent in sauces, soups, etc.). It's made from a blend of both high- and low-gluten flours . . . so if you use it to make, say, bread -- be prepared, because it won't necessarily be prize-winning (you're using a more general ingredient than a specific one, if that makes sense).
  • Coconut Flour is something we use on occasion, mostly in cookies and other baked goods. Though we've also used it to thicken soups. It's gluten-free, which is attractive to those of you who have restricted diets, and is full of dietary fiber. We're trying to learn about using gluten-free flours in baking -- so if you're at all interested in guest posting on this topic, we'd like to find out more (just email us).

Bleached versus unbleached? Unbleached flour is not treated with any color changers (i.e. BAD stuff like peroxides, dioxides, and chlorine). It is more a cream color than bright white. Bleached flour has been treated with the "BAD stuff" and is as white as it can be. After the bleaching is done, it's also missing some of the nutrition it had in its original state. I could be wrong, but I think the primary reason flour is bleached is for aesthetics. We stick with unbleached whenever possible.

Our favorite flour brands are Bob's Red Mill (for Wheat Pastry and Coconut) and King Arthur (for everything else). What do we have on hand right now? A full bag of all-purpose flour, a small bag (half-used) of wheat pastry, an unopened bag of wheat flour, and 3/4 a full bag of unbleached bread flour.


We're constantly using different kinds -- so it's key to keep ourselves well stocked. Plus, it's way healthier and more satisfying to bake up bread at the beginning of the week than purchase boring store-bought varieties.

If you're looking to try your hand at some recipes, here are some of our favorites:
What kind of flour do you use most often in the kitchen? We'd love to know if there are any regulars on your shelves that we may no have covered above (like spelt, rye, etc.). Just leave a comment or email us at neverhomemaker [at] gmail [dot] com.

Like what you just read? You can subscribe to the feed of these posts or follow us on Twitter or Facebook to be the first to know what the (never home)makers are up to. And we’ll love you forever!

Read more...

Very Blueberry-y Pancakes

>> Friday, August 27, 2010


Good morning! A quick breakfast recipe seems like a great way to start a Friday to me. Later today, we'll be posting info on our Operation Beautiful giveaway (to celebrate reaching over 2,000 subscribers) and new details about the Foodie Book Club. So, check back for all of that.

Right now: Pencil these pancakes into your weekend plans.

I got the idea to make these blue beauties because I had some thawed blueberries just hanging out in our fridge. We recently got a dehydrator (from CSN stores -- review soon!), and I wanted to make fruit leather yesterday with them (the blueberries). However, we don't have any applesauce at the moment, which is a critical ingredient. Execute plan B!

To puree, just throw blueberries in your food processor. Then stir together with your almond milk.

Very pretty:


And the end result is even prettier!


VERY BLUEBERRY-Y PANCAKES

What you'll need . . .
  • 1/2 cup blueberry puree
  • 1/2 cup almond milk
  • 1 cup wheat pastry flour
  • 1/8 cup canola oil
  • 1 egg (we used 1 tablespoon Bob's Red Mill replacer with 3 tablespoons water)
  • 1-1/2 teaspoons baking powder
  • 1/2 teaspoon salt
  • Handful or two frozen blueberries

Method . . .
  • Mix everything except the frozen blueberries together in a blender (or just with a spoon -- that works, too).
  • Fold in the blueberries.
  • Make as you would "normal" pancakes.
  • Top with maple-peanut butter (it's just equal parts maple syrup and crunchy peanut butter).

What did you eat for breakfast this morning? We tend to go a little over-the-top on Fridays as a celebration (you can check out more of our favorite breakfast recipes here). Usually our meal involves chocolate, but these blueberry pancakes really hit the spot.

Just leave a comment or email us at neverhomemaker [at] gmail [dot] com. And HAPPY FRIDAY!

Like what you just read? You can subscribe to the feed of these posts or follow us on Twitter or Facebook to be the first to know what the (never home)makers are up to. And we’ll love you forever!

Read more...

Vegan Pecan Chocolate Chip Cookies

>> Tuesday, August 3, 2010


I know I've said it before . . . and I'll likely say it again: These cookies are THE BEST cookies I've ever made. Sunday afternoon, I had a craving for chocolate chippers (those of you following us on Twitter heard all about it, too!). But I didn't want to make my usual recipes. Nope, I wanted to try out something that promised good results.

So, I Googled "ultimate chocolate chip cookie recipe" and started searching for methods that would work well when adapted to be vegan (I prefer baking without eggs and dairy for health reasons). Then, I found this recipe, which focuses on some precise techniques, and literally ran to the kitchen.


As I started pulling out my ingredients, however, I noticed I didn't have a single cup of all-purpose flour in the house. Nope. I had bread flour. Whole wheat. And white-whole wheat. 1/2 cup of wheat pastry. Yikes. If there's one thing I've learned in all my baking, it's that flour matters. Use the wrong kind, and you risk disaster.

But I forged on, and I'm so glad I did. The mixture of white-whole wheat and whole wheat flour worked extremely well. And it enriched my recipe with nutrition. If you're hesitant, maybe try making a half batch. Or use all purpose and wheat pastry flour. Trust me, though, these cookies taste a great as they look. Just remember to follow the instructions carefully.


THE ULTIMATE VEGAN CHOCOLATE CHIPPERS
(recipe yields around 40 cookies -- I made a half batch)

What you'll need . . .
  • 1 cup Earth Balance (I used the soy-free kind)
  • 1 cup brown sugar
  • 3/4 C natural sugar
  • 2 tablespoons Bob's Red Mill egg replacer whisked with 6 tablespoons water
  • 1-1/2 teaspoon pure vanilla extract
  • 1 cup whole wheat flour
  • 1 cup white whole wheat flour
  • 1/2 cup whole wheat pastry flour
  • 1-1/4 teaspoon baking soda
  • 2 cups pecan chips (or walnuts)
  • 3 cups vegan chocolate chips (I used Sunspire)


Method . . .
  1. Let Earth Balance warm to room temperature. Whisk together your egg replacer in a small bowl and set aside. Whisk together the dry ingredients in a medium bowl and set aside.
  2. In the bowl of an electric mixture, use the paddle attachment to beat the Earth Balance at medium speed until it is lighter and clings to bowl (30-45 seconds).
  3. Keeping beater at medium speed, add both sugars. Continue to cream butter and sugars for a total of 4-5 minutes, scraping down bowl as necessary. When done the mixture will be light and fluffy.
  4. Whisk egg replacer with vanilla in small bowl and add it to the butter and sugar mixture, keeping beater on medium speed. Beat for 3-4 minutes. The mixture should appear fluffy, like whipped cream cheese (see photo above).
  5. Put mixer on slowest speed and add the dry ingredients. As soon as the dry ingredients are incorporated, add chocolate chips and pecans. Leave beater on lowest speed for a few seconds to mix it all together.
  6. Line a cookie sheet with parchment paper and scoop heaping tablespoon amounts of dough onto it. No need to leave space between then at this point -- because when you're done scooping, you'll want to refrigerate the dough for between 2 and 4 hours, covered.
  7. Once the wait is over, preheat your oven to 400 degrees F. Remove to-be cookies from refrigerator and let warm to room temperature (30 min.).
  8. Keep cookie balls on baking sheet lined with parchment to bake. But before putting them in the oven, you'll need to space them like you would for "normal" cookies -- and then flatten with the palm of your hand just slightly. They'll look like small hockey pucks.
  9. Bake for between 8-10 minutes. Edges should be golden brown but center pale. I used two different kinds of cookie sheets for this -- thinner needed only 8 minutes to bake, thicker, the full 10.
  10. To finish, let sit at room temperature 5 minutes before taking off baking pan.


And it's not too late to take part in our upcoming week celebrating healthy living!!! No story is too insignificant or unimportant. Silly or boring. It's ALL good. All you need to do to be included is to email us (neverhomemaker [at] gmail [dot] com) what made you care about your health/fitness/nutrition. Anything goes, really. And if you have a blog address, be sure to include that, too. A photo would also be fantastic (can be of anything related to what you write).

We've already received some WONDERFUL submissions . . . and we're excited to post them for you next week. So, what are you waiting for? Send us your story now: neverhomemaker [at] gmail [dot] com!

Like what you just read? You can subscribe to the feed of these posts or follow us on Twitter or Facebook to be the first to know what the (never home)makers are up to. And we’ll love you forever!!

Read more...
Related Posts Plugin for WordPress, Blogger...

About This Blog

MyFreeCopyright.com Registered & Protected

© 2009-2014 by the (never home)makers
All content on this blog is copyrighted.

Want to publish our pics, tips, or tricks?
Contact us! [neverhomemaker@gmail.com]

We value transparency. Links on this page may contain affiliates. In addition, please see our disclosure policy regarding sponsored posts.

  © Blogger template Simple n' Sweet by Ourblogtemplates.com 2009

Back to TOP  

Blogging tips