
Olive Oil Loaf
>> Monday, January 11, 2010
Before I begin: If you haven't checked out our first giveaway yet -- head over there now!
My in-laws were up this past weekend to visit and have our belated x-mas celebration. Even my dad and brother made the trip up on Saturday to hang out in our tiny living room for the afternoon. It was a good time. And we got some AWESOME gifts -- including some fancy flour to try out, a mug (one for each of us) featuring our prettiest marathon photos, and GARMIN WATCHES! If you're a runner, you get it. The Garmin 405 is the Cadillac of GPS running watches -- even provides detailed maps, elevation charts, pace, heart rate, etc., etc. all via satellite connection.
Very cool. Stephen's enjoying his to the max. I, unfortunately, am not to thrilled with the watch's design and opted (thanks again Kathy & Joe!) to trade the HUGE thing in for a smaller Garmin. Can't wait to try it out sometime this week and provide a full report on its awesome-ness.
Anyway, enough running stuff. Now that's it's absolutely freezing out . . . I often have hours to kill on the weekend . . . and when the weather is absolutely terrible, I like to make bread from Martha Stewart's Baking Handbook.
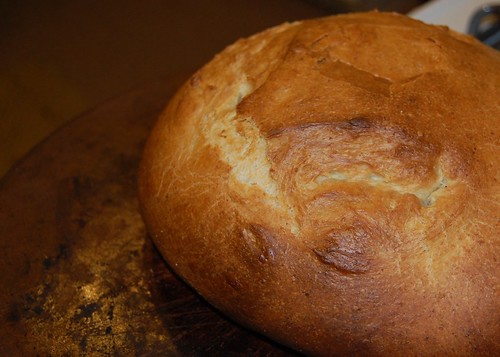
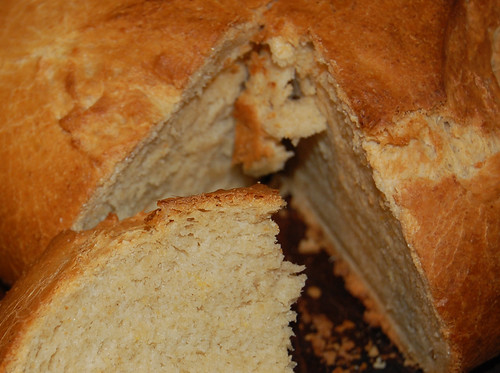
The Olive Oil Bread (page 293) looked easier than the others . . . and, as an olive oil lover, I was absolutely intrigued: what WOULD it taste like? Brilliant is the answer to that question. In fact, I can't stop eating the moist and flavorful stuff. You'll certainly taste the salt . . . and I imagine adding some minced garlic to the mix would be delicious. Seriously -- if you like bread, you're love this recipe. And as much as it takes time . . . it's far less labor intensive than some of the other recipes in the book (which, by the way, is a fantastic buy -- and I highly recommend picking up a copy for your cookbook library).
So, if you have several hours at home today, tomorrow, whenever . . . try it out. It's a wonderful dinner companion, or just a delicious snack on its own.
What you'll need . . .
- 2 cups water, room temperature
- 2-1/2 cups bread flour
- 2 cups wheat pastry flour (I modified this part -- you may use all bread flour if you like)
- More flour for dusting
- 1 ounce fresh yeast
- 3/4 cup extra-virgin olive oil, plus more for bowl and plastic wrap
- 1 tablespoon coarse salt
- Cornmeal, for dusting
- Time . . . lots of it.
Method . . .
- In the bowl of an electric mixer, combine the water, flour, yeast, and olive oil. Set your paddle attachment to low speed and mix until the ingredients are JUST incorporated. Cover with plastic wrap and let rise in a warm place (my mother-in-law suggested sticking it in the cool oven, which is warmer than most places in the house) until doubled in bulk -- about 1 hour and 15 minutes.
- Attach the bowl to the mixer fitted with the dough hook. Add the salt, and mix to combine on low speed. Raise the speed to medium, and beat until the dough pulls away from the sides of the bowl, but is still sticky (about 2 minutes).
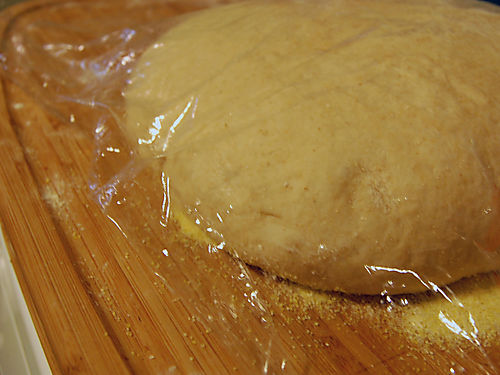
- Turn out the dough onto a lightly floured surface and knead it for approx. 1 minute. Then transfer the dough to a large, lightly oiled bowl. Cover with lightly oiled plastic wrap and let rise in a warm place until, again, doubled in bulk (about 1 hour)
- Return the dough to a lightly floured surface and fold in the following way: Fold the bottom third of the dough up, the top third down, and the right and left sides over -- tapping the dough after each fold to release excess flour and pressing down the seal. Flip dough seam side down, cover with the oiled plastic wrap, and let rest for about 15 minutes.
- Dust a large wooden peel (I used one of our cutting boards) with cornmeal and set aside. Transfer dough to a clean work surface. To shape, cup it between your rounded palms, roll it in a circular motion, pulling down on the surface of the dough to form a tight, smooth round. This is MUCH more intuitive than it sounds . . . just make it into a tight ball.
- Transfer the round to the wooden peel (or cutting board), and drape with the oiled plastic wrap. Let rest until slightly puffed: 30 minutes.
- Meanwhile, place a baking stone on the bottom oven rack and preheat the oven to 450 degrees F.
- Make four slashes on the top of the loaf with a knife (to form a square -- which helps make sure the bread bakes evenly). Slide the loaf onto the stone (I just picked the dough up and quickly transferred it).
- Bake until the crust is a dark, golden brown (about 35 minutes). Please bread on wire rack to cool before slicing.
Like what you just read? You can subscribe to the feed of these posts or follow us on Twitter to be the first to know what the (never home)makers are up to. And we’ll love you forever <3


