Showing posts with label candy. Show all posts

Peanut Butter Hearts

>> Monday, February 9, 2015

Happy Monday, friends. This “snow storm” is rather disappointing. Stephen has a two hour delay (update: school is now closed and Stephen’s jumping up and down like a little boy), which usually causes more stress than it’s worth. Anyway, I wanted to thank you guys for your thoughts, suggestions, and support with the next steps in our TTC process. It’s overwhelming, but I know we’re doing the right thing.

Now for something fun: My mainstream candy weakness? Reese’s Peanut Butter Cups. Not just the cups, though, I love this gigantic pumpkins, trees, hearts, and eggs that only come out on special occasions. The ratio of peanut butter to chocolate is optimal. And I’ve seen copycat recipes in the past, but most contain a load of confectioners sugar for sweetness.

So, I got to think about the flavors I like most in the candy. When they’re very fresh, there’s almost this hint of coconut I taste. It could be all in my head, but I taste coconut. Immediately, I knew what I needed to do. These guys are vegan, gluten-free, and contain more nutrients than the real deal.

#nom:
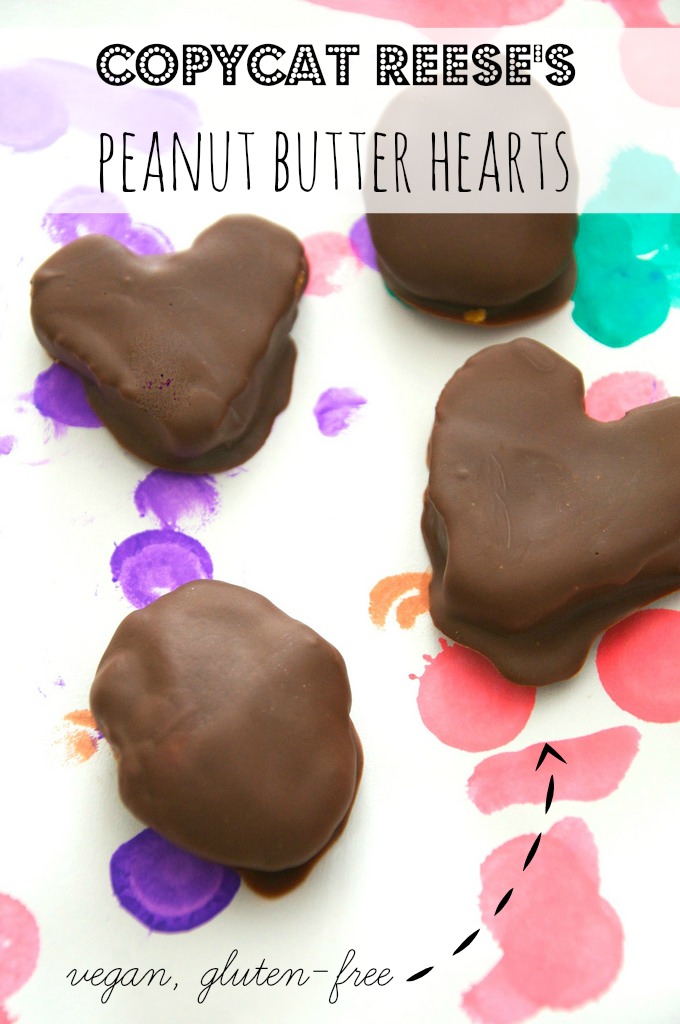

REESE’S COPYCAT PEANUT BUTTER HEARTS


What you’ll need . . .
  • 1/2 cup natural peanut butter
  • 2-3 tablespoons coconut sugar*
  • 2-3 tablespoons coconut flour*
  • 2-3 tablespoons maple syrup
  • 1/2 cup semi-sweet chocolate chips
  • 1 tablespoons coconut oil

Method . . .
  1. Combine your peanut butter, coconut sugar, coconut flour, and maple syrup in a food processor. I’ve made this recipe a few times now and have played with the ratios to suit my taste. For a slightly stiffer cup, I used 3 tablespoons of both coconut sugar and flour and just 2 tablespoons maple syrup. Another time, I used 2 tablespoons coconut sugar and flour and 3 tablespoons maple syrup. See what you like best for consistency and adjust as necessary.
  2. Then pulse to combine until mixture rolls into a ball. Take the ball out of your processor and place it on a piece of wax or parchment paper. Divide into 8-10 balls and roll.
  3. Then shape into whatever you like. I did some messy hearts and eggs. You can also just leave them as balls, but I think the coating part is easier when they’re a bit flattened out.
  4. Place hearts in your freezer for an hour or more. Before removing, make your chocolate coating.
  5. In a small saucepan, heat the chocolate chips and coconut oil on low, stirring constantly until melted together. Remove from heat.
  6. Take your hearts out of the freezer and then -- one by one -- place in the slightly cooled chocolate mixture. Coat all sides and then return to the wax or parchment. Repeat with all hearts.
  7. Return everything to the freezer (you can spoon any extra chocolate onto the tops of the hearts) and let rest until set.
  8. I store the eggs in my freezer to keep them fresh and also to deter me from eating ALL of them at once.

* Nutiva sent me samples of their Coconut Flour and Coconut Sugar to try. I’ve actually used their brand in the past with coconut oil, so it was neat to check out the other products in their line. I see they also carry hemp, chia, and red palm stuff -- but I’m all about the coconut.

Yum:


If you’ve never tried these ingredients, coconut sugar contains potassium, magnesium, zinc, iron, and B vitamins. It’s also reported to be lower GI than other sweeteners, which is why I’m favoring it these days. Coconut flour is much the same, with lower GI than standard flours and high fiber. Tip: When you’re using coconut flour in baking, use it for up to 1/3 of the flour. It tends to absorb a lot of liquid.

Have you made candy at home?

A while back, I had whipped up some Peanut Butter Twix, definitely time consuming but fun. I’ve also made Basic Peanut Butter Cups using a special blend of graham crackers + Homemade Peanut Butter.

Disclosure: Nutiva sent me the flour and sugar you see above, but I received no other compensation. My opinions are my own. And I hope you enjoy the peanut butter cup recipe! It’s a good one!

Like what you just read? You can subscribe to the feed of these posts or follow us on Twitter or Facebook to be the first to know what the (never home)makers are up to. And we’ll love you forever!

Read more...

Homemade Peanut Butter Cups

>> Wednesday, January 16, 2013


I thought about holding off on posting this recipe. You know, Valentine's Day is nearing, but we've still got several weeks to go. But then I figured you might want to practice your technique with these peanut butter cups.

Make several batches.
To try for yourself . . .
Before giving to others.

(Cute candy wrappers = optional, but highly recommended.)


GRAHAM PEANUT BUTTER
Of course, you can use store-bought, but homemade is best + far tastier.

What you'll need . . . 

  • 2 cups dry roasted peanuts
  • 1 tablespoon virgin coconut oil
  • 3 tablespoons organic powdered sugar
  • 1 teaspoon salt
  • 3 graham cracker rectangles (or more, it's up to you)

Method . . .

  1. Put peanuts in a food processor (I use this one for all my peanut butter-making) and blend until they turn into peanut butter. It takes a few minutes. Using dry-roasted peanuts is the key. 
  2. Then add in the coconut oil, powdered sugar, and salt. Combine for another minute. Then add in the graham crackers a square at a time. 
  3. Process until completely blended. Alternatively, though, you can opt for a crunchier peanut butter. Just remember you're going to need to cover with chocolate, so you don't want it too chunky.
  4. For more information on making homemade peanut butter, see this post + this post.

The CHOCOLATE COATING is just a bag of semi-sweet chocolate chips melted on the stove-top with a tablespoon of coconut oil. Be careful to melt chocolate with only low heat, stirring continually with a rubber spatula so it doesn't burn.

PEANUT BUTTER CUPS

Putting it all together . . .

  • Line a mini muffin tin with candy wrappers. You can find them in most grocery store in the bulk candy aisle. If you like the wrappers I used specifically, you can find them on Amazon.
  • I put my chocolate in a large plastic zip-lock bag. I put my peanut butter in another zip-lock bag. I did this instead of spooning the chocolate, which I've done in the past, and I think it made the process a lot faster + easier.
  • Start with a layer of chocolate. Cut a very small hole in the corner of the plastic bag -- just big enough to let the chocolate flow out slowly.
  • Just a dollop in each wrapper will do. Pipe one into each candy wrapper. When you've finished, tap the pan to let the chocolate settle flat in the cup.

  • Do the same this time with the peanut butter. I found I put a thicker layer on peanut butter into the cup. You just need to leave enough room for a layer of chocolate on top. 
  • I also tried my best to get the PB in the center so the chocolate would wrap around. Tap down the pan again when you're done to let the peanut butter settle.
  • Then do your last layer of chocolate. Honestly, I made my top layer too thick. Think of a store-bought peanut butter cup -- that top layer is thin. So, test it out, try to go light on it.
  • Tap down again and then cover with plastic wrap and place tin in the freezer for around 20 minutes.
  • Peanut butter cups are done when they are set. I keep mine refrigerated after that initial hardening.
  • You will likely have ingredients left over, but not too terribly much. 

I wasn't just being cute when I said you should make several batches. The peanut butter cups will go fast because they are so good BUT it may take several tries before you get them just how you like them.

I didn't mention in my yearly goals that I'm trying my best to avoid mass produced chocolates/candy in 2013. OK. Reese's peanut butter cups, specifically. I could eat a whole bag in 2 seconds. So, I guess I found a loophole. But really, with all the time + effort required to make these, my consumption of candy will definitely be less.

Maybe.

These candies are i.n.c.r.e.d.i.b.l.e. and would make a great Valentine's gift for your sweetheart. Especially if he/she likes chocolate + peanut butter. My favorite.

x.o.x.o.

Like what you just read? You can subscribe to the feed of these posts or follow us on Twitter or Facebook to be the first to know what the (never home)makers are up to. And we’ll love you forever!

Read more...

Caramel Apples

>> Monday, October 25, 2010


Caramel apples are sticky. Crisp. Gooey. Sweet and tart. So many textures and flavors . . . all on a convenient and cute stick. They're a must-do in the week before Halloween, especially if you have any kids running around. I found this recipe on Real Simple while browsing around for pumpkin carving ideas the other day.

Sure. It looked "simple" enough.
  1. Just melt caramel with a bit of water.
  2. Swirl your apples.
  3. Let set in your fridge for one hour.
Easy, right? Well. My experience was far from it. I'm not trying to discourage you from making them -- they're definitely fun and flavorful, well worth the time and effort -- but please learn from my mistakes. Because I hate when recipes so completely gloss over the difficult parts. Hate. It.


TIPS:
  • I'd recommend setting aside an hour for this recipe. I didn't give myself enough time. You should allot at least 25 minutes to peel off the plastic wrappings from your candies if you're in a time crunch. Oh, it was madness! Or consider making your own caramel. Or have a friend/sibling/significant other do the peeling for you! From the time of peeling off all the plastic wrappers until you have it melted and ready on the stove, it takes like 35 minutes total. Then the rest is a delicate process, too!
  • I'd advice adding slightly less water than the recipe recommends. Like maybe two tablespoons less.
  • Don't dip your apples when the caramel is super hot. Let it cool so that it's thick and sticky. It may relate to the last tip, but ours was a bit runny, so we had to drizzle some caramel on post-dip.
  • Don't worry if they're completely messy. Because no matter what, they likely will. And you'll probably get caramel in your hair. On your sweater. On the floor. On your cat or dog. On your cell phone. Probably more on you than on the apples.

"EASY" CARAMEL APPLES
(adapted from this recipe)

What you'll need . . .
  • 15 tart apples (such as Macouns or Winesaps, we also used Granny Smith)
  • 2 pounds caramel squares
  • 15 wooden popsicle sticks
  • 1/2 cup water plus 2 tablespoons (but I'd advice using less)
  • 1 teaspoon black pepper
  • 1/2 teaspoon ground cinnamon
  • 1/4 teaspoon ground cloves
  • Pinch of salt

Method . . .
  1. Peel off all the plastic wrap from your caramels. Listen to music or watch a brief TV show. Anything to pass the time.
  2. Wash and dry your apples (they need to be totally dry for this to work, trust me). Lay out some wax paper atop a cookie sheet (or two, if you need more space). Line up the apples and then press the popsicle sticks into them about half an inch.
  3. Then in a medium saucepan over low heat, toss in your caramels and water. Let cook until the caramel is completely melted -- stirring often -- about ten minutes.
  4. Take off heat and set aside for a minute or two. But while the caramel is still warm and gooey, dip your apples in and swirl out. place back onto the wax paper/cooking sheet. Repeat with all apples. Then place them in the fridge ASAP.
  5. Let set in fridge for about an hour.
Honesty time: If you're planning to make these for a party, I'd advise keeping them as cool as possible. If you bring them out to serve, put back in the fridge if no one is taking them right away. Otherwise, the caramel melts off and gets all over the place. Kind of like how it look in my photos -- glazed apples.

I'm making this recipe sound awful. It's really not THAT bad, just finicky. And fun. And festive. Not as "real simple" as Real Simple would make you think. As well, I added in the cinnamon, cloves, pepper, and salt. If you don't want the more grown-up version, just stick with the plain caramel.


Of course, if you're looking for a REALLY easy dip-and-let-set recipe, chocolate-covered pretzel rods are fantastic. Plus, there are few activities I like more than eating a bowlful of leftover chocolate and sprinkles!


Have you ever embarked on a seemingly basic cooking adventure . . . only to find yourself elbow deep in dough two hours later? Maybe you got egg in your hair. Or ganache on your foot. Butter on your glasses. Or perhaps something just took WAY longer or was WAY harder than you ever imagined it could be. Tell us about it! Just leave a comment or email us at neverhomemaker [at] gmail [dot] com.

Like what you just read? You can subscribe to the feed of these posts or follow us on Twitter or Facebook to be the first to know what the (never home)makers are up to. And we’ll love you forever!

Read more...

Don't Sweat the Sweet Stuff?

>> Wednesday, August 25, 2010


Carla writes:

"Hi, Ashley! I've been following your blog for a while now. I found you while looking up detoxes on Google. Anyway, I love your blog because you seem to have a really healthy, balanced attitude toward your diet and training. I'm wondering (and this is a question I have of all healthy living bloggers, not just you): Do you ever eat BAD food. Like candy? Fast food? French fries? Soda? Sometimes it seems to me like everyone in the blogosphere is eating so perfectly well and that my candy bar habit is getting the best of me! Please help!"

Carla, Carla . . . Carla. THANK YOU for asking this question. It's funny, when I bumped into (Healthy) Ashley at the Boilermaker in July, we found ourselves on this topic. There wasn't much for vegetarians/vegans to eat at the expo, and we were making a crack that it'd be funny to bump into each other while chowing down on some mega fast food. Doesn't seem right that I'd (or any other "healthy" blogger) eat crap . . . does it?


At least for me, it's not all coconut water, celery sticks, and sugarless cookies. I strive my very best to eat a healthy diet. This means I eat a lot of whole foods -- you know, starting the day off right with a green smoothie, Greek yogurt with fruit, or oatmeal bowl. But this doesn't mean I do this every day. There are times you'll catch me with a glazed donut and coffee (even though I said in my homemade chai post I'm not a coffee drinker, caffeine happens . . .). I'm also known to knock back quite a few slices of pizza on occasion.

And by "occasion" I mean like every weekend.


Stephen will be the first to tell you that I have a sweet tooth. Embarrassing as it might be for me to admit this to the healthy living blog world: I love peanut butter M&Ms. I usually eat some every single week. And that's on top of all the tasty desserts you see on this blog. I could go on a while about all my "unhealthy" eats, but that won't get to my point.

My answer to you is this: I exercise hard. I party hard . . . and usually that party involves bread (yes, sometimes WHITE bread). And cheese (fondue, perhaps?). And beer (the darker and heavier, the better!). I'm no nutritional saint. And you need not be either.


The best you can do is the best you can do. It's always good to be striving to eat as many "good" foods as possible. (we don't like assigning positive or negative words to foods -- so good just means foods that contribute to the healthy function of your body.) More times than not, the processed stuff -- yeah, processed: Think Lean Cuisine mac 'n cheese, which I'm known to chow down on occasionally) -- definitely doesn't taste as good as my vegan-ized, homemade version (with a side of kale, to boot). Make sure you get in your fruits, protein, veggies, whole grains, and drink tons of water. It sounds much easier than it actually is.

But a girl (or guy) can't survive on Reece's Peanut Butter Cups (another favorite) and ginger ale alone (trust me, I've been there -- in college). You need to make sure that all that junk food is in addition to a healthy diet, not in place of it.

However, do the best you can do and pay attention to how those not-so nutritional foods make you feel. My big thing is learning portion control. I like enjoying the sugary, salty, fat-filled stuff on a limited basis. Through cooking and baking, I've even started to prefer my own creations to many packages items I used to consider myself addicted to. You'd be amazed at what a little time in the kitchen can do. I even created these vegan peanut butter twix bars.


Yes, they are still sugary and sweet . . . but they are VEGAN and made with whole wheat flour and natural peanut butter. C'mon!

I also find that when I'm at work, I fall into the candy bar-a-day trap. So, what I did to help change that situation is pay attention to why I was searching for the quarters and dimes. Was I hungry? Stressed? Bored? Was "everyone else doing it," so to speak? Now I've stocked my desk with some healthier treats (oatmeal, nuts, peanut butter and whole wheat crackers, etc.) . . . and I take those cravings as they come. Sometimes, I do just want a treat -- so I let my inner sugar-crazed girl go wild. But I make sure to spoon myself an extra serving of veggies at dinner.


I can't speak for all healthy living bloggers, but my diet involves at least some candy, soda, and fast food. And -- at least for me -- the short answer is what we hear all the time, but is often the most difficult advice to heed: MODERATION is key. I hope this post was helpful to you!

Tell us: What are your secret cravings? Do you like sweet, salty, a mix of both? Don't be shy (or embarrassed). Even the "bad" stuff can have a place in a healthy diet. We'd love to hear your thoughts. Just leave a comment or email us at neverhomemaker [at] gmail [dot] com.

Like what you just read? You can subscribe to the feed of these posts or follow us on Twitter or Facebook to be the first to know what the (never home)makers are up to. And we’ll love you forever!

Read more...

Peanut Butter Candy Cookies

>> Thursday, June 17, 2010


One of the main reasons I bake is because I crave sweets almost constantly. Well, not exactly. Since I've stopped eating most packaged foods, my sugar cravings have curbed slightly. But I love, love, love a good cookie. So, when a craving for peanut butter & chocolate (the most common of all) consumed me Sunday night, I made these cookies. They're a bit juvenile, so I think they're perfect for kids (and me) -- still a bit healthier than the usual, store-bought cut & bake kind, but with all the flavor.

And when you're looking to bake something fast -- do you want all of THIS in your cookie (from Nestle's Ultimates - Peanut Butter Lovers)?

SUGAR, BLEACHED ENRICHED FLOUR (WHEAT FLOUR, NIACIN, REDUCED IRON, THIAMIN MONONITRATE, RIBOFLAVIN, FOLIC ACID), PEANUT BUTTER FLAVORED MORSELS (SUGAR, PARTIALLY HYDROGENATED PALM KERNEL AND PALM OILS, MILK AND NONFAT MILK, PEANUTS, PEANUT FLOUR, AND 2% OR LESS OF SOY LECITHIN, SALT, HYDROGENATED PALM OIL, ARTIFICIAL VANILLA FLAVORS), MARGARINE (PALM OIL, WATER, SUNFLOWER OIL, HYDROGENATED COTTONSEED OIL, SALT, VEGETABLE MONO- AND DIGLYCERIDES, SOY LECITHIN, SODIUM BENZOATE, CITRIC ACID, NATURAL AND ARTIFICIAL FLAVOR, BETA CAROTENE COLOR, VITAMIN A PALMITATE ADDED), PEANUT BUTTER (PEANUTS, DEXTROSE, HYDROGENATED RAPESEED AND COTTONSEED OILS, SALT), WATER, EGGS, HIGH FRUCTOSE CORN SYRUP, MOLASSES, SALT, CORNSTARCH, PEANUT BUTTER PASTE (PEANUTS, PEANUT FLOUR, PARTIALLY HYDROGENATED PALM KERNEL OIL, SALT, HYDROGENATED PALM OIL), BAKING SODA, SODIUM ALUMINUM PHOSPHATE, VANILLA EXTRACT, MONO- AND DIGLYCERIDES AND POLYSORBATE 60, VANILLIN - AN ARTIFICIAL FLAVOR

I certainly do not. Though this recipe has M&Ms and Reese's Pieces, it's far better than consuming all of that crap. That's for sure.

Convenient? Yes.
Scary? Also yes.


PEANUT BUTTER CANDY COOKIES

What you'll need . . .
  • 1 cup extra crunchy peanut butter (I used a natural variety from Wegmans)
  • 1 cup butter or Earth Balance (at room temp.)
  • 2 cups packed brown sugar
  • 2 eggs (or favorite replacement -- I used 1/2 cup unsweetened applesauce)
  • 2 teaspoons pure vanilla extract
  • 1-1/2 cups unbleached white flour
  • 1-1/2 cups whole wheat pastry flour
  • 1/2 teaspoon salt
  • 1 teaspoon baking soda
  • 1 teaspoon baking powder
  • M&Ms and/or Reese's Pieces

Method . . .
  1. Preheat oven to 350 degrees F.
  2. Cream together peanut butter, butter, and brown sugar until light and fluffy.
  3. Beat in the eggs (or replacement) one at a time; then stir in the vanilla.
  4. Sift together the flour, salt, baking soda, and baking powder and gently fold these ingredients into the wet mixture.
  5. Then mix in however many M&Ms and Reece's Pieces you want. I used about 3/4 cups M&Ms and Reece's combined.
  6. Take heaping tablespoons of dough and roll between your palms to make 2-inch balls (and spread them 2 inches apart on a nonstick baking sheet).
  7. Press each cookie with the tines of a fork.
  8. Bake for 10 minutes and then transfer to a rack to cool.
  9. Enjoy immediately (or store for up to four days in an airtight container).
Pssst! Don't forget you have until Friday, June 18th at 9PM to enter our CSN $60 Gift Certificate Giveaway. I know what I'd do with that $$$ -- buy a new food processor!!!

Like what you just read? You can subscribe to the feed of these posts or follow us on Twitter or Facebook to be the first to know what the (never home)makers are up to. And we’ll love you forever!!

Read more...

Homemade Chocolate-Peanut Butter Twix

>> Monday, March 1, 2010


This weekend I set out on a challenge like no other. I created one of my favorite candy bars, from scratch, and as vegan-ly as possible. In fact, this recipe IS vegan. The only thing I did that wasn't is be lazy. I had a ton of non-vegan semi-sweet chips around my house . . . and made this treat for a non-vegan crowd, but if you choose simply to use the Sunspire Chips I love so much, you -- too -- can enjoy this chocolate peanut butter madness vegan.

This recipe is difficult and very time consuming. Definitely one to save for weekends. And even then, you may want to enlist some help. Many of my directions are foggy. You need to figure out what's best for you . . . because by the end of it, I was covered head to toe in chocolate. There must be an easier, cleaner way :)

However, the end result is undeniably fantastic. And I'd say the bars were a big hit. Without even knowing, people said "Oh, these are these homemade twix?" To me, that meant the cookie was crispy enough, the chocolate coating wasn't too thick or lumpy, and the peanut butter wasn't too bland.


For the crispy chocolate cookie you'll need . . .
  • 1-1/4 cup wheat pastry flour
  • 1/2 cup unsweetened cocoa powder
  • 1 cup sugar (I used Sugar in the Raw)
  • 1 teaspoon baking soda
  • 1/4 teaspoon baking powder
  • 1/4 teaspoon salt
  • 1/2 cup (plus 2 tablespoons) Earth Balance (I ended up not having enough, so I used half EB and half coconut oil)
  • 1/4 cup unsweetened applesauce
NOTE: You may want to half this recipe because I ended up using only half of the resulting cookies. The rest we've been eating as wafers, and they're really good. But the peanut butter and chocolate recipes below will only make about 30 homemade twix. You'll have at least 20 extra cookies. But I messed up some of mine, so it was good I had the extra.


Method . . .
  • Sift together mix the flour, cocoa, baking soda and powder, salt, and sugar in a medium-sized bowl.
  • In the bowl of an electric mixer, cream together the Earth Balance and applesauce -- until fluffy. Add the dry ingredients and mix until it forms a dry dough (it will not stick together extremely well unless you form it . . . but it shouldn't be too crumbly -- if it is, add -- 1 tablespoon at a time -- canola oil until it comes together easily when formed with your hands).
  • Take rounded teaspoons of batter and place on a parchment paper-lined baking sheet approximately 2 inches apart.
  • Form dough into twix-sized pieces. About 4 inches by 1/2 inch (or so).
  • Bake for 10 minutes at 375 F (if you have to use a mixture of Earth Balance and coconut oil, lower your oven temp to 350 degrees F and bake for 15 to 20 minutes).
  • Set on a rack to cool for 15 minutes. If your cookies are too wide, you can cut them in half length-wise (I ended up doing this when mine came out an inch wide).
  • Then return to oven until crispy. Another 10 to 15 minutes or so. Remove from oven and put on cooling rack in your refrigerator until cooled completely.

For the peanut butter filling you'll need . . .
  • 1/3 cup crushed graham crackers
  • 3/4 cup natural peanut butter
  • 3/4 cup confectioners sugar
  • 1 tablespoon vanilla

Method . . .
  1. Mix together all ingredients.
  2. Set aside until your cookies are cooled.
  3. All you do is put about a teaspoon to 2 teaspoon amount of peanut butter on each cookie. I found it was easy to just roll it into a snake shape with my hands and place/press on to stick.

For the chocolate coating you'll need . . .
  • 1 bag of good quality semi-sweet chocolate chips (to make it vegan, use Sunspire)
  • 3 teaspoons agave nectar

Method . . . (and putting it all together)
  1. Make sure you're doing this step AFTER you've already got your peanut butter on your cookies. The chocolate will cool relatively fast, so you don't want it to get stiff.
  2. Prepare cookie sheets with some wax paper on 'em. This will help the end result "Twix" from sticking when it's a hot chocolate mess. Yes, that's a Christian Siriano reference.
  3. In a small microwave safe bowl, put in your chips and agave.
  4. Microwave on high for 30 seconds, stir, and then another 30 seconds until you can stir the mixture smooth. You may also use a double-boiler for this part. Just melt the chocolate.
  5. Take one cookie topped with peanut butter and spoon over it a heaping tablespoon of the hot chocolate use your hands (you may want to wear some food-grade rubber gloves) to carefully coat the whole bar in chocolate. This part is difficult, but don't be discouraged. Like with your first kiss, it'll seem intimidating, but you'll know what to do in the moment.
  6. Put 'em in the refrigerator for an hour or two -- until the chocolate is hard again.
Someone at the party said they look like that thing in the pool in Caddyshack. I certainly agree. But they taste AMAZING! So . . . Don't forget to check out this morning's post with the first three book selections for the Foodie Book Club! You can still sign on at any time. So far, we're happy to say we have 41 members! And we're so happy you're all so excited about this. I'm going to pick up my book after work today and try to at least get through the first couple chapters.

BUT today is Stephen's 26th birthday! In fact, as I type this, Stephen was born 26 years ago (at about ten to 8, he says). So, we'll definitely be cooking up a storm to celebrate. And, of course, even though we don't have TV . . . we'll be anxiously waiting to hear Jake's choice tonight. Tenley or Vienna? I think we already know the answer, and it makes us sad.

Like what you just read? You can subscribe to the feed of these posts or follow us on Twitter or Facebook to be the first to know what the (never home)makers are up to. And we’ll love you forever!

Read more...
Related Posts Plugin for WordPress, Blogger...

About This Blog

MyFreeCopyright.com Registered & Protected

© 2009-2014 by the (never home)makers
All content on this blog is copyrighted.

Want to publish our pics, tips, or tricks?
Contact us! [neverhomemaker@gmail.com]

We value transparency. Links on this page may contain affiliates. In addition, please see our disclosure policy regarding sponsored posts.

  © Blogger template Simple n' Sweet by Ourblogtemplates.com 2009

Back to TOP  

Blogging tips















