Showing posts with label muffins. Show all posts

Chocolate Chip Zucchini Muffins

>> Monday, September 5, 2016

Baking season is upon us. I picked up a delicious mix of apple pie spices the other day. So, when I saw a gigantic (and lonely!) zucchini hanging out in the fridge this morning, I knew what to do: Lure Ada off the iPad to make zucchini muffins! I have been making different banana breads and zucchini breads for years -- but I rarely go into muffin form. My plan is to freeze these guys for before-the-bus breakfasts.

Sniff. School starts tomorrow.

I adapted this recipe I found to make the muffins. I am also going to try to make a lower sugar version because I really don't feel like they need quite this much sweetness. I suggest cutting the sugar in half, and I'll report back with my own results soon.

PS: I've taken to using an ice cream scoop with a trigger release when I'm making muffins and cupcakes. Really makes the pouring part easier and less messy.


CHOCOLATE CHIP ZUCCHINI MUFFINS

Makes about 36 standard size muffins.

What you'll need . . . 

  • 3 cups all purpose flour
  • 3 tablespoons chia seeds
  • 1 teaspoon Kosher salt
  • 1 teaspoon baking soda
  • 1/2 teaspoon baking powder
  • 2 teaspoons apple pie spice*
  • 1/2 teaspoon arrowroot powder or cornstarch
  • 1 cup unsweetened applesauce
  • 1 cup brown sugar
  • 1 cup sugar
  • 3/4 cup canola oil
  • 1 teaspoon almond extract
  • 2-1/2 cups shredded zucchini
  • Chocolate chips, optional

* If you don't have a mix, use 1 teaspoon cinnamon, 1/2 teaspoon allspice, and 1/4 teaspoon of both nutmeg and cloves. Or all cinnamon. Whatever floats your boat.

Method . . . 
  1. Preheat your oven to 350 degrees F. Line a muffin tin with paper liners.
  2. Whisk together the flour, chia seeds, salt, baking powder, baking soda, arrowroot powder, and spices in a bowl.
  3. Whisk together the applesauce, sugars, oil, and almond extract. Fold in the zucchini and optional chocolate chips.
  4. Combine the wet and try ingredients with a spatula until everything is wet. Be careful not to over-mix.
  5. Spoon out batter into muffin liners until they are a bit over half full.
  6. Bake for 25-28 minutes, until golden brown. Remove from pan and let cool before eating.
  7. Repeat baking instructions with remaining batter.

Related recipes:

Read more...

Freezable Vegan Muffins

>> Wednesday, November 5, 2014

Breakfast used to be a free-for-all in our house. We have a few boxes of plain cereals, old fashioned + steel cut oats, toast, eggs, and fruit. I’d just make whatever with them depending on my mood, but it would be hectic and unsatisfying. Now I’m trying to treat breakfast with the same attention I pay to dinner, and it’s working out well.

These muffins are Ada’s favorite addition to her meal. I usually give her two with a banana and some milk. I made a few with chocolate chips for a semi-healthy snack, but you can really toss anything in them -- frozen or dry fruit, shredded veggies (like carrots or zucchini), baking chips, seeds, nuts, etc.


VEGAN BREAKFAST MUFFINS


What you’ll need . . . 

  • 3/4 cup all-purpose flour
  • 3/4 cup whole wheat flour
  • 1-2 tablespoons flax meal
  • 2 teaspoons baking powder
  • 1/2 teaspoon baking soda
  • 1/2 teaspoon cinnamon
  • 1/4 cup brown sugar*
  • Pinch sea salt
  • 1 cup almond milk (or other)
  • 1/4 cup olive oil (or coconut)
  • 1 teaspoon vanilla or almond extract
  • 1/2 - 1 cup add-ins (see above)

* I only have brown sugar in the house right now, but I think coconut sugar would taste amazing in this recipe. Or cane sugar -- other natural alternatives -- in the same ratio.

Method . . . 

  1. Preheat oven to 400 degrees F. Line a muffin tin with paper liners (or just grease well). Set aside.
  2. Whisk together the flours, flax, baking powder, baking soda, cinnamon, sugar, and salt.
  3. Then, in another bowl, combine the milk, oil, and vanilla.
  4. Pour the wet ingredients into the dry and mix until just combined. Then fold in whatever add-ins you want to include. Portion equally into the 12 tins.
  5. Bake around 20 minutes, until lightly brown and done in the middle (you can test with a toothpick).

// FREEZE + MORE MUFFINS


Let your muffins cool entirely on a cooling rack. Then place them in freezer bags. If you make a large batch, you can also freeze them on a cookie sheet before transferring to bags so they don’t stick to one another. To defrost, just warm in your oven for 10-20 minutes on 200 degrees F.


Enjoy!

Like what you just read? Browse more of our posts + recipes on Pinterest. You can subscribe to the feed of these posts or follow us on Twitter or Facebook to be the first to know what the (never home)makers are up to. And we’ll love you forever!

Read more...

Strawberry Shortcake Muffins

>> Tuesday, July 22, 2014

I'm a little late with posting these, since strawberry season has come and gone here in upstate NY. And pretty much everywhere else for that matter. If you were smart and preserved or have frozen strawberries on hand, they would make a perfect substitute for this recipe. Now that blueberry season is upon us, feel free to use them (or any other fruit) in equal ratio as well!

These muffins are gluten-free and make a delicious dessert or even breakfast, depending on your cravings. I used a 1/2 cup of sugar, but I'm thinking in the future I could certainly use less or substitute in maple syrup or honey for a lower glycemic punch.


STRAWBERRY SHORTCAKE MUFFINS

What you'll need . . . 
  • 2-1/2 cups rolled oats (if you're GF, use Bob's Red Mill)
  • 1 cup low fat Greek yogurt*
  • 2 tablespoons flax meal + 6 tablespoons hot water (you could also use 2 eggs)
  • 1/2 cup raw sugar 
  • 1-1/2 teaspoons baking powder 
  • 1/2 teaspoon baking soda 
  • 1 cup fresh strawberries, chopped -- more if desired
* To make this recipe vegan, you can substitute in your favorite dairy free yogurt. You could even experiment with nondairy milk, like Homemade Almond Milk, though you will need to perhaps use a bit less, more like 3/4 cups. 

Method . . . 
  1. Preheat your oven to 400 degrees F. Lightly grease a muffin tin or use liners and set aside.
  2. Give your flax eggs some time to gel up by combining the 2 tablespoons of flax meal with the 6 tablespoons of hot water. Just whisk in a little dish and let sit for a few minutes.
  3. Put all ingredients (except strawberries -- you will fold those in at the end) in your food processor and pulse until smooth. Alternatively, I'm sure you could just use some oat flour and mix it with the other dry ingredients and then add the wet later and stir until well incorporated.
  4. Then transfer to a bowl and fold in the strawberries. The flax and oats will make the dough quite sticky, so just make sure your muffin tins are greased. I used Earth Balance.
  5. Portion equally for 12 standard size muffins. Bake for 20 minutes, then check to see if edges are turning golden and you can even prick a muffin to check the center for done-ness. You may wish to bake up to 25 minutes or so.
  6. Let cool on a rack before serving.

// FREEZE + RELATED RECIPES

If you'd like to save some to freeze, just let cool completely, then wrap each individually in plastic wrap and store in another airtight freezer container for up to 6 months, longer if you have a deep freeze.


What's your favorite seasonal fruit? 

Mine? Strawberries. But I'm sure you could have guessed it!

Like what you just read? Browse more of our posts + recipes on Pinterest. You can subscribe to the feed of these posts or follow us on Twitter or Facebook to be the first to know what the (never home)makers are up to. And we’ll love you forever!

Read more...

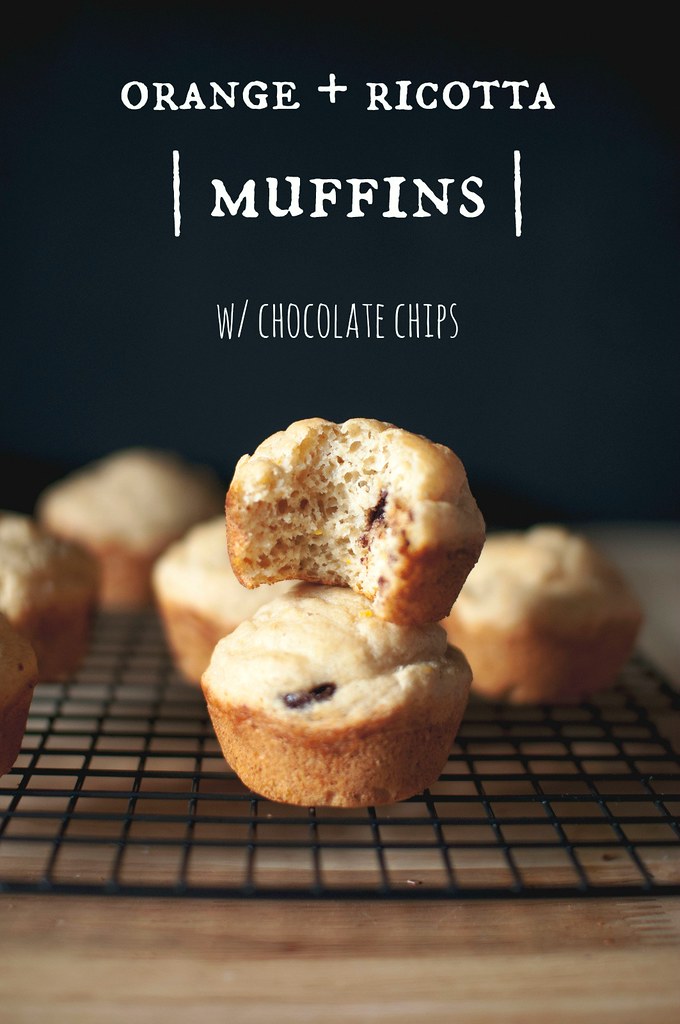
Zesty Orange Ricotta Muffins, etc.

>> Monday, January 13, 2014

Our new favorite pizza topping is ricotta cheese. Thing is, we usually have quite a bit leftover after using only a few dollops . . . a couple nights a week. Anyway, I was making Ada chocolate chip pancakes for breakfast on Friday, it's sort of our tradition, and I got this idea to give them a dose of protein with ricotta.

I made myself a few, too, but added adult flair with orange zest and honey.

Whoa. Good decision.


We don't have time for pancakes everyday. So, with our Juice Pulp Muffins // Bread fresh in my mind, I experimented + discovered this recipe works very well as pancakes, waffles, and muffins. It just requires a simple tweak. More or less almond milk. More for thinner batter for pancakes, a moderate amount for thicker waffle batter, and less for these muffins.

Or, should I say, your new favorite muffins?


ZESTY ORANGE RICOTTA MUFFINS
Or pancakes. Or waffles. Best with dark chocolate chips.

What you'll need . . .
  • 1-1/2 cups white whole wheat flour 
  • 1 tablespoon baking powder 
  • 1/4 teaspoon salt 
  • 2 tablespoons honey 
  • Zest one large orange 
  • Juice of large orange (hand-squeezed works great)
  • 1 tablespoon flax meal + 3 tablespoons hot water 
  • 1/2 cup part-skim ricotta
  • 3/4 to 1 cup almond milk (or other milk)***
  • 1 teaspoon vanilla extract 
  • Handful or two chocolate chips, dark chocolate
Method . . .
  1. Preheat your oven to 350 degrees F. Lightly grease a standard muffin pan with oil or butter or substitute. Or line with muffin papers. Alternatively, skip this step if you want to make pancakes or waffles. 
  2. In a large bowl, whisk together the flour, baking powder, and salt. 
  3. In another bowl, mix together the rest of the ingredients (starting with 3/4 cup milk) -- except the chocolate chips. 
  4. Combine the wet and dry ingredients and mix until just  combined. Batter should be thick, but not like bread dough. Add more liquid, depending. 
  5. Fold in chocolate chips + portion equally into the muffin tin.
  6. Bake for between 18-22 minutes, until golden brown. Let cool on a cooling rack to avoid sogginess.


*** To make pancakes or waffles, thin out batter with almond milk until familiar textures start to happen. Honestly, I'd make waffles with the muffin batter so they are extra thick. Pancakes tend to work better with a full cup of milk + be sure not to flatten while cooking.

ALSO: Make sure pan or waffle iron is well greased. And for pancakes, set heat to medium, as the juice and honey will tend to make them brown/burn a bit quicker.


The texture is almost like baked doughnuts. I was really surprised by all the airy lightness these guys pack. I'm not used to that happening when not using eggs. It was one of those lucky "mistakes" where -- instead of it being in the plan, it just happened that way. I'm pretty sure it's because I used just one flax egg. Or, again, just luck.

You may also substitute maple syrup in for the honey. You'll notice there isn't refined sugar in the recipe, as I'm trying to moderate how much gets in Ada's diet. It's funny how turning two opens up this new world of junk food, whether we intend for it to happen or not!

We do what we can.
We eat what we love.
It's a delicious balancing act.

Like what you just read? Browse more of our posts + recipes on Pinterest. You can subscribe to the feed of these posts or follow us on Twitter or Facebook to be the first to know what the (never home)makers are up to. And we’ll love you forever!

Read more...

Apple Cider Dunkers

>> Monday, August 20, 2012


It's fall. Well, almost. But it FEELS like it. Sign? Our favorite local cider mill opened last week. They have everything from mums to cider, of course, to cheddar cheese to doughnuts. I cannot get enough.

Behold! The cider doughnut in all its glory.


Thing is, it's not reasonable for me to eat three doughnuts a day (yeah -- that happened), every day. Not for the wallet. Not for the waistline. So, I spend some time looking through my various muffin/cake recipes, attempting to craft a similar, but baked-versus-fried treat.

And then the Cider Dunker was born.


As you'll see, the ingredients -- including sparkling water again! -- in this little guy are hardly sinful. In fact, I made them for breakfast (sans the sugar-topping, which I'll get to in a minute), and can't wait to have more tomorrow morning.

But enough about me. Let's get to it.


What you'll need . . .

  • 3 tablespoons Earth Balance 
  • 1 tablespoon olive oil 
  • 1/4 cup brown sugar 
  • 2 tablespoons apple cider 
  • 1 tablespoon flax meal + 2 tablespoons almond milk 
  • 1/2 cup sparkling water 
  • 1 cup whole wheat flour 
  • 1 teaspoon baking powder 
  • 1/4 teaspoon baking soda 
  • 1 teaspoon cinnamon 
  • pinch salt

Method . . .

  1. Preheat oven to 375 degrees F. Spritz a mini muffin pan and set aside. 
  2. In the bowl of an electric mixer fitted with the paddle attachment (I got this awesome one that scrapes the bowl as it mixes for X-mas!), beat together the Earth Balance, olive oil, sugar, apple cider, flax meal + almond milk, and sparkling water. 
  3. In another bowl, whisk together the rest of the ingredients and then add them into the wet. Mix until just combined. 
  4. Scoop heaping tablespoonfuls of the batter into the mini muffin pan. (This recipe yields approx. 16 dunkers, so you won't use the entire pan.) 
  5. Bake for 10 to 12 minutes. Until a toothpick inserted into the middle comes out clean.
  6. Let rest in pan for 5 minutes or so before removing.

This next part is entirely optional, but highly recommended. Well, and it's where the "dunker" part comes from. If you dip the top of the dunker into a bit of cider and roll it into some cinnamon/sugar mixture, it's divine.

Too bad we ate them all already.


And SPEAKING of eating lots of stuff, we have literally tons of squash to use up from our CSA share this week. Can't wait to share some fun recipes with you!

By the way, have you ever heard of ground cherries?


We hadn't, but they're very interesting. Sort of like cherries. Sort of like tomatoes. We didn't get enough to make much of anything, so we just ate them raw. But I'd love to make something more elaborate in the future. Suggestions?


Today on Writing Chapter Three, we posted some photos from our new evening routine. It rained too much today, so looking back at these photos is nice. I love the whole descent into fall!

Like what you just read? You can subscribe to the feed of these posts or follow us on Twitter or Facebook to be the first to know what the (never home)makers are up to. And we’ll love you forever!

Read more...

Blueberry Skillet Cake

>> Monday, April 9, 2012

We have bags upon bags of frozen blueberries leftover from our winter CSA share. It's not that we don't like blueberries. I just tend to bake with chocolate and peanut butter, as you'll see later this week, instead of fruit. This cake is very much like a gigantic blueberry muffin. Perfect for breakfast.

(Or lunch.)
(Or dinner.)
(Or snacks.)


I apologize for the eh-ness of these photos. I'm between photo editing softwares. I'm buying Lightroom soon, though!


BLUEBERRY SKILLET CAKE

What you'll need . . .
  • 2 cups whole wheat flour
  • 1/2 cup cornmeal
  • 1 teaspoon kosher salt
  • 1 tablespoon baking powder
  • 1/2 cup brown sugar
  • Juice of 1 lemon
  • 1 teaspoon vanilla extract
  • 2 bananas
  • 1 cup almond milk
  • 1/4 cup olive oil
  • 2 cups frozen blueberries
  • 2 teaspoons cornstarch

Method . . .
  1. Preheat your oven to 400 degrees F. Place your skillet inside to preheat as well.
  2. In the bowl of an electric mixer fitted with the paddle attachment, mash your bananas well, until they are as smooth as possible. Egg-like.
  3. Then add the vanilla extract, brown sugar, and lemon juice. Blend until well incorporated.
  4. Then add in the almond milk. Again. Stir in until well incorporated.
  5. In another bowl, whisk together the whole wheat flour, cornmeal, salt, and baking powder.
  6. Add the dry ingredients to the wet and mix until everything is moistened.
  7. In another bowl, toss the frozen blueberries with the cornstarch. Then fold them into the batter.
  8. Pour mixture into preheated skillet. Bake for 30 to 40 minutes, until golden and a toothpick inserted into the center comes out clean.
  9. Let cool before slicing.

NOTE: I tossed the blueberries with cornstarch because I read somewhere that it eliminates staining for a cleaner look. I don't know how well it worked, really. So, if you don't care about blue everywhere, you can skip that step.

The banana in the recipe isn't overpowering, which I'm thankful for. But I think it gave it a fantastic, dense texture -- and allowed me to use less oil than I normally would.


And remember in my Postpartum Fitness post how I wrote that I needed a haircut?

DONE.


I took matters into my own hands. I don't think I botched the job either. If you want to see for yourself, check out Writing Chapter Three. I also wrote all about taking care of sick baby Ada. It was quite a week.

Like what you just read? You can subscribe to the feed of these posts or follow us on Twitter or Facebook to be the first to know what the (never home)makers are up to. And we’ll love you forever!

Read more...

Hearty Pecan-Chip Micro-Muffins

>> Friday, June 17, 2011

The microwave has been disinfected -- twice (to clean out those nasty forgotten collards). So, I can finally post that recipe I've been dreaming up.

But first, feast your eyes:


HEARTY PECAN-CHIP MICRO-MUFFINS

What you'll need . . .
  • 4 tablespoons whole wheat flour
  • 2 tablespoons rolled oats (uncooked)
  • 1/2 teaspoon baking powder
  • Pinch salt
  • 1 large banana (about 1/2 cup) mashed
  • 1 tablespoon almond milk
  • 1 tablespoon coconut oil
  • 2 tablespoons crushed pecans
  • 2 tablespoons chocolate chips
  • 1 tablespoon peanut butter
  • 1 tablespoon almond milk
  • 1/2 teaspoon vanilla extract

Method . . .
  1. In a cereal bowl (or other small bowl), whisk together the flour, oats, baking powder, and salt.
  2. Add the mashed banana, almond milk, coconut oil, pecans, and chocolate chips. Mix well.
  3. Use a bit of the leftover oil to lightly grease a mug. Then pour in your mixture.
  4. Cook for between 2-1/2 and 3 minutes. Then let cool for a minute in the microwave.
  5. In the meantime, make your peanut butter sauce: Mix together the peanut butter, almond milk, and vanilla extract.
  6. Carefully take your mug out of the microwave (it'll be hot) and tip it over onto a plate. Cut the large muffin in half.
  7. Then serve with the peanut sauce.

Breakfast be messy -- you may even need to change your shirt before work. But you'll make these muffins over and over again. They take five minutes to prepare! Experiment with different add-ins, too. Or try some of our other micromuffin recipes: Mighty Green and Pumpkin-Chocolate Chip.

Don't forget to check out our Tazo Iced Chai Giveaway. And if you're catching up on baby-related reading, I posted about last night's preggo 5K PR on (never home)maker, baby!

Like what you just read? You can subscribe to the feed of these posts or follow us on Twitter or Facebook to be the first to know what the (never home)makers are up to. And we’ll love you forever!

Read more...

Salty Air . . .

>> Thursday, June 16, 2011

I'm taking a breather today. I woke up with the best intentions to make an awesome breakfast to share with you all. A new micromuffin recipe I've been dreaming up with tons of extra protein go-power.

I mixed together the ingredients . . .
oiled the mug . . .
and opened the microwave.

To my horror, a small dish of cooked collards were already in the machine. Let me specify. They had already been in there for at least three days. Rotting. I'm not one to re-heat greens. I have enough trouble eating them the first day, so the "oops" belongs to THIS guy:


Problem is, though I'm feeling much less morning sickness, a stench like that could send even pre-preggo Ashley off the deep end. My appetite was ruined. I almost lost my breakfast -- that I hadn't even eaten yet! So, I poured myself a bland bowl of Cheerios and sliced some strawberries over them. Which means no fun recipe for you!

Yeah. Today's a breather day. I want you all to inhale as you take in the beauty of this picture . . .


Exhale.
Inhale again.
Exhale.

This is where we'll be in just 15 days. And I can't wait. Unfortunately, though, today's post will have to wait until Stephen disinfects the microwave. Ick!

If you're interested, we posted 25 goals for 25, er, 23 weeks on (never home)maker, baby! today. We'd love to hear if we're on the right track, if we're forgetting anything, or if we're way too ambitious!

Like what you just read? You can subscribe to the feed of these posts or follow us on Twitter or Facebook to be the first to know what the (never home)makers are up to. And we’ll love you forever!

Read more...

Banana-Walnut Muffin Tops

>> Thursday, February 10, 2011

They're sort of like cookies. Sort of like muffins. And made without butter or sugar. All signs point to healthy so -- of course -- you know I'm eating them for breakfast as often as possible. If you really break it down, it's like gobbling up a hearty oatmeal bowl full of bananas, nuts, and chocolate.

Well, with a side of dry toast (the flour wouldn't be in an oatmeal bowl -- oh well). Still, not too shabby, if you ask me.


BANANA-WALNUT MUFFIN TOPS

What you'll need . . .
  • 2 large bananas
  • 1 teaspoon vanilla extract
  • 2 tablespoons maple syrup
  • 1-1/4 cups whole wheat flour
  • 1/2 cup hazelnut (or other nut) meal
  • 1/2 cup steel-cut oats (uncooked)
  • 1/2 teaspoon coarse Kosher salt
  • 1 teaspoon baking powder
  • 1/2 teaspoon baking soda
  • Handful walnuts
  • Handful chocolate chips

Method . . .
  1. Preheat your oven to 350 degrees F. Line a cookie sheet with parchment paper and set aside.
  2. In the bowl of an electric mixer, use the paddle attachment to mash the bananas on high speed until gooey/eggy. Then mix in the vanilla extract and maple syrup.
  3. In another bowl, whisk together the flour, hazelnut meal (if you don't have it -- just process some other nuts in a food processor until flour-like), oats, salt, baking powder, and baking soda.
  4. Add the dry ingredients to the wet and mix until well incorporated.
  5. Stir in the walnuts and chocolate chips.
  6. Bake for 16 to 18 minutes until golden brown. Let cool a bit before serving.
THURSDAY STYLE

Finally made some time to snap a fashion photo for you. These are all staples from my 30 for 30 this month. I love the striped shirt most of all.


Jeans and plain shirt: Gap
Striped shirt: J. Crew
Shoes: Target
Scarf: TJ Max


I know it seems a bit crazy to wear cropped jeans and shoes with no socks when it "feels like" -2 degrees F outside. That's why I bundle like a maniac before heading to work. I don't go OUT like this.

No, I look far more sexy. Oh, yeah . . .


Thankfully, the heat at work is boiling hot, so I enjoy stripping down the layers after my quarter-mile walk from the car to my office door. I do need to find a looser hat because I curled my hair this morning, but you'd never know it now.

How does the weather impact your style? Lately, I've felt like living in sweats because they're warm and layer-able. Oh, I'm looking forward to spring! Just leave a comment or email us at neverhomemaker [at] gmail [dot] com.

Like what you just read? You can subscribe to the feed of these posts or follow us on Twitter or Facebook to be the first to know what the (never home)makers are up to. And we’ll love you forever!

Read more...

Mighty Green Micro Muffins and Giveaway

>> Friday, January 21, 2011

***Giveaway Is Now Closed***


Happy Friday! Let's jump right in: We love the folks at iHerb.com. Not only do they send us great stuff to review (like the Midori Greens in this tasty micro muffin). But they are also incredibly generous to YOU all.

That's right -- they're furnishing another giveaway for us. Keep reading to see how you can win!

First, today's breakfast . . .


I'm always looking for ways to sneak greens into my diet. So, of course, I'm drawn to Midori Greens powder because it packs a powerful nutritional punch -- without weird flavor.

What's inside? Ashitaba, Japanese Matcha Green Tea, Wasabi, Whole Leaf Grasses, Herbs & Vegetables, Chlorella, and Marine Phytoplankton -- all of which support gastrointestinal health and overall well-being. How does it taste? The best I can describe is that it tastes a lot like Odwalla's Superfood drink.


In other words: It tastes green. But in a good way that goes well in breakfast foods. Trust me! It blended well into my Chocolate-Cherry Start-Your-Day-Right Smoothie the other day. And in this micro muffin, all you taste is deliciousness! (And chocolate chips.)

MIGHTY GREEN MICRO MUFFINS
(Print This Recipe!)

What you'll need . . .
  • 2 tablespoons flax meal
  • 2 tablespoons whole wheat flour
  • 1 scoop of Midori Greens
  • 1/2 teaspoon ground cinnamon
  • 1/2 tablespoon Bob's Red Mill egg replacer, just the powder
  • 1/2 (heaping) teaspoon baking powder
  • 1/4 cup unsweetened applesauce
  • 2 tablespoons maple syrup (or agave)
  • Handful chocolate chips

Method . . .
  1. Whisk together the dry ingredients (flax, flour, midori powder, cinnamon, egg replacer, and baking powder).
  2. Then add in the wet ingredients (applesauce and maple syrup).
  3. Fold in the chocolate chips.
  4. Spritz a mug with canola oil and pour your batter into it.
  5. Microwave on high for 2 minutes. Let cool for one minute. Then turn onto a plate and enjoy!
If you like this recipe, you'll probably like our Pumpkin-Chocolate Chip Micro Muffins and Banana-Chocolate Chip Micro Muffins, too!


THE GIVEAWAY:

Here's the scoop (get it? scoop?) . . .

THE PRIZE: $50 Shopping Spree at iHerb.com PLUS 1 (one) container of Midori Greens. Total value: $91.97.
TO ENTER: Leave a comment with the words MIGHTY GREENS somewhere in the mix.
IN ADDITION: Tell us your favorite way to incorporate greens into your diet.
GIVEAWAY CLOSES: Friday, January 28th at 9:00PM EST
PRIZE SHIPS: USA and International. See note below.
ALSO: To win, I need your email address -- so please provide it (or your blog link so I can find it -- just some way of contacting you) or, unfortunately, you cannot win.
PS: One entry per email address is allowed. The winner will be selected using Tara's Random Number Generator and announced Monday (1/31) morning.

(YES! This giveaway is open to both U.S. AND International residents. The winner must register at iHerb.com to claim his/her prize (it's quick and easy, I promise! And they don't SPAM you.) International winners are responsible for additional customs fees, taxes, duties.

Like what you just read? You can subscribe to the feed of these posts or follow us on Twitter or Facebook to be the first to know what the (never home)makers are up to. And we’ll love you forever!

Read more...
Related Posts Plugin for WordPress, Blogger...

About This Blog

MyFreeCopyright.com Registered & Protected

© 2009-2014 by the (never home)makers
All content on this blog is copyrighted.

Want to publish our pics, tips, or tricks?
Contact us! [neverhomemaker@gmail.com]

We value transparency. Links on this page may contain affiliates. In addition, please see our disclosure policy regarding sponsored posts.

  © Blogger template Simple n' Sweet by Ourblogtemplates.com 2009

Back to TOP  

Blogging tips