Showing posts with label bread. Show all posts

My All-Purpose Bread Mix

>> Tuesday, February 6, 2018

I've been in a great groove with homemade meals lately. For us, bread often makes the meal. This isn't to say we don't eat heaps of healthy whole foods. But if we're trying to be successful with resisting takeout and meals out of the house, making tasty pizza and other bread-y things is essential. So, I want to share with you the ONE recipe I've been using to make all of it.

I use this mix for garlic knots, pizza dough, and naan.

It does it all!


What you'll need . . .
  • 3-1/2 to 4 cups all-purpose flour
  • 2 tablespoons sugar
  • 2-1/4 teaspoons instant yeast
  • 1 teaspoon salt
  • 1-1/2 cups warm water or non-dairy milk

Method . . . 
  1. In a large bowl, whisk together 3-1/2 cups flour, the sugar, yeast, and salt.
  2. Add in water if you're making garlic knots or pizza dough. Add in milk if you're making naan.
  3. Mix with your hands until a ball forms. You may need to add more flour if it's too sticky to handle.
  4. Knead for 5-10 minutes. I find it's best when I really take the time, but five minutes will do in a pinch.
  5. Drizzle with olive oil and cover with plastic wrap or a damp tea towel.
  6. Let rise in a warm spot for 2-3 hours, until doubled in bulk.

To bake . . . 
  • Divide into small balls to make garlic knots. Bake for 10-13 minutes at 425 degrees F, until golden.
  • Divide into discs to make pizzas. We place this dough on well greased pans and press it thin. Bake with toppings at 450 degrees F for 10-13 minutes, until golden.
  • Divide into fist-sized balls and roll flat for naan. Bake on a pizza stone in a well preheated oven at 500 degrees for a few minutes until golden.

What's your favorite multi-purpose recipe?

I hope to be back into another blogging groove soon. Ada woke up with the stomach bug and I have some big deadlines this week. But we'll all survive! What would you like to see next? Any requests?

Read more...

Expanding Our Homemade Pantry

>> Tuesday, August 22, 2017

If you follow me on Instagram, you’ve seen my many food adventures this month. Stephen and I are trying to continue out frugal accomplishments by making more and more of our foods from scratch. Many of you have been interested in the recipes and methods we follow, so I figured a post was in order.

Today I’ll cover the more frequent items we’ve been cooking up. But I’m sure I’ll add to this list in the future. And be sure to check the links at the end for a more comprehensive list of the things we regularly make to stock our homemade pantry.

Yogurt


Ah, yes. Yogurt. I waited years to try making this on my own because the idea of it was daunting to me. Thing is, you can easily make yogurt in your slow cooker. A gallon of milk costs me around $1.65 to $2 and yields 8-9 cups of the stuff.

I currently follow this recipe in my crock pot. It is for Greek-style yogurt . . . but that really just hinges on how much you strain it. I tend to do a slightly thicker than regular and thinner than Greek consistency. That’s the beauty with homemade yogurt -- it’s customizable.

Now, I am investigating a few more that might create less waste and yield even more result. I hear if you use powdered milk, it thickens the batch so little straining is necessary. I began my batch by using a cup of the Siggi’s plain yogurt as my starter. The first batch was very similar to the Siggi’s and later batches (using homemade starter) have been more sour. But you can sweeten them up with honey, maple syrup, or -- my favorite -- peanut butter.

Also: I always use non-fat milk.

// Mozzarella Cheese


Mozzarella was also on my bucket list for many years, but actually buying vegetable rennet made the whole thing feel like a production. Oh, and I suppose I should also mention that I only very recently bought a rapid-read food thermometer, which has been a game changer for making all things dairy. Oh, and cheesecloth. Lots of cheesecloth, though the less-waste in me has started experimenting with nut milk bags.

I follow this recipe for mozzarella (the image is also from this site -- I somehow deleted mine). You simply heat the milk, add in the rennet and citric acid, strain curds, knead, etc. Then you get this delightful ball in less than half an hour. I’ve made this a few times now. With practice it becomes much more automatic. There’s nothing cooler than looking at a ball of fresh cheese you’ve made from scratch.

Also: I always use whole milk.

// Paneer 


Speaking of cheese, I am addicted to paneer. One way we’ve gained some independence from takeout meals is by making our own Indian food. I buy the simmer sauce at Aldi and make the cheese a day or hour ahead of time. It’s even easier than making mozzarella. All you need to curdle the milk is something like vinegar or lemon juice.

From there, it’s all about pressing. Here’s the recipe I follow for perfect paneer. I’ll be making it tonight -- with whole milk.

// Ghee


After making paneer, ghee was a natural next step, right? It’s wonderful on homemade naan (getting there in a minute -- just you wait!). It’s also great for cooking stir-fries, eggs, etc. I’ve only made one batch so far, but it’s was super easy.

Here’s the recipe I followed. It keeps on the counter for a few weeks to a month. I used unsalted butter.

// Naan


You guys know I’ve been making my own naan-like creations for years. It all started in college when I lived with a graduate student named Aggrey. He used to roll out these unleavened dough balls and cook them on the stove-top like he did back home growing up in Africa. I slowly developed my own version of a flattened, more savory pancake.

My favorite recipes include the following. We make different kinds according to our moods.

// Sandwich Bread


I searched far and wide for a suitable sandwich bread recipe. Something reminiscent of store-bought, but oh-so much better. And about a month ago . . . I found it. The perfect white bread recipe. It turns out flawlessly every single freaking time. My only sub is that I use canola oil in place of butter inside the bread. I may start brushing the top with ghee.

I’d like to slowly modify this to include more whole grains, but bread can be tricky. I’ll report back soon.

// Jarred veggies in brine


We’ve started jarring + pickling lots of veggies in the fridge -- from zoodles to jalapeƱos and more -- and I basically just chop them up and pour in this brine. The instructions say to wait until the brine is cool to add it to the veggies, but I actually like it hot with things like jalapeƱos. It makes them so soft and delicious.

// Seitan


It had been years . . . but we dusted off the old seitan recipe.

Now we make this stuff weekly. So much less expensive than buying Field Roast. I’ll have to do an updated recipe, too. We’ve been seasoning it in all different ways. We’re still making seitan dogs, too. And the other night, Stephen made a pulled-pork-esque thing with BBQ sauce! Did you know that vital wheat gluten is full of protein? It’s true.

// More pantry goodies


Homemade Almond Milk
Our Go-To Pizza Dough
Homemade Ciabatta Bread
Homemade Muesli
Adventures in Cereal-Making
Homemade Bagels
White + Whole Wheat No Knead Loaf
Three Seed Crackers
Homemade Flax Crackers
Homemade Pancake/Waffle Mix
Awesome Couscous Crackers
My Favorite Hummus
Stephen’s Homemade Pickles
Homemade Applesauce
Red Curry Kimchi

Read more...

Vegan Banana + Zucchini Bread

>> Friday, August 4, 2017

It’s that time again -- time to eat #allthezucchini. Every year I made zucchini bread, sometimes I combine with banana bread. Sometimes I add chocolate chips. This year, I figured I may as well combine all three to make a mega-bread of sorts. You can actually bake this mix into muffins, cake, or bread. It’s your call. I’ve given you the bake times to make any option work.

Without further delay, here’s the recipe. Perfect for a weekend baking session!


BANANA + ZUCCHINI BREAD with chocolate chips


What you’ll need . . .
  • 3 large ripe bananas
  • 1 cup canola oil
  • 1 cup soy or almond milk, unsweetened
  • 1 teaspoon vanilla extract
  • 2 cups all-purpose flour
  • 1 cup sprouted wheat flour*
  • 1 cup coconut sugar
  • 2 teaspoons apple pie spice (or mix of cinnamon + nutmeg)
  • 2 teaspoons baking powder
  • 1 teaspoon baking soda
  • 1 teaspoon sea salt
  • 1 cup vegan chocolate chips (optional)
  • 1 to 1-1/2 cups shredded zucchini
*I used some King Arthur sprouted flour I found at my store. It worked wonderfully, but I do think plain old whole wheat would work fine, too.


Method . . . 
  1. Preheat your oven to 350 degrees F.
  2. Mash bananas until as smooth as you can get them. Then whisk together with the canola oil, soy milk, and vanilla extract.
  3. In another bowl, whisk together the flours, sugar, spice, baking powder and soda, and salt.
  4. Then pour the wet into the dry ingredients and mix until just combined.
  5. Fold in the chocolate chips and zucchini shreds.
  6. You can bake in muffin tins, a cake pan, or a bread pan. If you bake in muffins, they take around 30 minutes. In a square glass cake pan, around 40-45. In a glass bread pan, maybe 50-55 or so. Basically, you want a toothpick inserted into the center to come out clean. The top should be a nice, golden brown.
  7. Let cool for 15 minutes before slicing. 


Related recipes:


Read more...

Chocolate Chip Zucchini Muffins

>> Monday, September 5, 2016

Baking season is upon us. I picked up a delicious mix of apple pie spices the other day. So, when I saw a gigantic (and lonely!) zucchini hanging out in the fridge this morning, I knew what to do: Lure Ada off the iPad to make zucchini muffins! I have been making different banana breads and zucchini breads for years -- but I rarely go into muffin form. My plan is to freeze these guys for before-the-bus breakfasts.

Sniff. School starts tomorrow.

I adapted this recipe I found to make the muffins. I am also going to try to make a lower sugar version because I really don't feel like they need quite this much sweetness. I suggest cutting the sugar in half, and I'll report back with my own results soon.

PS: I've taken to using an ice cream scoop with a trigger release when I'm making muffins and cupcakes. Really makes the pouring part easier and less messy.


CHOCOLATE CHIP ZUCCHINI MUFFINS

Makes about 36 standard size muffins.

What you'll need . . . 

  • 3 cups all purpose flour
  • 3 tablespoons chia seeds
  • 1 teaspoon Kosher salt
  • 1 teaspoon baking soda
  • 1/2 teaspoon baking powder
  • 2 teaspoons apple pie spice*
  • 1/2 teaspoon arrowroot powder or cornstarch
  • 1 cup unsweetened applesauce
  • 1 cup brown sugar
  • 1 cup sugar
  • 3/4 cup canola oil
  • 1 teaspoon almond extract
  • 2-1/2 cups shredded zucchini
  • Chocolate chips, optional

* If you don't have a mix, use 1 teaspoon cinnamon, 1/2 teaspoon allspice, and 1/4 teaspoon of both nutmeg and cloves. Or all cinnamon. Whatever floats your boat.

Method . . . 
  1. Preheat your oven to 350 degrees F. Line a muffin tin with paper liners.
  2. Whisk together the flour, chia seeds, salt, baking powder, baking soda, arrowroot powder, and spices in a bowl.
  3. Whisk together the applesauce, sugars, oil, and almond extract. Fold in the zucchini and optional chocolate chips.
  4. Combine the wet and try ingredients with a spatula until everything is wet. Be careful not to over-mix.
  5. Spoon out batter into muffin liners until they are a bit over half full.
  6. Bake for 25-28 minutes, until golden brown. Remove from pan and let cool before eating.
  7. Repeat baking instructions with remaining batter.

Related recipes:

Read more...

Spinach + Cheddar “Buttermilk” Biscuits

>> Thursday, April 16, 2015

You guys know I’m a biscuit fiend. (What gave it away? These 10,000 biscuit recipes?) I made this delicious slow cooker soup yesterday (I’ll post that recipe soon, too), and I always serve soup with biscuits, cornbread, or some other bready bread bread on the side. It’s just, like, a requirement. An essential part of the meal. Not to be skipped. Ever.

Especially now!


SPINACH + CHEDDAR “BUTTERMILK” BISCUITS


What you’ll need . . . 
  • 2 cups white whole wheat flour
  • 1 cup bread flour
  • 1 tablespoon baking powder
  • 1 teaspoon baking soda 
  • 4 tablespoons Earth Balance (or salted butter)
  • 1-1/4 cup Greek yogurt
  • 1-3 tablespoons water
  • 1 cup finely chopped spinach (I used baby spinach)*
  • 1/2 cup shredded sharp cheddar cheese
* I think basil or any other “soft” greens would work great too!


Method . . . 
  1. Preheat your oven to 450 degrees F.
  2. Whisk together the flours, baking powder, and baking soda in a large bowl.
  3. Cut in your Earth Balance or butter -- I simply used my hands to blend until the mixture resembled coarse meal.
  4. Toss in the Greek yogurt, spinach, and cheddar cheese. Mix with a spatula (or your hands) until everything is moistened. You may need to add another couple tablespoons of water so everything sticks together (but isn’t sticky).
  5. Then flour a work surface and take your ball of dough and flatten it with the palm of your hand. It should be around 1/4 to 1/2 inch thick.
  6. Take the ring of a Ball jar (standard size) and cut out your biscuits. Place them on an ungreased cookie sheet.
  7. Bake for 8-10 minutes, until edges are golden brown. Let cool a few minutes before serving. Store in an airtight container in your fridge for several days.
FYI: This recipe makes 12-15 of these guys.


RELATED RECIPES

Like what you just read? Browse more of our posts + recipes on Pinterest. You can subscribe to the feed of these posts or follow us on Twitter or Facebook to be the first to know what the (never home)makers are up to. And we’ll love you forever!

Read more...

Homemade Ciabatta Bread

>> Wednesday, February 18, 2015

Today I want to share with you a recipe that’s changed my life over the last week. Every Friday, Stephen and I gleefully dance on into Wegmans and pick up bakery bread to make The LOVER Sandwich (yes, we still eat that one almost weekly!) or my all-time favorite, the Caprese Sandwich. Lately, we’ve been crushing on soft, pillowy ciabatta. But the $4.50 price tag shocks me every time. I knew I could make this bread from home, I just wasn’t sure how easy it would be.

Enter my beloved Martha Stewart Baking Handbook, which has taught me how to make everything from homemade bagels to pizza dough to cookies to cakes and more. The ciabatta bread is actually a variation of Martha’s foccacia recipe. I’ve made it enough times now that I’m happy to share some extended notes on mixing and baking so you guys can make bubbly ciabatta bread at home tonight!


CIABATTA BREAD


What you’ll need . . . 

  • 3-1/2 cups bread flour
  • 1/2 teaspoon dry active yeast
  • 1-1/2 cups warm water + a couple tablespoons
  • Extra flour
  • 1 teaspoon salt

Method . . . 

  1. In an electric mixer fitted with the whisk attachment, combine 3 cups of the flour with the water and yeast. You want to create a sponge, so the dough should basically be wet but not soupy -- see photo below. Add the last 1/2 cup flour (or more) until you reach that consistency.
  2. Cover and let rise for 1 hour uninterrupted.
  3. Then add in the salt and possibly a bit more flour for kneading. The book suggests using the dough hook for this part, but I used a silicone spatula to knead my dough with a bit of flour inside the bowl for 3-5 minutes.
  4. Then cover and let rise for two hours. 
  5. Preheat your oven to 450 degrees F. Place a baking stone on the bottom. 
  6. Generously flour a work surface and pour/scoop your dough out onto it, paying carful attention not to knead and compromise any of those bubbles.
  7. Cut dough in half or thirds so you can fashion two or three generous loaves with your hands. Coat with a light dusting of flour on all sides and let rest for another 10 minutes or so while you wait for your oven to preheat.
  8. If you have a peel, you can transfer the dough onto the stone with it. I don’t, so I just used a floured unrhymed baking sheet. Get that dough onto the stone ASAP and close the oven door. Set your timer for 20-30 minutes.
  9. Bread is done baking when it is lightly brown and the bottom -- when tapped -- sounds hollow. For me, this has generally been around 25 minutes.
  10. Let cool completely on a wire rack.


Notes


  • This recipe makes two generous loaves. I estimate they are slightly smaller than the ones we buy at Wegmans, so they’d probably cost like $6.50 or $7 together in all. Yet with the flour required and negligible yeast, I’m thinking at home the price is around $1. 
  • Play with the salt ratio to suit your tastes. I like my bread saltier, but you might not.
  • It’s important you let it rise the full two hours after the initial because it will turn out rather flat otherwise -- not great for slicing.
  • You can also use this recipe for pizza dough! Just divide into two and then lay out flat on your stone and top with toppings. Bake using the broil method like I outline in this post for best results.
  • The bread will last 2-3 days when wrapped at room temperature. 
  • I haven’t tried freezing, but will report back on that sometime soon!
  • Martha has a few other ciabatta recipes worth checking out.

And if you like this recipe, check out why you should stop buying sliced bread at the store and make your own instead. It may seem like there are lots of steps involved, but after you get the hang of a few key recipes, you’ll never want to look back -- I promise!


Bakery Style Breads, Etc.


Like what you just read? Browse more of our posts + recipes on Pinterest. You can subscribe to the feed of these posts or follow us on Twitter or Facebook to be the first to know what the (never home)makers are up to. And we’ll love you forever!

Read more...

The Best Homemade Bagels

>> Monday, October 27, 2014

Bagels. They’re my favorite bread-y thing. I’ve been making my own bagels for years -- except the actual occasions when I take the time to make them are few and far between. Since I stopped buying sliced bread, I’ve been making more of an effort to continue that trend with other baked goods as well. And if you make them in bulk and freeze, this process is well worth the effort.

The recipe I follow for homemade bagels is always the same with a few exceptions, mostly with regard to add-ins and toppings. It’s modified from the bagel recipe you’ll find in the Martha Stewart Baking Handbook. I’m hoping to make a few batches of this recipe over the week to freeze (just slice before putting bagels into freezer bags!).


HOMEMADE BAGELS


Recipe originally posted a while back. Thought it was worth resurrecting.

What you'll need . . .
  • 3/4 teaspoon active dry yeast
  • 1-2/3 cups warm water
  • 3 tablespoons sugar
  • 3 tablespoons honey (see notes)
  • 3 cups unbleached all-purpose flour
  • 1-1/2 cups whole wheat flour
  • 1-1/2 tablespoons table salt
  • Poppy seeds, sesame seeds, coarse salt, etc. 
  • Vegetable oil (for bowl)
  • Plastic wrap
  • Parchment paper 
Mixing + prepping the dough . . .
  1. In a large bowl, whisk together the yeast and water, sugar and honey. Let stand fo 5 minutes. 
  2. Toss in the flours and salt. Knead for about 1 minute (until a slightly tacky -- but not sticky -- dough forms). You may need to add more flour or water depending on what you find. If so -- just add in 1 tablespoon amounts. Continue to knead dough by hand for about 5 more minutes -- then transfer to a lightly oiled bowl and cover with oiled plastic wrap.
  3. Let rise in a warm place for 2 hours (until doubled in bulk).
  4. Divide dough into 8-10 equal pieces. Cover with a damp kitchen towel. Let rest for a half hour.
  5. Line two unrimmed baking sheets with parchment paper and set aside.
  6. Roll each piece of dough into a 6-inch rope. Form a circle around your hand and then press the two ends (rather, roll them) together to seal. In short: Make a bagel shape and be sure to fuse the ends together.
  7. Place the bagels 2 inches apart on the prepared baking sheets. Cover with a piece of oiled plastic wrap (I used the same one from earlier in the process), and let rest while your oven preheats.
Boiling + baking the bagels . . .
  1. Preheat the oven to 500 degrees F (260 C) -- with racks in the upper and lower thirds.
  2. Fill a large stockpot with water and bring to a boil.
  3. Gently drop bagels into the water (as many as will comfortably fit without touching each other). After 30 seconds, use a slotted spoon to gently flip the bagels over -- simmer for yet another 30 seconds. (I boiled 3 at a time.)
  4. Then return the bagels to the parchment-lined sheets. Top them with the seeds or salt -- you must do this when the bagels are still wet so everything sticks to them. 
  5. When you've finished this process with all to-be bagels, immediately place sheets in the oven. Bake for 5 minutes and then rotate the sheets and reduce the temperature to 350 degrees F. Bake until golden brown, about 10 minutes.
  6. Then use a spatula and flip bagels over. Continue baking for another 5 minutes -- or until the back-sides are golden brown as well.
  7. Transfer bagels to wire rack to cool. 

// NOTES

  • Sometimes I used honey or maple syrup versus molasses.
  • Sometimes I use white sugar versus brown.
  • Sometimes I do all white bread flour or just all-purpose and WW, etc.
  • Sometimes I omit the flax meal entirely.
  • I’ll do plain toppings like just salt, poppy seeds, or sesame.
  • Whatever I toss in, the boiling + baking process is exactly the same.

// FREEZE

  • Let bagels cool completely. 
  • Slice in half. 
  • Cover each bagel with foil or plastic wrap.
  • Place inside a zip freezer bag. Freeze
  • Toast on low to defrost.
Like what you just read? You can subscribe to the feed of these posts or follow us on Twitter or Facebook to be the first to know what the (never home)makers are up to. And we’ll love you forever!

Read more...

Vegan Buttermilk Cinnamon Swirl Bread

>> Tuesday, September 30, 2014

I’m not always good at delivering my promised recipes as quickly as I want to. So, without further delay, here’s the vegan “buttermilk” cinnamon swirl bread I mentioned in yesterday’s Brown Rice Milk recipe. We’ve been eating this loaf toasted for breakfast for the last week. It’s almost gone now, so writing this post gives me a nice reminder to get going on my next one.

Enjoy!


“BUTTERMILK” CINNAMON SWIRL BREAD
Loosely based off this Cinnamon Raisin Bread recipe circa 2009

What you’ll need . . .

Bread mixture:
  • 2 cups all purpose flour
  • 2-1/2 cups whole wheat flour
  • Pinch sea salt
  • 1/4 cup warm water
  • 2-1/4 teaspoons active dry yeast
  • 1 teaspoon brown sugar
  • 1-1/2 cups rice milk or almond milk
  • 3 tablespoons Earth Balance (or other vegan buttery spread)
  • 1/3 cup maple syrup
Cinnamon mixture:
  • 1/2 cup brown sugar
  • 1 tablespoon cinnamon
  • 1 tablespoon water

Method . . .

  1. In a large bowl, whisk together the flours and salt. Set aside.
  2. Proof the yeast by placing the water, yeast, and brown sugar in a bowl and mixing. Let sit until frothy.
  3. On the stovetop, warm the Earth Balance over low heat and add the rice or almond milk. Mix in the maple syrup until everything is well incorporated and warm, not hot. If mixture gets warmer than wrist temperature, wait until it is cooler to add to yeast (heat can kill off the yeast).
  4. Combine the yeast mixture and warm milk mixture. Then add in the flour and start mixing with a spatula.
  5. Work to kneading with your hands, adding a bit more flour as necessary. Eventually turn out onto a lightly floured work surface and keep kneading for 5 or so more minutes. Dough should be moist, but not sticky.
  6. Place dough back in your bowl and cover with a wet tea towel or plastic wrap. Let sit until doubled in bulk, around 2 hours.


Baking:

  1. Preheat your oven to 475 degrees F. Place a dutch oven inside on the middle rack to preheat as well.
  2. Roll dough into a large rectangle (maybe the length/width of a baking sheet?) that’s around 1/4 inch or less thick on a well floured work surface.
  3. Mix together the ingredients for the cinnamon filling, then spread evenly onto the dough and roll into a long snake-like shape. Elongate and stretch this shape so it’s long enough to twist and coil around itself like in the photo. Maybe two feet long? (Sorry for the question marks, it sort of just happened when I was baking it -- I totally winged this part!)
  4. Then form into a round and place in your preheated (covered) dutch oven and place in oven.
  5. Bake for 5 minutes, then lower the heat to 425 and continue baking for another half hour to 45 minutes. Until crust is golden. 
  6. Remove and let cool before cutting (or the cinnamon mixture might spurt out).

Glorious homemade bread!


NOTES

  • There’s really no right or wrong way to twist and form your round. I just did what felt natural and wanted the most swirly action.
  • You’ll probably notice some leakage of cinnamon mixture at the bottom of your loaf. I had some, and at first I worried about it. Then it ended up being the most delicious part of the whole thing.
  • You can try this recipe with any type of milk or non-dairy substitute. Just beware that some slight modifications might be necessary with regard to flour. Just pay attention to the stickiness of your dough. It shouldn’t stick to your fingers. You might need more flour. (And alternatively, shouldn’t be too dry -- need more liquid). If you’re familiar with baking breads, I think you know the sweet spot.
  • This bread freezes famously well! Keeps you from eating the whole thing in two days (though I could have done that easily, too).


FREEZING

  • Wait to do all these steps until your loaf is completely cooled.
  • Slice your bread into medium slices. I say medium because too thin wasn’t working and I don’t think mega-thick slices of bread because they are hard to toast.
  • Lay out slices on cookie sheets and freeze for an hour or two. Then place slices in plastic zipper bags.
  • To defrost, I just put them in my toaster for a couple minutes.

Related Posts


Like what you just read? You can subscribe to the feed of these posts or follow us on Twitter or Facebook to be the first to know what the (never home)makers are up to. And we’ll love you forever!

Read more...

Ultimate Apple Guide + Recipes

>> Thursday, September 25, 2014

My favorite time of year also features some of my favorite foods. From pumpkin to squash to apples, I spend a lot of time in my kitchen simmering + baking foods that are both healthy and comforting. I’ll be sharing a bunch of new recipes in the coming weeks, but wanted to rewind to some of our best recipes from the past.

Let’s get to it!


// RECIPES


If you go apple picking or purchase a huge load of apples and plan to make applesauce in bulk, freezing is easy!
  1. Let your applesauce cool completely. You may even wish to place it in the refrigerator overnight.
  2. Portion into freezer bags or Ball jars. We’re eliminating plastics from our kitchen, which is why I switched to glass. Important: Leave an inch or two of headspace for expansion!
  3. Cover and freeze for 6 months to 1 year. Stays good longer if you have a deep freeze or dedicated upright.
What’s your favorite apple recipe? 

And have you tried any of the ones above?

Like what you just read? You can subscribe to the feed of these posts or follow us on Twitter or Facebook to be the first to know what the (never home)makers are up to. And we’ll love you forever!

Read more...

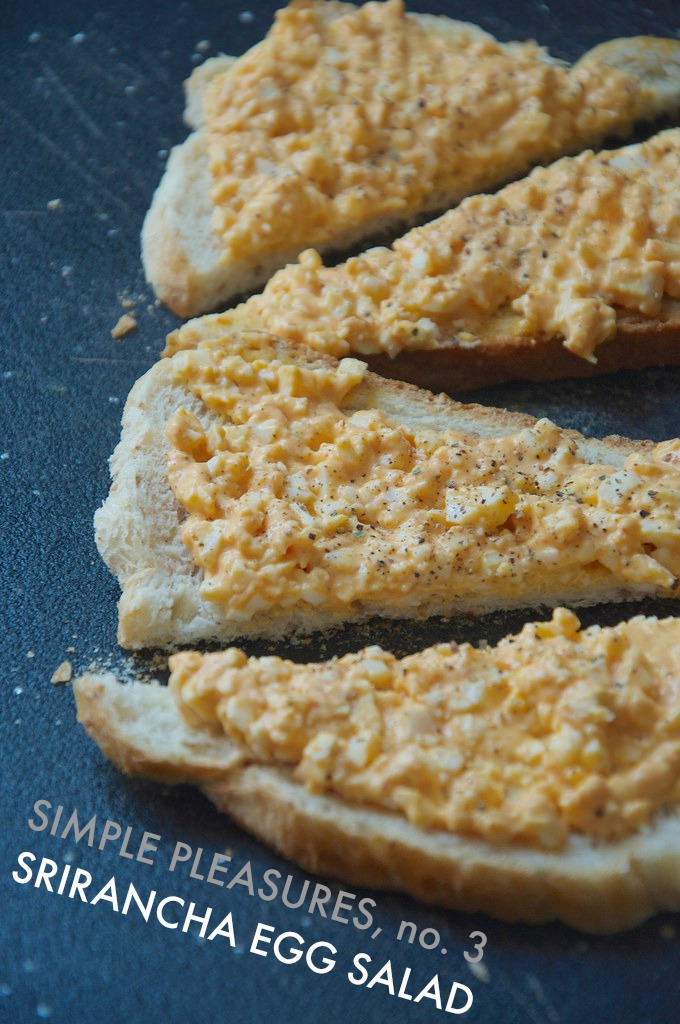
Simple Pleasures, no. 3

>> Monday, September 22, 2014


SRIRANCHA* EGG SALAD
  • 2 slices of homemade bread, toasted
  • 2 hardboiled eggs
  • A couple tablespoons ranch dressing
  • A few squirts Sriracha sauce
  • Black pepper, to taste
* Thanks to @lyndseyf412 on Instagram for giving this awesome sauce a name!

// Just mash together the eggs, dressing, and sauce until they form familiar egg salad consistency. Spread atop your toast. Sprinkle your black pepper. Enjoy!

Here are 5 more ways to eat protein perfect hardboiled eggs.

(Simple pleasures no. 1: Cheesy Toasted Bagel, no. 2: Roasted Apple For One)

Like what you just read? You can subscribe to the feed of these posts or follow us on Twitter or Facebook to be the first to know what the (never home)makers are up to. And we’ll love you forever!

Read more...

Homesteading: Stop Buying Sliced Bread

>> Tuesday, September 9, 2014

I grew up eating white, fluffy store-brought bread most every day. I'd have toast in the morning with peanut butter or cinnamon-sugar and butter. I'd eat PB&J, flutternutter, or cheese sandwiches for lunch. And I remember our family going through loaves and loaves of the stuff. It's inexpensive, tasty, and readily available.

When I started controlling my own shopping list and learned more about the power of whole grains, I started purchasing wheat bread. Multigrain varieties. Anything that wasn't white, and I thought my health was 10,000 times better for it. Right?

Well, what's inside most conventional loaves might surprise you, even if it looks hearty and healthy. To begin with, a lot of those "whole wheat" varieties are actually not much better than their white counterparts when it comes to nutrition. Then you factor in all the additives like azodicarbonamide, GMOs, even nasty stuff like bleach. It's enough to make your head spin, quite literally.


You guys know we're on a budget, so buying sprouted and ancient grain breads is more of a treat than a mainstay. When they're on sale (rarely), I'll stock up because our favorite -- Ezekiel 4:9 -- is already frozen and keeps for a long time. Otherwise? Well -- slowly -- I've started making most of our bread from scratch.

Yes, it's a little time-consuming. But once you get the hang and some favorite recipes up your sleeve, it's totally doable. I actually bake multiple loaves at once, then slice for freezing. Of all, I like making this Honey Whole Wheat Loaf with flax. I'll toss in raisins or craisins, sunflower kernels, walnuts, or whatever else I have on hand that week.

// FAVORITE RECIPES

Throughout the years, I've tried making a variety of breads and related foods with much success. Here are a few of my favorite recipes from simple to more complex. There are even a few neat ones to try, like making your own bagels and tortillas!


* If you're not sure about the ingredients in these recipes, be sure to check out Common Flour Types -- Demystified for tips on usage and substitutions.


// FREEZING TIPS

  • Always freeze the freshest bread you have. If homemade bread, for example, has been sitting out for several days -- you'll want to inspect it for signs of spoilage and staleness. Because homemade bread doesn't have preservatives in it, you can expect it to stay good only a couple days.
  • I usually make multiple loaves at once and keep one for eating immediately. I let the rest cool completely before freezing.
  • You can freeze a loaf whole, but I like slicing bread because we don't always eat a lot of it at once. This way, we can defrost a couple pieces for sandwiches as needed and keep the rest safe in the freezer.
  • Though we've stopped using plastic products in most areas of our kitchen, I do still use some plastic for freezing bread. I wrap the sliced loaf in plastic wrap and then cover the whole thing with a large freezer bag.
Do you avoid store-bought breads? What's your go-to recipe?

Like what you just read? Browse more of our posts + recipes on Pinterest. You can subscribe to the feed of these posts or follow us on Twitter or Facebook to be the first to know what the (never home)makers are up to. And we’ll love you forever!

Read more...

Gluten-Free Sweet Pumpkin Bread

>> Friday, August 29, 2014

Here we go with the pumpkin! Expect a lot of it from me (and everyone else) for the next several months! I couldn't resist picking up a can of my favorite orange puree the last time I visited the store. We adore our Pumpkin Garlic Knots and Brie-Stuffed Pumpkin Garlic Rolls, among many other pumpkin-centric recipes. Don't you?

When I found myself without flour, I made a bread that didn't require any! It's a sweet, quick bread that contains no refined sugar, flour, or dairy/eggs. So, it's suitable for a variety of diets and preferences. We all deserve a little fall indulgence. (Didn't you hear? It's fall already, at least in my mind.)


HEARTY + SWEET PUMPKIN BREAD
Gluten-free, vegan, naturally sweetened, and perfect for breakfast, etc.

What you'll need . . . 
  • 1 cup pumpkin puree
  • 1 cup coconut milk (or other nondairy milk)
  • 1/2 teaspoon vanilla extract
  • 1 tablespoon flax meal + 3 tablespoons hot water (flax egg)
  • 1/3 cup pure maple syrup
  • 3 tablespoons olive oil
  • 1-1/2 cups FINE GRIND cornmeal*
  • 1 cup almond meal
  • 1 cup gf rolled oats, uncooked
  • 1 tablespoon baking powder
  • 1/2 teaspoon ground cinnamon 
  • pinch salt
  • Handful semi-sweet chocolate chips (optional)
* I originally didn't specify the cornmeal I used -- but it was a fine grind variety. If you use a coarser meal, it will be more likely to crumble.

Method . . . 
  1. Preheat your oven to 350 degrees F. Generously grease a standard loaf pan with olive or coconut oil. Set aside.
  2. In a large bowl, mix together your wet ingredients -- pumpkin, milk, vanilla, flax egg, maple syrup, and oil. 
  3. In another bowl, whisk together your dry ingredients and then toss them into the bowl with the wet ingredients. Mix with a spatula until just moistened.
  4. Transfer to your prepared loaf pan and smooth down until even. 
  5. Bake for 1 hour, checking periodically. Should be set in the center when inserting a toothpick. If it doesn't come out clean, continue to cook for another 5 or 10 minutes.
  6. Let cool before serving.


I think walnuts would be an excellent addition to this recipe, I just didn't have any on hand. You can also substitute in any other purees you'd like, including applesauce, which would produce a lovely loaf. Oh, and I have another delicious vegan + gluten-free recipe coming up next week! It's a fall-ish cookie hybrid of oatmeal cinnamon raison + peanut butter chocolate chip cookies.

HAPPY FRIDAY!

// My Writing, Elsewhere:

How To Eat Well On Just $20/Week
6 Health + Fitness Rules That Have Changed
10 Things Healthy People DO NOT Have In Their Homes
Satisfying Stir-Fries in 20 Minutes Or Fewer
Tips For Getting the Home Loan You Want
12 Delicious Nut Butter Recipes to Make At Home
7 Tricks For Better Posture Today!
12 Herbs and Spices Every Pantry Should Have
5 Smart Ways To Save on Back-To-School Clothing
4 Workout Recovery Essentials For a Healthy Body
Make 15 Junk Food Favorites Healthier + Cheaper At Home

Like what you just read? You can subscribe to the feed of these posts or follow us on Twitter or Facebook to be the first to know what the (never home)makers are up to. And we’ll love you forever!

Read more...
Related Posts Plugin for WordPress, Blogger...

About This Blog

MyFreeCopyright.com Registered & Protected

© 2009-2014 by the (never home)makers
All content on this blog is copyrighted.
Want to publish our pics, tips, or tricks?
Contact us! [neverhomemaker@gmail.com]

We value transparency. Links on this page may contain affiliates. In addition, please see our disclosure policy regarding sponsored posts.

  © Blogger template Simple n' Sweet by Ourblogtemplates.com 2009

Back to TOP  

Blogging tips















