Showing posts with label spinach. Show all posts

Spinach + Cheddar “Buttermilk” Biscuits

>> Thursday, April 16, 2015

You guys know I’m a biscuit fiend. (What gave it away? These 10,000 biscuit recipes?) I made this delicious slow cooker soup yesterday (I’ll post that recipe soon, too), and I always serve soup with biscuits, cornbread, or some other bready bread bread on the side. It’s just, like, a requirement. An essential part of the meal. Not to be skipped. Ever.

Especially now!


SPINACH + CHEDDAR “BUTTERMILK” BISCUITS


What you’ll need . . . 
  • 2 cups white whole wheat flour
  • 1 cup bread flour
  • 1 tablespoon baking powder
  • 1 teaspoon baking soda 
  • 4 tablespoons Earth Balance (or salted butter)
  • 1-1/4 cup Greek yogurt
  • 1-3 tablespoons water
  • 1 cup finely chopped spinach (I used baby spinach)*
  • 1/2 cup shredded sharp cheddar cheese
* I think basil or any other “soft” greens would work great too!


Method . . . 
  1. Preheat your oven to 450 degrees F.
  2. Whisk together the flours, baking powder, and baking soda in a large bowl.
  3. Cut in your Earth Balance or butter -- I simply used my hands to blend until the mixture resembled coarse meal.
  4. Toss in the Greek yogurt, spinach, and cheddar cheese. Mix with a spatula (or your hands) until everything is moistened. You may need to add another couple tablespoons of water so everything sticks together (but isn’t sticky).
  5. Then flour a work surface and take your ball of dough and flatten it with the palm of your hand. It should be around 1/4 to 1/2 inch thick.
  6. Take the ring of a Ball jar (standard size) and cut out your biscuits. Place them on an ungreased cookie sheet.
  7. Bake for 8-10 minutes, until edges are golden brown. Let cool a few minutes before serving. Store in an airtight container in your fridge for several days.
FYI: This recipe makes 12-15 of these guys.


RELATED RECIPES

Like what you just read? Browse more of our posts + recipes on Pinterest. You can subscribe to the feed of these posts or follow us on Twitter or Facebook to be the first to know what the (never home)makers are up to. And we’ll love you forever!

Read more...

10-Minute (GF + Freezable) Lasagna

>> Wednesday, February 11, 2015

OK. This recipe doesn’t take ten minutes total with bake time included -- but to prepare? Not even ten active minutes. I always have stuff to make lasagna on hand. It’s one of those quick pantry meals we make when we’re low on groceries. Plus, that’s the beauty of this recipe -- there are no rules. Use what you have, leave out what you don’t, substitute where you can.

Assemble, store, and bake when you need it.

Start by mixing the filling:


In the mix:
  • Ricotta cheese (part-skim), one small tub
  • Sliced olives
  • 1/4 to 1/2 cup or so pumpkin puree
  • Couple handfuls chopped spinach
  • Salt + pepper
I set that aside and got some no-boil noodles. I decided to try a gluten-free variety made from brown rice, and they were quite good. Any no-boil noodles -- GF or standard -- should do for this recipe, though, a standard package usually includes enough to make a 9 x 13 pan of lasagna.

Just spread the uncooked noodles with the filling.


You’ll want to spread a small amount of sauce at the bottom of your pan. From there, layer your first row of noodles. Top with more sauce and spread to cover. Layer another row. More sauce + spread. Another row, etc. until you’ve used all the noodles. Top with more sauce, mozzarella cheese, and some Parmesan, if you feel so inclined.

I ended up using more than one jar of sauce, just FYI.


That whole part you just did should only take around 10 minutes! From there, you can stick this guy -- covered with foil -- in your fridge until you’re ready to bake (the passive part). Oven temperatures and cook times vary by the type of noodle. I cooked ours at 375 degrees F for around 45 minutes -- taking off the foil in the end stage of cooking to get that mozzarella browned.

We never eat an entire dish of lasagna, so I serve dinner and then refrigerate the leftovers overnight. The next morning I slice the cooled lasagna into squares and individually wrap in plastic wrap and then place the single serve portions in a freezer bag. To serve again, just thaw and bake in your oven (or in your microwave -- just be careful of hot spots!).

What’s your favorite quick pantry meal?

Like what you just read? You can subscribe to the feed of these posts or follow us on Twitter or Facebook to be the first to know what the (never home)makers are up to. And we’ll love you forever!

Read more...

Baked Spinach + Ricotta Gnocchi

>> Friday, January 2, 2015

And now for a simple recipe you’ll want to make over and over again. We tend to overdo the pizza in this house. So, I was looking to make something that uses many of the same ingredients we always have on hand -- just in a different way.

If you’ve never had baked gnocchi, you’re in for a treat. The gnocchi (pronounced like this) are super tender yet a hint crisp. You can bake them and eat with any kind of sauce you please (a pesto or brown butter sauce is divine!). I chose to use some store-bought tomato sauce from Aldi and fresh mozzarella. And if you’re into individual portions -- these guys freeze quite beautifully.

Mangia!


SPINACH + RICOTTA GNOCCHI


What you’ll need . . .
  • 15 ounces ricotta cheese (I used part-skim)
  • 1 cup packed spinach leaves
  • 3/4 cup flour*
  • 1/4 cup finely grated parmesan cheese
  • 1 egg
  • 2 tablespoons olive oil
  • 1 tablespoon nutritional yeast
  • salt + pepper
  • Pasta sauce
  • Fresh mozzarella cheese
* I used caked flour because I wanted to see how it would work. All purpose would be a good substitute. I also think this recipe would lend well to gluten-free flours, just play with the amount. To get the right mix. You want the resulting gnocchi to be a bit firm but mostly tender.

Method . . .
  1. Preheat oven to 350 degrees F. Lightly grease two baking pans or dishes with olive oil and set aside.
  2. Blanche spinach leaves in a small pot of boiling water (1 minute). Immediately submerge in cold water to stop cooking. Dry leaves as much as possible using a tea towel and chop finely.
  3. Toss all ingredients into a bowl and mix until you form a wet dough.
  4. Portion out by heaping tablespoonful onto/into greased baking sheets or dishes.
  5. Bake for 20 minutes, until firmed up a bit and slightly golden.
  6. Turn the oven to broil.
  7. Then cover gnocchi with tomato sauce (a lot or a little, depending on your preference) and top with cuts of the cheese. Broil for 5-7 minutes until the cheese browns and bubbles.
  8. Serve immediately.


FREEZE:


  • Spoon onto wax paper lined baking sheets in the tablespoon portions.
  • Put in your freezer until completely frozen -- a couple hours.
  • Store in an airtight freezer bag for up to 6 months. 
  • Then bake as instructed above in whatever size portion works best for you.
I’m going to try to get my new year thoughts out today, but I’m still getting over this pesky sickness. So, whatever the case -- that post is coming next. I hope you enjoy this recipe, though. It’s definitely one that is getting put into the regular rotation because it’s so easy and delicious.

Here’s to more recipes in 2015!

Like what you just read? Browse more of our posts + recipes on Pinterest. Chat with us on Twitter or Facebook. And you can always email us with your questions and comments.

Read more...

Seasonal Veggie Wrap

>> Thursday, July 24, 2014

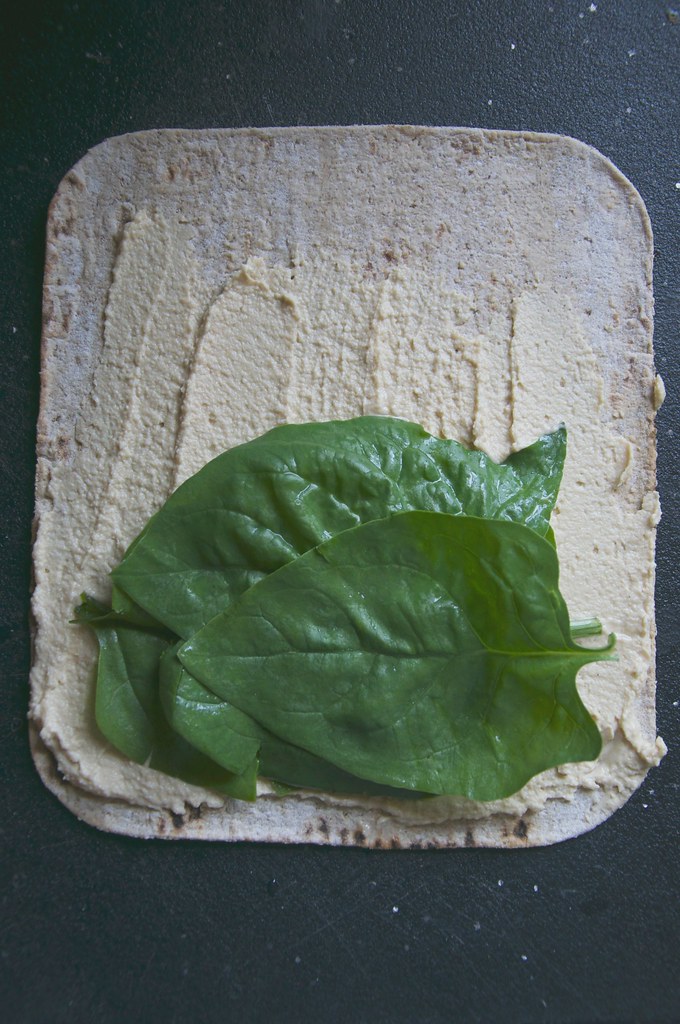
I've been eating this crunchy wrap for lunch often. I use whatever we have on hand from our CSA basket, whatever leftovers might be in the fridge, and a good dressing. I've actually become quite obsessed with dressings lately, but that's a topic for another day.

Let's take a look!


And now . . . the closeup!


SEASONAL VEGGIE WRAP

What you'll need . . .
  • A wrap -- I buy mine (multigrain) at Aldi
  • A green -- I used spinach
  • Something(s) crunchy -- I used carrots and bell peppers
  • A spread -- I made some Tahini-Free Hummus*
  • A bean or grain -- I had some leftover farro
  • Cheese -- this is honey goat cheese**
  • Dressing -- this is Brianna's Poppy Seed Dressing
  • Drizzle -- I like to use hot sauce or even Inglehoffer Sriracha Mustard
* Tahini-Free Hummus is just 1 can of chickpeas -- drained + rinsed -- blended in your food processor with a clove of garlic, a couple tablespoons olive oil, and then 1/4 to 1/2 cup water (until you reach your desired consistency). Season with salt and pepper.

** Omit to make this "recipe" vegan.

Method . . . 
  1. Assemble the ingredients as I did above. There are no rules, so feel free to put them on your wrap in whatever order makes the most sense to you. I find it helpful to cut my crunchy veggies into thin strips for easy eating.
  2. Hunt in your refrigerator shelves for more leftovers (rogue beans make a good fit) to toss on. Really, this "recipe" is a great way to eliminate food waste.
  3. Dress and drizzle for flavor. Then roll into a loose wrap. Everything will be heaping, so you won't have an airtight seal by any means.
What's your favorite seasonal fruit or vegetable?

I'm most excited for TOMATOES to come into full bloom (here's why!). I love Caprese Salads, homemade BBQ Sauce, slow roasted tomatoes, and quick-to-prepare Pasta Sauces.

Like what you just read? Browse more of our posts + recipes on Pinterest. You can subscribe to the feed of these posts or follow us on Twitter or Facebook to be the first to know what the (never home)makers are up to. And we’ll love you forever!

Read more...

Spinach Zucchini Pesto with Walnuts

>> Wednesday, April 16, 2014

Continuing with our zucchini theme this week -- I bet you didn't think I could possibly have another pesto recipe up my sleeve. Pesto has definitely become my favorite spread over the last several years. And ever since I discovered I could make it without any cooking or basil or whatever else I used to use with more traditional recipes -- I've been mixing it up weekly.

This is a great recipes to make with leftover zucchini and spinach!


ZUCCHINI PESTO
Use up veggie leftovers in this zesty pesto!

What you'll need . . . 
  • 1 medium zucchini (about 1-1/2 cups grated)
  • 1/2 cup spinach (you could sub in other greens, like kale, too)
  • 2-3 cloves garlic
  • 1/4 cup fresh lemon juice
  • 1/4 cup olive oil
  • 1/2 cup parmesan cheese*
  • 1/4 cup walnuts
  • salt + pepper to taste
  • water to achieve desired consistency
Method . . .
  1. Put all ingredients -- except water -- in a food processor and blend until smooth.
  2. Then add water 1 tablespoon at a time until you reach your desired consistency.

* Vegans can experiment with using nutritional yeast to substitute. I would have done it, but we're out + have some parmesan leftover.


In all, this recipe mixes up about 2 cups of pesto. We used ours in some delicious Pumpkin Pesto Rolls last night. Today we might use the rest atop pizza. It's tasty spread on sandwiches, in French toast, and so on.

// ALSO TRY

Vegan + Gluten Free Zucchini Burgers
Vegan Chocolate Chip Zucchini Bread
Pesto + Avocado Sauce (Video!)
Pumpkin Pesto Rolls
Garlic Scape + Swiss Chard Pesto, 2 Ways
Steamed Pesto Dumplings
Pesto Pizza Dough
Baby Kale Pesto
Walnut Basil Pesto
Basil-Pesto French Toast
Pesto French Toast, II -- with Avocado Butter
Pesto Quiche with Oatmeal Crust
Pesto Garlic Knots
Pesto Portabella Sandwiches
(Pesto) Smothered Mother

Like what you just read? You can subscribe to the feed of these posts or follow us on Twitter or Facebook to be the first to know what the (never home)makers are up to. And we’ll love you forever!.

Read more...

Pesto + Avocado Sauce // Cooking Video

>> Thursday, February 27, 2014

Sauces can make or break a dish, am I right? For example, we've been making a lot of quesadillas with beans, peppers, onions, zucchini, etc. -- but without the salsa and Greek yogurt (which we use instead of buying additional sour cream to save $), it's just not as interesting.

I think you've gathered by now that pesto is my all-time favorite spread. Plus, it's so easy to make. I used to go with more complicated recipes, but over the years, I've discovered that the simpler the better.


I gave you guys a similar recipe for pesto in our Lentil + Quinoa Burgers post, except that time I had used baby kale versus spinach. Today I wanted to simplify it even more -- seriously, this recipe takes just 5 minutes to mix together and will spice up a variety of meals from burgers to pizza to pasta.

Here's how it's made -- no cooking or roasting, just blending:


// 5-MINUTE SPINACH PESTO

Combine the following ingredients in your food processor until smooth.

  • 2 (heaping) handfuls fresh spinach
  • 1/4 cup almond meal
  • 1/4 cup Parmesan cheese or nutritional yeast
  • 2 large cloves garlic
  • 1/4 cup olive oil
  • 1-2 tablespoons water
  • salt + pepper, to taste

// CREAMY AVOCADO PESTO SAUCE

Then I took half of that pesto and blended it even more with the flesh of one avocado and a few more tablespoons water until I made this creamy, alfredo-like sauce. It's great spread onto some toast or on the side with homemade quesadillas (I literally just licked some off my fingers before typing this post).

Or you can just coat a bit of pasta in it.

Maybe serve with a fried egg.

Definitely some salsa.

And Sriracha?


// GREEN PASTA WITH EGG

  • Cook pasta to the package directions. These shells boiled for 30 minutes. Then I drained and rinsed them so they cooled off a bit.
  • Then scoop a couple tablespoons of your green sauce onto them and mix around until well coated.
  • Fry an egg (or make it any style you like best) and place atop the pasta.
  • Top with salsa and Sriracha sauce, or whatever other condiments you want on there.
  • Enjoy!

Basically, this Avocado + Pesto mix is your new favorite sauce.

Period.

If you'd like to make the pesto first -- I'd even freeze half of it (so 1/2 cup of pesto for later use) by either placing it in a plastic bag and freezing flat or even putting it in an ice cube tray for smaller chunks.

OTHER PESTO RECIPES

Pumpkin Pesto Rolls
Garlic Scape + Swiss Chard Pesto, 2 Ways
Steamed Pesto Dumplings
Pesto Pizza Dough
Baby Kale Pesto
Walnut Basil Pesto
Basil-Pesto French Toast
Pesto French Toast, II -- with Avocado Butter
Pesto Quiche with Oatmeal Crust
Pesto Garlic Knots
Pesto Portabella Sandwiches
(Pesto) Smothered Mother

Like what you just read? You can subscribe to the feed of these posts or follow us on Twitter or Facebook to be the first to know what the (never home)makers are up to. And we’ll love you forever!.

Read more...

Automatic (Healthy) Eating // Tip 2

>> Tuesday, December 3, 2013

Fact: Healthy eating can feel like a lot of hard work. (If you're catching up, check out tip #1: stocking up on frozen veggies.) When I have my best success with eating lots of the "right" stuff, it's when I'm not trying to follow any fussy recipes. Instead, I get fresh, unprocessed ingredients and make things like salads or warm veggie bowls. Simplicity with cooking seems to work really well with simple, whole foods.

As a vegetarian, you might be surprised to learn that I sort of hate salad. Well, that's not entirely true, but it takes a LOT for me to enjoy munching on greens. With a little finesse, though, greens become my best weapon in the war against eating entire batches of Peanut Butter Blossoms.

// TIP 2: Buy Greens + Use Them


Greens are versatile, though. There's spinach, kale, collards, romaine, swiss chard, and the list goes on. By tossing in a handful of greens to your meals, you add lots of nutrition, including fiber, vitamins, minerals, and various phytochemicals that are great for your health. And salads don't have to be cold and crunchy, necessarily.

Consider these uses of greens:
If you're still hesitant to stock your refrigerator with this leafy stuff, start with baby greens like baby spinach or baby kale. The stems are what get me a lot of the time, and on the tiny versions, they're just not an issue.

The warm salad in the photo above is:

2 handfuls baby kale + fried tofu + 1/2 avocado, sliced + rehydrated seaweed w/ 1 tablespoon sesame oil + sesame seeds + ginger juice + soy sauce


I also shy from buying greens sometimes because I feel like they go limp before I get a chance to use them. The first defense is just using them up quickly -- adding them to most every meal. But if that's no possible and they tend to get slimy?

Here are some ways to keep 'em fresh:

How do you use greens? Bonus points if you just love a plain salad!

Like what you just read? You can subscribe to the feed of these posts or follow us on Twitter or Facebook to be the first to know what the (never home)makers are up to. And we’ll love you forever!

Read more...

Brie-Stuffed Pumpkin Garlic Rolls

>> Wednesday, November 27, 2013

Finally got a chance to make the last dish for our Thanksgiving Brunch special. So far, we've served up Soft-Boiled Eggs atop Spinach Toast, a Bittersweet Pumpkin Pie, and Maple Roasted Fingerling Potatoes. There were a lot of directions I wanted to go with another selection, but I simply couldn't choose between sweet + savory.

So I settled on these guys.


This recipe is incredibly easy to make. So much so, you'll want to eat them again and again. If you've been reading for a long while (in which case, I'm thankful for you!), you've already got the basics down. You can even mix your dough together today, let rise, and refrigerate for use tomorrow.

Get going!

:: Make up a batch of Pumpkin Garlic Knots dough + let rise for 2 hours.
:: Then consult the Pumpkin Pesto Rolls post for some method illustrations.

The real difference with these rolls versus the others is the filling.

Check it out:


BRIE-STUFFED PUMPKIN GARLIC ROLLS

You'll need . . . 
  • 1 wedge buttery brie, cut rind off + chop
  • 2 tablespoons maple syrup 
  • 1 handful baby kale or spinach, chopped 
  • 2 cloves garlic, minced 
  • Salt + pepper to taste
  • Jam for topping
Method . . .
  • Preheat your oven to 425 degrees F. Lightly grease a standard muffin tin, like this one.
  • Once you've chopped the garlic and kale, just toss everything into a bowl and mix by hand until well incorporated.
  • Then roll your dough atop a floured work surface into a long log. Divide into 12 equal portioned pieces of dough.
  • Take each piece and roll out into an oval-ish shape, spread your cheese mixture inside, then roll and place in your muffin tin.
  • Continue with all remaining pieces of dough and until you run out of brie mixture.
  • Then bake in the oven for 15 to 17 minutes. Until golden brown and bubbling. Let cool before eating.


We then topped ours with some delicious Hot Pepper Raspberry Preserves. You can eat them however you like. But consider this your alternative to boring stuffing. Or just eat them whenever. I mean, these rolls are quite literally stuffing, so we have you covered in that regard!

I wish you luck with all your final shopping trips + tweaks with recipes for the big day tomorrow. I'd love to know what's on your menu this year. As well as if you celebrate with traditional Thanksgiving dinner or do something a little different like brunch.

Happy Thanksgiving!

Like what you just read? You can subscribe to the feed of these posts or follow us on Twitter or Facebook to be the first to know what the (never home)makers are up to. And we’ll love you forever!

Read more...

Soft Boiled Eggs for Breakfast

>> Friday, November 15, 2013

I love eggs. (Here's why they're great for runners.) Fried, scrambled, hard boiled, poached, and especially in Avocado Egg Salad -- eggs are always an awesome, inexpensive meal option, no matter the time of day. I got the idea to make soft boiled eggs after watching the finale of MasterChef Junior (those kids have skills!).

I used to soft boil back when I was too lazy and unsuccessful to poach, but wanted a similarly delicious + gelatinous yolk experience. One thing's for sure: there's certainly a science to cooking eggs, and I get it wrong. Often. So, I practice.

And practice makes perfect.


// SOFT BOILED EGGS
  1. Bring a small pot of water (enough to cover eggs) to a boil + reduce back to a simmer. 
  2. Gently drop eggs into the water one at a time. I usually make just two, but I've successfully done up to 4. 
  3. Set your timer for 6 minutes. You could go for 5 if you like really runny and 7 if you're more into a harder/gooey yolk.
  4. Then remove promptly and place in a cool water bath or run under cool water for around a minute. This stops the cooking.
  5. You can then serve in those little egg cups, slice the tops off and dip your toast in the center. 

Or you can peel and smash:


While I cooked my eggs, I toasted two thick slices of Rosemary-Salt Bread and piled high with some sauteed spinach (with garlic and olive oil). An egg atop each did the trick. May possibly be the best breakfast I've made in quite some time.

I go through sweet versus savory breakfast trends, and lately I've been favoring the Bloody Mary over the Mimosa.

See why?


I don't usually post breakfast on Fridays, so I suppose I'm taking part in Ashley's #bfastfridayclub! Hooray! Go forth and make something delicious for your morning meal this weekend.

Speaking of Ashley: The winner of the Baked Doughnuts for Everyone! giveaway is #73, Lynda. She writes: "Have made doughnuts before, but love to bake. Within the last few months was diagnosed as being Celiac, so anything that says YUM in front of GF is all the better for me now."

Have a wonderful weekend. I have lots of things -- think vegetarian Thanksgiving brunch! -- in store for next week.

Like what you just read? You can subscribe to the feed of these posts or follow us on Twitter or Facebook to be the first to know what the (never home)makers are up to. And we’ll love you forever!

Read more...

Spinach Mac 'n Cheese

>> Thursday, November 7, 2013

I finally found my camera charger (!!!), as evidenced by the quality shots from yesterday's roasted apple for 1 recipe. However, we're sliding backward today with a INSTA-dinner recipe inspired by last month's delicious Curried Delicata Mac 'n Cheese. We've been making this comfort dish every week, so it was time to tweak it to starve off boredom.

I'm always amazed at how an entire container of spinach purees down to this:


// PUREE INSTRUCTIONS

I just bought one of those large bins of baby spinach at Wegmans and then placed it all in a large pot with about 1/4 cup boiling water. You can use other greens if you like -- you'll likely have to change up the spices + salt if you use, say, kale which is much more bitter.

Anyway, I covered the pot for a minute and then mixed the greens a few times until everything had wilted. I poured the entire contents of the pot -- yes, water and all -- into my food processor and blended until smooth. In all, it made just about 2 cups of radioactive-looking sludge.

Hmmmm. Maybe I should use another word for sludge?


SPINACH MAC 'N CHEESE
Serves 4-6, or dinner for 2-3 for 2 nights!

What you'll need . . .
  • 2 cups spinach puree, instructions above
  • 2 cups shredded cheddar cheese (I used a mixed bag)
  • 1/4 cup grated parmesan
  • 1 cup milk (soy milk is delicious), unsweetened
  • 1 teaspoon smoked paprika
  • 1 teaspoon garlic powder, or more depending on your preference
  • salt + pepper to taste
  • 1 egg, whisked
  • 1 tablespoon butter or Earth Balance
  • 16 ounces elbow or shell pasta
  • breadcrumbs, whole wheat
 Method . . .
  1. Preheat your oven to 375 degrees F. Grease a 9 inch square baking dish or a 2-1/2 quart round and set aside.
  2. Start a pot of water to cook your pasta. Just cook it al dente, around 8 or 9 minutes.
  3. While your pasta cooks, combine your puree, cheeses, milk, and seasonings in a small pot over low heat. Mix until totally combined. You may adjust it with more/less milk as desired. Ours was around the consistency of thin fondue.
  4. Then drain the pasta, put the tablespoon of butter or Earth Balance back into the pot, return the pasta too -- toss and pour your cheese mixture over top. 
  5. Mix gently. Then slowly pour the egg in while whisking so it doesn't cook unevenly. Add more spice if you like.
  6. Cover with breadcrumbs -- the more the better, in my opinion.
  7. Cover with foil and bake for 20 minutes. Then uncover and bake another 35 to 40 minutes, until golden brown. Let cool 10 minutes before serving.

I think I should have posted this recipe for Halloween. It sure looks spooky. But the spinach and garlic make it taste delicious + each serving boasts a ton of veggies. Of course now my mind is wandering to ideas like PESTO mac 'n cheese, which I'm sure I'll be making in the near future. This recipe is kid tested + approved, too.

More unexpected greens: Green Smoothies + Green Pancakes + Green Waffles + Green Oats.

Like what you just read? You can subscribe to the feed of these posts or follow us on Twitter or Facebook to be the first to know what the (never home)makers are up to. And we’ll love you forever!

Read more...

Spinach Pesto

>> Thursday, May 2, 2013

I have this habit of buying spinach in bulk -- assuming it will go to use in smoothies, salads, or other edible sundries -- and not using it until the very last minute. Truth: I hate salads and even when I tell myself I want to be "good" at eat my veggies that way, I never can do it.

I am a grown adult and I still skip the salad.

But that doesn't meant I don't get in my greens. I just have to be my own sneaky chef. I love homemade Dinosaur Kale Chips, Leafy Green Pancakes for breakfast, and the occasional kale or collard Veggie Stuffed Stromboli.

And now . . .


SPINACH PESTO W/ PUMPKIN SEEDS
vegetarian + vegan options -- both delicious

What you'll need . . .

  • 1/2 cup raw pumpkin seeds
  • 2 cups fresh baby spinach
  • 1/2 cup baby kale leaves (or more spinach)
  • 1/4 cup parmesan cheese or nutritional yeast
  • 3-4 cloves garlic
  • 1 to 2 tablespoon fresh lemon juice
  • 2 to 3 tablespoons olive oil
  • salt + pepper


Method . . .

  1. Roast your pumpkin seeds: 400 degrees F for 5 to 7 minutes -- until browned -- then let cool a bit while you get the rest of the ingredients together.
  2. Then place all ingredients except the salt + pepper, olive oil, and lemon juice into your food processor and pulse.
  3. Then start adding in the lemon juice + olive oil a bit at a time until you reach your desired consistency.
  4. Season with salt and pepper to your tastes.
  5. Makes a heaping cup. Cover in an airtight container and store for up to a week. Or freeze.

I love this spinach pesto. We've topped pizzas with it to add a healthy dose of green and even used it in my proudest creation: Pumpkin Pesto Rolls. You can feel free to substitute pine nuts or walnuts in for the pumpkin seeds -- I was just using what we had in the pantry. They worked beautifully!

OTHER PESTO RECIPES

Vegan Walnut Pesto
Basil-Pesto French Toast
Pesto French Toast, II -- with Avocado Butter
Pesto Quiche with Oatmeal Crust
Pesto Garlic Knots
Pesto Portabella Sandwiches
(Pesto) Smothered Mother
 
Like what you just read? Browse more of our posts + recipes on Pinterest. You can subscribe to the feed of these posts or follow us on Twitter or Facebook to be the first to know what the (never home)makers are up to. And we’ll love you forever!.

Read more...
Related Posts Plugin for WordPress, Blogger...

About This Blog

MyFreeCopyright.com Registered & Protected

© 2009-2014 by the (never home)makers
All content on this blog is copyrighted.

Want to publish our pics, tips, or tricks?
Contact us! [neverhomemaker@gmail.com]

We value transparency. Links on this page may contain affiliates. In addition, please see our disclosure policy regarding sponsored posts.

  © Blogger template Simple n' Sweet by Ourblogtemplates.com 2009

Back to TOP  

Blogging tips