Showing posts with label veggie. Show all posts

Seasonal Veggie Wrap

>> Thursday, July 24, 2014

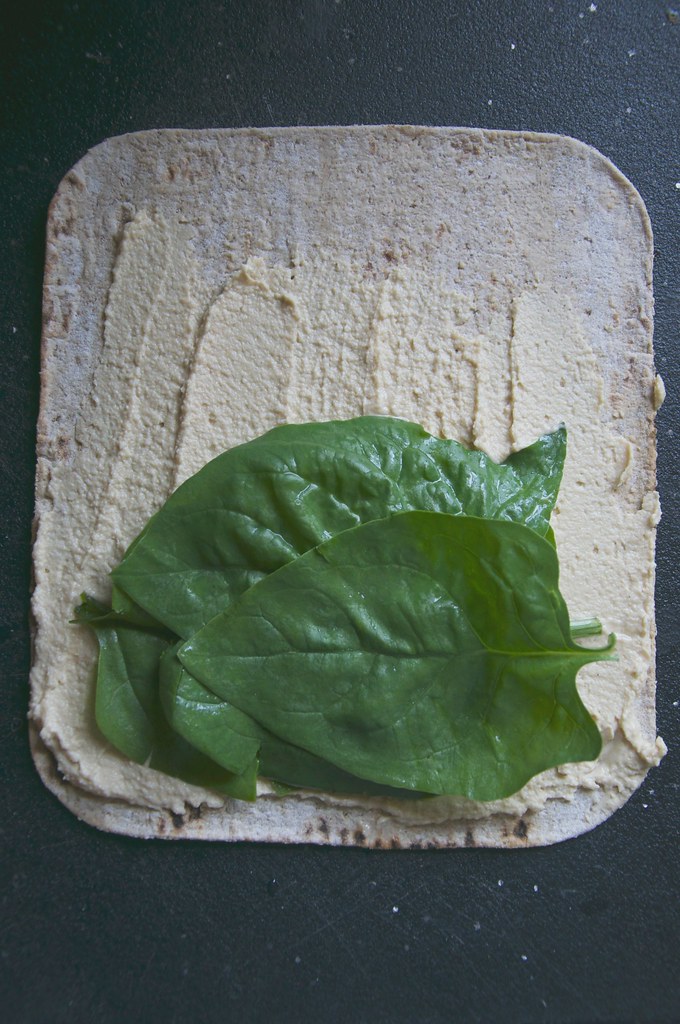
I've been eating this crunchy wrap for lunch often. I use whatever we have on hand from our CSA basket, whatever leftovers might be in the fridge, and a good dressing. I've actually become quite obsessed with dressings lately, but that's a topic for another day.

Let's take a look!


And now . . . the closeup!


SEASONAL VEGGIE WRAP

What you'll need . . .
  • A wrap -- I buy mine (multigrain) at Aldi
  • A green -- I used spinach
  • Something(s) crunchy -- I used carrots and bell peppers
  • A spread -- I made some Tahini-Free Hummus*
  • A bean or grain -- I had some leftover farro
  • Cheese -- this is honey goat cheese**
  • Dressing -- this is Brianna's Poppy Seed Dressing
  • Drizzle -- I like to use hot sauce or even Inglehoffer Sriracha Mustard
* Tahini-Free Hummus is just 1 can of chickpeas -- drained + rinsed -- blended in your food processor with a clove of garlic, a couple tablespoons olive oil, and then 1/4 to 1/2 cup water (until you reach your desired consistency). Season with salt and pepper.

** Omit to make this "recipe" vegan.

Method . . . 
  1. Assemble the ingredients as I did above. There are no rules, so feel free to put them on your wrap in whatever order makes the most sense to you. I find it helpful to cut my crunchy veggies into thin strips for easy eating.
  2. Hunt in your refrigerator shelves for more leftovers (rogue beans make a good fit) to toss on. Really, this "recipe" is a great way to eliminate food waste.
  3. Dress and drizzle for flavor. Then roll into a loose wrap. Everything will be heaping, so you won't have an airtight seal by any means.
What's your favorite seasonal fruit or vegetable?

I'm most excited for TOMATOES to come into full bloom (here's why!). I love Caprese Salads, homemade BBQ Sauce, slow roasted tomatoes, and quick-to-prepare Pasta Sauces.

Like what you just read? Browse more of our posts + recipes on Pinterest. You can subscribe to the feed of these posts or follow us on Twitter or Facebook to be the first to know what the (never home)makers are up to. And we’ll love you forever!

Read more...

The Automatic Meal

>> Monday, June 30, 2014

We're hopefully moving this year week (more here). But I want to try and keep forging on with some stuff I've been meaning to share. Like my favorite breakfast (or lunch) (or dinner). It's pretty basic, but it's one of the most satisfying meals I make.


Really, I could eat this mix every day, every week. It's pretty darned healthy, too.
  • Fry two whole eggs in virgin coconut oil
  • Toast bread (sourdough!) or cook a sweet potato in your microwave
  • Add some avocado via pre-made guacamole or simple slices
  • Toss some salsa and/or hot sauce in the mix
  • Slice some fruit or even add more veggies on the side
  • Finish off with tea or water or whatever you're drinking these days
What's your favorite all-day sort of meal?

I'm actually off to make this one right now! I think what makes it best is that it doesn't require much planning. I almost always have the ingredients. And it comes together in a flash. Now that's what I think is a recipe for automatic healthy eating!

MORE TIPS TO EAT HEALTHY

#1: Stock up on frozen veggies 
#2: Buy greens and actually USE them 
#3: Create simple, go-to meals
#4: Learn to love alternatives
#5: Prep, Make, and Store
#6: Add In: Convenience to your advantage
#7: Eliminate Food Waste
* 20 Ideas for Make-Ahead Meals

Like what you just read? Browse more of our posts + recipes on Pinterest. You can subscribe to the feed of these posts or follow us on Twitter or Facebook to be the first to know what the (never home)makers are up to. And we’ll love you forever!

Read more...

Zucchini Burgers // Vegan + Gluten-Free

>> Tuesday, April 15, 2014

See a trend? I can't promise I'll be able to swing it every week -- but I'm trying to offer up some tasty recipes that make use of the same ingredients in different ways. And I also like if I can make meals and treats using ingredients primarily purchased at Aldi.

Yesterday was delightfully vegan Chocolate Chip Zucchini Bread.

Today:


ZUCCHINI BURGERS
Makes 6-8. Vegan. Gluten-Free. Delicious.

What you'll need . . .
  • 1-1/2 cups grated zucchini
  • 1/2 white onion, diced or grated
  • 1 can beans (I used white beans) -- drained + rinsed
  • 2 tablespoons flaxmeal
  • 2 tablespoons chia seeds
  • 2 tablespoons sesame seeds
  • 2 tablespoons sunflower kernels
  • 1 tablespoon smoked paprika + chipotle seasoning (or other spices)
  • 2 teaspoons olive oil
  • Salt and pepper to taste
Method . . .
  1. Pulse the beans in your food processor a few times. Alternatively, you can roughly mash with a fork. You want them mushy, but not pureed like hummus.
  2. Then combine all ingredients in a large bowl. You can use a big spoon or even your hands. Just mix until everything is well incorporated.
  3. Then take palmfuls of the "dough" and form 6-8 patties. 
  4. Place patties on a plate (wax paper is optional) and refrigerate for an hour or more to help firm up. I actually found the burgers we left in the fridge overnight did better.*
  5. Then heat some olive oil in a fry pan on your stove top and cook on both sides until browned.


* Since this recipe doesn't have flour or oats or any other type of grain, it is a bit mushier when cooked. However, if you don't press the burgers down flat while cooking, they keep their shape nicely. Worth it for a true veggie burger sans fillers -- IMO.

Slap between slices toasty bread.

Top with salsa, avocado, or whatever else you desire!

Maybe some Baby Kale Pesto?


Much to my surprise, salsa and mustard make a winning combination! I love these burgers because they are light and seedy. I don't know what it is, but I have a thing with seeds lately. So, feel free to substitute any ingredients you have on hand.

// MORE SANDWICHES + BURGERS:
* means VEGAN

Like what you just read? Browse more of our posts + recipes on Pinterest. You can subscribe to the feed of these posts or follow us on Twitter or Facebook to be the first to know what the (never home)makers are up to. And we’ll love you forever!

Read more...

Vegetable Burgers in Bulk + Frozen

>> Monday, September 30, 2013

We've covered a lot of meals this month, haven't we? And as I mentioned in my freezer month cooking tips -- I love simple recipes that mix together using just my two hands. This veggie burger recipe is great because you don't need many tools to make it. And you can customize using any vegetables or grains you have on hand within reason.

Use black beans or kidney beans or even garbanzos. Sub in brown rice or quinoa for oats. Use sweet potatoes or parsnips instead of carrots or spice things up with jalapeno peppers. You get the idea, just stick to the basic ratios and adjust the moisture content as needed. The goal is for it to be moist, but not sticky when you form the mix into patties.

Here we go!


HAND-MIXED VEGGIE BURGERS

What you'll need . . .
  • 2 cups black beans, drained + rinsed
  • 3 large garlic cloves, minced
  • 1 large bell pepper, diced
  • 1 large onion, diced
  • 1 large carrot, grated
  • 3/4 to 1 cup rolled oats
  • 1/2 to 3/4 cup whole wheat breadcrumbs
  • 1/2 cup sunflower or other seeds/nuts
  • 1/4 cup flax meal 
  • 1 tablespoon smoked paprika + chipotle seasoning
  • 2 tablespoons soy sauce
  • 2 teaspoon apple cider vinegar
  • salt and pepper to taste 
Method . . . 
  1. Prepare all ingredients ahead of time (be sure to chop everything finely so it will blend well)
  2. Then put your beans in a large bowl and mash gently with your hands. Add in the oats and bread crumbs and toss.
  3. Add the rest of the ingredients and just keep mixing until it's all incorporated, adjusting with more/less dry versus wet ingredients. Check seasoning, too, to make any modifications.


// TO FREEZE + COOK:

Get a baking sheet and line with parchment or wax paper (I would have done this, but I was out!). Form dough into 12 to 16 patties, depending on the size of burgers you want. Then cover loosely with plastic wrap and freeze for about an hour, until firm. Then transfer patties into freezer bags. To prevent sticking, I put mind in smaller batches in smaller bags and then put four of these smaller bags in one larger freezer bag.

You may also cook some of these burgers right away if you wish -- just use a medium pan with some olive oil over medium-high heat and work to golden brown on each side. Serve with your favorite bread or bun.

To cook once frozen, let thaw completely and then cook using the instructions above.

If you're just catching up, be sure to check out these posts!


Like what you just read? You can subscribe to the feed of these posts or follow us on Twitter or Facebook to be the first to know what the (never home)makers are up to. And we’ll love you forever!

Read more...

Baked Veggie Pockets

>> Monday, June 10, 2013

Making this vegan spanakopita recipe transformed how I view my own at-home cooking. Kicked my butt, in a way. I have much longer post about that whole situation in the queue for tomorrow. It's a continuation on my why food blogging is weird series.

First, the deliciousness!


I'm not going to pretend it turned out like traditional spanakopita. Foremost, my spotlight veggie was kale, baby kale, specifically, and not spinach. Halfway through the recipe, I decided I had changed so much, it had transformed into something else entirely.

The turning point? I tried making phyllo dough and failed pretty miserably.

It doesn't look half bad, though.


BAKED VEGGIE POCKETS 
an attempt at creating a healthier grab-and-go lunch
based off this fantastic + legit vegan spanakopita recipe

What you'll need . . . 

  •  1-1/2 cup flour
  • 1 teaspoon salt
  • 1 teaspoon baking powder
  • 2 tablespoons olive oil
  • 1/3 cup water
  • 1/4 cup olive oil (for brushing)
  • A large tub of baby kale or spinach*
  • 1 can of black or white beans, drained + rinsed 
  • 1 small onion, chopped
  • 1/4 cup almond meal
  • squeeze lemon juice
  • 1 tablespoon nutritional yeast
  • seasonings, for which I used 
    • smoked paprika
    • thyme
    • salt + pepper
* I don't remember exactly the measurement, but it's one of those large plastic tubs of greens. It cooked down to about 3/4 cup of kale when all was said and done. Feel free to sub in other greens as well.

Method . . .

  1. Follow the instructions in the original recipe for how to mix together the dough. Then refrigerate it for about 2 hours and made the veggie mixture.
  2. Boil 1 cup of water with baby kale and let cook -- covered -- until it wilts. Then let that cook until cool enough handle to squeeze out the excess moisture, chop up a bit, and place in a large bowl.
  3. Saute an onion in some olive oil and then add to the bowl as well as the beans, nutritional yeast, almond meal, and other seasonings. Give mixture a good tossing to ensure it is all coated.
  4. Preheat your oven to 350 degrees F + roll out the dough, again, just like in the instructions
  5. Then I deviated to turn these into pockets versus a pie. Lay two pieces of the dough atop one another, brushing a layer of olive oil in between, and then cut into diamonds or rectangles, however you choose to look at it. (Around 5 inches long by 3-4 inches wide.) 
  6. Fill half of each with a heaping tablespoon of the veggie mixture, fold over and use the tines of a fork to press and seal. 
  7. Continue this process with the remaining ingredients, placing each unbaked veggie pocket onto a rimmed baking sheet. Poke holes with tines of fork into each to let steam escape. Brush each with a bit of olive oil.
  8. Bake for between 20-30 minutes, until golden brown. Let cool before serving.

And after all that, I I snapped one good finished photo and then accidentally deleted it when I was taking photos of Ada. You'll just have to trust that what's inside stays nice and green and the outside gets crisp and delicious.

Trust me? Still, it's a far cry from spanakopita. So stay tuned for tomorrow's food blogger rant #2.

Like what you just read? Browse more of our posts + recipes on Pinterest. You can subscribe to the feed of these posts or follow us on Twitter or Facebook to be the first to know what the (never home)makers are up to. And we’ll love you forever!

Read more...

Green Curry Tofu Stir-Fry

>> Monday, March 18, 2013

I'm discovering that the easiest gluten-free dinners to prepare don't revolve around specific gluten replacements or fancy flours and baking methods at all. Instead, they require me to look outside the bread box and redefine what dinner means to our family. We used to eat a ton of stir-fries.

I think we fell out of practice when I was pregnant and many veggies turned my stomach. I got in the habit of eating lots of bread-centric foods  because they went down the easiest. They also continued being a favorite when we were busy with a newborn and they were easy to grab.

Newsflash: We don't have a newborn anymore. So, back to stir-frying!


GREEN CURRY TOFU STIR-FRY

What you'll need . . .

  • 1 cake tofu, drained well 
  • 1 large head broccoli 
  • 1 white onion 
  • 2-3 cloves garlic, minced 
  • 1 cup white mushrooms, sliced 
  • 1 red pepper, sliced (we were out, but usually use one) 
  • 1 to 2 tablespoons green curry paste 
  • 15 ounce can low fat coconut milk
  • Juice of half a lime


Method . . .

  1. In a small bowl, whisk together the green curry paste and coconut milk until well combined. Set aside.
  2. Drain your tofu using this method. Cube and set aside while you warm a couple tablespoons of olive oil in a large fry pan. Cook the tofu until well browned on all sides.
  3. In another, larger pan over medium-high heat, add your oil and onions and garlic. Cook until glassy + fragrant.
  4. Then add in the broccoli and red pepper. Cook until softened, but still a bit crunchy. Then add in the mushrooms and cook a few minutes more.
  5. Add the coconut curry mix to your veggie pan. Cook for a few minutes, until bubbly.
  6. Add the tofu to the veggie/curry pan . . . then cook covered over low heat for another 15 to 30 minutes. Then squirt in the lime and stir.
  7. Serve over rice (should make two large servings) and add basil or another garnish as desired. 

I'd say coconut curry stir-fries are our favorite. They aren't quite as authentic as ordering out, but the flavor is more interesting than our other go-to, which is mostly soy sauce mixed with sesame oil. We pretty much go back and fourth between the two.

Here's a Red Curry Stir-Fry recipe we made a while back (with photos taken in the day! sorry about that . . . ). And we sometimes make this tasty marinade, bake the tofu, and serve with roasted veggies. Just another way of making a similar meal.

If you've gone gluten-free or have been trying to eat less gluten, do you try to replace those bread-y foods you used to enjoy or do you shift to eating entirely different sorts of meals? Or maybe a mix?

Enjoy!

Like what you just read? You can subscribe to the feed of these posts or follow us on Twitter or Facebook to be the first to know what the (never home)makers are up to. And we’ll love you forever!

Read more...

Deep Dish Veggie Tart

>> Friday, August 20, 2010


We shared with you some of the recipes we've been lusting over last Friday. For dinner yesterday evening, we finally got a chance to knock one of those items off the to-make list: the Lasagna Tart from 101 Cookbooks.

But since we rarely make recipes exactly as they appear online or in books, we changed it up a bit. What resulted was more of a veggie deep dish pizza than a lasagna tart. But that's OK -- even better than OK. I'm thinking some of you guys and gals who recently attended the Health Living Summit in Chicago might be feeling a little nostalgic. You may want to relive last weekend's events by making this healthy deep dish for dinner . . . tonight.

Am I right?


DEEP DISH VEGGIE TART

What you'll need . . . for the tart crust:
(original recipe is Clotilde's Easy Olive Oil Tart Dough)
  • 2 cups whole wheat pastry flour
  • 1 teaspoon coarse kosher salt
  • 1 teaspoon dill (or other dried herbs)
  • 1/4 cup olive oil
  • 1/2 cup cold water


What you'll need . . . for the filling:
(again, inspired by 101 Cookbooks)
  • 2 medium zucchini, sliced into thin "coins"
  • 1/2 can of black beans, drained and rinsed
  • 1-1/2 cups Monterrey Jack cheese
  • 3 cloves garlic, minced
  • 2 tablespoons olive oil
  • 1 teaspoon red pepper flakes
  • pinch of kosher salt
  • 1 14-ounce can fire roasted tomatoes


Method . . .
(don't let these EASY 20 steps scare you off!)
  1. Preheat oven to 375 degrees F. Lightly oil a tart pan and set aside.
  2. Toss the zucchini coins with 1 teaspoon of salt in a dish to extract some of the moisture. Set aside while you prepare your crust.
  3. Whisk together the flour, salt, and herbs. Add in the oil and water. Mix with a fork . . . and then give in and use your hands. The dough will be slightly sticky. You may add more water, if necessary.
  4. On a lightly floured work surface, roll out the dough so it'll fit your tart pan. We make ours about an inch in diameter larger. Quick rolls are best, you don't want to handle the dough too much.
  5. Very carefully transfer the tart dough to the pan. Fold over the excess dough to make the crust thicker. Cover with plastic wrap and let rest in your refrigerator for half an hour to an hour.
  6. Make your sauce: In a food processor, combine the garlic, canned tomatoes, 1 teaspoon salt, olive oil, and red pepper flakes. Stephen also added a pinch of cayenne for good measure. Heat over medium-low heat on stove to warm and let flavors mingle. However, you don't want the sauce scalding hot when you put it in the crust. Warm is the key word here.
  7. Prick the bottom of your tart crust with a fork a couple times. Bake on the middle oven rack for 15 minutes. Remove from oven and let cool (I waited 20 minutes).
  8. Lower your oven temperature to 350 degrees.
  9. Then let the layering begin!
  10. Start with 1/2 of your cheese on the bottom.
  11. Then 1/2 of your sauce. (A spatula helps spread.)
  12. Then pile your zucchini coins in a circular pattern (again, using 1/2 of them -- see photo above).
  13. Then add all the black beans.
  14. Then another layer of cheese. This time, only add about 2/3 of what is left.
  15. Then another layer of zucchini.
  16. Then the rest of your cheese.
  17. Then the rest of your sauce to top it all off.
  18. Smush your ingredients just so -- you don't want them toppling over the top of the tart pan.
  19. Get out a rimmed baking sheet -- you don't want juices wandering to the bottom of your oven -- and place your tart pan on it. Bake for 40 minutes.
  20. Let cool before serving (10 minutes or so).
Despite how long this recipe is, you go from this unbaked wonder . . .


To THIS beautiful deep disher in no time at all!


Have you ever made a recipe that didn't turn out exactly as you thought it would -- but you loved it anyway? This happens to us ALL the time. It's how a lot of our favorite meals are made. And that's what I love about the experimentation aspect of cooking and baking . . . even when we make the same recipe, use the same ingredients, etc. -- there's never a guarantee that it will come out the same way twice!

Like what you just read? You can subscribe to the feed of these posts or follow us on Twitter or Facebook to be the first to know what the (never home)makers are up to. And we’ll love you forever!

Read more...

Vegetable Dumplings: Dinner IN A FLASH!

>> Monday, February 1, 2010


This is yet another dinner IN A FLASH post where I offer a quick and tasty recipe with HORRIBLE photography to show it off. Last month's post was a hearty vegetable soup with hubbard squash puree for some extra flavor and nutrition. Today's recipe is one of our favorites because it's just one of those things you never think you can make yourself: Vegetable Dumplings!

Let's get to it, then.


What you'll need . . . (for the dough)
  • 1-1/2 cups organic white flour
  • 1/2 to 3/4 cup water
  • Pinch of salt


What you'll need . . . (for the filling)
  • 1/2 cup shredded red cabbage
  • 1/2 cup shredded carrots
  • 2-3 cloves minced garlic
  • Some onion (if you like)
  • And feel free to add mushrooms or whatever else you'd like . . .
  • Sesame oil (for frying)


Method . . .
  1. Shred and cut all ingredients for the filling. Mix together. Set aside.
  2. In a medium-sized bowl, combine water and flour to make a dough. Adjust water/flour until dough comes out only slightly sticky. Knead for about 5 minutes.
  3. Take a heaping tablespoon amount of dough (or slightly more) and roll it into a circle about 3 inches in diameter and 1/8 inch thick. Set on a clean work surface and roll with a rolling pin.
  4. Put a spoonful of mixture inside (in the middle), and fold in half -- pressing edges together.
  5. Continue following these instructions until either the dough or mixture runs out (we had a bit of dough left over).
  6. Heat sesame oil in a wok or large pan on medium high heat. Coat dumplings in the oiled pan and cook until browned on each side (flip often while on the stove to evenly cook).
  7. When they're browned . . . add about 1 tablespoon of water to the pan and cover for one minute -- turning down the heat to medium.
  8. Serve with soy sauce (we added garlic and ginger powder to ours).


Like what you just read? You can subscribe to the feed of these posts or follow us on Twitter or Facebook to be the first to know what the (never home)makers are up to. And we’ll love you forever!

Read more...
Related Posts Plugin for WordPress, Blogger...

About This Blog

MyFreeCopyright.com Registered & Protected

© 2009-2014 by the (never home)makers
All content on this blog is copyrighted.

Want to publish our pics, tips, or tricks?
Contact us! [neverhomemaker@gmail.com]

We value transparency. Links on this page may contain affiliates. In addition, please see our disclosure policy regarding sponsored posts.

  © Blogger template Simple n' Sweet by Ourblogtemplates.com 2009

Back to TOP  

Blogging tips