Showing posts with label egg. Show all posts

Baked Spinach + Ricotta Gnocchi

>> Friday, January 2, 2015

And now for a simple recipe you’ll want to make over and over again. We tend to overdo the pizza in this house. So, I was looking to make something that uses many of the same ingredients we always have on hand -- just in a different way.

If you’ve never had baked gnocchi, you’re in for a treat. The gnocchi (pronounced like this) are super tender yet a hint crisp. You can bake them and eat with any kind of sauce you please (a pesto or brown butter sauce is divine!). I chose to use some store-bought tomato sauce from Aldi and fresh mozzarella. And if you’re into individual portions -- these guys freeze quite beautifully.

Mangia!


SPINACH + RICOTTA GNOCCHI


What you’ll need . . .
  • 15 ounces ricotta cheese (I used part-skim)
  • 1 cup packed spinach leaves
  • 3/4 cup flour*
  • 1/4 cup finely grated parmesan cheese
  • 1 egg
  • 2 tablespoons olive oil
  • 1 tablespoon nutritional yeast
  • salt + pepper
  • Pasta sauce
  • Fresh mozzarella cheese
* I used caked flour because I wanted to see how it would work. All purpose would be a good substitute. I also think this recipe would lend well to gluten-free flours, just play with the amount. To get the right mix. You want the resulting gnocchi to be a bit firm but mostly tender.

Method . . .
  1. Preheat oven to 350 degrees F. Lightly grease two baking pans or dishes with olive oil and set aside.
  2. Blanche spinach leaves in a small pot of boiling water (1 minute). Immediately submerge in cold water to stop cooking. Dry leaves as much as possible using a tea towel and chop finely.
  3. Toss all ingredients into a bowl and mix until you form a wet dough.
  4. Portion out by heaping tablespoonful onto/into greased baking sheets or dishes.
  5. Bake for 20 minutes, until firmed up a bit and slightly golden.
  6. Turn the oven to broil.
  7. Then cover gnocchi with tomato sauce (a lot or a little, depending on your preference) and top with cuts of the cheese. Broil for 5-7 minutes until the cheese browns and bubbles.
  8. Serve immediately.


FREEZE:


  • Spoon onto wax paper lined baking sheets in the tablespoon portions.
  • Put in your freezer until completely frozen -- a couple hours.
  • Store in an airtight freezer bag for up to 6 months. 
  • Then bake as instructed above in whatever size portion works best for you.
I’m going to try to get my new year thoughts out today, but I’m still getting over this pesky sickness. So, whatever the case -- that post is coming next. I hope you enjoy this recipe, though. It’s definitely one that is getting put into the regular rotation because it’s so easy and delicious.

Here’s to more recipes in 2015!

Like what you just read? Browse more of our posts + recipes on Pinterest. Chat with us on Twitter or Facebook. And you can always email us with your questions and comments.

Read more...

30-Minute Mushroom + Kale Frittata

>> Monday, November 10, 2014

Eggs.


Veggies.


Combined with cheese.


And baked.


MUSHROOM + BABY KALE FRITTATA

What you’ll need . . . 
  • 6 eggs
  • 4 large white mushrooms, chopped
  • Gigantic handful baby kale (or other greens), chopped
  • 2-3 cloves garlic, minced
  • 2 tablespoons mayo or milk*
  • 3/4 - 1 cup shredded cheddar 
  • Black pepper to taste
  • Pinch salt
* I know lots of you guys don’t like mayo, and I don’t use it often. But when you’re scrambling eggs or making bakes like these -- the texture is amazing. We use mayo that’s made with olive oil that contains half the fat and calories of a traditional blend.

Method . . .

  1. Preheat your oven to 350 degrees F. Lightly oil an 8 x 8 inch casserole dish and set aside.
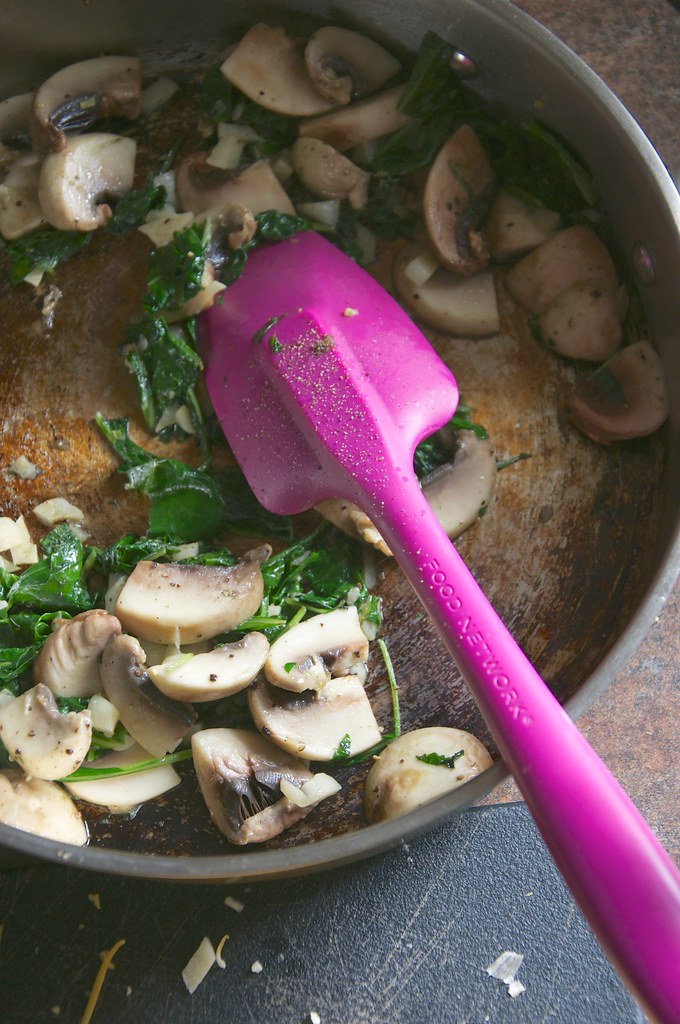
  2. Chop your veggies, then sauté them on the stove, starting with the garlic. Add the mushrooms and cook for a few minutes, until softened. Then add the greens and wilt. You don’t want the mushrooms super soft just yet. Season with salt and pepper.
  3. Whisk your eggs with the mayo or milk, then toss in the shredded cheese and cooked veggies. Mix until combined. Then pour into your prepared casserole dish.
  4. Bake for 20-30 minutes or until the top is lightly golden brown and the middle is set. Let cool a while before slathering on the hot sauce. 
Yum!


This meal’s a good one to modify using whatever odds and ends you might find in your fridge. You can pretty much toss any vegetables or cheese in the mix. Frittatas tend to keep well for around 5 days when stored in an airtight container. You can eat it cold or heat up again for several minutes at 350 degrees F.

And my favorite way to enjoy this egg bake? Between two slices of crusty bread.

Enjoy!

Like what you just read? You can subscribe to the feed of these posts or follow us on Twitter or Facebook to be the first to know what the (never home)makers are up to. And we’ll love you forever!

Read more...

Guacamole Deviled Eggs

>> Monday, July 7, 2014

Our 4th of July kicked off a whole new season in our lives. Though we still didn't technically own our new home, we hosted our first "big" party with family and a few friends. It was one of those totally last minute deals where we were literally buying a gas grill hours before we lit it up . . . and I was in need of some majorly tasty party food -- and fast.

PS: I need a major post-move makeover, people!


Deviled eggs are an all-time favorite of mine. I could seriously eat an entire batch myself. And keeping with my Avocado Egg Salad theme, I thought to try them with some guacamole we had leftover from a Veggie-Loaded Quesadillas dinner the night before.

Let me tell you, these eggs are !!!


GUACAMOLE DEVILED EGGS

What you'll need . . . 
  • 12 eggs, hard boiled 
  • A couple tablespoons to Vegenaise or mayo*
  • 1/4 cup homemade guacamole (or store bought), more if desired
  • Dried dill, paprika, etc.
* Optional, but I love the tangy taste it adds to this recipe!

Method . . .
  1. Hard boil your eggs on the stove. The best instructions I have ever run across for this process are from Martha Stewart. Works perfectly every time -- cover eggs with 1 inch of cold water, bring to a rapid boil, take off from heat + cover, and let sit for 12 minutes before putting in a bath of cold (or icy) water to stop the cooking.
  2. Slice eggs in half -- carefully -- and place hardened yolks in a small bowl. Arrange on a plate for future filling.
  3. Then add the Vegenaise or mayo and guacamole and mix until well incorporated. You may add more mayo or guac, depending on your desired flavor and texture.
  4. Then scoop a generous amount into each egg 
  5. Then top with generous sprinklings of dill and smoked paprika, etc. I also added some fresh grated black pepper and sea salt for good measure.

I will definitely be making another batch (for myself only!) ASAP. There's just something about that avocado + egg mixture that gets me every time. Oh, and if you're vegan, you can always tried the Tofu Avocado Salad recipe we posted last year. It's another winner!

Happy Monday -- and I hope you all had a great holiday! Here are some more photos from our party. I'd say this recipe is certainly a strong move toward making more of my clean eating goals a reality.

Like what you just read? You can subscribe to the feed of these posts or follow us on Twitter or Facebook to be the first to know what the (never home)makers are up to. And we’ll love you forever!

Read more...

The Automatic Meal

>> Monday, June 30, 2014

We're hopefully moving this year week (more here). But I want to try and keep forging on with some stuff I've been meaning to share. Like my favorite breakfast (or lunch) (or dinner). It's pretty basic, but it's one of the most satisfying meals I make.


Really, I could eat this mix every day, every week. It's pretty darned healthy, too.
  • Fry two whole eggs in virgin coconut oil
  • Toast bread (sourdough!) or cook a sweet potato in your microwave
  • Add some avocado via pre-made guacamole or simple slices
  • Toss some salsa and/or hot sauce in the mix
  • Slice some fruit or even add more veggies on the side
  • Finish off with tea or water or whatever you're drinking these days
What's your favorite all-day sort of meal?

I'm actually off to make this one right now! I think what makes it best is that it doesn't require much planning. I almost always have the ingredients. And it comes together in a flash. Now that's what I think is a recipe for automatic healthy eating!

MORE TIPS TO EAT HEALTHY

#1: Stock up on frozen veggies 
#2: Buy greens and actually USE them 
#3: Create simple, go-to meals
#4: Learn to love alternatives
#5: Prep, Make, and Store
#6: Add In: Convenience to your advantage
#7: Eliminate Food Waste
* 20 Ideas for Make-Ahead Meals

Like what you just read? Browse more of our posts + recipes on Pinterest. You can subscribe to the feed of these posts or follow us on Twitter or Facebook to be the first to know what the (never home)makers are up to. And we’ll love you forever!

Read more...

Tofu Salad Cups

>> Wednesday, May 29, 2013

So, instead of a Tofu-Avocado Salad sandwich or wrap . . .


Make a mini phyllo bowl!


Obviously you won't have time or the desire to make something snazzy like this for lunch every single day. But once in a while, a delicious phyllo dough crust is just right. Especially in summer, when light finger-type foods are preferred over gigantic, heavy submarine rolls.

HOW TO:
  • If you use store bought phyllo, which I'll get to in a moment, you'll need to thaw in the refrigerator overnight or follow the instructions on the box. So, make sure you do that before proceeding. 
  • Preheat your oven to 375 degrees F. Grease a muffin tin with olive oil or butter/Earth Balance and set aside. 
  • Make up a batch of the Tofu-Avocado Salad (or even Avocado-Egg Salad) and set aside // refrigerate.
  • I used frozen phyllo dough for this recipe because making my own seemed far too daunting. However, if you're interested, here's a recipe for phyllo dough. 
  • The secret to making phyllo cups is being liberal with olive oil or butter/Earth Balance. When it gets too dry -- even just sitting uncovered for a minute -- it breaks apart, and there's no returning from it. There should be information on the package about keeping everything moist and pliable.
  • Lay down a large sheet of phyllo, brush it with olive oil, lay down another sheet, brush, another sheet, brush, and yet another sheet with more oil. That's 4 layers total. You could do 3 as well.
  • Cut into 5 - 6 inch squares and press them -- gently -- into a (again, greased) muffin tin to form a mini-bowl or cup. 
  • Bake for 10 minutes or so, until golden brown. Be careful not to over-bake.

Then all you need to do is let them cool and scoop in the salad . . .


It's crisp. It's light. It's fun. We have a Greek food festival coming up this weekend where we live, so I guess phyllo is on the mind. I have already decided I'm going to try and make my own spanakopita over the weekend.

And if you haven't tried it yet, the Tofu-Avocado Salad and Avocado-Egg Salad recipes are simple + tasty + quick to prepare. We eat one of them at least once a week over here.

What's your favorite light meal for summer? Or have you used phyllo in cooking before? How?

Like what you just read? Browse more of our posts + recipes on Pinterest. You can subscribe to the feed of these posts or follow us on Twitter or Facebook to be the first to know what the (never home)makers are up to. And we’ll love you forever!

Read more...

Breakfast Rut

>> Monday, May 20, 2013

The word "rut" has such a negative connotation, doesn't it? Maybe I should use a different term. Basically: I've been eating the same thing for breakfast for the last five or so days. I feel like I've found a good groove -- because when I first started keeping my meal diary, I was being far too skimpy on this important meal.

Here she is!


THE MEAL:
  • Egg friend in coconut oil sprinkled with black pepper + paprika
  • Two slices of Ezekiel toast (7 sprouted grains) 
  • 1 cup chopped strawberries
  • 1/2 sliced avocado

BREAKDOWN:


You guys had some great suggestions to not get too hung up in the numbers counting when I track what I eat. Instead, paying attention to my macros is going to probably be the best thing for me to do. This meal looks pretty balanced to me. And coming in at 426 calories versus the 250 (a trap I fell into while looking too much at the calorie #), is much more sustaining.

So, I'll happily fall into this breakfast rut if it means I get the right mix of what will keep my satiated and energized with drippy goodness . . .


Do you have go-to meals like these? Any suggestions?

Like what you just read? Browse more of our posts + recipes on Pinterest. You can subscribe to the feed of these posts or follow us on Twitter or Facebook to be the first to know what the (never home)makers are up to. And we’ll love you forever!

Read more...

Breakfast Quiche + Rosemary Crust

>> Wednesday, April 24, 2013

I've tacked the word "breakfast" onto this tasty quiche recipe, but it's really appropriate no matter the time of day. Or year, for that matter. I have some more spring-like recipes coming up, it's just been a tough transition from all the comfort dishes I've been making.

Let's dive right in . . .


BREAKFAST QUICHE + ROSEMARY BISCUIT CRUST
individual servings made easy using a muffin tin!

What you'll need for the crust . . . 

  • 2 cups whole wheat flour
  • 1 tablespoon baking powder
  • 1 teaspoon salt
  • 1 teaspoon fresh or dried rosemary
  • 1/2 cup cold Earth Balance
  • 2/3 cup almond milk 

What you'll need for the egg mixture . . .

  • 5 large eggs
  • 1/2 cup shredded cheddar
  • 1/2 cup red or green peppers, chopped 
  • 1/2 cup onions, diced
  • Salt and pepper to taste
  • 2 tablespoons almond milk 

Method . . .

  1. Preheat your oven to 425 degrees F. Lightly grease the cups of your muffin tin and set aside.
  2. In a food processor, pulse together the flour, baking powder, salt, and butter/Earth Balance until it becomes coarse meal.
  3. In a bowl, mix with the almond milk until just combined. Do not over-mix.
  4. On a lightly floured work surface, divide into 12 equal pieces of dough. Roll into balls and then flatten or roll flat. Press into the muffin tin cups as you would pie crust.
  5. Gently whisk together all ingredients for the egg filling. Then distribute into the cups, making sure to leave some space at the top for expansion (if you fill them too much, they will spill out and make a mess of your oven, I know this from experience!)
  6. Bake for 20 to 25 minutes, until eggs are set and lightly browned. Let cool before serving.
  7. Serve immediately or can be refrigerated for a few days and eaten warm or cold.

If you'd like to freeze these guys for a convenient grab + go, simply:
  • Let quiches cool completely. This part is important when freezing most things. I even place mine in the refrigerator to make the process faster. 
  • Wrap individually in plastic wrap and then place in a large freezer bag. Choose your freezer spot carefully so they aren't crushed. 
  • Consider defrosting first in your refrigerator when it's time to re-heat -- though they can be reheated from a frozen state. 
  • Also consider topping with aluminum (if reheating in the oven) so they don't brown too much. Choose microwave setting carefully to avoid hot spots.
Oh, and please top liberally with hot sauce. My favorite lately always is Sriracha Hot Chili Sauce. It goes especially well with eggs fried in coconut oil. And on pizza. Anything, really.

Any suggestions? Hot sauce is my favorite condiment!

Like what you just read? You can subscribe to the feed of these posts or follow us on Twitter or Facebook to be the first to know what the (never home)makers are up to. And we’ll love you forever!

Read more...

Family and Food

>> Wednesday, June 13, 2012


I've mentioned it a few times on Twitter recently -- but I am totally obsessed with genealogy at the moment. And to be entirely truthful, I have been my entire life.

I've been catching back-episodes of Who Do You Think You Are? and it set me over the edge.


My dad's family (above) has done extensive research into where we're from, who's who, etc. My mom's side is a bit of a mystery . . . so that's what I'm concentrating on currently. Gathering known names and dates from my grandparents and searching like crazy.

Stephen would tell you that I've parked myself on the couch each night for a week -- computer in lap -- yelling out phrases like "Obituaries are where it's AT!" and "Hell YES findagrave [dot] com!"

Last night I discovered that some of my ancestors came over to Philadelphia, PA, in 1740 from Germany (Switzerland today) on a ship called the Friendship. I don't know. There's something so incredibly interesting to me about the whole process.


One thing I certainly did not inherit from my family is my taste in food.


I was telling my mom about this avocado egg salad recipe and she, somehow without words, said YUCK! But that's totally not the case. It may be one of my new favorite recipes.

First we need to talk about making the best hard-boiled eggs. This is important because growing up (and, sorry again, mom), I always thought hard-boiled eggs were supposed to be slightly grey on the inside. But actually this means they are over-cooked.

This is more like it:


And I must default to Martha Stewart for the method. I follow it e.x.a.c.t.l.y and get perfect results every single time.


To make the avocado egg salad, you need the following . . .

  • 4 hard-boiled eggs
  • 1 large avocado, cubed as you see above
  • 2 tablespoons mayonnaise or Vegenaise (we used it b/c we don't love mayo)
  • 1 teaspoon curry or fenugreek powder
  • Pinch of salt and pepper

I didn't get a great photo, and this filter doesn't help much either. But all you do is combine all the ingredients in a large bowl and mash together with a fork. Adjust the salt/pepper/mayo to your tastes. Then slap between two slices of bread or in a wrap and enjoy.

Yet another fantastic sandwich we had this weekend. And if you didn't catch yesterday's post, we had quite a masterpiece on Saturday night as well!


Speaking of food and family, today on Writing Chapter Three we're talking about Ada's current solids situation. We started out with Baby-Led Weaning. What we're doing now has involved a change of plans.

Like what you just read? You can subscribe to the feed of these posts or follow us on Twitter or Facebook to be the first to know what the (never home)makers are up to. And we’ll love you forever!

Read more...

Scrambled Egg Bites

>> Wednesday, February 29, 2012

There are few breakfasts that are easier to prepare than scrambled eggs. But when I have time, I like to add a bit more flair to my favorite meal of the day. These bites make a filling solo breakfast . . . but I also think they'd make a great brunch appetizer!


SCRAMBLED EGG BITES

What you'll need . . .
  • 2 large eggs
  • 1 tablespoon plain low fat yogurt
  • 1 tablespoon brown mustard
  • Handful chopped onions
  • Handful chopped arugula
  • Handful shredded cheddar cheese
  • Pepper, to taste

Method . . .
  1. Preheat your oven to 350 degrees F. Spray 8 cups in a mini muffin pan with some olive oil. Set aside.
  2. Whisk together the eggs, yogurt, and mustard in a small bowl.
  3. Then fold in the onions, arugula, and cheddar.
  4. Season with some pepper.
  5. Evenly distribute the mixture into the 8 cups. Bake for 18 to 20 minutes, until browned and bubbly.

Serve immediately. Tastes great with ketchup (yeah -- I'm a ketchup and eggs girl) or hot sauce. And feel free to swap out ingredients and use peppers in place of onions, spinach in place of arugula, or Monterey Jack in place of cheddar.

NOTE: You can also make a full pan of these bites by increasing the eggs to 6, the yogurt to 3 tablespoons, mustard to 3 tablespoons, and so on.

SITE CHANGES:

Just FYI -- we recently added all the posts related to running while pregnant to our Running page. We also changed the navigation a bit on the Recipes page. And we're nearing the end of setting up our new blog. Hope to launch it next week!

Like what you just read? You can subscribe to the feed of these posts or follow us on Twitter or Facebook to be the first to know what the (never home)makers are up to. And we’ll love you forever!

Read more...

Use-It-Up Brunch Bake

>> Tuesday, October 4, 2011

On the weekends, we usually have lots of edible odds and ends hanging around the kitchen. A spare tomato. Quarter of an onion. Half a green pepper. Just random stuff that doesn't necessarily constitute a meal. We hate wasting food, but sometimes these bits go bad before we find a good use for them.

On the other hand, we always have eggs and almond milk in our fridge. Cheese is another ingredient we've always got fresh and handy. So, this weekend while Stephen was out running his long run, I decided to whip up something to combine all of these items.


USE-IT-UP BRUNCH BAKE

What you'll need . . .
  • 5 eggs
  • 1/3 cup almond or other milk
  • 1/3 cup cheddar cheese, shredded
  • 1/2 large green pepper, chopped
  • 1 large tomato, chopped
  • 1/2 teaspoon ground black pepper
  • Few slices crusty sourdough bread, cut into smaller pieces

Method . . .
  1. Preheat your oven to 350 degrees F. Prepare a 2 to 3 quart baking dish by lightly greasing with some butter or Earth Balance.
  2. In a large bowl, whisk together the eggs and milk. Add the black ground pepper. Then add in the chopped green pepper, tomatoes, bread, and cheese.
  3. Let sit for a couple minutes -- allowing the bread to absorb the egg mixture.
  4. Pour the mix into your prepared baking dish. Place in the oven and let bake for 45 to 50 minutes.
  5. Bake is done when the middle is set and somewhat firm, but be careful not to over-bake.

The best part about this dish? You can use up pretty much anything you have on hand. Just stick with the 5 eggs, 1/3 cup milk, 1/3 cup shredded cheese part. The rest is up to you. Use mushrooms, onions, asparagus . . . even kale or collards, etc.

As well, any kind of crusty bread works, but we'd suggest not using regular sandwich bread. It won't taste bad. It just won't be as interesting.


Portion size is also up to you, but I'd say 2 to 3 people can get a good meal out of the dish. Stephen told me, though, he likely could have eaten the entire thing himself!


What's your favorite way to use your edible odds and ends? Just leave a comment or email us at neverhomemaker [at] gmail [dot] com.


And if you're following our baby posts, today on (never home)maker, baby! I share what we learned in our 1-day birth class. It was information-overload, but well worth the time!

Like what you just read? You can subscribe to the feed of these posts or follow us on Twitter or Facebook to be the first to know what the (never home)makers are up to. And we’ll love you forever!

Read more...
Related Posts Plugin for WordPress, Blogger...

About This Blog

MyFreeCopyright.com Registered & Protected

© 2009-2014 by the (never home)makers
All content on this blog is copyrighted.

Want to publish our pics, tips, or tricks?
Contact us! [neverhomemaker@gmail.com]

We value transparency. Links on this page may contain affiliates. In addition, please see our disclosure policy regarding sponsored posts.

  © Blogger template Simple n' Sweet by Ourblogtemplates.com 2009

Back to TOP  

Blogging tips