Showing posts with label ricotta. Show all posts

Comfort Food // Stuffed Shells

>> Friday, September 18, 2015

Sometimes you just need comfort food. Yesterday was surely the day for me. Bonus points if it takes only minutes to come together. I haven’t made stuffed shells in ages, so I dug up my old favorite recipe and got to work. This is a great meal to make with little ones (easy stuffing!) and bakes up in just half an hour.

Also, random question: Have you guys seen whole wheat, sprouted, or otherwise “healthier” jumbo shells? I performed a rather thorough search of Wegmans and only found the standard type.


STUFFED SHELLS w/ GREENS


What you’ll need . . .

  • 1 package jumbo shells
  • 15 ounces ricotta cheese, part-skim
  • 1/3 cup shredded mozzarella cheese
  • 1/4 cup Parmesan cheese
  • 2 handfuls baby kale, baby spinach, or mix
  • 1 jar (24 ounce) your favorite tomato sauce
  • Bunch fresh basil
  • Garlic powder
  • Ground pepper
  • Handful mozzarella
  • Sprinkles Parmesan 

Method . . . 

  1. Preheat oven to 400 degrees F*.
  2. Cook shells in boiling water for 9 minutes and drain (will be al dente). Let cool a bit while you mix the filling.
  3. Chop the greens and basil considerably. Then combine them with the ricotta, mozzarella, Parmesan (no need to measure the cheeses carefully -- add more if you wish), and a dash of garlic powder + pepper.
  4. Pour half the tomato sauce on a greased 9x13 pan. I used glass.
  5. Stuff shells with filling. Then line them up next to one another until your pan is full. I always have some shells leftover. Ada likes them plain, so I just save in a baggie to re-heat. 
  6. Then cover with the rest of the tomato sauce, sprinkle on some more mozzarella + Parmesan, and cover with foil.
  7. Bake for 30 minutes. Then take the cover off and broil for a couple minutes until browned. Let cool a while before serving.

* Alternatively, you can prepare this meal in advance, cover + place in your fridge, and bake whenever you’re ready to eat. That’s another reason I love this meal so much.


// GIVEAWAY WINNER


Congrats to Katrina, the Magformers giveaway winner. Katrina says "My little guy plays with them at the library. We would build a school because he loves playing school.” I’ll be in touch with you soon regarding your prize.

Like what you just read? You can subscribe to the feed of these posts or follow us on Twitter or Facebook to be the first to know what the (never home)makers are up to. And we’ll love you forever!

Read more...

10-Minute (GF + Freezable) Lasagna

>> Wednesday, February 11, 2015

OK. This recipe doesn’t take ten minutes total with bake time included -- but to prepare? Not even ten active minutes. I always have stuff to make lasagna on hand. It’s one of those quick pantry meals we make when we’re low on groceries. Plus, that’s the beauty of this recipe -- there are no rules. Use what you have, leave out what you don’t, substitute where you can.

Assemble, store, and bake when you need it.

Start by mixing the filling:


In the mix:
  • Ricotta cheese (part-skim), one small tub
  • Sliced olives
  • 1/4 to 1/2 cup or so pumpkin puree
  • Couple handfuls chopped spinach
  • Salt + pepper
I set that aside and got some no-boil noodles. I decided to try a gluten-free variety made from brown rice, and they were quite good. Any no-boil noodles -- GF or standard -- should do for this recipe, though, a standard package usually includes enough to make a 9 x 13 pan of lasagna.

Just spread the uncooked noodles with the filling.


You’ll want to spread a small amount of sauce at the bottom of your pan. From there, layer your first row of noodles. Top with more sauce and spread to cover. Layer another row. More sauce + spread. Another row, etc. until you’ve used all the noodles. Top with more sauce, mozzarella cheese, and some Parmesan, if you feel so inclined.

I ended up using more than one jar of sauce, just FYI.


That whole part you just did should only take around 10 minutes! From there, you can stick this guy -- covered with foil -- in your fridge until you’re ready to bake (the passive part). Oven temperatures and cook times vary by the type of noodle. I cooked ours at 375 degrees F for around 45 minutes -- taking off the foil in the end stage of cooking to get that mozzarella browned.

We never eat an entire dish of lasagna, so I serve dinner and then refrigerate the leftovers overnight. The next morning I slice the cooled lasagna into squares and individually wrap in plastic wrap and then place the single serve portions in a freezer bag. To serve again, just thaw and bake in your oven (or in your microwave -- just be careful of hot spots!).

What’s your favorite quick pantry meal?

Like what you just read? You can subscribe to the feed of these posts or follow us on Twitter or Facebook to be the first to know what the (never home)makers are up to. And we’ll love you forever!

Read more...

Baked Spinach + Ricotta Gnocchi

>> Friday, January 2, 2015

And now for a simple recipe you’ll want to make over and over again. We tend to overdo the pizza in this house. So, I was looking to make something that uses many of the same ingredients we always have on hand -- just in a different way.

If you’ve never had baked gnocchi, you’re in for a treat. The gnocchi (pronounced like this) are super tender yet a hint crisp. You can bake them and eat with any kind of sauce you please (a pesto or brown butter sauce is divine!). I chose to use some store-bought tomato sauce from Aldi and fresh mozzarella. And if you’re into individual portions -- these guys freeze quite beautifully.

Mangia!


SPINACH + RICOTTA GNOCCHI


What you’ll need . . .
  • 15 ounces ricotta cheese (I used part-skim)
  • 1 cup packed spinach leaves
  • 3/4 cup flour*
  • 1/4 cup finely grated parmesan cheese
  • 1 egg
  • 2 tablespoons olive oil
  • 1 tablespoon nutritional yeast
  • salt + pepper
  • Pasta sauce
  • Fresh mozzarella cheese
* I used caked flour because I wanted to see how it would work. All purpose would be a good substitute. I also think this recipe would lend well to gluten-free flours, just play with the amount. To get the right mix. You want the resulting gnocchi to be a bit firm but mostly tender.

Method . . .
  1. Preheat oven to 350 degrees F. Lightly grease two baking pans or dishes with olive oil and set aside.
  2. Blanche spinach leaves in a small pot of boiling water (1 minute). Immediately submerge in cold water to stop cooking. Dry leaves as much as possible using a tea towel and chop finely.
  3. Toss all ingredients into a bowl and mix until you form a wet dough.
  4. Portion out by heaping tablespoonful onto/into greased baking sheets or dishes.
  5. Bake for 20 minutes, until firmed up a bit and slightly golden.
  6. Turn the oven to broil.
  7. Then cover gnocchi with tomato sauce (a lot or a little, depending on your preference) and top with cuts of the cheese. Broil for 5-7 minutes until the cheese browns and bubbles.
  8. Serve immediately.


FREEZE:


  • Spoon onto wax paper lined baking sheets in the tablespoon portions.
  • Put in your freezer until completely frozen -- a couple hours.
  • Store in an airtight freezer bag for up to 6 months. 
  • Then bake as instructed above in whatever size portion works best for you.
I’m going to try to get my new year thoughts out today, but I’m still getting over this pesky sickness. So, whatever the case -- that post is coming next. I hope you enjoy this recipe, though. It’s definitely one that is getting put into the regular rotation because it’s so easy and delicious.

Here’s to more recipes in 2015!

Like what you just read? Browse more of our posts + recipes on Pinterest. Chat with us on Twitter or Facebook. And you can always email us with your questions and comments.

Read more...

No-Boil Pasta Bake + Food Prep

>> Tuesday, November 4, 2014

This is sure to be your new go-to dinner. A while back, I made this awesome Skillet-Baked Cappellini Pomodoro. The cool part about it was that you didn’t need to cook the noodles before tossing it in the oven. Well, I tinkered and improved on this meal to bring introduce more veggies (we usually roast some with our usual meal prep on Sunday afternoon) and improve the overall flavor.

Here it is!


NO-BOIL PASTA BAKE
Takes just 10 minutes to toss together, 1 hour to cook.

What you’ll need . . .
  • Thin spaghetti noodles
  • Jar of spaghetti sauce (or homemade)
  • Low-fat ricotta (or maybe tofu ricotta?)
  • Shredded mozzarella
  • Spinach or other greens
  • Roasted veggies (any will do)
  • 1/2 to 3/4 cup water
Method . . .
  1. Preheat your oven to 350 degrees F. Get out a 9 x 13 glass casserole dish (or other baking dish of similar size).
  2. Spread a thin layer of spaghetti sauce on the bottom of the dish. Then a layer of the thin noodles. Add some of the roasted veggies (we used butternut squash), spinach, and dots of ricotta. Cover with more of the sauce. There are no right or wrong measurements.
  3. Repeat with another layer in the same way, but this time cover with the rest of the sauce and top with as much cheese as you wish. Some Parmesan works well too. 
  4. Then pour in some water where your pasta isn’t covered by sauce. Just a little here and there is all your need.
  5. Place in your oven covered by tin foil and bake for 45 minutes. Then remove the foil and cook for another 15 minutes.

Meal Prep


And here are some other foods I prepped for us this week!


Slow Cooker Applesauce -- with Honey Crisps.


Honey WW + Flax Loaf -- with some oats tossed in.


Simple vegan breakfast muffins -- recipe tomorrow!


What foods did you prep this week? 

We’re trying to dig deep into our cupboards and freezer drawers to have another $10 grocery week, which I’ll write about very soon. Basically, we’re avoiding buying lots of groceries and trying to use up what we already have hanging around -- only heading to the store for bananas, milk (for Ada), and other essentials.

Like what you just read? Browse more of our posts + recipes on Pinterest. You can subscribe to the feed of these posts or follow us on Twitter or Facebook to be the first to know what the (never home)makers are up to. And we’ll love you forever!

Read more...

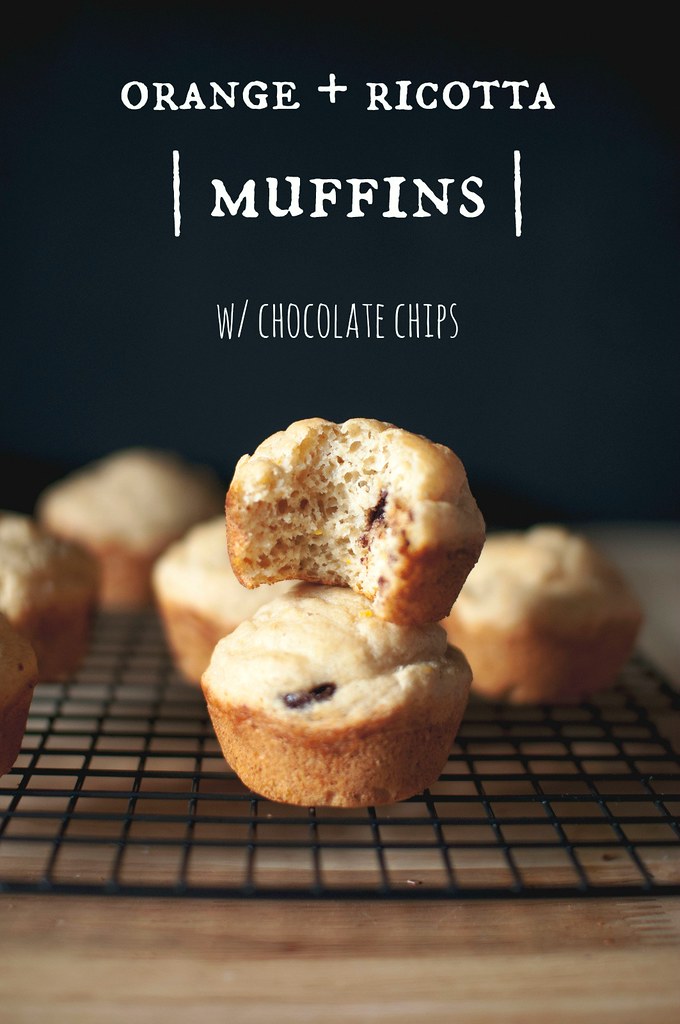
Zesty Orange Ricotta Muffins, etc.

>> Monday, January 13, 2014

Our new favorite pizza topping is ricotta cheese. Thing is, we usually have quite a bit leftover after using only a few dollops . . . a couple nights a week. Anyway, I was making Ada chocolate chip pancakes for breakfast on Friday, it's sort of our tradition, and I got this idea to give them a dose of protein with ricotta.

I made myself a few, too, but added adult flair with orange zest and honey.

Whoa. Good decision.


We don't have time for pancakes everyday. So, with our Juice Pulp Muffins // Bread fresh in my mind, I experimented + discovered this recipe works very well as pancakes, waffles, and muffins. It just requires a simple tweak. More or less almond milk. More for thinner batter for pancakes, a moderate amount for thicker waffle batter, and less for these muffins.

Or, should I say, your new favorite muffins?


ZESTY ORANGE RICOTTA MUFFINS
Or pancakes. Or waffles. Best with dark chocolate chips.

What you'll need . . .
  • 1-1/2 cups white whole wheat flour 
  • 1 tablespoon baking powder 
  • 1/4 teaspoon salt 
  • 2 tablespoons honey 
  • Zest one large orange 
  • Juice of large orange (hand-squeezed works great)
  • 1 tablespoon flax meal + 3 tablespoons hot water 
  • 1/2 cup part-skim ricotta
  • 3/4 to 1 cup almond milk (or other milk)***
  • 1 teaspoon vanilla extract 
  • Handful or two chocolate chips, dark chocolate
Method . . .
  1. Preheat your oven to 350 degrees F. Lightly grease a standard muffin pan with oil or butter or substitute. Or line with muffin papers. Alternatively, skip this step if you want to make pancakes or waffles. 
  2. In a large bowl, whisk together the flour, baking powder, and salt. 
  3. In another bowl, mix together the rest of the ingredients (starting with 3/4 cup milk) -- except the chocolate chips. 
  4. Combine the wet and dry ingredients and mix until just  combined. Batter should be thick, but not like bread dough. Add more liquid, depending. 
  5. Fold in chocolate chips + portion equally into the muffin tin.
  6. Bake for between 18-22 minutes, until golden brown. Let cool on a cooling rack to avoid sogginess.


*** To make pancakes or waffles, thin out batter with almond milk until familiar textures start to happen. Honestly, I'd make waffles with the muffin batter so they are extra thick. Pancakes tend to work better with a full cup of milk + be sure not to flatten while cooking.

ALSO: Make sure pan or waffle iron is well greased. And for pancakes, set heat to medium, as the juice and honey will tend to make them brown/burn a bit quicker.


The texture is almost like baked doughnuts. I was really surprised by all the airy lightness these guys pack. I'm not used to that happening when not using eggs. It was one of those lucky "mistakes" where -- instead of it being in the plan, it just happened that way. I'm pretty sure it's because I used just one flax egg. Or, again, just luck.

You may also substitute maple syrup in for the honey. You'll notice there isn't refined sugar in the recipe, as I'm trying to moderate how much gets in Ada's diet. It's funny how turning two opens up this new world of junk food, whether we intend for it to happen or not!

We do what we can.
We eat what we love.
It's a delicious balancing act.

Like what you just read? Browse more of our posts + recipes on Pinterest. You can subscribe to the feed of these posts or follow us on Twitter or Facebook to be the first to know what the (never home)makers are up to. And we’ll love you forever!

Read more...

Skillet-Baked Cappellini Pomodoro

>> Monday, June 3, 2013

In the vast + deep sea of other food bloggers you follow, you probably haven't noticed that I never post pasta recipes. Like ever. And that's because . . . I hate pasta. Sort of. Obviously, I'm more of a pizza girl. Or calzones. Sometimes ravioli.

Cappellini, too, is quite nice when done up the right way.


Maybe it's because until the last five years, the bulk of my "authentic" exposure to Italian pastas was through Olive Garden. Now we live in an area with undeniably amazing + REAL Italian cuisine, so I suppose I need to start giving their homemade noodles a try.

This recipe can be made at home in around half an hour.

Here's how:


I'd do an old-school animated GIF circa (never)homemaker 2010.
 

But the image resolution sucks. So, you're stuck scrolling . . .


Almost there!


SKILLET-BAKED CAPPELLINI POMODORO 
just a fancy way of writing thin spaghetti w/ tomato sauce

What you'll need . . .

  • A good-sized skillet
  • 1-1/2 cups tomato sauce (I used our Boozy + Bold Chunky Sauce)
  • 1/2 package of cappellini pasta (uncooked)
  • 1 onion, sliced and browned in olive oil atop the stove
  • Drops of low-fat ricotta
  • Sprinkles of mozzarella cheese
  • Salt, pepper to taste
  • Tablespoon olive oil

Method . . . 

  1. Preheat your oven to 350 degrees F. Drizzle the bottom of your skillet (this skillet is the one I used) with olive oil. Break the cappellini in half by snapping it and arrange at the bottom of the pan.
  2. Make your tomato sauce or use your favorite store brand.
  3. After you've browned your onions over medium-high heat, arrange them atop the pasta.
  4. Then spread the sauce. You may use more or less sauce, depending on your taste for it. I know some people like LOTS and others just a little. You'll need to cover all the pasta, though, for the moisture to cook the noodles.
  5. Then scatter your dollops of ricotta and sprinkle with some mozzarella.
  6. Place in the oven for 30-40 minutes, until cheese is lightly browned + bubbly.
  7. Let cool before serving.

I couldn't find a more creative way to photograph the finished product. Or maybe after a while I couldn't stop scooping my fork into the pan and taking big bites. But the result is an al dente + chewy pasta underneath that thick blanket of cheese and sauce. Delicious. And super easy for a week-night meal.

What's for dinner tonight at your house?

Like what you just read? Browse more of our posts + recipes on Pinterest. You can subscribe to the feed of these posts or follow us on Twitter or Facebook to be the first to know what the (never home)makers are up to. And we’ll love you forever!

Read more...

Lunch "Calzone" for One

>> Thursday, June 21, 2012


Finding time to make a substantial lunch is getting harder and harder these days. I had these notions that being home with Ada would mean lots of time to fiddle around in the kitchen. Lots of time in general, really. But as Ada's mobility has picked up speed, my ability to keep the house clean, feed myself, and maintain order otherwise has lessened.

 Halted? Well, maybe not that bad. But I'm still getting used to it all.

So, at least for now, lunches (any everything else) require a bit of planning. Being smart. Keeping convenient sources of healthy nutrients on hand. Actually, it reminds me quite a bit of when I was working full-time. Imagine that!


LUNCH "CALZONE" FOR ONE

What you'll need . . .

  • 1 whole wheat tortilla 
  • 1/4 cup part-skim ricotta cheese 
  • 1 fresh tomato or a few canned, peeled tomatoes, sliced 
  • 1/2 cup fresh greens, like baby spinach 
  • Black pepper, to taste 
  • Spritz of olive oil

Method . . .

  1. Take your tortilla and spread your ricotta evenly. You may use more or less ricotta depending on what you'd like to eat, of course. There's no right or wrong way. 
  2. Spritz a fry pan with some olive oil and blaze some medium-high heat underneath. Then place your ricotta-topped tortilla inside, ricotta side up, of course. Let cook for a couple minutes. Then sprinkle some pepper and arrange your slices of tomato. Top with greens. Cook for another couple minutes until the bottom of your "calzone" has browned nicely. 
  3. Then fold in half with a spatula and let cool for a couple minutes. 
  4. Cut into slices, if you wish, and enjoy. 
It's quite a messy lunch, but well worth it! Of course, it isn't much like a real calzone. It's lighter -- so perfect for a mid-day meal. I served mine with what I call "race day oranges" which is just my dorky way of saying quartered oranges. It's my favorite way to eat the fruit.


Breastfeeding combined with running is really kicking my butt. I am starving almost constantly. So, I eat whenever Ada eats. This means I'm not sitting down for three large meals a day. Instead, I nosh on medium-sized meals, like this one, throughout. It's working well for me, but incorporating more protein, with eggs, cheese, yogurt, nuts, tofu, etc., as many of your have suggested, has been key.

How do you make time for lunch? If you're working, do you pack the night before? If you're home, do you have some go-to meals you stick with? I'd love to hear your methods!

And today on Writing Chapter Three, I wrote about Me, Myself, and Ada. How to retain a sense of my identity as a stay-at-home mom. Harder than I thought.

Like what you just read? You can subscribe to the feed of these posts or follow us on Twitter or Facebook to be the first to know what the (never home)makers are up to. And we’ll love you forever!

Read more...

Homemade DP Dough

>> Tuesday, November 30, 2010


Though I didn't gain the "freshman 15" my first year at Ithaca College, I probably should have. Looking back, I'd most definitely have to declare DP Dough the official meal of choice that year. For, when I wasn't chowing on dining hall pizza and ice cream, I was on the phone ordering my favorite: a basic cheese calzone.

To be fair, IC has a great selection of vegetarian options, including a tasty meat-free, dairy-free chimichanga and even vegan grilled cheese. Too, there was this amazing Kosher kitchen. Many of us -- Kosher or not -- chose to eat there because they had THE BEST hummus EVER.

But every chance I got, I'd call to order DP Dough.


On a Friday night before heading to a friend's dorm to hang out. On a Sunday morning (we're talking 12:30 AM) after I'd had too much to drink and needed to fill my stomach with carbs. On a Tuesday afternoon . . . just because.

Of course, I understand the nutritional value of these hefty calzones is pretty much void. Fat, carbs, more fat. And a bit more fat. So, I'd order the cheese calzone, always making sure to add: "Light on the cheese, please." To which I'd get some sort of "Uhhh, OK?" from the guy on the phone. He was probably thinking: "Anything that'll help you sleep at night, crazy girl!"

Now that I'm older and a little wiser, I've learned to make my own calzones. This one, in particular, reminded me so much of the real thing, I just had to share it!


THE DOUGH

What you'll need . . .
  • 2-1/4 teaspoons active dry yeast (or one packet)
  • 1-1/4 cups warm -- not hot -- water
  • 1 tablespoon agave nectar (or honey/maple syrup)
  • 2 cups unbleached white bread flour
  • 1-1/4 cups unbleached all-purpose flour
  • 1 teaspoon coarse Kosher salt
  • 1/4 cup olive oil

Method . . .
  1. In a small bowl, add the yeast and agave nectar to the warm water. Stir and let sit for five minutes, until frothy.
  2. In a large bowl, whisk together the flours and salt. Make an impression in the middle of the bowl with your fist.
  3. Pour the oil into the bowl with the yeast mixture. Whisk a couple times. Then pour it into the impression you made in the flour.
  4. Mix with a spatula. Then use your hands to knead everything in a smooth, elastic ball.
  5. Spritz a large bowl with some oil and place the dough ball inside -- covered with some plastic wrap -- for one hour to rise. (You can allow it to rise more, it won't hurt. But if you're in a pinch, an hour is all you really need.)
  6. Divide dough into four balls. You may wish to freeze the others (or refrigerate if you plan to use in the next two days.

THE CHEESE
  • 1/4 cup low-fat shredded mozzarella
  • 1/4 cup skim ricotta
  • 2 tablespoons (or so) grated parmesan cheese
  • 1 tablespoon Earth Balance or butter


PUTTING IT TOGETHER
  1. Preheat your oven to 425 degrees F. If you have a pizza stone -- allow it to preheat as well.
  2. Take one of those dough balls and stretch it into a round on a lightly floured work surface (like you would to make a pizza).
  3. On one half of the round, spread our your mozzarella.
  4. Then take dabs of the ricotta and distribute throughout.
  5. Then sprinkle on the parmesan.
  6. Then take dabs of the Earth Balance (or butter) and distribute throughout.
  7. Fold over the top end and seal the edges (you may wish to pull the bottom dough edge over the top and press down to seal).
  8. Poke the top (not the whole way through) a few times with a fork to allow steam to escape.
  9. Bake for 10 minutes.
  10. Then, get a large pan and spray it with a bit of oil. Heat on medium to high heat.
  11. Leave the oven on, but take the calzone out of the oven and put it on the hot pan. Cook until lightly browned on one side. Then flip and do the other.
  12. Return to the oven for around another 10 minutes (until cheese is bubbly and top is well browned).
  13. Cut in half an serve with marinara sauce.
REAL DP DOUGH:


OUR VERSION:


I did a rough calorie count for this baby. It comes in right around 725, which isn't terrible. I estimate that the original likely has more like 1,200 (however, I searched high and low and can't find a reliable calorie count -- one of 'em says 450. I don't think so!). Plus, if you're making your own at home, you can choose to make a smaller or larger one. Use more or less cheese. Add veggies. Whatever you like!

For me, there are just days when I want to indulge. I'm planning to continue to tinker with this recipe (use wheat or pumpkin pizza dough, for example). But the key to making it great is the pan "frying" part in the middle of the process. It gives the crust a crispier texture. So, don't skip that part!


Hey! Here's the image source for the authentic DP Dough calzone.


Like what you just read? You can subscribe to the feed of these posts or follow us on Twitter or Facebook to be the first to know what the (never home)makers are up to. And we’ll love you forever!

Read more...
Related Posts Plugin for WordPress, Blogger...

About This Blog

MyFreeCopyright.com Registered & Protected

© 2009-2014 by the (never home)makers
All content on this blog is copyrighted.

Want to publish our pics, tips, or tricks?
Contact us! [neverhomemaker@gmail.com]

We value transparency. Links on this page may contain affiliates. In addition, please see our disclosure policy regarding sponsored posts.

  © Blogger template Simple n' Sweet by Ourblogtemplates.com 2009

Back to TOP  

Blogging tips