Showing posts with label bake. Show all posts

30-Minute Mushroom + Kale Frittata

>> Monday, November 10, 2014

Eggs.


Veggies.
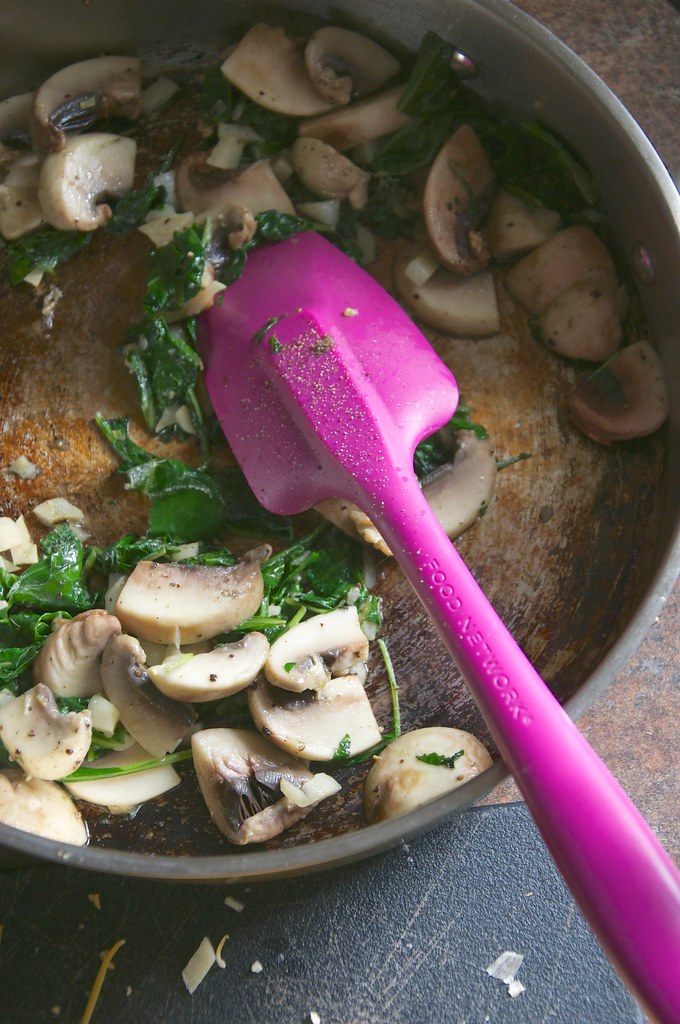

Combined with cheese.


And baked.


MUSHROOM + BABY KALE FRITTATA

What you’ll need . . . 
  • 6 eggs
  • 4 large white mushrooms, chopped
  • Gigantic handful baby kale (or other greens), chopped
  • 2-3 cloves garlic, minced
  • 2 tablespoons mayo or milk*
  • 3/4 - 1 cup shredded cheddar 
  • Black pepper to taste
  • Pinch salt
* I know lots of you guys don’t like mayo, and I don’t use it often. But when you’re scrambling eggs or making bakes like these -- the texture is amazing. We use mayo that’s made with olive oil that contains half the fat and calories of a traditional blend.

Method . . .

  1. Preheat your oven to 350 degrees F. Lightly oil an 8 x 8 inch casserole dish and set aside.
  2. Chop your veggies, then sauté them on the stove, starting with the garlic. Add the mushrooms and cook for a few minutes, until softened. Then add the greens and wilt. You don’t want the mushrooms super soft just yet. Season with salt and pepper.
  3. Whisk your eggs with the mayo or milk, then toss in the shredded cheese and cooked veggies. Mix until combined. Then pour into your prepared casserole dish.
  4. Bake for 20-30 minutes or until the top is lightly golden brown and the middle is set. Let cool a while before slathering on the hot sauce. 
Yum!


This meal’s a good one to modify using whatever odds and ends you might find in your fridge. You can pretty much toss any vegetables or cheese in the mix. Frittatas tend to keep well for around 5 days when stored in an airtight container. You can eat it cold or heat up again for several minutes at 350 degrees F.

And my favorite way to enjoy this egg bake? Between two slices of crusty bread.

Enjoy!

Like what you just read? You can subscribe to the feed of these posts or follow us on Twitter or Facebook to be the first to know what the (never home)makers are up to. And we’ll love you forever!

Read more...

Strawberry Shortcake Muffins

>> Tuesday, July 22, 2014

I'm a little late with posting these, since strawberry season has come and gone here in upstate NY. And pretty much everywhere else for that matter. If you were smart and preserved or have frozen strawberries on hand, they would make a perfect substitute for this recipe. Now that blueberry season is upon us, feel free to use them (or any other fruit) in equal ratio as well!

These muffins are gluten-free and make a delicious dessert or even breakfast, depending on your cravings. I used a 1/2 cup of sugar, but I'm thinking in the future I could certainly use less or substitute in maple syrup or honey for a lower glycemic punch.


STRAWBERRY SHORTCAKE MUFFINS

What you'll need . . . 
  • 2-1/2 cups rolled oats (if you're GF, use Bob's Red Mill)
  • 1 cup low fat Greek yogurt*
  • 2 tablespoons flax meal + 6 tablespoons hot water (you could also use 2 eggs)
  • 1/2 cup raw sugar 
  • 1-1/2 teaspoons baking powder 
  • 1/2 teaspoon baking soda 
  • 1 cup fresh strawberries, chopped -- more if desired
* To make this recipe vegan, you can substitute in your favorite dairy free yogurt. You could even experiment with nondairy milk, like Homemade Almond Milk, though you will need to perhaps use a bit less, more like 3/4 cups. 

Method . . . 
  1. Preheat your oven to 400 degrees F. Lightly grease a muffin tin or use liners and set aside.
  2. Give your flax eggs some time to gel up by combining the 2 tablespoons of flax meal with the 6 tablespoons of hot water. Just whisk in a little dish and let sit for a few minutes.
  3. Put all ingredients (except strawberries -- you will fold those in at the end) in your food processor and pulse until smooth. Alternatively, I'm sure you could just use some oat flour and mix it with the other dry ingredients and then add the wet later and stir until well incorporated.
  4. Then transfer to a bowl and fold in the strawberries. The flax and oats will make the dough quite sticky, so just make sure your muffin tins are greased. I used Earth Balance.
  5. Portion equally for 12 standard size muffins. Bake for 20 minutes, then check to see if edges are turning golden and you can even prick a muffin to check the center for done-ness. You may wish to bake up to 25 minutes or so.
  6. Let cool on a rack before serving.

// FREEZE + RELATED RECIPES

If you'd like to save some to freeze, just let cool completely, then wrap each individually in plastic wrap and store in another airtight freezer container for up to 6 months, longer if you have a deep freeze.


What's your favorite seasonal fruit? 

Mine? Strawberries. But I'm sure you could have guessed it!

Like what you just read? Browse more of our posts + recipes on Pinterest. You can subscribe to the feed of these posts or follow us on Twitter or Facebook to be the first to know what the (never home)makers are up to. And we’ll love you forever!

Read more...

Healthy Chocolate + PB Brownies

>> Monday, June 2, 2014

After I made the Healthy Peanut Butter Blondies with chickpeas, I set my sights on the whole ubiquitous black bean brownie idea. And the recipe morphed into exactly that with just a couple substitutions! So, if you'd like to make THESE tasty, protein-rich treats -- keep reading.

Oh, did I mention they are gluten-free?

(I know some of you guys want more GF recipes!)


BLACK BEAN BROWNIES

What you'll need . . .
  • 1 can black beans, drained + rinsed
  • 1 medium ripe banana
  • 2 tablespoons maple syrup
  • 1/2 cup smooth peanut butter
  • 2 teaspoons vanilla extract
  • 1/4 to 1/3 cup unsweetened cocoa powder
  • 1/4 teaspoon baking powder
  • 1/4 teaspoon baking soda
  • pinch sea salt
  • 1/2 cup chocolate chips
Method . . .
  1. I preheated my oven to 350 degrees F. 
  2. Then I tossed it all but the chocolate chips into my food processor and blended until well combined, folded in the chocolate chips, and then spread into a well oiled bread pan (you can also use a square brownie dish), and let bake for 25 minutes.
  3. I let cool for around a half hour before slicing.

The fact that these guys have absolutely no butter, added oil, flour, or huge dose of sugar in them sort of blows my mind. I was especially impressed with the texture of the brownies because I have a lot of trouble getting vegan brownies to set well. And I've made black bean brownies before (with carrot puree!), but I used flour -- so the ones above are just sort of magical to me.

Now, if you'd like a more traditional vegan brownie recipe, these Ultimate Vegan Brownies certainly take the cake -- I highly recommend them! You could even say they'll change your life, but I'll leave that up to you to decide. Basically, they are the best ever. EVER!

So, like with the Peanut Butter Blondies recipe, please let me know how these turn out for you! They are a new favorite around these parts, and I think now that I've written this post, I'll definitely need to go make a batch for an after-dinner treat.

Nom.

Like what you just read? Browse more of our posts + recipes on Pinterest. You can subscribe to the feed of these posts or follow us on Twitter or Facebook to be the first to know what the (never home)makers are up to. And we’ll love you forever!

Read more...

Fun Gifts for Foodies

>> Saturday, December 14, 2013

Continuing with our gift lists today . . . this time some fun things for those foodies in your life. I think we all have an appreciation for food on some level, whether it's making or simply eating. Or at least we all have items in our kitchen we'd like to renew or replace.

My favorite picks below include the cost-sensitive dutch oven (for all that sourdough bread baking), the Oxo Rubber-Bottom Mixing Bowls (they are awesome!), and the pizza stone set (we use ours every day, it seems!).


Let is snow, let it snow, let it snow!

(Though, we're only supposed to get 5-7 inches . . .)

Like what you just read? You can subscribe to the feed of these posts or follow us on Twitter or Facebook to be the first to know what the (never home)makers are up to. And we’ll love you forever!

Read more...

Brie-Stuffed Pumpkin Garlic Rolls

>> Wednesday, November 27, 2013

Finally got a chance to make the last dish for our Thanksgiving Brunch special. So far, we've served up Soft-Boiled Eggs atop Spinach Toast, a Bittersweet Pumpkin Pie, and Maple Roasted Fingerling Potatoes. There were a lot of directions I wanted to go with another selection, but I simply couldn't choose between sweet + savory.

So I settled on these guys.


This recipe is incredibly easy to make. So much so, you'll want to eat them again and again. If you've been reading for a long while (in which case, I'm thankful for you!), you've already got the basics down. You can even mix your dough together today, let rise, and refrigerate for use tomorrow.

Get going!

:: Make up a batch of Pumpkin Garlic Knots dough + let rise for 2 hours.
:: Then consult the Pumpkin Pesto Rolls post for some method illustrations.

The real difference with these rolls versus the others is the filling.

Check it out:


BRIE-STUFFED PUMPKIN GARLIC ROLLS

You'll need . . . 
  • 1 wedge buttery brie, cut rind off + chop
  • 2 tablespoons maple syrup 
  • 1 handful baby kale or spinach, chopped 
  • 2 cloves garlic, minced 
  • Salt + pepper to taste
  • Jam for topping
Method . . .
  • Preheat your oven to 425 degrees F. Lightly grease a standard muffin tin, like this one.
  • Once you've chopped the garlic and kale, just toss everything into a bowl and mix by hand until well incorporated.
  • Then roll your dough atop a floured work surface into a long log. Divide into 12 equal portioned pieces of dough.
  • Take each piece and roll out into an oval-ish shape, spread your cheese mixture inside, then roll and place in your muffin tin.
  • Continue with all remaining pieces of dough and until you run out of brie mixture.
  • Then bake in the oven for 15 to 17 minutes. Until golden brown and bubbling. Let cool before eating.


We then topped ours with some delicious Hot Pepper Raspberry Preserves. You can eat them however you like. But consider this your alternative to boring stuffing. Or just eat them whenever. I mean, these rolls are quite literally stuffing, so we have you covered in that regard!

I wish you luck with all your final shopping trips + tweaks with recipes for the big day tomorrow. I'd love to know what's on your menu this year. As well as if you celebrate with traditional Thanksgiving dinner or do something a little different like brunch.

Happy Thanksgiving!

Like what you just read? You can subscribe to the feed of these posts or follow us on Twitter or Facebook to be the first to know what the (never home)makers are up to. And we’ll love you forever!

Read more...

Tofu Salad Cups

>> Wednesday, May 29, 2013

So, instead of a Tofu-Avocado Salad sandwich or wrap . . .


Make a mini phyllo bowl!


Obviously you won't have time or the desire to make something snazzy like this for lunch every single day. But once in a while, a delicious phyllo dough crust is just right. Especially in summer, when light finger-type foods are preferred over gigantic, heavy submarine rolls.

HOW TO:
  • If you use store bought phyllo, which I'll get to in a moment, you'll need to thaw in the refrigerator overnight or follow the instructions on the box. So, make sure you do that before proceeding. 
  • Preheat your oven to 375 degrees F. Grease a muffin tin with olive oil or butter/Earth Balance and set aside. 
  • Make up a batch of the Tofu-Avocado Salad (or even Avocado-Egg Salad) and set aside // refrigerate.
  • I used frozen phyllo dough for this recipe because making my own seemed far too daunting. However, if you're interested, here's a recipe for phyllo dough
  • The secret to making phyllo cups is being liberal with olive oil or butter/Earth Balance. When it gets too dry -- even just sitting uncovered for a minute -- it breaks apart, and there's no returning from it. There should be information on the package about keeping everything moist and pliable.
  • Lay down a large sheet of phyllo, brush it with olive oil, lay down another sheet, brush, another sheet, brush, and yet another sheet with more oil. That's 4 layers total. You could do 3 as well.
  • Cut into 5 - 6 inch squares and press them -- gently -- into a (again, greased) muffin tin to form a mini-bowl or cup. 
  • Bake for 10 minutes or so, until golden brown. Be careful not to over-bake.

Then all you need to do is let them cool and scoop in the salad . . .


It's crisp. It's light. It's fun. We have a Greek food festival coming up this weekend where we live, so I guess phyllo is on the mind. I have already decided I'm going to try and make my own spanakopita over the weekend.

And if you haven't tried it yet, the Tofu-Avocado Salad and Avocado-Egg Salad recipes are simple + tasty + quick to prepare. We eat one of them at least once a week over here.

What's your favorite light meal for summer? Or have you used phyllo in cooking before? How?

Like what you just read? Browse more of our posts + recipes on Pinterest. You can subscribe to the feed of these posts or follow us on Twitter or Facebook to be the first to know what the (never home)makers are up to. And we’ll love you forever!

Read more...

Pumpkin Pesto Rolls

>> Monday, April 1, 2013

I've been holding out on you. Maybe that's not the right way to put it. It was gluten-free month after all. But I made these ages ago, just hadn't had the opportunity to take great photos.

Mind-blown.


PUMPKIN + PESTO ROLLS

What you'll need . . .
  • A full batch of Pumpkin Garlic Knots dough, recipe here.
  • A full batch of Walnut Basil Pesto, recipe here or your favorite pesto recipe with a similar yield.
  • A standard muffin tin, like this one.

Method . . .

  1. Let your dough rise + make your pesto.
  2. Preheat your oven to 425 degrees F. Lightly grease the cups of the muffin tin with olive oil and set aside.
  3. Knead dough for a minute, then divide into 12 equal balls. Using a rolling pin, flatten and roll out one ball until it is about 4 to 5 inches long.
  4. Spread a heaping tablespoon of pesto onto it and roll. Place into muffin tin.
  5. Continue with process with the remaining pieces of dough and pesto until all cups are full.
  6. Bake for 15 to 17 minutes or until puffed and golden brown. Let cool slightly before serving with your favorite tomato sauce.

I hope the photos convey that this recipe is a MUST-make. I'd also love to figure out a gluten-free version. As always please, please, please let me know how you like this recipe! It's definitely a new favorite.

We ate them up quickly, but if you wrap tightly in plastic wrap and put in an air-tight container, I think you could freeze/reheat these pretty easily.

Enjoy!

Like what you just read? You can subscribe to the feed of these posts or follow us on Twitter or Facebook to be the first to know what the (never home)makers are up to. And we’ll love you forever!

Read more...

Sourdough Soft Pretzels

>> Thursday, January 31, 2013


Quirk // I write many of my recipes on the backs of unopened junk mail.


It's a strange habit that started in college and it's stuck to this day, apparently. I need to invest in some composition books or something. Oh, and my writing instruments of choice range from markers and crayons to sharpies and Stephen's red grading pens. Whatever is around and not out of ink.

All that sloppy scratching =


SOURDOUGH SOFT PRETZELS
 Makes 4 >> vegan << pretzels

What you'll need . . . 

  • 1/2 cup sourdough starter (straight from the fridge) 
  • 1/3 cup low sodium veggie juice (I used R.W. Knudsun's Very Veggie)***
  • 1 tablespoon olive oil
  • 1 teaspoon apple cider vinegar
  • 1 teaspoon active dry yeast
  • 1-1/2 cups bread flour
  • 1 tablespoons flax meal
  • 2 tablespoons nutritional yeast
  • pinch salt
  • rosemary + paprika, to taste (optional)
*** You can also use water, I'm sure of it.


Method . . . 

  1. Easy enough: Toss all wet ingredients into a large bowl followed by the dry ingredients.
  2. Mix together using a spoon, then work into kneading with your hands, adding extra flour if necessary. Form a smooth, elastic ball.
  3. Put a bit of olive oil in the bowl and cover with plastic wrap overnight (or 8 to 10 hours should do it).
  4. Preheat your oven to 450 degrees F. Lightly grease a baking sheet and set aside.
  5. Divide dough into 4 equal portions. Then, on a slightly oiled surface (I used a large plate) roll out into a long snake. Shape into a pretzel, as per these instructions from another recipe.
  6. Fill a large stock pot with water and bring to a raging boil. Then place the pretzels in one by one (or two by two, if you're comfortable) and keep submerged for about 30 seconds (they will begin to float).
  7. Repeat with the other two pretzels. Then sprinkle with coarse salt (and more paprika, if you like).
  8. Bake for 5 minutes. Then lower the oven temperature to 350 degrees F and bake for another 10 to 15 minutes, until golden.

I've been making a lot of stuff with my sourdough starter. Honestly, I didn't know there were so many uses for it. Bagels, pretzels, pancakes, waffles, just to name a few. My favorite creation has to be the basic sourdough loaf, though.

I've also noticed a gigantic difference in taste, sourness, with letting things rise overnight versus just a few hours. It's well, well, well worth the wait, whenever possible.

And I took your advice and bought a non-Le Creuset dutch oven. Got it -- a Wolfgang Puck, 5.6 qt -- at TJ Max on clearance for $39. THIRTY NINE DOLLARS. As in, at least $100 under what I thought I needed to spend.


You'll be getting good use this weekend, my friend.

Like what you just read? You can subscribe to the feed of these posts or follow us on Twitter or Facebook to be the first to know what the (never home)makers are up to. And we’ll love you forever!

Read more...

Chai Scones

>> Wednesday, January 9, 2013


I'm out of OATS!
Not a crisis at all, really.
OK . . . maybe to a food blogger.

Oats are a key ingredient in the bean burgers I wrote about yesterday. I tried substituting brown rice and -- I think I used too much sweet potato this time around -- they turned to mush. A gigantic patty of delicious mush seasoned with just the right amount of cumin, thyme, and paprika.

I got nothing. I woke up early today and decided to bake scones before sunrise.


I promise I don't have some sort of baking addiction. But if I get the kitchen to myself and the house is otherwise quiet (like before Ada wakes up for the day, bless her heart), I must take full advantage.

Then while I was waiting for enough daylight so I could photograph them, I wrote a post all about how baking vegan doesn't mean using strange ingredients. The text got rather long and took on a life of its own, so I'm saving it for another day.

It's been a while since you've had a descent recipe. Let's get to it.


CHAI SCONES w/ CHOCOLATE CHIPS + WALNUTS = Vegan recipe

What you'll need . . .

  • 2-1/2 cups whole wheat flour
  • 1 cup spelt flour
  • 1 heaping tablespoon baking powder
  • 1 teaspoon Kosher salt
  • 1/2 cup Earth Balance*
  • 1 cup chai tea, double-bagged**
  • 1 tablespoon flax meal
  • 1/3 cup maple syrup
  • 1/3 cup brown sugar
  • 1 teaspoon apple cider vinegar
  • 1 teaspoon vanilla extract
  • 1 cup dark chocolate chips
  • 1 cup crushed walnuts
* I imagine you could also use oil or butter, for that matter.
** Just brew a cup of tea, but use two bags of your favorite chai.


Method . . . 

  1. Preheat your oven to 400 degrees F. If you have a baking stone, place it inside you oven. Otherwise, a baking sheet should do fine, just grease a bit.
  2. In a large bowl, whisk together the flours, salt, baking powder, and salt.
  3. Then cut your Earth Balance/butter into small pieces and toss it in the flour mixture. Use your hands to incorporate it until the flour looks like coarse meal. (If you have a food processor -- especially if you plan to try oil -- you could also put it all in there and pulse until incorporated.) Set aside.
  4. Once your tea is brewed nice and dark, pour it into a smaller bowl and mix with the flax meal. Let sit for a couple minutes. Then add in the maple syrup, brown sugar, vinegar, and vanilla extract. Mix.
  5. Add the wet ingredients to the dry and mix with a spoon until just combined.
  6. Then fold in the chocolate chips and walnuts. I actually folded them together with my hands -- being careful not to knead the dough.
  7. I place the bowl in the refrigerator for 20 minutes or so. Then on a floured work surface, I rolled out into a round disk and cut into 8 slices. You can make smaller scones, too. It's up to you.
  8. Then place on your baking stone (or sheet) and bake for 15 minutes. You may need a couple more minutes depending on the size of your scones.
  9. Let cool a bit before serving. But they are delicious warm with a cup of -- you guessed it -- chai tea.

Go forth & make scones!

(And if you do, please tell me how they turn out for you!)

Like what you just read? You can subscribe to the feed of these posts or follow us on Twitter or Facebook to be the first to know what the (never home)makers are up to. And we’ll love you forever!

Read more...

Use-It-Up Brunch Bake

>> Tuesday, October 4, 2011

On the weekends, we usually have lots of edible odds and ends hanging around the kitchen. A spare tomato. Quarter of an onion. Half a green pepper. Just random stuff that doesn't necessarily constitute a meal. We hate wasting food, but sometimes these bits go bad before we find a good use for them.

On the other hand, we always have eggs and almond milk in our fridge. Cheese is another ingredient we've always got fresh and handy. So, this weekend while Stephen was out running his long run, I decided to whip up something to combine all of these items.


USE-IT-UP BRUNCH BAKE

What you'll need . . .
  • 5 eggs
  • 1/3 cup almond or other milk
  • 1/3 cup cheddar cheese, shredded
  • 1/2 large green pepper, chopped
  • 1 large tomato, chopped
  • 1/2 teaspoon ground black pepper
  • Few slices crusty sourdough bread, cut into smaller pieces

Method . . .
  1. Preheat your oven to 350 degrees F. Prepare a 2 to 3 quart baking dish by lightly greasing with some butter or Earth Balance.
  2. In a large bowl, whisk together the eggs and milk. Add the black ground pepper. Then add in the chopped green pepper, tomatoes, bread, and cheese.
  3. Let sit for a couple minutes -- allowing the bread to absorb the egg mixture.
  4. Pour the mix into your prepared baking dish. Place in the oven and let bake for 45 to 50 minutes.
  5. Bake is done when the middle is set and somewhat firm, but be careful not to over-bake.

The best part about this dish? You can use up pretty much anything you have on hand. Just stick with the 5 eggs, 1/3 cup milk, 1/3 cup shredded cheese part. The rest is up to you. Use mushrooms, onions, asparagus . . . even kale or collards, etc.

As well, any kind of crusty bread works, but we'd suggest not using regular sandwich bread. It won't taste bad. It just won't be as interesting.


Portion size is also up to you, but I'd say 2 to 3 people can get a good meal out of the dish. Stephen told me, though, he likely could have eaten the entire thing himself!


What's your favorite way to use your edible odds and ends? Just leave a comment or email us at neverhomemaker [at] gmail [dot] com.


And if you're following our baby posts, today on (never home)maker, baby! I share what we learned in our 1-day birth class. It was information-overload, but well worth the time!

Like what you just read? You can subscribe to the feed of these posts or follow us on Twitter or Facebook to be the first to know what the (never home)makers are up to. And we’ll love you forever!

Read more...
Related Posts Plugin for WordPress, Blogger...

About This Blog

MyFreeCopyright.com Registered & Protected

© 2009-2014 by the (never home)makers
All content on this blog is copyrighted.

Want to publish our pics, tips, or tricks?
Contact us! [neverhomemaker@gmail.com]

We value transparency. Links on this page may contain affiliates. In addition, please see our disclosure policy regarding sponsored posts.

  © Blogger template Simple n' Sweet by Ourblogtemplates.com 2009

Back to TOP  

Blogging tips















