Showing posts with label black pepper. Show all posts

30-Minute Mushroom + Kale Frittata

>> Monday, November 10, 2014

Eggs.


Veggies.


Combined with cheese.


And baked.


MUSHROOM + BABY KALE FRITTATA

What you’ll need . . . 
  • 6 eggs
  • 4 large white mushrooms, chopped
  • Gigantic handful baby kale (or other greens), chopped
  • 2-3 cloves garlic, minced
  • 2 tablespoons mayo or milk*
  • 3/4 - 1 cup shredded cheddar 
  • Black pepper to taste
  • Pinch salt
* I know lots of you guys don’t like mayo, and I don’t use it often. But when you’re scrambling eggs or making bakes like these -- the texture is amazing. We use mayo that’s made with olive oil that contains half the fat and calories of a traditional blend.

Method . . .

  1. Preheat your oven to 350 degrees F. Lightly oil an 8 x 8 inch casserole dish and set aside.
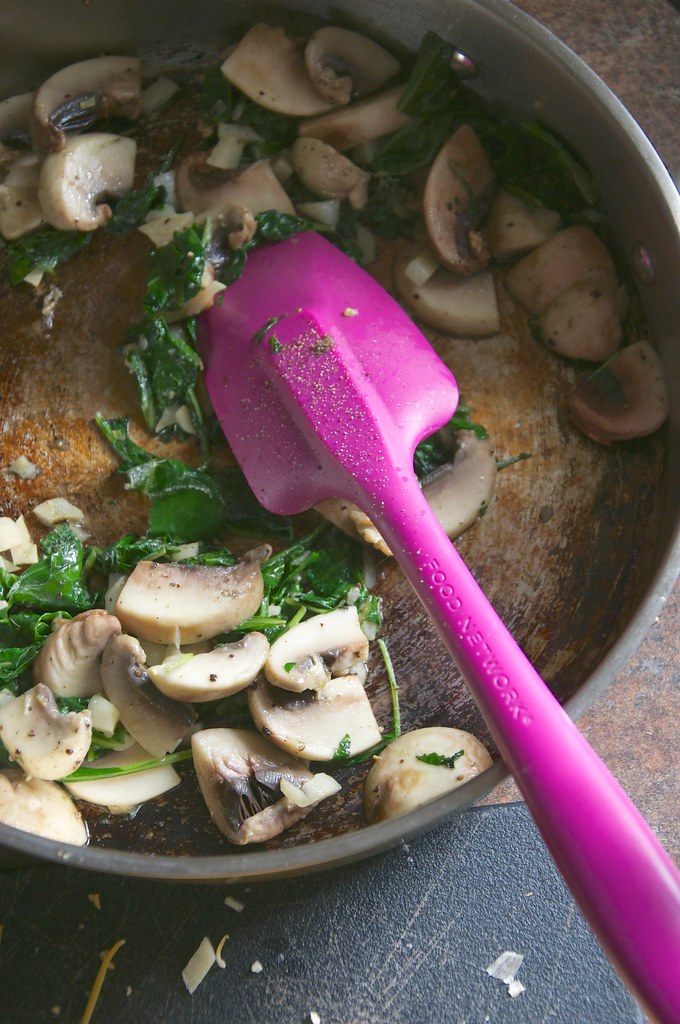
  2. Chop your veggies, then sauté them on the stove, starting with the garlic. Add the mushrooms and cook for a few minutes, until softened. Then add the greens and wilt. You don’t want the mushrooms super soft just yet. Season with salt and pepper.
  3. Whisk your eggs with the mayo or milk, then toss in the shredded cheese and cooked veggies. Mix until combined. Then pour into your prepared casserole dish.
  4. Bake for 20-30 minutes or until the top is lightly golden brown and the middle is set. Let cool a while before slathering on the hot sauce. 
Yum!


This meal’s a good one to modify using whatever odds and ends you might find in your fridge. You can pretty much toss any vegetables or cheese in the mix. Frittatas tend to keep well for around 5 days when stored in an airtight container. You can eat it cold or heat up again for several minutes at 350 degrees F.

And my favorite way to enjoy this egg bake? Between two slices of crusty bread.

Enjoy!

Like what you just read? You can subscribe to the feed of these posts or follow us on Twitter or Facebook to be the first to know what the (never home)makers are up to. And we’ll love you forever!

Read more...

Black Pepper + Basil Olive Oil Biscuits

>> Tuesday, February 11, 2014

I've tweaked my biscuit recipe, and now I can't get enough! I've made variations of this batch three times in the past week, one of which is  sweet chocolate dessert biscuit -- so get ready for that recipe tomorrow! I love biscuits because they are simple enough to make and require only a few, inexpensive ingredients.

Plus, they go great with breakfast, lunch, and a Miso Split Pea Soup dinner. 


BLACK PEPPER + BASIL OLIVE OIL BISCUITS 

What you'll need . . . 
  • 2-1/2 cups bread flour
  • 1/2 cup cornmeal
  • 1-1/2 tablespoons baking powder
  • 1/2 teaspoon salt
  • 2 teaspoons black pepper
  • 1-2 tablespoons dried basil
  • 1/2 cup olive oil
  • 1/2 cup water
  • 1/2 cup soy or almond milk
Method . . . 
  1. Preheat your oven to 425 degrees F. Lightly grease a baking sheet or line with parchment.
  2. Whisk together the flour, cornmeal, baking powder, salt, pepper, and dried basil.
  3. Then pour in the wet ingredients and mix until dough forms. Knead a few times until everything is moistened.
  4. Lightly flour a work surface and roll with a pin or flatten with your palm the dough until it is around 1 inch thick. 
  5. Using a round cookie cutter (I used a Ball jar lid ring), cut dough into 12 biscuits.
  6. Bake for 11-12 minutes, until biscuits are lightly browned. Be careful not to over-bake or they will get dry.
  7. Let cool a few minutes before serving warm.

// MORE BISCUITS


// HENNA HAIR COLOR

I know some of you who don't normally read Writing Chapter Three said you are interested: I colored my hair with Henna and made a little video documenting the experience. I doubt I'll go back to chemical box dyes again. I love how it turned out!


And a big thanks to RedEnvelope for sending me this gorgeous monogrammed birthstone pendant necklace (in Ada's November birthstone -- maybe someday I'll pass it along to her!). I've been smitten with RE since I first got a catalog way back in college, and I now have several pieces of their jewelry in my collection. Whether you're shopping for a friend or yourself, their Favorites for Her is a great place to scope out pretty gifts. 

RedEnvelope sent me this necklace. I was not compensated otherwise. My opinions are my own.

ALSO: Don't forget to enter our Taste of Nature snack bar #giveaway!

Like what you just read? Browse more of our posts + recipes on Pinterest. You can subscribe to the feed of these posts or follow us on Twitter or Facebook to be the first to know what the (never home)makers are up to. And we’ll love you forever!

Read more...

Peppery Polenta Bites

>> Wednesday, April 25, 2012

Thing about that ratatouille recipe is that it doesn't fill us up on its own. That's why I made up these peppery polenta bites to accompany dinner. They were definitely an afterthought. We hadn't made polenta in a while, so I mixed up a batch because I thought it'd go well with all the veggies. Then Ada got fussy/tired/cranky right when I was about to pour it into a large baking dish and chill in the fridge. Her impending nap meant I had some more time to put it into our mini-muffin tin.

(My life is exciting, right?)


Anyway, if you haven't made polenta before, it's quite easy. 

PEPPERY POLENTA BITES

What you'll need . . .
  • 4 cups water 
  • 1 cup yellow cornmeal 
  • Pinch of salt 
  • 1 tablespoon olive oil 

 Method . . . 
  1. Just add the salt to the water and bring to a boil.
  2. Turn heat down to a simmer and whisk in the cornmeal 1/4 cup at a time. Stir vigorously to prevent lumps and bumps. 
  3. Add in the olive oil and keep stirring for around 5 minutes.
  4. Then pour into a baking dish -- in this case, a mini muffin tin -- and chill in the refrigerator for a couple hours.

All you need to do to make them crispy and peppery is to preheat your oven to 400 degrees F. Spritz a baking sheet with olive oil. Then place your chilled polenta bites on the sheet. Spritz each with a bit of olive oil and then generously top with pepper. Bake for 30 to 40 minutes -- until crisp. Serve with dipping sauce of your choice. Or ratatouille goes great with them, too!

In other news, I finally bought a new pair of running shoes last night. For the first time in a year, in fact -- and I desperately needed them. I don't pay attention anymore to the specific mileage guidelines for when to get rid of shoes. Instead, I take each run as it comes and evaluate how my legs feel afterward.

These shoes felt dead these past couple weeks.


I tried on many different shoes, as a few of you wrote me to say the Nike Run + 2 and + 3 didn't feel the same as the type I'm used to. Stephen had me try on the Brooks Pure Connect (my heel felt so wobbly and lower than my toes -- didn't like it at ALL!), Saucony's Kinvara (eh...), and a few other more minimal types.

I tried on the Run + 2s and HATED them. Something about the decorative side plastic-y things didn't feel right on my feet. But when I slipped my foot into the +3s, I fell in love. Too bad the store only had the most obnoxious, neon color known to man. I edited to to mute it out. If you have sunglasses handy, here's the true color.


OK. Secretly -- and I guess now NOT-SO secretly -- I enjoy having a really bright, loud shoe. Makes me feel like I'll seem faster than I actually am when I lace up at races. I completed my first run in them yesterday (a blustery 5.5-miler) and they were glowing. But so was I. I get so anxious switching models of my favorite shoes. I've had bad experiences in the past, but I think I'm in the clear with this one. (PS: Thanks to the ladies who wrote me to help with making up my mind!)

Oh, yeah! And with several coupons and store credits (from using the store's loyalty card), I didn't spend the $100 retail price. Closer to $60. Nice.

Today on Writing Chapter Three I wrote a longer-than-it-needed-to-be post about our toy storage and cleaning situation. I'd love for fellow parents to let me know what they do to wrangle all their loot. My entire house looks like this one corner does right now.

Like what you just read? You can subscribe to the feed of these posts or follow us on Twitter or Facebook to be the first to know what the (never home)makers are up to. And we’ll love you forever!

Read more...

Summer Squash Pancakes

>> Thursday, September 22, 2011

Third trimester exhaustion is REAL, people. Granted, it's been a busy few days . . . but I can't seem to keep my eyes open this morning. Dinners have been fast and easy as a result -- more time for napping. Or not.

These summer squash pancakes are made with squash from our garden. They also come together in less than five minutes.


You need not use summer squash if you have another type on hand. Zucchini would work beautifully. Or you could even get exotic with it. Remember the opo squash we bought last year?


It was HUGE!


Anyway, I love making savory pancakes on nights when I just don't have time to whip up a more proper dinner. And it's easy to adapt your favorite breakfast/sweet recipe for this purpose. This one, for example, is a variation on our Wheat and Oats Pancakes.


SAVORY SUMMER SQUASH PANCAKES

What you'll need . . .
  • 2/3 cup wheat flour
  • 1/2 cup white flour (or you can use all wheat)
  • 1 teaspoon baking powder
  • 1 egg
  • 3/4 cup almond milk
  • 1 teaspoon (or more) black pepper
  • 1 cup shredded summer squash (rinsed and peeled first)

Method . . .
  1. Whisk together the flours and baking powder. Add in the egg and almond milk. Mix well.
  2. Fold in the summer squash shreds and black pepper.
  3. Heat a pan over medium-high heat. Grease a bit with some olive oil.
  4. Drop half cup to three-quarters cup amounts of batter on the pan. Cook on each side until browned.
  5. Top with cheddar cheese, sauteed onions, or savory jelly. Blame pregnancy, but I even added a little maple syrup!
  6. You'll also notice that we added some tomato slices -- also from the garden -- during the cooking process.
WHY NOT TRY . . .


Leafy Green Pancakes


Corn Pancakes and Pan-Browned Brussels Sprouts

Like what you just read? You can subscribe to the feed of these posts or follow us on Twitter or Facebook to be the first to know what the (never home)makers are up to. And we’ll love you forever!

Read more...

Roasted Artichokes for Two

>> Wednesday, October 20, 2010


Stephen loves, loves, loves roasted artichokes. I like them, but am not totally blown away like he is. So, since I do most of the cooking, we don't make them often. When we do, however, we BOTH dive right in -- slurping up every last lemony bite. You see, you can't really eat a roasted artichoke and not get completely covered in the juicy debris.

You just can't. It's part of the fun.

Keeping the preparation simple is key when roasting artichokes. Well, with roasting most vegetables. A little salt, pepper, lemon or lime juice, and olive oil can make the natural flavor blossom. Plus, it's way healthier that way. A win-win.


ROASTED ARTICHOKES FOR TWO

What you'll need . . .
  • 2 large artichokes (whole)
  • 1 lime, halved
  • 2 large cloves garlic, peeled
  • 2 tablespoons olive oil
  • 1 teaspoons coarse kosher salt
  • 1 teaspoon black pepper


Method . . .
  1. Preheat your oven to 425 degrees F. Get a rimmed baking sheet and two large pieces of heavy duty aluminum foil ready for roasting.
  2. Cut off the stem of the artichoke (at its base) with a serrated knife. Also cut off one inch off the top of the artichoke, exposing the center a bit.
  3. Rub each down with half of the lime. Squeeze the remaining juice over them.
  4. Place each artichoke on a piece of foil -- standing on its base.
  5. Push a clove of garlic into the center pocket and keep pushing until it is inside (half an inch or so).
  6. Drizzle each with 1 tablespoon of olive oil. Sprinkle each with 1 teaspoon of salt and 1 teaspoon of pepper. Squeeze the other half of the lime juice over the top.
  7. Grab the corners of the aluminum foil and press together on top to tightly seal the artichoke. You don't want any gaps or openings. Use another piece of foil if necessary.
  8. Place on rimmed baking sheet and bake for 1 hour and 20 minutes.
  9. Let rest in foil for another 15 minutes before serving (in a bowl -- we'd recommend).


Part II: HOW TO EAT A ROASTED ARTICHOKE

It's definitely a skill I had to learn. It seems easy enough -- just tear away leaves and eat. But some of those outer leaves are tough. Swallowing them is painful (and not recommended, as I doubt you can easily digest them). We tear off the outer leaves are eat only the bottom/base of them. Really, it reminds me of eating lobster. We just discard the inedible (at least in our option) part after sucking away the good stuff.

Once you get more toward the center, all the leaves will be tender. Go to town on these. They're at the heart. Many people even discard the outer stuff pre-roast and only eat the heart, like in this recipe. What you do is up to you, but we enjoy the base of those outer leaves. Otherwise, it seems wasteful!

What's your favorite vegetable (or other item) to roast? We really started roasting up a storm when we discovered grilled pizza. Toppings just didn't seem to thrill us unless we roasted them before adding them to the mix. Now, we roast EVERYTHING, or so it seems.

Just leave a comment or email us at neverhomemaker [at] gmail [dot] com.

Like what you just read? You can subscribe to the feed of these posts or follow us on Twitter or Facebook to be the first to know what the (never home)makers are up to. And we’ll love you forever!

Read more...
Related Posts Plugin for WordPress, Blogger...

About This Blog

MyFreeCopyright.com Registered & Protected

© 2009-2014 by the (never home)makers
All content on this blog is copyrighted.

Want to publish our pics, tips, or tricks?
Contact us! [neverhomemaker@gmail.com]

We value transparency. Links on this page may contain affiliates. In addition, please see our disclosure policy regarding sponsored posts.

  © Blogger template Simple n' Sweet by Ourblogtemplates.com 2009

Back to TOP  

Blogging tips