Showing posts with label walnuts. Show all posts

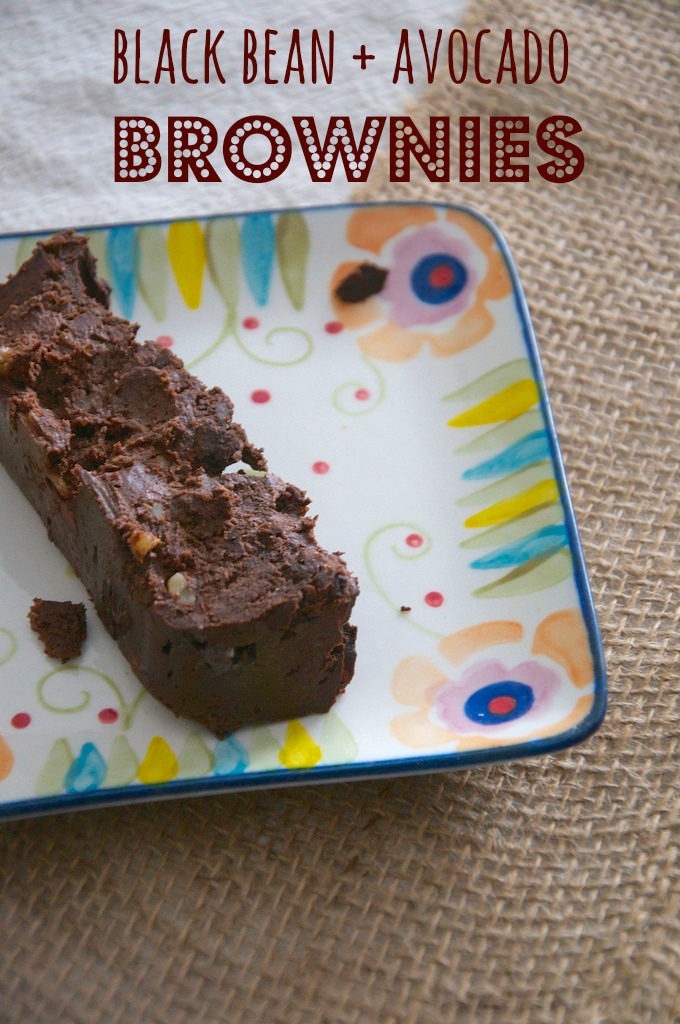
GF Black Bean Avocado Brownies

>> Wednesday, January 21, 2015

Here’s a sweet treat for your Wednesday. This recipe is a modification of the Healthy Chocolate + PB Brownies and Peanut Butter Blondies I posted last summer. What makes these guys different is that I used avocado in place of banana and made them super dark chocolate. Adding walnuts also made them taste even more legit. Please let me know if you try this recipe! The first ones were a huge hit, so I’m hoping this one’s a new favorite.

In pictures:


BLACK BEAN AVOCADO BROWNIES 

Flourless, gluten-free, vegan, etc.

What you’ll need . . .
  • 1 can black beans, drained and rinsed 
  • 1 medium-large avocado, ripe 
  • 1/3 cup pure maple syrup 
  • 1/3 cup smooth peanut butter 
  • 2 teaspoons vanilla extract 
  • 1/3 (heaping) cup unsweetened cocoa powder 
  • 1/4 teaspoon baking powder 
  • 1/4 teaspoon baking soda 
  • pinch sea salt 
  • 2 Moser Roth chocolate bars, 70% dark (from Aldi)
  • (or big handful dark chocolate chips)
  • 1/3 cup walnuts 

Method . . .
  1. Preheat oven to 350 degrees F. Grease a loaf or square baking pan with coconut oil and set aside.
  2. Place all ingredients except the chocolate and walnuts in a food processor and combined until smooth.
  3. Then pulse in the walnuts and chocolate until well incorporated but chunky.
  4. Pour mixture into your prepared pan and distribute evenly, flatten with a spatula.
  5. Bake for 20-25 minutes. Let cool before serving.

Enjoy!

Like what you just read? You can subscribe to the feed of these posts or follow us on Twitter or Facebook to be the first to know what the (never home)makers are up to. And we’ll love you forever!

Read more...

Automatic (Healthy) Eating // Tip 4 + Recipe

>> Thursday, December 5, 2013

You know all about my previous and present struggles with sugar (and so-called detoxes). For me, completely cutting it out (a suggestion I've received many times) just isn't an option. I fail. So, I've slowly developed a taste for less sweet treats that are intended more for fueling my body than spiking my glucose levels.

I still eat traditional desserts -- and often -- but if I keep what we have at home in check, I'm in a better place. Take these energy chunks, for example.

// TIP 4: Learn to Love Alternatives


At the start of each week, I like to make up a batch of homemade energy bars or chunks or some other healthed-up snack/dessert option. I make enough for the entire week so I'm not tempted to get out all my baking gear out of desperation on, say, a Wednesday night. That way, if I'm craving something chocolate-ly, and I always have that craving, I have a (healthy) option already on hand.

What I make changes from week to week, but I love playing with this basic Chocolate-Peanut Butter recipe for energy chunks and then modifying it for whatever ingredients I have in my pantry.

CHOCOLATE ALMOND BUTTER ENERGY CHUNKS

What you'll need . . .
  • 1 cup steel cut oats
  • 1/2 cup walnuts
  • 1/3 cup unsweetened coconut flakes
  • 1/2 cup natural almond butter
  • 1/4 cup maple syrup
  • 1/4 cup cocoa powder
Method . . .
  1. Put all ingredients in a food processor and pulse until blended, but still chunky.
  2. Add more almond butter if batter is too stiff.
  3. Drop heaping tablespoonfuls onto a cookie sheet lined with parchment paper.
  4. Keep in an airtight container in your fridge.
* You can replace walnuts with other nuts, almond butter with other nut butters, maple syurp with agave, honey, or other natural sweetener, and leave out the cocoa powder. Totally customizable! 


From a purely caloric standpoint, you might not be saving much here. But if your main goal is to feel great, have more stable blood sugar, and consume simple foods (good goal, btw!), making alternative treats is in your favor. You can get the healthy fats, etc. you need, all while feeling satisfied + avoiding the brain fog associated with eating too much pure sugar.

Here are some more ideas:
Alternatives go beyond making entirely different items for those sweet treats you know and love. Something as simple as a swap of applesauce for oil,  natural, low-glycemic sweetners for sugar, or wheat flour for white is all you need to transform a cookie from conventional to healthful. Here's a handy chart to help with ratio calculations.

And don't underestimate the power of adding things INTO a recipe versus taking them away. You can toss in flax meal, nuts, dried fruit, oats, or a number of other good ingredients to make a treat more wholesome.

At very least, you can make small batches in a pinch:
For more healthy dessert and snack ideas, you can browse our recipe archives (vegan selections are noted with *). I try to make good swaps whenever possible. If you'd rather browse via photo, check out our Pinterest board for previous posts.

How do you make treats healthier? What's your favorite recipe?

(If you're catching up, check out tip #1: stock up on frozen veggies + tip #2: buy greens and actually USE them + tip #3: create simple, go-to meals.)

Like what you just read? You can subscribe to the feed of these posts or follow us on Twitter or Facebook to be the first to know what the (never home)makers are up to. And we’ll love you forever!

Read more...

Try It: Replace Conventional Flour w/ Sprouted

>> Wednesday, August 14, 2013

I've gone on enough no-sugar and/or detox kicks by now. I know myself. I cannot resolve to cut sugar out of my diet for the rest of my life. I don't want to either. (And I'm amazed at those of you who have the strength to abstain.)  I like love dessert. It's fun + relaxing to mix and bake . . . and, undeniably, dessert tastes good.

What I've finally accepted is that dessert cannot and should not replace meals, particularly breakfast. That's a part of maturing my eating habits that I understand. Knowing is half the battle. So, I've been experimenting with substitutions and alternatives.

And not at the flavor's expense.


// A BRIEF HISTORY

These are my favorite vegan chocolate chip cookies. I then modified the recipe back in 2012 by subbing in some pulsed oats to lighten the flour. Then again, I came up with a half dozen quick recipe + a gluten free version for a similar cookie, just less of it. (Remember all my half dozen recipes? I need to do more of them!)

And now I've changed them again. Chocolate chip cookies are my favorite dessert by far. I'll continue to make variation after variation, too. I'm that passionate and dedicated!


This time, I took the original recipe and . . .

  • I replaced the sugars with coconut sugar (specifically this kind, which is lower glycemic, less processed, more nutrient dense)
  • I switched the egg replacer + water with a flax egg (added omegas + what IS egg replacer?)
  • I changed up the flour by using all sprouted flour (specifically this kind, which digests "like a vegetable" and isn't processed/refined + has all sorts of vitamins, enzymes, and minerals) 
  • I also swapped the pecans for crushed walnuts because that's all we had in the pantry.

So, for any of my friends or family wondering what I did with my birthday money this year -- I bought these alternative baking supplies. We don't have money in the budget to always afford such interesting and exotic luxuries. These cookies are, in fact, literally a treat . . . on many levels.

As far as taste and texture, they are similar to the original recipe, just a bit chewier. It was my first time using sprouted flour, but I can surely tell a difference from a digestive perspective. And perhaps because I was using special ingredients, I was much more careful to conserve these cookies and resist eating them all in a week a day.

Have you baked with sprouted flour?

I'm itching to try something else. Perhaps a pie crust! I have all these frozen plums and I think pie might be just the thing. Baking is truly an emotional release for me. It's also given me time to think these last few weeks -- and I think I've been on a roll so I should keep it going!

Like what you just read? Browse more of our posts + recipes on Pinterest. You can subscribe to the feed of these posts or follow us on Twitter or Facebook to be the first to know what the (never home)makers are up to. And we’ll love you forever!

Read more...

Half Dozen Brownie Cookies

>> Tuesday, January 29, 2013


I've been experimenting with different varieties of the half dozen cookies recipe. Probably more than I should be if we're keeping tally of number of cookies consumed. This particular variation is super chocolatey and reminds me of brownies.

Pass the (almond) milk, please.


What I've discovered is that the basic framework for this recipe works with innumerable substitutions. I have an oatmeal raisin (err -- I added chocolate chips, but raisins would be perfect) variation I'll share next week. A peanut butter cookie for the week after that. And a sugar cookie for the week after that.

Maybe a couple gluten-free substitutions, too.

Now you can start to understand how many cookies we've been taste-testing in this house. A half dozen at a time.

6 x 1,000,000 . . .

HALF DOZEN BROWNIE COOKIES
vegan recipe

What you'll need . . . 

  • 1/4 cup Earth Balance or olive oil
  • 1/4 cup palm sugar or brown sugar
  • 1/2 teaspoon vanilla extract
  • 1 teaspoon ground flax meal
  • 1 tablespoon water
  • 1/2 cup whole wheat flour
  • 1 tablespoon cocoa powder
  • 1 teaspoon baking powder
  • Pinch salt
  • Handful or two chocolate chips
  • Handful crushed walnuts

Method . . .

  1. Preheat your oven to 350 degrees F. Lightly spritz a baking pan with some olive oil or grease with a bit of Earth Balance.
  2. In the bowl of an electric mixer, use the paddle attachment to cream the Earth Balance (you can use olive or coconut oil in a pinch, too!) and sugar together. Add in the vanilla, flax meal, and water. Mix well.
  3. Then add in the flour, cocoa powder, and salt. Mix. Stir in the chocolate chips and walnuts.
  4. Scoop heaping tablespoons of dough onto the cookie sheet and flatten with your palm. If you have leftover dough, eat it or evenly distribute.
  5. Bake for 8 to 10 minutes, until golden on top. Let cool before devouring.
Now I'm off to bake soft pretzels of all things. At 8 AM on a Tuesday. Add what's in them? VEGETABLE JUICE. Sorry to spoil the surprise. Actually, they have a fun twist (see what I did there?) that uses some of this stuff, which I'm hoping benefited from an overnight rise.

I know, I know. BREAD. I really do eat my fruits + veggies, but what I make is so basic it just isn't blog-worthy most of the time. Or maybe that means it's most definitely something I should be posting. 

Ciao, ragazzi!

Like what you just read? You can subscribe to the feed of these posts or follow us on Twitter or Facebook to be the first to know what the (never home)makers are up to. And we’ll love you forever!

Read more...

Freezer Fudge

>> Saturday, December 22, 2012


Things may be busy here, but there's no way I'm letting the holiday slip by without at least one dessert recipe. I have plans for this blog in the new year. Lots of plans. More recipes is one of them, of course. I can't wait to share my ideas with you. Watch out.

We went to a holiday party last night and had to come up with something sweet to share. In our favorite procrastination fashion, we had an hour to do it. So, baking was out of the question.


The great thing about this recipe is that it has few ingredients, is quick to mix together, and freeze/set time is only 20 minutes.

Then just slice, plate, and go.


FREEZER FUDGE (VEGAN)

What you'll need . . .

  • 16 ounces semi-sweet chips
  • 2/3 cup full fat coconut milk
  • 1 cup raw walnuts
  • 1 teaspoon vanilla extract
  • Extra walnuts & toppings*
* We used a handful of those Stacy's cocoa chips. Crushed them up -- perfect!


Method . . .  

  1. Line a 9" x 13" pan with wax paper. Set aside.
  2. In a food processor, pulse the coconut milk and walnuts until smooth. Set aside (keep in food processor).
  3. Put the chocolate chips in a pot over low heat on the stove. Stir continually until melted. Then add melted chocolate to food processor.
  4. Pulse until smooth. Add in the vanilla extract. Pulse again.
  5. Pour mixture into pan and smooth out.
  6. Crush toppings and sprinkle over top. Then cover with plastic wrap or foil and freeze for 20 minutes.
  7. Cut out fun shapes or just plain squares. Arrange on plate and keep frozen until ready to serve.


Prepare to be addicted to the fudge. We took one plate to the party and had enough left over for an entire plate here at the house. If you don't have all the ingredients, feel free to substitute your favorite milk substitute for the coconut milk. And cashews or another soft, raw nut for the walnuts. Dark chocolate would be divine. And maybe peppermint extract!

Oh, and can you tell we're having fun with our chalkboard walls in the kitchen? Thinking about the holidays, though, I should go. We need to get some last-minute shopping done. Hope you all have a great weekend and eat fudge!

Here are some other fun dessert recipes:

Boozy Fudge
Tahini Fudge Squares
Mexican Hot Chocolate Chippers
Salted Cornmeal Sugar Cookies
Clove Spiced Shortbread

What's your favorite festive dessert this year?

Like what you just read? You can subscribe to the feed of these posts or follow us on Twitter or Facebook to be the first to know what the (never home)makers are up to. And we’ll love you forever!

Read more...

Vegan Walnut Basil Pesto

>> Monday, July 16, 2012


For how much I love the stuff, you'd be surprised to learn that I've only made pesto a couple times in my life. Our food processor is back on the mend (OK. I discovered that the "problem" with it was user-error -- oops!). And this weekend's CSA basket came teeming with all the right ingredients.

HOORAY for local garlic and basil!


(NOTE: Several of you have asked us which food processor we have, it's the Cuisinart Pro Custom 11-Cup -- great for making anything, including nut butters! It's a great deal for such a heavy-duty machine, too.)

(ANOTHER NOTE: We also used to have the small Kitchen Aid 4-cup, but it died a year after we got it, so I don't necessarily recommend it.)


Like I said, I've only made pesto a couple times, and I've never made it with pine nuts. Actually, I rarely have pine nuts on hand -- but one of my friends suggested trying walnuts. I've been hooked ever since.

Bonus! We have walnut oil we bought at Home Goods for the full experience.


WALNUT BASIL PESTO

What you'll need . . .


  • 3/4 cup walnuts (or pine nuts)
  • 2 cups fresh basil leaves (loosely packed)
  • 2 cloves garlic, chopped up a bit
  • 1/2 cup walnut oil (or olive oil)
  • Salt, pepper -- to taste


Method . . .

  1. Preheat your oven to 400 degrees F. In a rimmed baking sheet, spread your walnuts and then roast for 5 minutes. Stir. Roast another couple minutes, until you can smell 'em. Then set aside to cool completely.
  2. Microwave or boil a cup (or so) of water and then "shock" the basil (helps keep the green color longer) by placing it in water for 10 seconds. Then immediately pour into colander and rinse with cold water and pat dry with a tea towel.
  3. In a food processor, combine all ingredients. Then pulse until well combined. You may need to scrapes the sides a couple times to get everything incorporated. 
  4. Store in an air-tight container for 2-4 days in the refrigerator for use or freeze in ice cube tray for the future.
Makes enough to fill an 8-ounce Mason jar.


We used ours as pizza sauce (not shown). Atop toast with fried eggs. As sauce for a tofu stir-fry with napa cabbage and onions. And as flavoring for hummus (to accompany a Mission Wrap lunch "pizza").

Just plop in a couple tablespoons and you're good to go!


OTHER PESTO RECIPES

Basil-Pesto French Toast
Pesto French Toast, II -- with Avocado Butter
Pesto Quiche with Oatmeal Crust
Pesto Garlic Knots
Pesto Portabella Sandwiches
(Pesto) Smothered Mother

Today on Writing Chapter Three, I have shared 10 ways to Start Fresh in under 5 minutes. If you've ever wanted a do-over on your diet, exercise, or life -- you should check 'em out. And if you have tips to share, we'd love to hear them!

Like what you just read? You can subscribe to the feed of these posts or follow us on Twitter or Facebook to be the first to know what the (never home)makers are up to. And we’ll love you forever!.

Read more...

Roasted Veggies on Pizza

>> Wednesday, May 30, 2012

We make a lot of pizza. You all know this from the ridiculous number of recipes we post. Lately, though, we've been going far beyond the usual sauce and cheese. It started with the Mexican Pizza with Tequila Shot Crust.

Now? We can't get enough veggies. Especially of the roasted variety.


STEP 1: Make pumpkin pizza dough, which is our go-to whenever we want pizza or knots. Actually, Stephen steamed some carrots and pureed them versus using canned pumpkin. Turned out great AND we had a spoon-able dinner for Ada!


STEP 2: Preheat your oven to 400 degrees F. Then chop, if necessary, the following ingredients into large chunks and assemble on a large, rimmed baking pan.

  • 1 large summer squash
  • 1 large white onion
  • 15 (or so) sprigs of asparagus
  • Couple handfuls walnuts
Just drizzle everything with olive oil and season with salt and pepper. We also added a lot of red pepper flakes for heat. Then place in the oven for 45 minutes, mixing every 15 minutes until you reach your desired black-ness. Set aside.


STEP 3: While they are roasting, make a tasty sauce. We recommend this one.


STEP 4: Up the oven temp to 425 degrees F and place a pizza stone inside. Divide dough into two balls and save one for a rainy day. Then flatten out and put on your pizza stone (a regular pizza or baking sheet would work fine, too). Bake for 4 to 5 minutes. Then flip over and spread your sauce and toppings. We used half a package of mozzarella and some parmesan cheese.

Bake for for 12 minutes. Then broil for a couple to crisp it up.


Slice and enjoy. My favorite part of this particular pizza? The WALNUTS! What a wonderful afterthought. I am definitely adding them to more pies in the future. Otherwise, roasting veggies has become my new obsession, so look for more recipes like this one in the very near future.

SITE UPDATES:
  • We are still working on synching the comments up. If you visit the main page, the counter by each post usually says "no new comments" because it isn't pulling from DISQUS. But usually there are lots of wonderful comments. So, it's annoying.
  • I added several drop-down menus to the top navigation bar. I think it helps find content much faster than before.
  • This summer I will work furiously to get all newer posts linked to various categories like Recipes, Running, and Life. I just need more time without a crawling 6-month-old grabbing at wires whenever I look away from her.
  • I added a subtle chevron background. But I'm starting to feel like chevron is "so over" -- we'll see how long it lasts.
  • If you have any suggestions, we'd love to hear 'em -- shoot us an email at neverhomemaker [at] gmail [dot] com.

And today on Writing Chapter Three, we've written installment two of the Baby Must-Haves series. This time, it's the 3 to 6 month edition.

Like what you just read? You can subscribe to the feed of these posts or follow us on Twitter or Facebook to be the first to know what the (never home)makers are up to. And we’ll love you forever!

Read more...
Double Chocolate Granola-ish Bars

>> Thursday, May 27, 2010


These chocolate walnut oat bars (I need a better name, of course) are divine. They pack a one-two chocolate punch and a heck of a lot of protein (and other nutrition). And making them is as easy as pie! Actually, much easier! I ate a lot of great foods yesterday, but this bar was definitely my favorite of all.

And if you need to get caught up on the life my stomach's been leading lately, check out the life of my stomach day 1, day 2, and day 3.


What you'll need . . .
  • 3/4 cup steel cut oats, processed until powdery
  • 3/4 cup raw walnuts, processed into meal
  • 1/4 cup unsweetened coconut flakes
  • 2 tablespoons cocoa powder
  • 1/4 cup honey or maple syrup
  • 2 heaping tablespoons coconut oil
  • 2 handfuls vegan chocolate chips
  • 1/4 cup natural peanut butter (or almond butter)

Method . . .
  1. Preheat your oven to 250 degrees F.
  2. Whisk together your processed steel cut oats, walnut meal (just pulse each ingredient in a food processor for a bit), cocoa powder, and coconut flakes.
  3. Then, in the bowl of an electric mixer, add the honey (or maple syrup), coconut oil, and peanut butter.
  4. Stir in the chocolate chips.
  5. Then lightly oil an 8x8 glass dish and pour your mixture in. Press into corners to distribute evenly.
  6. Bake for 20 minutes. Then remove from oven to let cool for 10 minutes. Slice into either 8 or 10 bars (8 bars equals 270 calories each, 10 bars equals around 210).
  7. Then up the oven temperature to 350 degrees F. Put the dish back in the oven and bake for another 15 to 20 minutes -- until lightly browned. Let cool and then transfer to your refrigerator (this will help them stay together even more).
  8. Enjoy!

NOTE: Yeah. It's a weird baking process. I admit that. But I was inspired by the way biscotti is made.

Like what you just read? You can subscribe to the feed of these posts or follow us on Twitter or Facebook to be the first to know what the (never home)makers are up to. And we’ll love you forever!!

Read more...

5-Minute "Baked" Apples

>> Thursday, February 4, 2010


This recipe is as fresh as you can get. I ate this very apple (pictured above in all its delicious, honey crisp glory) for breakfast this morning . . . promptly took some juicy photos . . . and typed up the recipe -- all before heading to work today! Oh, how I love my readers :)

So, while we're on the topic of useless kitchen appliances and gadgets, I'd like to bring up one that IS so totally worth the splurge. I'm talking about microwaves, folks! They're awesome. And I know many will disagree. However, I was craving apple crisp for breakfast, and with only 1 hour till work, I wouldn't have had time to wait for my oven to kick itself into gear.

. . . enter the MICROWAVE. A quick chop, core, and mix . . . and five minutes later I was feasting on a "baked" apple with oatmeal-maple topping! It doesn't get any better than this.


What you'll need . . .
  • 1 beautiful apple (I highly recommend the honey crisp variety)
  • 1-1/2 teaspoon Earth Balance (or butter)
  • 1 tablespoon maple syrup
  • 2 tablespoons quick oats
  • 1 tablespoon flax meal
  • Cinnamon to taste
  • Crushed walnuts (for topping)


Method . . .
  1. Split apple in half and take out the core.
  2. Put in a deep glass (or other microwave safe) dish and cover with plastic wrap or lid. I used a Pyrex square brownie dish.
  3. Microwave on high for 2 minutes.
  4. Mix together the Earth Balance, maple syrup, quick oats, flax meal, and cinnamon until totally combined. I just used a fork to mix.
  5. Take apples out of microwave and top with your topping.
  6. Return to microwave for another 2 minutes on high (again, covered to seal in the juices).
  7. Let cool for a minute. Top with crushed walnuts.
  8. And enjoy!


Like what you just read? You can subscribe to the feed of these posts or follow us on Twitter or Facebook to be the first to know what the (never home)makers are up to. And we’ll love you forever!

Read more...

Challah French Toast

>> Tuesday, December 22, 2009


Among many other things you can do with the challah bread recipe I posted yesterday, you can make this immensely decedent challah French toast. (Please note that this recipe isn't vegan, but it's definitely possible to make it so -- just follow these steps -- I have successfully made some amazing vegan French toast in my 26 years on this planet.) But what's interesting about me is that prior to this past Sunday, I had never, ever made "regular" French toast.

Basically: I wanted to give it a try. With eggs.


What you'll need . . . (to make four heaping helpings)

  • Challah bread (recipe here)
  • 4 eggs
  • 1 cup milk or soy milk
  • 1 teaspoon cinnamon
  • 1/4 teaspoon nutmeg
  • 1 teaspoon vanilla extract
  • Butter or Earth Balance


Method . . .

  1. Slice challah into eight thick pieces. Set aside. Save the rest for other delicious creations (stay tuned for super easy grilled peanut butter and honey sandwich recipe).
  2. In a small bowl, whisk together the eggs, milk, cinnamon, nutmeg, and vanilla. Pour into a shallow container.
  3. In a large frying pan over medium-high heat, drop a teaspoon or so amount of butter and heat until it sizzles.
  4. Place three or four slices of challah bread in the egg mixture and let sit for about 1 minute. Then flip over a repeat on the other side.
  5. Transfer gooey bread slices to pan and cook on each side for 2-3 minutes, until lightly browned & cooked through.
  6. Repeat with remaining slices. You may need to add more butter to the pan between batches.
  7. Top with maple syrup, confectioners' sugar, and walnuts. Or anything, really.


Like what you just read? You can subscribe to the feed of these posts or follow us on Twitter to be the first to know what the (never home)makers are up to. And we’ll love you forever <3

Read more...
Related Posts Plugin for WordPress, Blogger...

About This Blog

MyFreeCopyright.com Registered & Protected

© 2009-2014 by the (never home)makers
All content on this blog is copyrighted.

Want to publish our pics, tips, or tricks?
Contact us! [neverhomemaker@gmail.com]

We value transparency. Links on this page may contain affiliates. In addition, please see our disclosure policy regarding sponsored posts.

  © Blogger template Simple n' Sweet by Ourblogtemplates.com 2009

Back to TOP  

Blogging tips















