Showing posts with label freezer. Show all posts

Nesting: What's In My Freezer

>> Tuesday, September 18, 2018

My in-laws were up visitng over the weekend. While I hadn't planned on it at all, I woke up Saturday morning with this INTENSE NEED to make all the freezer meals I could -- as quickly as possible. I don't really like freezer meals, truth be told. But I have had good success in the past with the dump -- raw ingredients -- freezer meals method. So you basically chop everything, put it in a bag, but you don't pre-cook. Then you freeze and thaw it out the night before you dump it into the crock pot.

I learned this method years ago from New Leaf Wellness. They have a great post with 31 vegetarian meals you can make this way. I didn't use any of those recipes -- I mostly stuck to those tried-and-true meals that we know we like. It's too risky for me to branch out and make unfamiliar fare. Anyway, the dump method is legit. I feel like it makes everything taste fresher. It's also wicked fast.

Rather than getting long-winded, I thought I would just share with you everything I was able to cram into my freezer this weekend. As far as cost, it's tricky because I had some of these ingredients on hand. I can tell you that I spent $65 at the grocery store getting produce, more beans, and some random ingredients. But I made 12 meals (some will have lunch leftovers), several batches of cookies, and a bunch of other items, like freezer waffles.
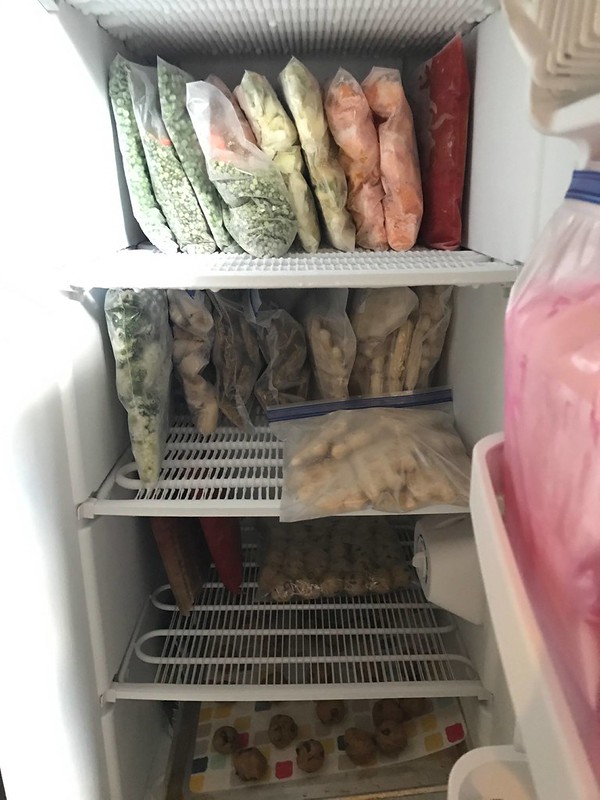

WHAT I MADE


Tikka Masala with Chickpeas, sweet potatoes, peas, etc. x 2

Note: For this recipe, I just chopped an onion and two sweet potatoes, then I added a can of drained chickpeas and a heaping cup of frozen peas. I plan to just use Aldi Tikka Masala sauce when it comes time to cook.

Irish Italian Spaghetti Sauce x 2

Note: This is a family recipe. It's a can of tomato soup, can of cream of mushroom soup, onion, some Italian spices, and traditionally some ground beef. I used Aldi "meat"balls instead. You just simmer and reduce and then use it to top spaghetti.


Note: I added a heaping helping of ginger to this mix.


Peanut Butter Chocolate Chip Cookies x 2

Note: this is a variation of the Pecan Chocolate Chip Cookie recipe above. If you're interested, I could post it. I mostly just replaced all sugar with brown sugar and did half Earth Balance, half Peanut Butter for the "butter". The rest is the same, minus pecans.


Bag of mixed veggies (kale, cauliflower, celery) to add to smoothies

Gigantic bag of frozen bananas 

36 Padsicles for the lady bits

TIPS


// My favorite storage device for an activity like this is the humble gallon freezer bag. I know they're not low waste, but they stack flat and I don't have to worry about glass breaking (I've never had an issue with it -- but it's always a possibility. I also think it's easier to thaw things that have frozen flat).

// I like to turn the top of the bag (the zipper) inside out so it stands up straight while I toss everything in the bag.

// I made two of each meal because it was easier to buy ingredients in bulk and then chop them all in an assembly line. Likewise, I found it most easy to make meals with similar ingredients (lots of carrots, sweet potatoes, butternut squash, onions, beans, etc.).

// I left out wet ingredients like vegetable stock or Aldi sauces (here's more #notsponsored posts about my Aldi love). I did put in some wetter ingredients, like tomatoes, in. There wasn't too much method to the madness, but it made sense that way. OH! And while we're on stock/broth. I actually bought a stock concentrate and put in the correct amount of that versus planning to use packaged stock/broth. When I go to make the meal, I'll just add water in the amount of stock needed.

// When you're freezing stuff like waffles, naan, cookie dough, cookies, etc., it's best to freeze them first laying flat on a baking sheet lined with parchment or some other  non-stick layer. Then once they're fully frozen you can transfer to bags.

// Try to get as much air out of the bags as possible to help prevent freezer burn. I do the fancy method of actually sucking the air out myself!

// Some of those recipes above are not crock pot recipes. But they work in the crock pot! Trust me. And several of the soups will require blending afterward. Which is annoying. I'm considering getting an immersion blender.

WHAT'S NEXT?


I don't have a clear plan. Obviously I did a lot of soups and stews already. I'm not a big casserole person. I also really don't love pasta. I know I want to make 100 pieces of homemade naan for sides or pizzas. I'd also like to whip up some Sweet potato + beet veggie burgers (x 4).

Otherwise, I'm also planning to get a few very large bags of assorted frozen fruits for smoothies, several bags of Aldi's "meat"balls, and a few convenience things. If you have suggestions or a recipe that you particularly loved, PLEASE SHARE! Space is getting short, but I'm happy to have done so much on this project in just one weekend.

If you have any questions, I'd be happy to answer them either on here (I know my comments app can be weird) or on Instagram.

Read more...

Tempeh Veggie Burgers

>> Thursday, January 8, 2015

Freezer and crock pot meals have been a big game changer for me when it comes to meal prep and planning. I’m sure it’s the same with a lot of you. This year, it’s all about doing it better and changing up the recipes. We try to have a good stock of veggie burgers in the freezer at all times, but over the holidays our count dwindled to zero.

We bought a bulk slab of tempeh (two pounds!) at the Greenstar Coop the last time we were in Ithaca, and I’ve been waiting to do something amazing with it. When I thought to mix together my Freezer Veggie Burger recipe, I stopped myself short. A few pulses of the food processor later and this “meaty” burger was born.


TEMPEH VEGGIE BURGERS

Double this recipe to make 16-18 freezable* burgers.

What you’ll need . . .
  • 1 pound tempeh, chopped
  • 1/2 large onion, chopped
  • 1/2 large bell pepper, chopped
  • 2 green onions, chopped (or 1 clove garlic)
  • 2 tablespoons ACV
  • 2 tablespoons olive oil
  • 1/2 cup ground flax meal
  • 1/4 cup sesame seeds
  • 1 tablespoon nutritional yeast
  • salt, pepper
  • other seasonings (optional)

Method . . . 
  1. Preheat your oven to 350 degrees F. Line a baking sheet with parchment. Alternatively, I used a special pan to form my burgers, which I’ll write more about in a minute.
  2. Chop all ingredients and place in your food processor. It helps to pulse the veggies a little first. Then all the tempeh and continue pulsing with the wet ingredients. Then let blend for a few minutes until a wet dough forms.
  3. Scoop heaping 1/4 cup of dough onto your sheet and form patties. Flatten slightly.
  4. Bake for 15 minutes, until burgers feel a bit firm. Then it’s up to you. You can eat right out of the oven. If you want to eat them right away, I suggest heating some olive oil in a pan and browning both sides (I like the crispy texture). 
  5. *To freeze: Cool burgers on a cooling rack and then place on wax paper on a baking sheet in the freezer until frozen. Put in an airtight container (zip bag is great). To re-heat, let thaw for around 30 minutes. Then heat olive oil in a pan over medium-high heat and brown on both sides.


My mother-in-law bought me this Muffin Top Pan for Christmas, and I’ve made tons of stuff in it, just not muffins! I love the shape for cookies, burgers, and even baked egg dishes (more on that soon). So, if you think a sheet like this might have a million purposes in your kitchen, I wholeheartedly agree.

See? Perfect patties!


I’ve been eating my burgers open-faced on a slice of toasted Ezekiel bread lately. More flavor, a little less bread, and definitely saves money. (That bread is so expensive, which is why we usually make our own.) With a little cheese broiled on top, some sliced tomato, and BBQ sauce? Perfecto.

Stay warm today, friends!


Like what you just read? You can subscribe to the feed of these posts or follow us on Twitter or Facebook to be the first to know what the (never home)makers are up to. And we’ll love you forever!

Read more...

Eat Local // Sweet Butternut Squash Soup

>> Monday, October 20, 2014

Would you believe that when I started this blog back in 2009, I had absolutely no idea what it meant to cook seasonally? I’d go to the grocery store, pick up whatever looked good that week, and make whatever recipes interested me at the moment. Instant gratification at its finest. I can’t really blame myself, though. That’s how the store system is set up -- we can have it all if we want, whenever we want.


After I had immersed myself in the food world for a couple years and honed my own cooking skills, I had a sort of awakening. Or maybe it was a pretty fundamental mind shift certainly also sparked by books like Plenty (100 Mile Diet), Animal, Vegetable, Miracle, The Omnivore’s Dilemma, and more. I started to understand where my food actually comes from and why it’s not exactly natural, for example, to slice fresh tomatoes onto my plate in the dead of a Northeast winter. I also discovered the world of CSA shares, local farmers, and buying more eats -- like eggs, honey, milk, etc. -- from nearby sources. 

I can’t say I eat locally 100 percent of the time. After all, we shamelessly stash bananas and avocados in our cart at Aldi on a weekly basis. We favor our local cafes and restaurants, but still go through the Panera drive through in a pinch. And -- yes -- I heartily eat up those supermarket tomatoes for a subpar taste of summer even on the coldest January afternoon. In my opinion, it’s all about balance and trying and budget and trying some more.

This soup was actually inspired by one of those Panera quickie experiences. They have an autumn squash soup on the menu that’s sickeningly sweet -- I knew I could do better at home using local ingredients. The butternut squash, onions, and garlic came from our farm share this week and the biggest, juiciest Honey Crisp apples came from a local orchard. There’s a satisfaction knowing these foods were grown on our native soil. There’s a soulfulness in knowing and caring for the people who work so hard to nourish us throughout the seasons. 

And eating locally just tastes better -- there’s no denying that.


SWEET BUTTERNUT SQUASH SOUP
Makes around 4 quarts -- that’s 16 cups!

What you’ll need . . . 
  • 3 medium butternut squashes
  • 2 large onions, chopped
  • 1 bulb (or 4 huge cloves) of garlic, chopped
  • 2-3 large apples, chopped 
  • Water*
  • Cinnamon, to taste
  • Sea salt + black pepper
*Alternatively, you can use vegetable broth. We’re just out and trying to spend $0 on food this week, which I’ll write more about in another post.

Method . . . 
  1. Preheat your oven to 375 degrees F. Place an safe bowl with a few inches of water in it on the bottom of the oven. 
  2. Wash your butternut squash, then chop off the top, cut in half, and scoop out the seeds. Rub down with olive oil and sprinkle a little salt and pepper before placing halves face-down on a cookie sheet to bake for around an hour, checking periodically for done-ness. (Just needs to be soft enough to scoop out of shells).
  3. Once your have your squash meat set aside, heat some olive oil in a large stock pot over medium-high heat. Add in your onions and garlic and cook until translucent before tossing in apple chunks. Cook until softened.
  4. Since you’re making a large amount of soup, you’ll need to puree in batches. Add around half the squash meat, half the apple mixture, and a few cups of water to a blender and blend until smooth. Repeat with what’s leftover. You can add however much (or little) water as you like. In fact, I leave it up to you since you might also want to reserve some of this puree for baby -- and a bit thicker is nicer for baby food consistency.
  5. Return everything to the stove to season with the salt, pepper, and cinnamon powder. I did around a tablespoon of salt, a teaspoon of black pepper, and a teaspoon of cinnamon. 
  6. You may also wish to stir in additional water at this point to achieve your desired consistency. Just add about a half cup at a time and stir well to incorporate.
  7. Serve with crusty bread on the side. Freeze leftovers using this simple method.


NOTES:


  • Use you can whatever apples you have on hand -- but I’d say the juicer and sweeter the better because you really do taste them in this recipe.
  • As noted above, you can use this soup as baby food as is or even after just pureeing with less water for a thicker consistency. To freeze, portion into 1-ounce cubes and once frozen place in a freezer bag for storage. Let thaw and/or warm before serving.
  • You can also use other winter squashes like delicata and acorn in this recipe -- the size will impact the yield and ratio of squash to apples. So, maybe three to four large delicata and 4 acorn squashes.
  • If you don’t like cinnamon or want to change the flavor, I recommend using curry powder much like we do in our Delicata Mac and Cheese recipe. Curry powder marries well with squash. Smoked paprika, too. Yum!

And head to Writing Chapter Three for a peek into the kitchen in progress. Last weekend, I painted the cabinets white and -- this weekend -- I hand-painted the tile backsplash this weekend. Some notes on how I did it, what I used, and if I like it (or not). Things are certainly coming along! Can’t wait to share the finished kitchen with you guys!

Like what you just read? You can subscribe to the feed of these posts or follow us on Twitter or Facebook to be the first to know what the (never home)makers are up to. And we’ll love you forever!

Read more...

6 Sneaky Ways to Fill Your Freezer

>> Wednesday, September 17, 2014

When I wrote all about our vegetarian month of freezer meals last year, I focused on a single bulk cooking weekend as the means to an end. This year, I've taken a much different approach, and it's one that I think you guys might be into. Instead of overwhelming myself with meal after meal after meal to freeze, I've built up our stash slowly over the course of a month (or thereabouts).

Here are some sneaky ways to fill your freezer. I also plan to share some of the recipes I've made this time around, including a new and improved veggie burger, amazing squash-filled waffles, and more. Feel free to share your own tips + tricks in the comments below!


#1: Make Double


Whenever you cook this month, make a double, triple, or bigger batch. Slow cooker soups are excellent for this idea, since a full pot is often enough for at least two meals for two or three people. My favorite Freezer-Friendly Veggie Burgers are another great option, since you can make some for dinner tonight and still have a good stash for next month. Just eat whatever you want immediately and freeze the rest. Portion out into individual sizes whenever possible for the fastest re-heating.

#2: Utilize Leftovers


Make a huge dish of lasagna? Or too much of whatever else? If you didn't eat all your meal tonight, you're in luck. Rather than eating the leftovers for lunch tomorrow, freeze for future consumption and pack a PB+J instead. We often store leftovers in the fridge with good intentions to gobble them up, and they go to waste anyway. If you freeze straight away, there's no risk! Do this for two or three meals each week, and it adds up fast.

#3: Use It Up


If you have time on the weekend, dig deep into your refrigerator to find the ingredients that will soon go bad. Lay them out in front of you and figure out what you can make. Consider whatever you create a bonus meal -- and freeze it up! We often have half blocks of cheese, a couple cups of almond milk, half of an onion or pepper, a limp head of broccoli, super ripe bananas, etc. I most often use our tips to Eliminate Food Waste and some of the recipes on that page. Otherwise, I -- again -- use the slow cooker. Here are some tips for making awesome crockpot meals without recipes.

#4: Think Part vs. Whole


You don't need to make dinner from soup to nuts to take advantage of freezer cooking. Think about the different parts of a meal you can make easily the day of . . . and make the rest for freezing. Pasta cooks up simply with little cleaning required. So, make + freeze just the homemade tomato sauce or perfect pesto to accompany and thaw the night of.

#5: Freeze Ingredients


When we went blueberry picking, I used up a lot of them making jam + brie grilled cheese, muffins, and other goods. I still had a good number left that I rinsed, dried, and froze whole. We've been getting gazillions of tomatillos, so -- along with making tomatillo salsa -- I've washed them well, cut in half, and frozen on a baking sheet before stashing into a container. I also freeze cooked beans (here's how) that we end up using all month long.

#6: Plan Ahead


You can also just choose a list of solid vegetarian make-ahead meals and pick a couple days each week to crack away at them. No need for an intense bulk cooking experience. Just make an extra dinner here and there and watch them pile up. Before you know it, you'll be cooking and cleaning far less and enjoying the fruit of your efforts much more.


Here are some more tips + recipes:


Like what you just read? You can subscribe to the feed of these posts or follow us on Twitter or Facebook to be the first to know what the (never home)makers are up to. And we’ll love you forever!

Read more...

Roasted Tomatillo Corn Salsa

>> Wednesday, August 20, 2014

I have a bunch of healthy home stuff I want to write (laundry detergent recipes, for example), but I also feel like I need to push some of my seasonal recipes up so they're out there before the produce is, gulp, gone. Like many of our eats these days, this Roasted Tomatillo Corn Salsa recipe was entirely inspired by our latest CSA basket. It is mild and sweet, so it's a nice change from tomato-based salsas.

We love pairing it with our Veggie Loaded Quesadillas!


ROASTED TOMATILLO CORN SALSA
Just 5 ingredients. Makes five 8-ounce jelly jars perfect for freezing!

What you'll need . . . 
  • 3 cups fresh corn kernels 
  • 16 medium tomatillos 
  • 1 large onion
  • 1 bell pepper or a mix of other peppers
  • Salt and pepper -- to taste
  • Up to 1 cup water 
Method . . . 
  1. Preheat oven to 375 degrees F. Chop all ingredients coarsely and place on a well-oiled + rimmed baking sheet. 
  2. Place in the oven for 15-20 minutes. Then mix around and bake another 15-20 minutes. Stir again and finish with another 15-20 minute bake, until lightly browned. 
  3. Place everything in a food processor (you may need to scoop to get some liquid) and pulse a few times with salt, pepper, and water. I added 1/4 cup at a time until I reached my desired consistency (around 3/4 cup).
  4. Spoon out into small Ball jars with 1+ inches of headroom. Use right away or freeze for up to 1 year. 
  5. To freeze just let salsa cool completely, then place a top on your jars and place in your freezer. More info on freezing in glass jars -- as well as some FAQ about my freezing process.
// PROCESS


// RESULT


Freezing in-season foods for the off-season?

Yes. Please. Let's capture the goodness while we still can!

What's your favorite way to preserve foods?

Like what you just read? You can subscribe to the feed of these posts or follow us on Twitter or Facebook to be the first to know what the (never home)makers are up to. And we’ll love you forever!

Read more...

Freezer Drawer // Love or Hate It?

>> Tuesday, January 28, 2014

Airing my dirty laundry today. Or, I guess in this case, it's my cluttered freezer drawer.


We have an upright freezer in our basement that I have filled to the brim (and organized, labeled, etc.!) with all sorts of foods, from Vegetarian Freezer Month eats to big bulk bags of veggies + fruits to glass containers of homemade staples, like applesauce, waffles, and chili.

Our refrigerator's freezer drawer is quite another story, as you can see. It's a catch-all for leftovers that aren't as, well, planned. Like bananas that are too ripe. Or half bags of frozen stuff. Or old freezer packs. (We have a million on them somehow.) From what I discovered . . . stuff expired in 2007 and ALL . . . what we keep upstairs is stuff we rarely eat.

Hmmm.

I think a huge part of it is my own lack of labeling and organization coupled with the poor design. Or let me re-state that. The poor design for my own preferences. When we bought our refrigerator several years ago, a drawer was a HOT item on my must-have list. Now? I don't really like hate it! Everything gets lost in there.

After doing a major cleaning, I ended up getting rid of the majority of what you see above. Including a few rogue breastmilk bags from Ada's first year. Now we're left with an empty space looking to be filled.

Here's the deal:
  • I'm planning to keep a roll of masking tape + a Sharpie next to the fridge to make labeling simple.
  • I'd also like to create a list of what's in the freezer to post on the refrigerator door.
  • I might invest in some smarter storage for that type of space, maybe something like these taller, slimmer containers.
  • I may also try to create some loose zones in the freezer (like fruit, veggies, meals, desserts, etc.) so everything is easier to find.
  • And obviously, I need to clean the freezer more regularly to keep everything under control.
I'm hoping to unveil a much more inspiring freezer space the next time I share. But I guess I'm wondering if any of you have tips you could give me. Do you have a freezer drawer? Love or hate it? And, it not -- maybe there are universal methods that would work for everyone?

I need all the help I can get!

Like what you just read? Browse more of our posts + recipes on Pinterest. You can subscribe to the feed of these posts or follow us on Twitter or Facebook to be the first to know what the (never home)makers are up to. And we’ll love you forever!

Read more...

Automatic (Healthy) Eating // Tip 1

>> Monday, December 2, 2013

I feel like there was this collective groaning all over social media this morning. Too much Thanksgiving indulgence = now it's time to detox, exercise more, "eat clean," etc. I'm not immune to this way of thinking, but at the same time -- at the ripe age of 30, I've grown tired of the whole back/forth of eating as it relates to the holidays. Haven't you? Doesn't it get tiring?

Honestly, I struggle year-round to keep my eating in check. I haven't kept this a secret from you guys, so this is a topic that I'm raising as we deck the halls, but it's not season-specific. Slowly I've learned a few tricks to make healthy eating more automatic.

Over the next several days, I'll be sharing my top 5 (or so) tricks to help you make it through this festive season (or just life) without feeling like you need to continually hit the reset button. And if this stuff works for me, there's a wonderful chance it might help you, too!

// TIP 1: Stock Up On Frozen Veggies


If you cook with mostly fresh food like we do, you might not step into the freezer section at your local grocery store. I only recently started venturing to those parts because Ada is partial to frozen peas and waffles. And when I did the whole month of freezer dinners, I became much more open to different ways of approaching meal time.

The more I nosed around the chilly aisles, the more interesting stuff I found.

For example, not only can you purchase frozen peas, broccoli, corn, peppers, spinach, squash, and pretty much any other vegetable + fruit you can imagine -- but many stores also have these great veggie mixes. I knew that sort of stuff was on the shelves, but our Wegmans has these really interesting Asian varieties that are absolutely perfect for stir-fries in a pinch.


True, many of these veggie packs aren't organic and some come with these highly processed sauce mixes that are questionable. But at the low price point (yup -- pretty inexpensive!) and convenience factor -- I'd rather toss these in my wok than resign myself to munching on whatever enticing chocolate pie leftovers are in the fridge.

Preparation of these frozen veggies is simple + fast, too.
  • I usually fry up some cubed tofu or an egg or two, then I set the protein aside and add a little olive or sesame oil to the hot pan. 
  • On medium-high heat, I then take a cup or two of veggies (that's just a single serving) and cook until warmed through, but still crisp (that's the trick, because mushy isn't good at all!).
  • I then splash on a bit of low sodium soy sauce, a squeeze of juice from freshly grated ginger, sprinkle on some sesame seeds, or use whatever else I have around the kitchen to spice things up.
  • I often make rice or some other side dish, but it's not necessary if I'm in a hurry. A healthy meal can be made in like 10 minutes. Seriously!
For us, frozen vegetables are a solid backup plan if we find ourselves scratching our heads around dinner time. Or if I can't figure out what to eat (or pack for Stephen) for lunch. Or if we're running low on CSA produce or just trying to save a little money.

If you'd like to hold out for organic, local freezer veggie options, there are winter CSA shares in many parts of the country. Just ask around at your local farmers market. We've taken part in the past, and it's super helpful. All those flash frozen packets of goodness make wonderful soups, pot pies, stir-fries, and stews.

Heck. With enough foresight, you could even make your own mixes! I'd love to think ahead in the bountiful produce season to have these quality frozen ingredients on hand, especially for this time of year. Sigh. Foresight isn't one of my best qualities.

Do you cook with frozen vegetables? How often? How do you use them to your advantage?

Like what you just read? You can subscribe to the feed of these posts or follow us on Twitter or Facebook to be the first to know what the (never home)makers are up to. And we’ll love you forever!

Read more...

(Another) Vegetarian Freezer Month?

>> Tuesday, October 22, 2013

For obvious reasons, I didn't attempt making a month of freezer foods for our October consumption. But now that we're nearing another fresh start, I'm toying with the whole idea again. I first want to review the pros and cons of what I did for September, as well as provide some details about what I would modify going forward.

  • I prepared a variety of meals -- from vegan lasagna to veggie burgers -- but planned on eating each once a week. Overall, I didn't get as bored with the food as I thought I would, but there were certainly times I felt I'd rather cook fresh because I love cooking.
  • Without using a microwave, which we've banished to the basement for more counter space, reheating the foods took a long time -- and if I didn't think enough ahead (which there's no excuse -- but it still happened, multiple times), dinner would only be lukewarm when we were starving. 
  • It was nice to have meals already portioned out, and I think it helped us conserve our food resources ($$$) instead of just carving away piece by piece at what could be leftovers.
  • I'd have to say the taste of the food was good, but some was lost in freezing and reheating. I don't know if this is entirely avoidable or if I just don't use much salt (though I'm not willing to load stuff for taste). Maybe trying new, spicier recipes is in order?
  • However, speaking of spicy recipes -- this Indian stew looked vibrant and tasty when we made it . . . but after freezing was a complete mess. Cook and learn, I guess.


If I freeze foods for November, I think I'll likely change the following:

  • I'd only make freezer dinners for 2 or 3 nights each week, decreasing the BIG COOK intensity, but also giving me an opportunity to make fresh meals when I feel like it.
  • I'd still meal plan for the entire month -- fresh cooking included -- and attempt to buy the bulk of the month's groceries in a massive shop to save money.
  • I'd plan to make very simple fresh meals that have only few ingredients or prepare easily in the crock pot or in one bake dish by roasting, etc.
  • I'd use a lot of local and seasonal squash because it's inexpensive, readily available, hearty (doesn't spoil easily), and versatile. Another batch of Delicata Mac 'n Cheese, anyone?
  • And with the fresh foods I do make, it'd be nice to plan for leftovers and then remix them for the following day (lunch) or night (dinner).
  • I might also like to make freezer bagels or breads this month -- the baking bug has bitten me. And this month I will make time for a batch of Homemade Freezer Waffles.
  • I'd also like to keep a closer watch on the budget for what I spend the weeks after the big shop. When stuff got crazy last month, I honestly stopped caring about that piece -- but I plan a full budget analysis and see how it compares to just regular cooking.
So that's where I am with planning for next month. I'll be sure to share the recipes I intend on making (some new stuff -- hooray!) soon. The freezer lasagna was a big hit, and I'd love suggestions for tried-and-true recipes you know freeze really well.

Anyone else doing freezer meals?

Like what you just read? You can subscribe to the feed of these posts or follow us on Twitter or Facebook to be the first to know what the (never home)makers are up to. And we’ll love you forever!

Read more...

Vegetarian Freezer Month: Details

>> Tuesday, September 3, 2013

I finished my shopping.
I did all my cooking.
I'm "done" for the month, at least when it comes to 5 dinners each week.
Phew. I need a drink.

There's a lot to write about this whole thing, so today I'll just give the shopping and recipe details.


// MENU
= 20 meals for 2.5 people, frozen

That's 5 meals a week for the entire month of September. I could have done more, but I wanted to cook at least one night a week and we usually get takeout or go out to eat once a week. Written out in this way, it seems sort of boring. I mean, we'll be eating the same stuff every week. But when I thought about it, that's what we usually do anyway. I made a few of the meals in smaller quantities to mix things up a bit.

I planned meals we've regularly made in the past with much success -- I linked to a few recipes, but everything I made was actually new, so I'll be trying to get out a recipe list at some point (I tried making everything more balanced nutritionally -- adding protein, etc.). I wanted to find dishes that used the same ingredients in different ways to cut down on the number of items needed at the store (and to take advantage of deals where I could find them).

At the same time, I do think I went a little tomato-heavy, which brings up another point. It's hard to give exact numbers for how much everything cost because I tried using our CSA box as much as possible -- and we had tons of tomatoes! So, while I'm attempting this whole thing for budget reasons, it's also just for ease of cooking + cleaning throughout the month. Trial and error in all regards, too.

// SHOPPING LIST
  • Shredded cheese x 4
  • Extra Firm Tofu x 4
  • Green Peppers x 6
  • Yeast
  • Sweet Potato Fries
  • Frozen Spinach
  • Frozen Corn
  • Frozen Peas
  • Frozen Cauliflower
  • Black Beans x 2
  • Garbanzo Beans x 2
  • Pumpkin x 4
  • Whole Peeled Tomatoes x 2 (28 ounce)
  • Kidney Beans x 2 (40 ounce)
  • Vegetable Broth (carton versus can)
  • Lasagna Noodles 
  • Red Lentils (dry bag)
  • Bread Flour (1 bag)
  • Cornmeal
  • Breadcrumbs
  • Onions (2 lbs)
  • Carrots (5 lbs)
= About $70

* Remember -- this is just for dinners. So, 20 dinners would average out at about $3.50 a meal, and divided by 2.5 people = about $1.40 per person. I guess I thought it would figure to less, but I'm still satisfied with these figures.

// OTHER SUPPLIES 
  • Freezer Bags
  • Freezer Containers
  • Plastic Wrap
  • Tin Foil
// OTHER INGREDIENTS + FOODS
  • Chocolate Chips x 2
  • 7 Grain Tempeh x 4
  • Earth Balance x 2
  • Greek Yogurt x 4
  • Lowfat Yogurt x 4
  • Ezekiel Bread x 2
  • Tuna x 8 (for Stephen's lunches)
  • Frozen Strawberries (5 lbs)
  • Turmeric
  • Curry
  • Fenugreek

Would I do it again?

I'm still in shock from how much preparation + how many hours it all took, so it's a hesitant "yes" at this time.

First we need to see if everything tastes good a month later. After thawing, you know? And while I could be bummed I didn't see major $$$ savings, I am also trying to consider that a lot of the extremely low-cost meal plans I've encountered are for stuff like spaghetti + sauce or rice + beans; what we're eating will not only fill our bellies, but also fuel our running.


In my next post on this topic, I'll try to give some handy tips for making foods for freezing and then how to best freeze + defrost them. Till then, at least I know what I'm having for dinner tonight (and tomorrow, and the next day, etc.)!

Like what you just read? You can subscribe to the feed of these posts or follow us on Twitter or Facebook to be the first to know what the (never home)makers are up to. And we’ll love you forever!

Read more...

Tangy Freezer BBQ Sauce

>> Friday, August 30, 2013

I'm nearly ready to go on my big shopping date for the Vegetarian Freezer Meals I'm planning for the entire month of September. In my planning, I realized that barbeque sauce would suit a variety of the dishes I'm included in our plan well. It works as a topping for veggie burgers and even as a sweet sauce for pizza. Really. It's going to be fabulous.

And guess what! We already had several pounds of farm fresh tomatoes around. So, I did some prepping early and opted to freeze this bunch rather than can them.


SWEET + TANGY FREEZABLE BBQ SAUCE
Makes 4 to 5 pints of the stuff for slathering

What you'll need . . . 
  • 1 to 2 small chopped onion
  • 3 to 4 garlic cloves, chopped
  • 10 to 12 cups chopped tomatoes (any size/variety)
  • 1/4 to 1/3 cup brown sugar
  • 1/4 to 1/3 cup maple syrup
  • 1/3 to 1/2 cup apple cider vinegar
  • Salt and black pepper, to taste
  • 1/4 cup smoked paprika/chipotle seasoning
  • Red pepper flakes


Method . . .
  1. Chop all tomatoes and set aside. In a large stock pot over medium high heat, saute your onions/garlic until glassy. Then add the tomatoes and crank the heat a bit higher.
  2. Add the brown sugar, maple syrup, apple cider vinegar, salt, pepper, and spices. Bring to a boil and continually stir/mash until mixture thickens. About 20 minutes.
  3. Then lower the heat and let simmer for an hour, stirring occasionally. Turn off heat and let cool for a few minutes.
  4. And then blend in a food processor or blender. (We used our beloved Ninja Blender + I did this process in two batches.)
  5. Return mixture to pot and simmer over medium/low heat for another 30 minutes to an hour, depending on how you'd like the consistency. (The longer you cook, the thicker it gets.)
  6. Take stock of the flavor at this point and make any modifications accordingly. Add any sugar/spices/etc. at just 1 tablespoon at a time (or less, depending).
  7. Fill pint jars, leaving 3/4 inch of space for freezing. Bring jars down to room temperature and refrigerate overnight before placing in your freezer (covered well so no air can get in). Stays good for up to 1 year. (In the fridge, use in a week or so.)

So stay tuned for my menu guide for freezer month, along with recipes for this whole thing. Many of you said you've tried this method, but that a whole month is a bit intense (both on the cooking/cleaning end and because it means not much cooking for a long while). I'm already tending to agree -- and I haven't even started yet.

But, then again, maybe I'll fall in love with freezer meals. Time will tell!

Happy Friday!

Like what you just read? You can subscribe to the feed of these posts or follow us on Twitter or Facebook to be the first to know what the (never home)makers are up to. And we’ll love you forever!

Read more...

A Month of Vegetarian Freezer Dinners

>> Monday, August 26, 2013


I mentioned in Weekend Things that I'm in the process of getting together a month of freezer meals. Many of you seemed interested, so I thought I'd take you with me along the way as I figure the whole thing out. Planning the "big cook" (any Breaking Bad fans in the bunch?), as I'm calling it, has taken a bit of thinking.

I've seen all sorts of plans for freezer meals and promises that range from a cleaner kitchen to money saved on groceries. Thing is, a lot of these recipes aren't vegetarian or vegan. And if they are, they haven't necessarily been written by vegetarians. So, I've finally taken the time to wrap my head around how this seemingly magical solution -- a month of vegetarian freezer dinners -- could work for our family.

I'm hoping we'll . . .
  • Save money by buying our ingredients purposefully + using them -- without waste -- in various recipes.
  • Eliminate a load (quite literally) of dishes each night, saving us water money and time.
  • Free up time during the day that I can use for my freelancing projects and, more importantly, doing things with Ada.
  • Have more time together as a family during the work week with our meals decided + already made in the evenings.  
  • Improve the nutritional content of our meals by planning accordingly and boosting with lots of protein.
  • Create some delicious, satisfying recipes that will become new family favorites.
I'm focusing mostly on dinners Monday through Friday for the first month, as cooking oats for breakfast and slapping together a sandwich aren't terribly labor intensive. I also want freedom to cook on weekends because that's what I love doing. I'd miss it! I do think I'll make a gigantic batch of homemade freezer waffles. Who knows. I could get carried away, which would actually benefit me in this situation.

CHALLENGES / CONCERNS
  • We'll still be heading to the store/market at least every other week to get Ada's milk and other items (like fresh fruit and our CSA share)
  • Actually I am a bit concerned about how we'll be using our CSA share if I cook our meals ahead, since dinner is when we use the bulk of these ingredients.
  • However, I figure I can just can or freeze different items for the next month, too.
  • I am also worried somehow I'll spend more at the store. So, using my handy grocery app will be helpful in projecting the costs.
  • And will cooking everything in a single weekend be totally overwhelming? When I was pregnant, I made a gigantic batch of chili one weekend and it was a bit much.
I haven't made final decisions on recipes yet, but I'm thinking -- again, just for the first month -- of being relatively repetitive from week to week. Like Monday night is X night, Wednesdays are for X, etc. It sounds formulaic and perhaps boring, but it's what we're already doing while making from scratch every night. I'll be sharing this information next Monday, after I cook everything.

So, the "big cook" will be going down next weekend. Before then, I need to clean out our freezer, go through the ingredients we already have on hand to make stock, finalize the meal options, write out a master grocery list, and . . . go shopping.

If I sit and think about the possibility of having our week-night dinners made for an entire month, I get pretty giddy. Don't you? What would you most hope to gain from making dinners for an entire month?

Like what you just read? You can subscribe to the feed of these posts or follow us on Twitter or Facebook to be the first to know what the (never home)makers are up to. And we’ll love you forever!

Read more...

Homemade Freezer Waffles

>> Thursday, February 14, 2013


I mentioned in my grocery budget post how we're resisting kid-specific foods because they can be ridiculously expensive. Part of Ada's standard breakfast each and every morning is a toaster waffle. We were buying the ones with Cookie Monster on the box -- blueberry minis by Earth's Best. One Sunday morning, something clicked.

You HAVE a waffle maker, Ashley. Why are you still buying frozen?


I've gone through various trials + tribulations trying to create a waffle recipe that is fluffy, doesn't stick to the maker, and freezes well in bulk. It features a mere 5 ingredients, too! I don't have an old box handy, but even with the "natural" label, I'm sure that beats Ada's old breakfast.

The added nutritional bonus of the applesauce in this recipe is awesome. The natural sugars help the waffles develop a golden brown crisp. And you can taste the sweetness without adding bucketfuls of the white stuff.


APPLESAUCE WAFFLES
vegan, kid-friendly, freezable, and only 5 ingredients

What you'll need . . . 

  • 1 cup unbleached flour
  • 1 tablespoon baking powder
  • pinch salt
  • 1/2 cup applesauce (homemade or store-bought)
  • 1/2 cup almond milk (or even water), possibly a few tablespoons more


Method . . .

  1. Whisk togehter all ingredients in a small bowl. Batter should be thick, but not dough-like. 
  2. NOTE: You may need to add a few more tablespoons of liquid depending. This morning I added 2 tablespoons. Another day, it was just one. It depends on the moisture content of your applesauce AND how much flour your "1 cup" really ends up being.
  3. Feel free to double or even triple the recipe as desired, keeping in mind the note about the almond milk.
  4. Preheat your waffle maker. When it's ready, generously grease the top and bottom with Earth Balance or spray oil. Then scoop heaping 1/4 to 1/3 cupfuls and cook as directed.
  5. Eat immediately or follow the instructions below for storage.

STORAGE + RE-HEATING

  • When making in bulk, it's helpful to let waffles rest on a drying rack so they don't get soggy while you're making the rest of your batch.
  • One cooled slightly, arrange waffles flat on a baking sheet, preferably atop some parchment paper.
  • Place in freezer for 1 hour. Till they are frozen. 
  • Store them into a freezer bag + return to the freezer. 
  • Treat like store-bought waffles. No need to thaw. Just pop into toaster.

Our cheap waffle maker has sure been earning its keep with this new project of mine. I'm hoping this weekend to make enough waffles for an entire month, among many other freeze-ahead foods. (And as I've told you before, you can get a decent waffle maker for under $20 and even under $10.)

What's your favorite vegetarian/vegan freezer meal? Stephen has a 4-day weekend, so I have lots of time to cook + I need ideas!

HAPPY VALENTINE'S DAY!

Treat Yourself: V-Day Gift List
Red Velvet Black Bean Brownies
We Heart Beet Burgers
DIY Pom Heart Art
DIY Stamped Arrow Shirt

Like what you just read? You can subscribe to the feed of these posts or follow us on Twitter or Facebook to be the first to know what the (never home)makers are up to. And we’ll love you forever!

Read more...

Freezer Fudge

>> Saturday, December 22, 2012


Things may be busy here, but there's no way I'm letting the holiday slip by without at least one dessert recipe. I have plans for this blog in the new year. Lots of plans. More recipes is one of them, of course. I can't wait to share my ideas with you. Watch out.

We went to a holiday party last night and had to come up with something sweet to share. In our favorite procrastination fashion, we had an hour to do it. So, baking was out of the question.


The great thing about this recipe is that it has few ingredients, is quick to mix together, and freeze/set time is only 20 minutes.

Then just slice, plate, and go.


FREEZER FUDGE (VEGAN)

What you'll need . . .

  • 16 ounces semi-sweet chips
  • 2/3 cup full fat coconut milk
  • 1 cup raw walnuts
  • 1 teaspoon vanilla extract
  • Extra walnuts & toppings*
* We used a handful of those Stacy's cocoa chips. Crushed them up -- perfect!


Method . . .  

  1. Line a 9" x 13" pan with wax paper. Set aside.
  2. In a food processor, pulse the coconut milk and walnuts until smooth. Set aside (keep in food processor).
  3. Put the chocolate chips in a pot over low heat on the stove. Stir continually until melted. Then add melted chocolate to food processor.
  4. Pulse until smooth. Add in the vanilla extract. Pulse again.
  5. Pour mixture into pan and smooth out.
  6. Crush toppings and sprinkle over top. Then cover with plastic wrap or foil and freeze for 20 minutes.
  7. Cut out fun shapes or just plain squares. Arrange on plate and keep frozen until ready to serve.


Prepare to be addicted to the fudge. We took one plate to the party and had enough left over for an entire plate here at the house. If you don't have all the ingredients, feel free to substitute your favorite milk substitute for the coconut milk. And cashews or another soft, raw nut for the walnuts. Dark chocolate would be divine. And maybe peppermint extract!

Oh, and can you tell we're having fun with our chalkboard walls in the kitchen? Thinking about the holidays, though, I should go. We need to get some last-minute shopping done. Hope you all have a great weekend and eat fudge!

Here are some other fun dessert recipes:

Boozy Fudge
Tahini Fudge Squares
Mexican Hot Chocolate Chippers
Salted Cornmeal Sugar Cookies
Clove Spiced Shortbread

What's your favorite festive dessert this year?

Like what you just read? You can subscribe to the feed of these posts or follow us on Twitter or Facebook to be the first to know what the (never home)makers are up to. And we’ll love you forever!

Read more...

Freezer FAQs

>> Thursday, April 19, 2012

I think the best thing I did while I was pregnant was make a MONDO-batch of pumpkin chili and freeze it. Seven months later, we're still slurping the stuff on nights when we simply have no time to cook. What a life-saver!

We outlined our process in a post back in November. But we received quite a number of questions related to the whole thing. Too many to answer at the time, when we were caring for a newborn. But it's been almost 6 months. Time to revisit.


Are glass jars the best choice for freezing?

I don't know if I'd consider them the absolutely best choice ever for freezing. However, I don't know what would be. We try to stay away from too much plastic in our household (BPA), and wide-mouth canning jars are much less expensive than freezer-specific glass containers sold. They save space, too! Overall, breakage is the most noted concern of folks who wrote to me.

We haven't experienced any breakage, which we attribute to: 1.) Waiting to fill until the filler (in our case, the chili) cooled to room temperature (and then some in the refrigerator). 2.) Making sure to leave a good portion of empty space at the top of the jar to account for expansion. (We may have left even a bit too much room, but better safe than sorry!)

Does the food taste the same after being frozen for so long?

No. It actually does taste somewhat different. But we expected that. Not different in a bad way. But somehow the flavors have mingled in a new way. And the composition of the veggies/beans changed ever-so slightly. Like they were, well, frozen. A bit bloated is the only way I can think to describe it.

How long does frozen soup/etc. stay good once frozen?

We have a dedicated freezer in our basement set at a low, low temperature. I've read that our chili will stay good for up to a year. In a regular refrigerator/freezer combo, I have read anywhere from 3 to 6 months.

How do you keep track/label your jars?

Simple. We just use a Sharpie marker to write on the top of the jar.

What -- besides chili -- have you frozen?

Applesauce, mainly. And a few other types of soups. Now that we're running low on our supply, I'd like to make more soups, of course, but also stocks, cooked dried beans, pizza sauce, and purees in bulk.

One of our readers (Jodie) wrote that she freezes pancakes, cookies, and muffins. We don't have the right equipment right now, but I would LOVE to make up waffles and have homemade toaster waffles in the house. Need to get on that!

How did you choose the size of the jars?

We have a variety of glass Ball jars. We went with the large (I believe 32-ounce) because we realized that it would contain one complete meal for the two of us. We split it between us and have enough soup to feel full. With other items, like the sauce and purees I mention above, we will likely use the standard 16-ounce variety.

Another reader (Shady) suggests making up family-sized meals and freezing individual portions in muffin tins. I think that's a fantastic idea -- especially for foods we might want to munch on at lunch, when we often don't eat together.

What's the best way to thaw frozen food in jars?

If we have enough foresight, we try to get a jar from the freezer and let it slowly defrost in the refrigerator for a day or two. More often than not, however, we're rushing around in the evenings and make a last-minute decision to eat chili for dinner. On these nights, I put a large stock pot in the sink and fill it with warm -- not hot -- water and set the frozen jar inside. I change out the water a few times until the chili is loosened up and, when it can plop out of the jar, put it on the stove over medium heat and cook until warmed again.

For our entire process, you can check out the original FREEZE post -- the comments are especially helpful, full of tips from our readers. And if you have other questions, we'd be happy to answer them. We're not experts, but we've been through an entire round of freezing and eating now, so we feel like we're getting in a good groove.

Now it's just time to make some bulk meals again and reap the rewards later.


If you follow our home life on Writing Chapter Three, you have two posts to catch up on. The first is all about our new dinnertime routine (plus a tasty dinner idea!) now that we have a baby. And the second is about Ada's new love for momsicles. Yeah. That's right. Breastmilk popsicles.

Like what you just read? You can subscribe to the feed of these posts or follow us on Twitter or Facebook to be the first to know what the (never home)makers are up to. And we’ll love you forever!

Read more...
Related Posts Plugin for WordPress, Blogger...

About This Blog

MyFreeCopyright.com Registered & Protected

© 2009-2014 by the (never home)makers
All content on this blog is copyrighted.

Want to publish our pics, tips, or tricks?
Contact us! [neverhomemaker@gmail.com]

We value transparency. Links on this page may contain affiliates. In addition, please see our disclosure policy regarding sponsored posts.

  © Blogger template Simple n' Sweet by Ourblogtemplates.com 2009

Back to TOP  

Blogging tips















