Showing posts with label project. Show all posts

Our Stock Tank Pool: Part I

>> Monday, June 4, 2018

You may remember the pool we set up last year in the backyard. It was absolutely perfect. Around 7.5 feet by 9.5 feet and just around 2 feet deep. The kids had so much fun splashing around all summer in those 870 gallons of H2O. The setup worked well, and it was relatively inexpensive. If you're interested, I would highly recommend these Bestway pools as a first step into learning how to care for a pool.

But we had a mouse issue in the fall and they got to the pool. So, we needed a solution for this year . . . and hopefully for many years to come. I've seen so many articles about stock tank pools crop up in recent years. I was always too intimidated by the process of getting a huge galvanized tub to my house, so it was on the back burner.

This year, we decided to pull the trigger.


For those of you who have been asking me questions (and there are many of you!): We picked up our 8 foot stock tank at Tractor Supply. It's 24 inches deep. Our store does not do delivery, so we asked a friend to help us get it home. It wasn't too bad a process -- aside from one roadside adjustment -- and ended up being much easier than we anticipated. When we got it home, we gave it a good scrub because the store had been displaying plants inside it.

From there, it was all about re-leveling the area we had dug out last year.


Surprisingly, it took a few hours to get the area absolutely perfect. Last year, we settled with level-ish. But one benefit of getting this type of pool is that you can leave it out all year. We're hoping to leave it in place, so taking our time was in our best interest.

When that was done, we put it where we want it to go and got to work on the landscaping. Mostly rocks that we bought at the store and pulled up from the creek area behind our house.


I love how it looks! So much prettier than the bold blue with white supports from last year.


This stock tank holds around 700 gallons of water, so it is smaller than last year's. I had to buy a new filter pump that we are going to drill/hook up tonight. That will be part II of my posting. But if you're interested in doing a similar project at your home, I highly suggest checking out the number of really helpful tutorials I found online.

Here are some of my favorites:

DIY Stock Tank Pool: Everything You Need to Know
How to Make a Stock Tank Pool
Stock Tank Swimming Pool Ideas

Just a budget breakdown. We ended up getting the tank for $349 plus tax at the store. They're usually $399, but we got it on a Memorial Day sale. The new filter we bought was $35 on Amazon. The rock was around $30 because we already had some leftover from last year. It's not the least expensive upgrade we could have done, but I am hoping it will pay off in the long run.

Why didn't we go with a larger option? Well, partially because we didn't want to eat up our yard with a pool the whole year. Or have a big hole when it's cold outside. I like that it's shallow enough that Eloise's head is well above the water. But yet it's big enough to still get in as an adult and cool down. It looks nice, though I understand the style isn't for everyone. And we are hoping that the galvanized steel is durable and lasts for many years.


If you have further questions, I'd be happy to answer them either in the comments or on Instagram!

I'm going to do another post once we get it up and running to talk about any issues we run into or any tips I have. But I won't be writing out a full tutorial. Again, I highly recommend the links I provided above. We're learning as we go.

Happy Monday!

Read more...

Half Bath Mini Makeover

>> Thursday, February 18, 2016

I have to admit in the nearly two years we've been in our "new" home, the novelty of having more than one bathroom has certainly not worn off. Our first house had a tiny, window-less bathroom on the second floor. One toilet. One sink. One tub and shower. And it was fine . . . until it wasn't. I remember dragging my huge pregnant self up the stairs in the final weeks before Ada was born and, ugh, it was pure torture.

So, this has been amazing:


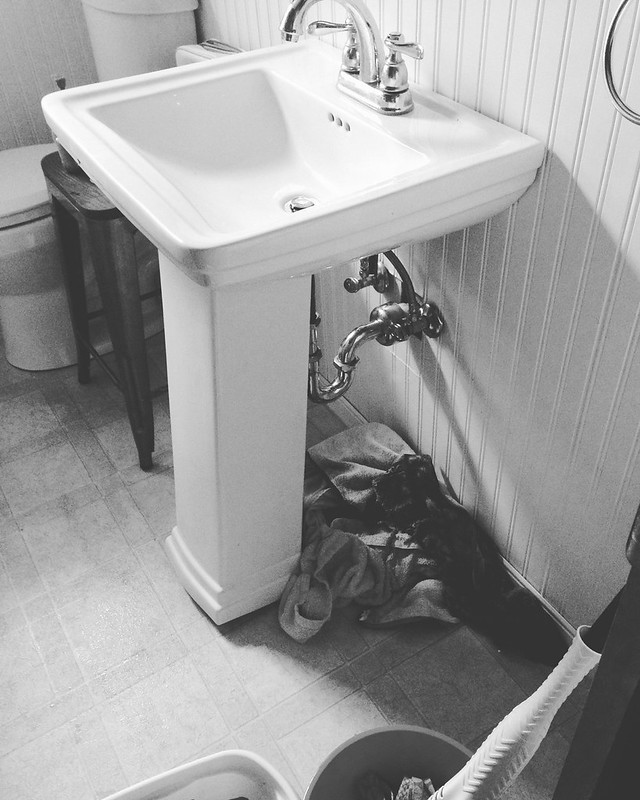
The one thing we never liked about the bathroom off the kitchen was the pedestal sink. (Well, and the impossible-to-clean flooring.) I mean, it was lovely looking. But it was always unstable because it wasn't installed properly. Then we had the whole matter of a four-year-old hanging all over it. We tightened and tightened and secured. It'd never fail, though. A couple weeks or months later, everything would be loose again. This time? The plumbing connections started to fail.

Leaks -- we had enough.


Ah, that's better:


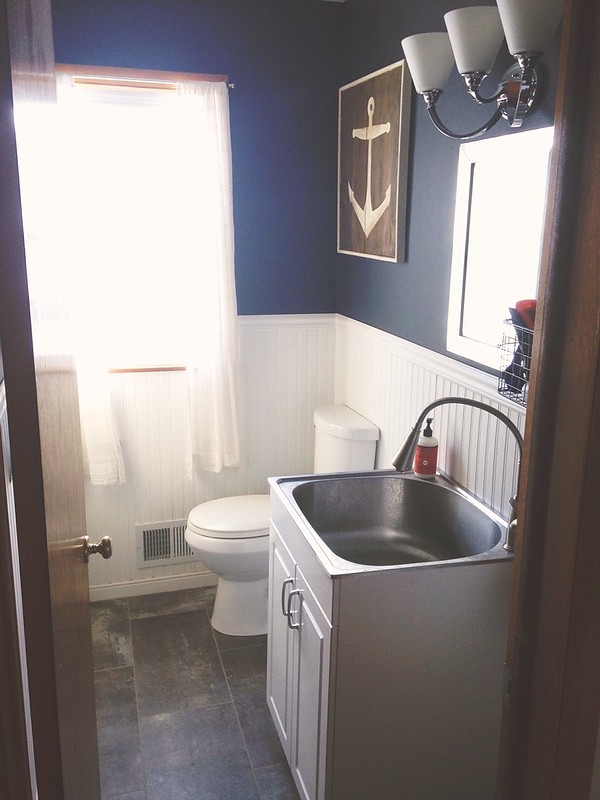
All the while, we've really wanted to expand the use of the bathroom and make it more utilitarian. We wanted a nice, deep sink for soaking or spraying off muddy shoes, dirty scrub brushes, (maybe bathing baby?), etc. A good cabinet as a place to store all our homemade cleaning supplies. Most of all, we wanted it to be sturdy.

I've been eyeing laundry sinks for the space, but most of them were too deep to fit. When we decided we wanted to change the sink, like, NOW -- I was thrilled to discover that Home Depot now carries a laundry sink cabinet that is under 22 inches deep with lots of storage and an AWESOME spray thing.

We rushed right over to pick it up along with some new vinyl tile flooring we've been meaning to install.


Stephen installed the sink in a matter of an hour. We love it. Stainless steel is perfect. The sprayer is already getting good use. The sink itself is 9 inches deep, so I definitely think we'll be bathing the baby in here often. And, like I mentioned, while we were at it, we changed the flooring by getting some of those 12 inch by 24 inch vinyl tiles and using grout to make them look more like real stone.

It totally transformed the space:


On the other wall, we have many of our cleaning tools hanging around on a simple accordion rack:


Overall, it's made us love this bathroom. It's the one our guests use when they're visiting, so it's nice to have it looking sharp. It's also nice to have a super messy craft project with Ada and have a great place to stick all the paint and goo until we can clean it. I can't believe I'm so excited about a simple sink.

Our house has come a long way since we moved in. And even since I did the updated tour in June. I guess it's time to do another tour. Maybe a video idea! My biggest project goal is to install a sliding or French door in the living room (in place of an existing window) that will lead into the backyard. We're thinking of getting a few quotes soon just so we have a number in mind so we can save. (I'm clueless on how much something like that would cost.)

Happy Thursday!

Like what you just read? You can subscribe to the feed of these posts or follow us on Twitter or Facebook to be the first to know what the (never home)makers are up to. And we’ll love you forever!

Read more...

DIY Silhouettes // $10

>> Thursday, October 1, 2015

I’ve been slowly transforming our house through cleaning and decor to make it a calmer place to spend time. After all, this is my home and my office, so I spend a ridiculous number of hours under this roof. We’ve always been clean (wiped down counters, scrubbed toilets, steamed floors) . . . but definitely messy (mountains of clean laundry on the floor, toys everywhere, piles of mail).

With all the stuff we’ve been going through, I’ve found cleaning and decluttering to be this weird therapy of sorts. Like, I’d rather spend a couple hours cleaning than reading or watching TV. I even skipped working out on Thursday last week and cleaned for a couple hours instead. And the other night I took a good half hours to wipe down the washer + dryer that were honestly not left in the best condition from our previous owners over a year ago.

Do you think I’m crazy? Maybe I am.


Our decor is making a shift, too. I want cohesiveness. I want simplicity. Neutrals. Country and rustic to remind me of my hometown. Corner by corner, we’ve been doing little projects to make our home a place that feels really cozy and lovely. But as the fall and holidays seasons are approaching, we’ve stopped any heavy lifting (I so badly want to add beams to our living room!) to focus on the light stuff, like art and textiles.

Here’s a fun DIY art project you can make in a weekend for less than $10. There are lots of tutorials you can find online, but it’s a pretty intuitive process. In fact, my second grade teacher made silhouettes of all my classmates way back in the day by shining light on our heads and tracing the outline with pencil. This is that project, just kicked up a notch + improved with some technology.

Here’s my inspiration:


STEP 1: Take Your Photo


Take a selfie or have someone else take a photo of your profile on a plain background. You can use a wall or even fabric backdrop. Some tutorials I came across even suggested using a window, but I found the light made it tricky to get all the right detail.


STEP 2: Edit + Order


Convert your image to black and white and up the contrast using a photo editing site like Pic Monkey. There’s no right or wrong. You just want to make sure you’re clearly able to outline your features. Oh, I took our photos in square cropping, so I had to overlay them onto a 4x6 backdrop with black so they would print out well. Does that make sense?

Then order prints at a place like Walmart. I got a couple in 4x6 and 5x7 because I wasn’t sure which size I wanted. (And they were super cheap per print, so it wasn’t a big deal to have a couple extras.) For our silhouettes, I ended up using the 5x7 of my photo and Stephen’s. We used the 4x6 of Ada so she’d be a bit smaller.


STEP 3: Cut it Out


You can use sharp scissors or an X-Acto knife, but go slowly! Get the divot where your bangs hit your forehead. Keep that stray piece of hair. Don’t chop off where your glasses hit your nose. Basically, cut as closely to the photo as humanly possible because the more little details you get -- the more it will actually look like you.


STEP 4: Spray It Black 


Again, a lot of tutorials had different instructions for making your silhouettes black (or whatever color you want!). I decided to use some matte spray paint we had hanging around in the basement -- and it was SO EASY this way.

Just a few spritzes, dry time, and they were done with an extremely smooth, flat finish.


STEP 5: Mount on Paper


So, you’ll need frames for this next part. Cut out a piece of paper (I used plain white and some paper bag paper) to the size of your frame. Use a bit of glue and stick the photo onto the paper. You can write your name, the date, or anything else, or just leave it plain.

STEP 6: Frame


Stick your artwork in your frame and admire your project! I love the look of oval frames for silhouettes, but I couldn’t find any for instant gratification. So, I ended up picking up a mixed lot of frames because I want to add to our collection in the future, but I don’t want to be limited by the type of frame so they would all match.

The frames I got were around $7 a piece, the paint was free because we already had it, and the prints were like less than a quarter. So, you can easily do this project for $10 or less, depending on what frames you use.


This isn’t how I plan to have them displayed in the long run (see my inspiration, above!). I want them on the wall, but I want to add a bunch more first. So, I’ve put them on the ledge for the time being. I need to mix in some more dark frames, too. But I’d love to do the cats and maybe some full-length silhouettes. We shall see.

Have you tried this project before? 

Please let me know if you do!

Psst: For more cheap DIY decor, check out the 5-Minute Fall Wreath.

More fall essentials:


Like what you just read? You can subscribe to the feed of these posts or follow us on Twitter or Facebook to be the first to know what the (never home)makers are up to. And we’ll love you forever!

Read more...

DIY // 5-Minute Fall Wreath

>> Thursday, September 24, 2015

I’ve taken our fall decorating to the extreme this year. Between the Indian corn, decorative gourds, pumpkins, and mums . . . I think we’ve covered. I’ve always had this vision of hanging some indoor wreaths in our living room, so I went to Michael’s yesterday to check out prices.


Whoa, nelly! Even with a 50 percent off promotion, they were like $20 to $35 per wreath. And I need TWO. So, I decided to take a trek and see what I might find to DIY. Here’s what I came up with for just $10 and five minutes of my time!


DIY FALL WREATH


What you’ll need . . . 

  • 16 inch grapevine wreath ($4.99)*
  • Bundle of blooms ($4.99)
  • Chalkboard tag ($1.99)
  • Yarn or twine
  • Chalk

* ALWAYS take a coupon to stores like Michael’s, A.C. Moore, etc. You can find coupons right on the website. I got 40 percent off the wreath, bringing my project cost to just $10.


Method . . . 

  1. First and foremost, there’s no right or wrong way to do this project. 
  2. I found that blooms with longer stems worked well because I didn’t need to glue them into place. I just poked the stems through the wreath and tucked in the leftovers. If you don’t like how it looks, take it out and start again. I arranged all the blooms on the bottom of the wreath, but you can do whatever you like.
  3. You can also hot glue acorns, pine cones, and other free stuff from nature onto your wreath. Go wild.
  4. Then wrap some yarn on the top and loop your tag through a few times to secure.
  5. Tie of off in the back and then add another small segment of yarn to create a hanger.
  6. Draw something fun on the tag. A heart is really unoriginal, but I like it.
  7. And you’re done!

Thanks for weighing in about our painted piano situation. As a musician, I understand some of the concerns with regard to the instrument’s timbre, etc. But honestly? It’s not the best sounding piano, it’s actually got a wood veneer on it versus solid wood, and from what I’m read -- any impact would be minimal. I was going to try chalk paint but have decided to just use chalkboard paint instead (you have to use wax every few months on the chalk paint -- ehhhh).

I’ll be back soon with some thoughts on sibling age gaps and more musings.

More fall essentials:


Like what you just read? You can subscribe to the feed of these posts or follow us on Twitter or Facebook to be the first to know what the (never home)makers are up to. And we’ll love you forever!

Read more...

DIY Stair Runner // $60

>> Thursday, August 6, 2015

We’ve been wanting to do a runner in our front entryway for almost a year. When we moved in, the stairs and entry floor were covered by dingy white carpeting. We ripped it up almost immediately. We covered the entry floor with inexpensive vinyl tile + grout and left the steps naked . . . until today.

I got this crazy idea to do a DIY stair runner using cheap rag rugs from Ollie’s (a discount store chain). They’re only a couple dollars each, and this project only cost us $60 and about 90 minutes of our time. A lot less than the $400 we paid in our last house to get a boring carpet runner professionally installed.

Here’s how we did it:


SUPPLIES


  • 7 x rag rugs at $5.99/each = $42*
  • Non-slip runner pad = $12
  • Double sided carpet tape = $6 (like these)
  • Staple gun = Already owned (DeWalt for $26)
  • 3/8” to 1/2” staples = Already owned (like these)
  • Scissors 
  • Measuring tape
  • Hammer
* If you can’t find these locally, you can browse some on here. The size we used was approx. 2x3.

Total: $60

INSTRUCTIONS 


Like I said, I followed the tips on this tutorial. We also sort of just freehanded it once we got going. The first step was measuring the steps to see how many rugs we needed. You guys know I’m addicted to rag rugs, so I just used one I had in the width I wanted on the stairs to see how many I’d need.

When I got to the store, I didn’t have too many choices for patterns and colors because I needed 7 in all. Luckily, I really liked the one I was able to find. I bought 7 and then hopped over to the hardware store to get my other supplies.

When I got home, I measured the width of the stairs and marked the center on each with pen (I’d be covering it over anyway!). Then I cut the anti-slip pad so it would be a couple inches shy of the step from front to back and a couple inches short of the rug from side to side. I folded each in half and made another mark that I could align while taping.


Then I cut strips of the tape to adhere each pad to each step. I lined up the marks and did one per step.

Staple time! We started at the top of the steps and just lined up the top of the rug with the first step. We stapled in a line every couple inches. Then on the edges every couple inches. Then a couple other places. I followed the YHL tutorial for this part.


We didn’t do anything fancy for the seams. Thankfully they met on the under part of each step, so we didn’t have to deal with anything tricky where we’d be walking. Instead of overlapping, we just pulled the edges close together and stapled. It ended up working great.

We made our way down the rest of the stairs -- measuring periodically to center the rugs -- and when we reached the bottom, we cut the excess with several inches to spare. We tucked the excess under and stapled to finish.


I also found it really helpful to go back over some of the staples and hammer them deeper into the rug. There are a few that are still somewhat noticeable, so we’re planning to color them blue with a Sharpie when we get the chance.


End result:


We’re both really pleased with how it looks. It adds a lot of style to the space. Better yet, it added some nice traction to the stairs (they’re quite slippery without a runner). There’s some definite sound absorption going on, too. We still need to touch up some wood that was damaged when we pulled the old carpet off the steps, but this is a huge improvement.

I’ll be sure to let you know how this holds up. For $60, I think it’s a win. I would have liked to get a couple spare rugs as replacements in case something happens. They didn’t have any more in the same pattern, so I might check back in a few weeks.

One last before + after.


PS: I’ll share more about our new closet door in another house post soon.

For now, don’t forget to enter the Gallery Direct #giveaway.

I’ll be announcing the winner tomorrow morning!

Like what you just read? You can subscribe to the feed of these posts or follow us on Twitter or Facebook to be the first to know what the (never home)makers are up to. And we’ll love you forever!

Read more...

Recycled Bird Feeders and Oral Health

>> Thursday, June 4, 2015


It’s finally spring! After the long, cold winter we had, I’m so much enjoying the warmer, sunnier weather and being outdoors again. This is our first spring in our new house, and we’ve already noticed that we get many more critters over here than we did at our last place.

Since our property backs up to a creek, we’ve especially noticed a greater variety in birds flying around. We thought it would be fun to set up a few feeders in trees so Ada could get more up close and personal. I started shopping around, but then quickly remembered making birdhouses and feeders out of old milk cartons when I was a kid. I thought this project would be fun for Ada to help me with as we begin to enjoy this new season.


STEP 1:

Clean out a used milk or juice container. We used this lemonade one, and I like how it has the round cap for eventually hanging the bird feeder in a tree. I even used the artwork to guide my cuts in the next step.


STEP 2:

Cut out access points/windows using an X-ACTO knife or scissors. I strongly suggest the adults do this part because cutting through cardboard can be tricky. There’s really no right or wrong way to do it. Just create enough space so a bird can go inside. You’ll want at least one window, but you can make as many as you like of all different shapes and sizes.


STEP 3:

(Optional) Paint your bird feeder. I used a thin coat of some leftover indoor/outdoor spray paint we had in the basement. You can also just leave your container as is or paint using something that won’t immediately wash off. I’ve also seen people use colored tapes, buttons, twigs, etc.


STEP 4:

Use string to feed through the top spout and then through a hole you can poke in the back for hanging. I used some yarn, but I think twine might work best.


STEP 5:

Fill with bird food. We purchased a good amount at our Christmas Tree Shops for less than $2. Just spoon the food into the bird feeder until it’s full. You can also add a perch if you like, but in my experience, the birds do fine either way.

And then you’re done! We’ve had ours up since the very first days of spring (when there was still even some snow on the ground!) and it’s holding up great!


This post is sponsored by Aquafresh® toothpaste in an effort to remind each of us -- young and small -- to practice good brushing habits this spring (and all year long!). Obviously sugary, acidic beverages, like my beloved lemonade, are delicious to sip in the warm weather . . . in moderation. However, they can certainly wreck havoc on our teeth and gums.

I’m actually quite self-conscious about my teeth. I was born with low tooth enamel due to a medication my mom took for hyperemesis gravidarum during her pregnancy. It was black boxed several months after she had finished her dosage. Anyway, I need to be particularly careful about my oral hygiene (we all should), which is why I’ve decided to share this information with you in this campaign.

Here are some things you can do:
  • Keep an eye on the stuff you eat. There are sneaky sugars in so many foods these days, so try to minimize your exposure to food and drink that contain excess sugars. 
  • Brush twice a day.
  • Brush at a 45-degree angle to the gums and use short, gentle strokes on all of your teeth’s surfaces.
  • Don’t forget to also brush your tongue and floss! Your gums trap food and plaque between teeth where the brush can’t as easily access. 
  • I always keep a water bottle handy so I can flush away anything when brushing isn’t convenient.
  • Check out more tips for healthy teeth and gums.

How do you celebrate Springtime? Tell me in the comments for a chance to win a $100 VISA gift card!

Entry Instructions: 

No duplicate comments.

You may receive (2) total entries by selecting from the following entry methods:

1. Leave a comment in response to the sweepstakes prompt on this post
2. Tweet (public message) about this promotion; including exactly the following unique term in your tweet message: “#SweepstakesEntry”; and leave the URL to that tweet in a comment on this post
3. Blog about this promotion, including a disclosure that you are receiving a sweepstakes entry in exchange for writing the blog post, and leave the URL to that post in a comment on this post
4. For those with no Twitter or blog, read the official rules to learn about an alternate form of entry.
This giveaway is open to US Residents age 18 or older (or nineteen (19) years of age or older in Alabama and Nebraska). Winners will be selected via random draw, and will be notified by e-mail. The notification email will come directly from BlogHer via the sweeps@blogher email address. You will have 2 business days to respond; otherwise a new winner will be selected.

The Official Rules are available here.

This sweepstakes runs from 6/3/2015 – 7/3/2015

Be sure to visit the Aquafresh® toothpaste brand page on BlogHer.com where you can read other bloggers’ posts!

Read more...

Pinterest to Reality

>> Friday, May 1, 2015

I’ve been going beyond crazy on Pinterest lately. I don’t know if it’s the same for you, but it’s like my stress release. If I’m feeling cranky or sad or otherwise icky, I’ll hop on there and browse. I hardly look back at the stuff I’ve pinned, so I’m trying to make a better habit of following through on these mini-dreams of mine.

From time to time, I hope to share a few Pinterest to Reality projects with you. Here’s my progress on a few items I’d like to complete in the near future.

BACKYARD COMPOST


I’ve mentioned it before on some homesteading posts, but we haven’t started up a composting system at the new house. Finally the ground has thawed and we’re ready to figure it out. After searching around, I’m pretty sure we’ve decided to go a galvanized can route.

Current:

Kitchen garbage bowl . . .


Inspiration: 

Galvanized Composter via Creative Homemaking


I just need to pick up a galvanized trash can, use a quarter inch drill bit to drill holes in the bottom half, and get digging. I’m going to try to tackle this project over the weekend, provided we don’t get too much rain today. I love that it’s tamper-proof. We’ve had problems with some of Ada’s plastic yard toys getting totally chewed by animals.


BETTER HAIR


Oh, man. My hair. Don’t look too closely -- it’s a mess. The last time I had a professional haircut was on Mother’s Day last year. I got all of it cut off and then started the long, grueling process of regrowth. I’ve also been dying my hair with henna and box dye and henna again, etc. It’s reddish, and I’ve kept it that way for years. Lately, I’ve been wanting it more of a dirty blonde/light brown color. Basically my natural color with a little oomph.

Current:

Self-cut style that I lightened using L’oreal hi-lift . . .


Inspiration:

This style/color by Anh Co Tran, though I might want to go slightly lighter and longer. But I need some professional to touch my head at some point with scissors. The front of my hair looks OK right now, but the back is a choppy mess.


TELEVISION TAMER


I think one of the most obvious ways I’ve been coping after the miscarriage is nesting. I mean, we had a lot of started projects . . . and I’ve been working to finish them like whoa. We put new vinyl flooring in the bathroom (we’re also painting, etc.), we spiffed up the living room, we added new window treatments, our budget kitchen update is almost complete, we’re planning to stain our deck, and the list goes on.

Right now I’m looking for a way to deal with the cords sprouting out of our TV above the fireplace.

Current:


Inspiration via Cameras and Chaos


These people snaked their cords through a clever channeling system disguised as architectural details. It looks easy enough. I love the structure it adds to the room. It cost them $120 with all the wood slats. They also got a great deal on their mounting hardware ($45!) and picked up some extra long HDMI cords.

What’s on your Pinterest to-do list?

Like what you just read? You can subscribe to the feed of these posts or follow us on Twitter or Facebook to be the first to know what the (never home)makers are up to. And we’ll love you forever!

Read more...

Kitchen Updates

>> Thursday, April 9, 2015

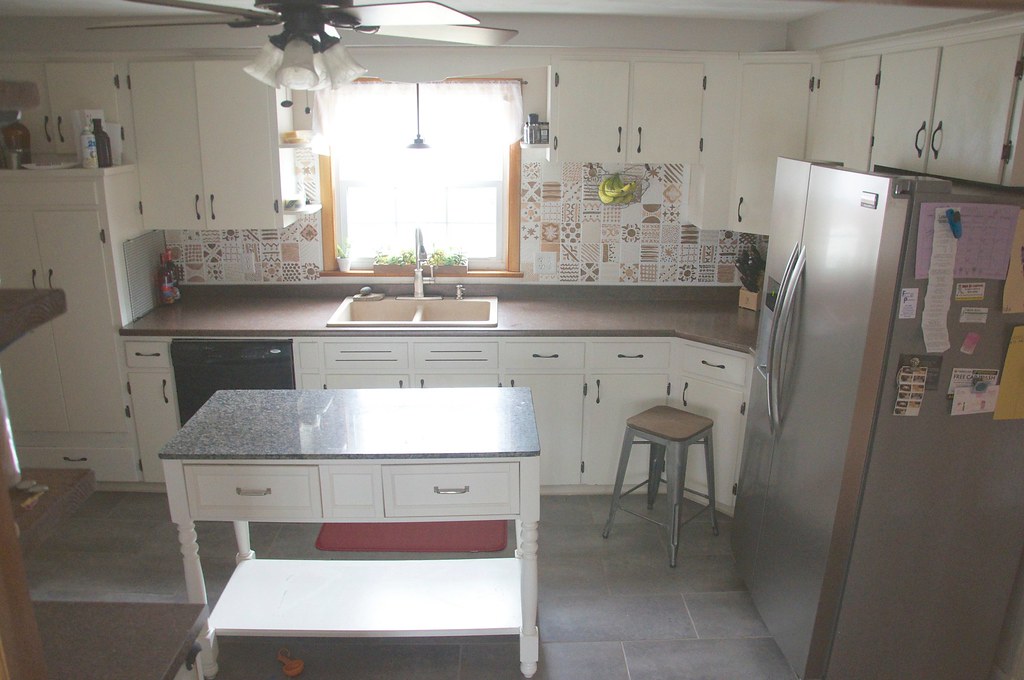
It’s been a while since I’ve written about our kitchen renovation. We made a few more updates recently that I’m excited to share, and I think the space is coming along nicely. I actually really liked the wooden cabinets when we moved in, but after a while we noticed that the kitchen doesn’t get much light for most of the day. As a result, we were always cooking in the dark unless we flipped on the artificial light.

Here’s the before:


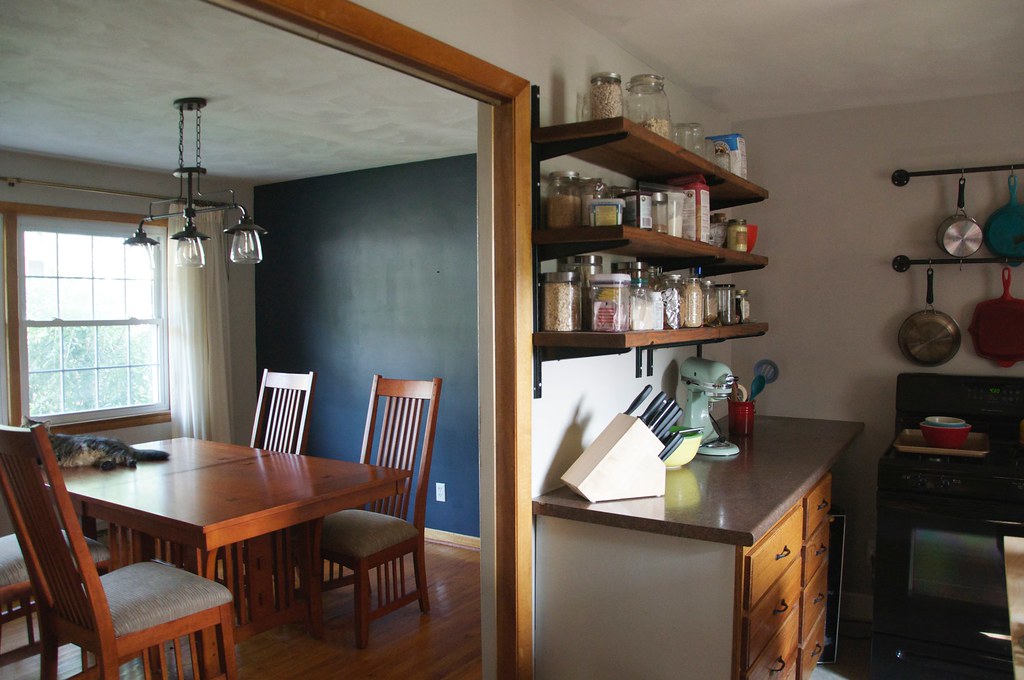
We installed the wooden shelving from our old kitchen (remember the $400 update we did before selling last year? Crazy!) in the new space a few days after we moved into the house. I love having all my bulk ingredient at an arm’s reach, and I think it looks pretty great.  Part of me wants to remove half the wall these shelves are on to open up the kitchen to the dining room, but then I’d lose all the storage.

We also did the floor with vinyl tile + grout.

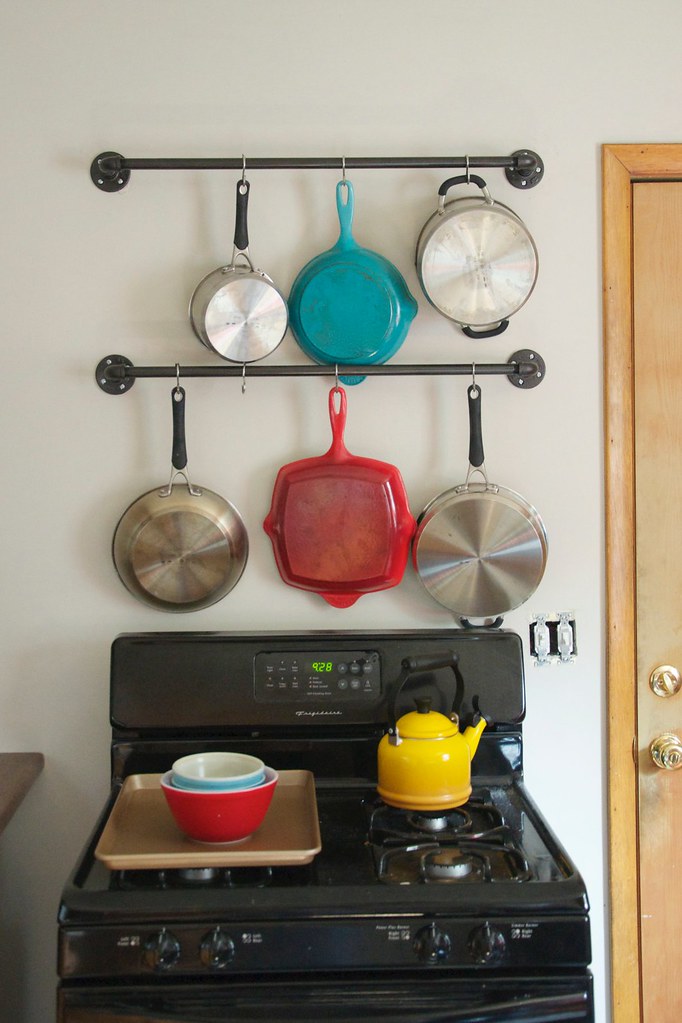
Oh, and we also made a DIY pot rack using plumbing pipes.


After spray-painting the cabinets white . . .

And hand-painting the backsplash . . .

Here’s where we are today:


Two big improvements:

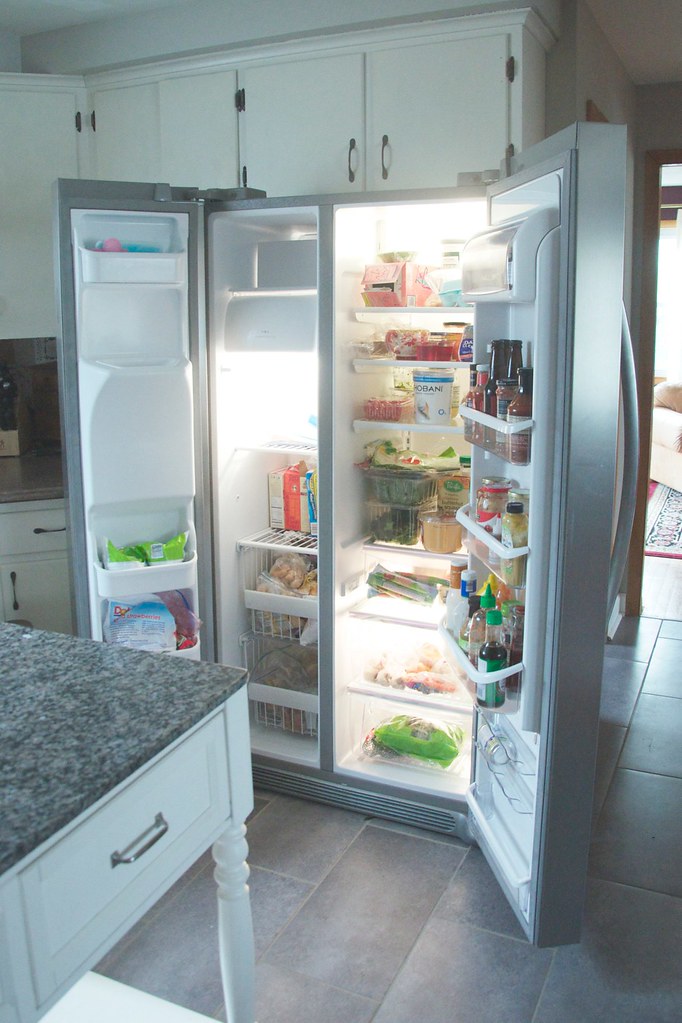
A new faucet (which I’ll write more about soon) and our new counter-depth, side-by-side refrigerator (this one by Frigidaire Gallery). Our old fridge was an off-white color and the freezer handle snapped off long ago. We also have a water softener, so I hate the way our water tastes out of the faucet, we’re planning to hook up the water component soon -- its filter is awesome. I also really like this style of fridge better than our drawer freezer because I do a lot of freezer cooking. Now I can stack my meals and keep stuff better organized.

Here’s a closer look:


So, we’re at this point when the project is nearly “done” -- but our countertop color does annoy me because the rest of the space is relatively cool and doesn’t jibe with the warm brown. I thought the backsplash might tie it all together, but it still looks a bit jumbled. At the same time, they’re totally functional and in excellent condition, so I don’t see changing them anytime in the near future.

I’m hoping to do another couple updates with budget breakdown and then stick a fork in this project. It’s awesome to have the room where we spend the most time so personalized. Especially since we’re planning to be in this house for a long time.

Happy Thursday!

Like what you just read? You can subscribe to the feed of these posts or follow us on Twitter or Facebook to be the first to know what the (never home)makers are up to. And we’ll love you forever!

Read more...
Related Posts Plugin for WordPress, Blogger...

About This Blog

MyFreeCopyright.com Registered & Protected

© 2009-2014 by the (never home)makers
All content on this blog is copyrighted.

Want to publish our pics, tips, or tricks?
Contact us! [neverhomemaker@gmail.com]

We value transparency. Links on this page may contain affiliates. In addition, please see our disclosure policy regarding sponsored posts.

  © Blogger template Simple n' Sweet by Ourblogtemplates.com 2009

Back to TOP  

Blogging tips