Showing posts with label natural. Show all posts

How I Feel About // Essential Oils

>> Monday, January 16, 2017

This is such a long-overdue post. I've hinted from time to time that I use essential oils in anything from household cleaners to DIY personal care stuff. But I've never gone on record explaining the full extent of my usage. The thing is, I've not one of those crazy hashtag oily moms.

At least not yet.


I started using essential oils when I was in college. I've mentioned many times that I went to Ithaca College, which is in Ithaca, NY. To me, this meant I was living in a total hippy town. And my very first independent persona as a college freshman was, well, a completely granola girl. It's something I have yet to shake all these years later.

You see, I used to have bouts of insomnia and headaches. I blame it on stress my first year of college. On a bad relationship I was in that had me all sorts of crazy. I marched into the local food co-op one afternoon and was looking for anything "natural" that might bring me calm and contentedness. I picked up two things -- a small bottle of Valerian root extract and a small bottle of lavender essential oil.

I'll get into the Valerian another time. But the essential oil was something I fell in love in instantly. I had started my first yoga class that semester, and our teacher actually would rub lavender mixed with jojoba on on necks during the final savasana. So. Incredibly. Relaxing.

I had no idea what I was doing on my own. I sniffed the bottle. I put the plain oil on my wrists and neck (oops -- I never had a reaction, but undiluted oil is usually a no-no). I dripped it onto this rice pillow I kept in my bed. It helped me feel calm.


Fast-forward many, many years but I started using peppermint, lemon, tea tree, and eucalyptus oils in my homemade cleaning supplies. I loved the natural scent and antimicrobial properties it added to the mix. Eventually I even got a diffuser and started unwinding with a few drops of lavender at the end of a hard day. If I felt a cold coming on, I'd do some peppermint mixed to eucalyptus.

And, really, up until today -- that's been the extent of my oil usage. I've seen a gigantic surge in essential oil popularity over the last couple years. I've remained rather skeptical about it all. I mean, can oils really CURE sickness? Can they ward it off? Should we REALLY be slathering our babies in this stuff? My first inclination is to say, uh, no. Be safe rather than sorry. This stuff is potent.

But many friends of mine who I know and respect -- some of them with medical degrees -- swear by the stuff. Am I missing out? Is it all snake oil? Will it kill my cats or injure my children? There are just so many questions. There are not that many iron-clad sources either.

Then there's the whole sourcing issue. I have only Aura Cacia oils in my personal collection. I can buy them at Wegmans. I respect their company, as they claim to be free from fillers and don't advocate ingestion (perhaps the biggest usage I'm skeptical about), and their prices seem reasonable.


I currently have:
  • Peppermint
  • Lavender 
  • Eucalyptus
  • Tea Tree
  • Lemon
  • Frankincense (my new favorite)  
  • And my diffuser is from Gurunanda
I hear that other oils from Young Living, doTerra, and Rocky Mountain are better quality -- at least perhaps.

So, how do I feel about essential oils? 


Curious.

As a long-time user, I'm still just on the tip of the iceberg. I'd love to hear from you more experienced oily people what I may be missing out on. Should I dip my toes in deeper? Am I right to be skeptical? What safety do you follow around kids?

Read more...

Henna Hair Color // Before + After (Video)

>> Tuesday, September 13, 2016

I'm thinking of doing henna on my hair again -- and then I looked for my post on how to do it. It was on my old family blog. So! I'm posting it here again. Also because it was one of the most requested posts on that site, so I don't want to cut off access. Enjoy!

I've been coloring my hair since I was 12 years old. That's 18 21 years! The last time I used my favorite box dye, my scalp felt disgusting and the color washed out super fast. Frustrated, I searched around and decided to give henna a try. I love the idea of a natural, chemical-free "formula" -- all with the added benefit of stronger hair and longer lasting color.

So, I ordered some Lush Caca Rouge red henna color, and I waited through two snowstorms + various shipping delays for it to arrive.


And here's my coloring experience:


// SCENES


Cutting + mixing together the henna wasn't nearly as difficult as I had assumed. It probably took 10 minutes to achieve the "brownie batter" consistency described in the instructions. Slathering it on wasn't terribly different from using my regular hair color, except as the henna dried, it did tend to crumble a bit. I covered everything with a nice layer of plastic wrap and let sit for 2-1/2 hours.

Washing it out had sort of scared me, as other reviewers said it either took out their hair or stained everything, but I didn't have either issue. Overall, I'd say my coloring experience was really positive -- I just didn't like having to wait that long for the color to take hold. I think it's worth it, though, because I'd rather wait than use dangerous chemical developers.

// RESULT


The red color is subtle, yet definitely vibrant, shiny, and noticeable. I'm really happy with how it looks. Not shocking, but certainly a change. My hair feels well conditioned versus dry or broken or just weird. My scalp isn't tingly or injured like it becomes when I use box dye.

In short: I love it!

// WHERE TO GET

I definitely think I'll be sticking to henna from now on, despite the time commitment. I used to think you could only dye your hair red with henna, but LUSH makes several different colors. I know there are cheaper henna dyes out there, but LUSH gets their red henna from a source that has less orange and more true red tones. Very important!

Here's the whole line:
Note: These bars went up in price considerably on Amazon since I first shared this post. Go check them out on the links, but I suggest buying at Lush stores directly.
// QUESTIONS?

If you guys have any questions, I'd be happy to answer them. Obviously, I'm not an expert, though I think after going through the process once, it's pretty easy to catch on. My color is still deepening and becoming richer even hours after, so I'll be interested to see in a week what it looks like!

Mostly, if you regularly color your hair -- either at the salon or at home -- I think it's worth giving more natural colors/methods a try. I'm always trying to make an effort to purge out those nasty chemicals from my life with what I eat, the products I use to clean my house and body, etc. So, I'm surprised it took me so long to try this whole thing out!

Do you dye your hair? How long have you been doing it?

Like what you just read? Browse more of our posts + recipes on Pinterest. Chat with us on Twitter or Facebook. And you can always email us with your questions and comments.

Read more...

Green in 15: Dishwasher Tabs

>> Tuesday, May 17, 2016

It's been a while since I did a Green in 15 post. If you're new to this series, so far I've covered how to revamp your cleaning with natural supplies and all the details about our no more paper towels system.

I've been making our own dishwasher detergent for quite a while now. We keep it in powder form in a small jar near the dishwasher. We fill the rinse dispenser with vinegar and occasionally add essential oils for extra punch. The thing is, even with my airtight container, the mixture gets clumpier than I'd like. Plus, I eventually decided we needed to change our formula to help with water stains from our hard water.

So, I searched around on Pinterest and found basically 10,000 slight variations on this recipe. The epsom salt helps with hard water while the addition of vinegar and essential oils help bind everything together and get dishes smelling great.


DIY DISHWASHER TABS


What you'll need . . .

  • 2 cups washing soda (or baking soda)
  • 2 cups borax
  • 1/2 cup epsom salts (or kosher salt)
  • 1/2 cup white vinegar 
  • 20 drops lemon essential oil
  • 2 ice cube trays
  • Airtight container for storage

Method . . . 

  1. Simply mix together all the dry ingredients and then add the wet. It will start clumping on its own -- just make sure it's well incorporated.
  2. Then press mixture into your ice cube trays and packed as it will go.
  3. Let dry 24 hours (I found that overnight was long enough for me) before popping out of the molds.
  4. Store in airtight container.

To use:


Put one tab in your machine's slot. Pour 1/4 to 1/2 vinegar in the bottom of the machine to act as an extra rise aid (again -- we have really hard water, I just do this anyway). And run the machine as usual. These tabs work well even on my machine's eco-setting that doesn't use super hot water or drying.

// RELATED


Green in 15: No More Paper Towels
Green in 15: Revamping Your Cleaning
DIY Natural Lotion Cubes
Powerful DIY Laundry Detergent
Cleaning with Vinegar
5 Green Cleaners That Work
5-Minute Homemade Deodorant
8 Ways We've Eliminated Plastics
Cleaning Produce The Natural Way
Chemical-Free Clean With Castile Soap

Like what you just read? You can subscribe to the feed of these posts or follow us on Twitter or Facebook to be the first to know what the (never home)makers are up to. And we’ll love you forever!

Read more...

Our House Cleaning Routine

>> Friday, April 8, 2016

Skipping ahead of myself again to share something I've been meaning to write up for quite some time. Our cleaning routine! And the reason I've wanted to write about it but haven't is because we weren't in a good groove . . . and I thought posting would help push us in the right direction. Well, now that we've cleaned and cleared out in our minimalist efforts, everything is falling much better into place.

Here's how we approach cleaning our spaces, how often we clean what, and what things we tend to leave for longer periods of time. Note: I'm not slating this as some "best practices" kind of post. Just merely sharing what we do. I'd love to hear how you approach cleaning in your everyday life!


Everyday


#1: The kitchen tends to be the busiest spot in our home. I typically cook most of our meals and snacks from scratch to help save money in the budget for other areas. As a result, I use my food processor, blender, stand mixer, slow cooker, and multiple pots and pans almost daily. Holy dishes! Cleaning the kitchen consists of getting the dishes through the washer and putting them away. Cleaning any kitchen tools we've used. Wiping up crumbs and grime from counter tops. Sweeping any big messes off the floor. This isn't a deep clean, it's simply to keep things running smoothly.

#2: Tidying up clutter. I run through the main areas of the house regularly throughout the day and attempt to keep whatever near its "right place." Ada's toys are the things that migrate around mostly. We have a few baskets in the living room to put blocks and a few other quiet toys in. Stuffed animals are her favorite, so I find them everywhere. It's not a big deal if they're around, but there's something so soothing about walking around the house at night and it's all clear for the next day.

Also: We've been getting Ada in on the task because we've put a metal bucket at the bottom of the stairs. In the evenings, we ask her to get anything that belongs in her room and put it in the bucket so we can put it back before bedtime.

#3: Paperwork. This is something new we've attempting to tackle every single day. We noticed that so much of the crap we've been stashing for far too long was junk mail and other documents that could be cleared out almost immediately. I don't know what our hangup was. Now I try to recycle junk mail and take care of other random papers coming into the house the day we receive them. It's a work in progress.


Every Other Day


#1: We vacuum the floor on the main level of the house just about every other day. A lot of this ends up being mess from eating in the dining room, cooking in the kitchen, or general crumbs and dirt from the outdoors.

#2: Laundry. I'd like to get on a better, less frequent schedule with washing laundry. Part of this battle has been paring down our wardrobes. Part of it has been being more patient if favorite clothes are soiled. I think we could be better at waiting longer between loads, but it seems like we're doing at least a few every other day. I wrote a whole article about how we should wash our clothes less often for Wisebread a few years ago, it's an interesting read!

#3: Recycling. We have a huge bin for recycling in our kitchen and we try to empty it into the garage bin about every other day. But here's the problem -- I don't know WHY we seem to have so many boxes, plastics, and other things going through the house. This should be a once a week thing in my opinion. I'm really trying to examine why we have so much packaging. BTW: Check out this great article about Surviving a Week of Zero-Waste Shopping. We have a lot of work we could do in this area. Oh, goals!


Once a Week


#1: Bathrooms. I feel like our bathrooms get so dirty so fast! We tend to give them a total clean once a week, consisting of cleaning the toilet, wiping down the sink (toothpaste + 4-year-old = ugh!), spritzing the mirrors, and clearing out any empty containers.

#2: We vacuum the basement carpet once a week. If it needs to be cleaned more often, we can't ever tell because it's all different shades of brown and masks things well. I would like to get a shampooer to give the thing a good wash a few times a year. Anyone rent or buy one and have experiences to share?

#3: We wash our paperless towel system once a week -- sometimes more if we've been using a lot of them.

#4: Bedrooms. I'll just tell you I don't make our bed every day. I probably make it once a week. I used to make it mostly daily, but since being pregnant, I crawl in and out on occasion -- so I figure, what's the point? Ada's bed is the same way because she's still napping. And as good as we are with washing our clothing, we are slow to put it away. This is something I'd like to work on because having calm, clean sleep spaces is important. They're not horrible, but I hate seeing laundry piles.

#5: Change sheets. I say weekly because that's what we usually do. But if I'm being totally honest, there are times when maybe two weeks go and we don't change the sheets. Still, I try to keep this a weekly thing. If I can remember to do it before bedtime, I'm golden. If I continue to stay up too late, it doesn't get done in a timely manner. Is that gross? Probably.

#6: Trash. I am surprised this doesn't go out more frequently. Somehow, we haven't had a ton of actual trash. It's more about the recycling. Of course, if something smells or is full, we take it out right away. But usually we do the bathroom bins once a week on trash night. The kitchen has been mostly once a week since we started composting. There are always exceptions to the rule, but -- yeah.


Less Often


#1: So, we don't really vacuum upstairs all that often. It's a mix of being too lazy to take the vacuum up the stairs and the fact that we don't wear shoes or eat much up there, so there's less mess to contend with. I'd say we end up doing it every other week or every three weeks (is that awful? it's been working well for us!).

#2: I have this thing about cleaning our windows. I mean, most people I talk to don't worry about it but once a season. I really like to give ours a good scrub once a month or so. I think having plantation shutters also exposes more dust that needs to be cleaned. So, I use some homemade cleaners and spritz everything about once a month.

#3: Dusting. I feel kind of weird admitting that I don't like to dust, so I don't do it often. I mean, dust accumulates, but it never seems terribly overpowering to me. If if notice a lot of dust, I'll of course wipe it up. Otherwise, I'd say I don't dust more than once a month. I think that's one benefit of having less furniture, too!

#4: OK, so I do a surface cleaning of the kitchen every day and it keeps things sane for a while. I do a deep clean probably every three weeks to a month. Like wiping out and clearing out the refrigerator. Cleaning the (outside) of the stove. Digging into the pantries to see what's expired. That kind of stuff. In an ideal world, I'd do this weekly or every other week.

#5: Wiping down furniture. I clean off the dining set about once a month unless I see something on it from an afternoon art project. We also recently washed and conditioned our leather couch after about a year of letting it go. We should probably vacuum under couch cushions more regularly. And one area I'm always embarrassed about? Underneath our bed. I don't know how so many clothes, toys, dust bunnies, etc. end up there . . . but they do, in droves.

#6: Closets. As we've gotten rid of more, we've needed to clean our closets far less often. Only a few sets of sheets helps with the linen closet. Fewer clothes means less mess in our bedroom closets. The worst closet in the house, though, is in the craft room. When I say we're mostly done with our leaning out, it's because the office/craft room is still a mishmash of things. We're working on it, and I hope to do a before/after really soon!

So, that's our general cleaning schedule. I have probably forgotten something major and you've all wondering WHY I don't clean whatever it is . . . but I assure you, there's nothing smelly or too terribly disgusting lurking inside these walls.

Happy Friday, friends!

// RELATED


Green in 15: Revamping Your Cleaning
DIY Natural Lotion Cubes
Powerful DIY Laundry Detergent
Cleaning with Vinegar
5 Green Cleaners That Work
5-Minute Homemade Deodorant
8 Ways We've Eliminated Plastics
Cleaning Produce The Natural Way
Chemical-Free Clean With Castile Soap


Like what you just read? You can subscribe to the feed of these posts or follow us on Twitter or Facebook to be the first to know what the (never home)makers are up to. And we’ll love you forever!

Read more...

Green in 15: No More Paper Towels

>> Tuesday, February 9, 2016

I've been meaning to post about our no paper towels system for ages. It's not that it's complicated or fussy. It was laziness on getting a good photo. I figured I need to get over that part and just post about it already! So, here's my latest installment of Green in 15, all about banishing paper towels from your home.

Here you go:


NO MORE PAPER TOWELS


  • Basically, we have 25-35 assorted towels. Some are flour sacks, some are nubby bar cloths, some are tea towels, and there are a few stray rags and washcloths in there, too.
  • We hung a fabric tote (similar to this one) containing all towels using some hooks in the closet right off the kitchen. I think this space was originally a utility closet, but it's quite small. Our vacuum doesn't fit very well, so I like using it for this purpose.
  • Underneath, we have a slim Simple Human Trash Can lined with a diaper pail liner to collect all the dirty rags.
  • You take a clean rag, use it up, and when it's dirty -- toss it into the bin. Easy, right? 
  • When the bin gets full, we grab the liner and take it downstairs to wash everything. We usually have a good stock of towels to use on wash day (and only do laundry once or twice a week).
  • We don't take the time to fold the towels. We simply toss them into the bin. We use the towels for general kitchen cleanup, napkins at dinner, and general cleaning tasks. 
  • Though they're all tossed in together, we use the nubbier cloths to do heavy cleaning, the flour sacks for everyday kitchen spills and even helping bread rise (in place of plastic wrap), and the tea towels for napkins. It's not always perfect, but it works.
  • To wash, we use our homemade laundry detergent and pour some vinegar into the rinse. They don't smell, though some do have stains from heavy use.
And that's really it!

You may already have towels on hand and some of the other supplies you need to get a system like this going. Mostly it's a matter of finding nooks and crannies to store everything into. You could probably sneak something like this on a smaller scale underneath your kitchen sink or in an unoccupied kitchen cabinet.

Those of you who don't use paper towels, what do your system look like?

// RELATED


Green in 15: Revamping Your Cleaning
DIY Natural Lotion Cubes
Powerful DIY Laundry Detergent
Cleaning with Vinegar
5 Green Cleaners That Work
5-Minute Homemade Deodorant
8 Ways We've Eliminated Plastics
Cleaning Produce The Natural Way
Chemical-Free Clean With Castile Soap

Like what you just read? You can subscribe to the feed of these posts or follow us on Twitter or Facebook to be the first to know what the (never home)makers are up to. And we’ll love you forever!

Read more...

Green in 15: Revamping Your Cleaning

>> Wednesday, February 3, 2016

So, I had this idea the other day. It came out of a conversation I had with a woman at the grocery store when I was buying a gallon jug of vinegar (on sale for $2.50!). She asked: "What in the world are you planning to do with all that vinegar?" And I was like "What CAN'T I do with it?!" I proceeded to list off all my uses, and I think she got a bit freaked out by my enthusiasm.

When people think about making all their cleaning supplies from scratch, it can become overwhelming. It's a lot like cooking everything from scratch. But with a little practice and some smart recipes -- it becomes second nature. We've been using vinegar, baking soda, and some other basic cleansers to do the bulk of our home cleaning for several years now. It takes very little effort to make the switch.

Green in 15 is a new series of sorts I'll be sharing that gives you some activities you can finish in just 15 minutes (or fewer) that will lead you in the right direction. Today, I thought I'd start with the absolute basics: Greening your all-purpose cleaning processes using vinegar. While you're at it, you can also start banishing paper towels with a few tips.


THE SUPPLIES

  • Vinegar (approx $3 per gallon, or less)
  • Water (free-ish?)
  • Isopropol alcohol (got mine at the $1 store)
  • Rags (free if you have 'em or $12 for a pack of 24)
  • Old spray bottles (free if you have 'em)
COST: Between $4 and $16

THE RECIPES 


#1: All-Purpose Cleaner -- Just fill up half an old spray bottle (you can also buy them on Amazon -- here's a 3-pack of plastic or some nice glass ones) with vinegar and the rest with water and maybe a few essential oil drops. Give a good shake and use for cleaning countertops, tabletops, and -- really -- anywhere else. It's ALL PURPOSE!

#2: Window Cleaner -- I add a bit of alcohol to the all-purpose mix (a few tablespoons works -- I make a smaller spray bottle of it for this purpose) and that helps windows stay streak-free!

#3: Dish Rinse -- I mentioned in our 5 Green Cleaners That Actually Work post that we make our own dishwasher detergent. We fill our rinse basin with plain vinegar mixed with essential oils. Works like a charm and takes two seconds.

#4: Veggie Wash -- If you don't like the Castile Soap Method for cleaning fruits and vegetables, you can make an easy spray wash using around 3 parts water, 1 part vinegar (hmm, sounds a lot like the dilution above -- score for multi-purpose!)

#5: Bathtub Cleaner, Etc. -- I also use full-strength vinegar in our bathroom for most cleaning (tub, tiles, shower surround, sink. For tough jobs, I combine with our natural scouring scrub.

Want more in-depth info? Check out my homesteading post about Cleaning with Vinegar. It includes these recipes plus 10 more uses for your gallon of the stuff.

CLOTH VERSUS PAPER


For most of your cleaning tasks, a good, nubby washcloth or rag will do the heavy lifting. We keep a bin of the clean ones in the kitchen utility closet. We keep a bag of the dirty ones hanging on the door of that closet. Then we wash them every couple days. Keeping around 24 rags is a good number if you're wiping down surfaces regularly. You may find you need more or less depending on the size of your home and your cleaning habits.

Just grab a clean rag and get to cleaning as you normally would.

Oh! Someone had asked me how we deal with occasional cat episodes. We use our rags (we have a few that have been around longer and are dirtier). We just rinse them out well after cleaning the cat mess and clean them with the rest.

I'll be sure to snap some photos and share more about switching from paper to cloth soon. It's dreadfully dark and rainy here today and all my shots are coming out quite depressing.

// RELATED


DIY Natural Lotion Cubes
Powerful DIY Laundry Detergent
Cleaning with Vinegar
5 Green Cleaners That Work
5-Minute Homemade Deodorant
8 Ways We've Eliminated Plastics
Cleaning Produce The Natural Way
Chemical-Free Clean With Castile Soap

Like what you just read? You can subscribe to the feed of these posts or follow us on Twitter or Facebook to be the first to know what the (never home)makers are up to. And we’ll love you forever!

Read more...

3-Ingredient DIY Face Scrub Vlog

>> Friday, January 15, 2016

Happy Friday, friends! Here’s a weekend project you can knock out in only a couple minutes, but the reward will last much, much longer. I love exfoliating scrubs for my face. My combination skin requires both gentle and more powerful cleansers, though. Since a lot of scrubs on the market contain those plastic microbeads, I started making my own at home.

This recipe is safe for pregnancy, contains just three ingredients, and will last a good month or more in an airtight container. Don’t forget to subscribe to my YouTube Channel to get more fun videos like these! (Oh, and don’t mind my wicked-awful roots. Going blonde before pregnancy wasn’t the smartest idea, right?)


BASIC DIY FACE SCRUB


You’ll need . . . 

  • 1/2 cup baking soda
  • 1/2 cup sugar
  • 1 cup unrefined coconut oil

TO MAKE: Just mix together everything in a food processor, pour into an airtight container, and love your skin! For best results, use only once a day (or less frequently) and scrub gently.


Here’s some facial scrub inspiration:

* One thing I forgot to mention in the video is that the feel of the scrub, especially after rinsing your face, does take some adjustment. It initially leaves an oily residue that comes off 90% when you towel dry. The hint of oil left behind provides some nice moisturize -- especially this time of year.


More homemade beauty products, etc.:

Like what you just read? You can subscribe to the feed of these posts or follow us on Twitter or Facebook to be the first to know what the (never home)makers are up to. And we’ll love you forever!

Read more...

Seed Cycling // Phase Two

>> Wednesday, September 2, 2015

(TMI Warning: If you don’t like TTC or menstrual cycle talk, skip this post. Also: I’m not claiming anything I’m doing works or doesn’t work -- it’s all an adventure.)

Today I started my second batch of seeds for Seed Cycling. To recap: Seed cycling might have the power to help regulate hormones. In the first half of your cycle (pre-ovulation), you consume 1 tablespoon of ground flax seeds and pumpkin seeds each day. In the second half (post-ovulation), you consume ground sesame seeds and sunflower kernels each day.

Here are my seeds:


I didn’t plan on writing an update so soon, but I definitely have noticed a few things, so I figured I’d share. Now, I am not doing seed cycling in isolation this month. I’ve sort of put myself on a mini bootcamp of sorts to see if I could help with my late (for me) ovulation and premenstrual symptoms. You see, I was always an ovulate between cycle day 15 to 16 sort of gal. I was that way when I got pregnant with Ada on our first try. And even though I wasn’t charting years ago, all the fertile signs pointed to those days consistently. I think I also had a 12 to 13 day luteal phase back then.

This past year (well, over that now) my cycles were really erratic. I mean, it started before TTC and got really bad last fall. I was ovulating one month on cycle day 11 and the next on cycle day 20, another on cycle day 13 and the next on cycle day 17. This isn’t awfully abnormal because I’ve read it’s “OK” to ovulate before day 21 . . . but the inconsistency worried me.

When I conceived in the winter, I ovulated on cycle day 20. My luteal phase during all this time had been around 10 to 11 days but I was spotting starting around 8 to 9 days, sometimes more. Very strange. No one ever told me why. I had lots of tests. Then when I got pregnant, it didn’t seem to impact stuff. Even when I miscarried, my body held onto the pregnancy, so it seemed progesterone wasn’t an issue.

Ever since the miscarriage and D+C, my ovulation has been between 18 and 20 days consistently for about five months. So, I guess it’s good there’s a regular pattern, but it definitely felt like my body wanted to ovulate sooner. I’d get lots of pains, fertile mucous (sorry!), and weird, erratic temperature patterns despite taking my temp the preferred way. I have no idea what exactly is working . . . but this month I got a positive OPK on cycle day 13! And with a notable temp shift this morning (and monitoring various other signs), I’m pretty sure I ovulated this month on cycle day 15.

FIFTEEN!

Holy moly. That’s awesome.

Along with seed cycling this month, I’m doing a few other “new” things to help regulate myself. Like I wrote at the start of this post, I don’t know if any of this is actually working or if my body is totally in control. I’d like to think there’s a connection. Regardless, I see these things as stuff that will improve my overall health -- not just reproduction -- so, why not?

  • I’m taking Rainbow Light Prenatals daily
  • I’m drinking a green smoothie almost every day
  • I’m avoiding gluten, but not totally abstaining
  • I’m avoiding sugar, but not totally abstaining
  • I’m following this 10K plan, so running approximately 15 miles a week
  • I’m doing yoga 5 to 6 times a week between 15 minutes to 1 hour
  • I am taking a couple teaspoons of Royal Jelly each day*
  • I’m drinking tons of water and herbal tea
  • I’m upping my protein with Greek yogurt, eggs, beans, lentils, oats, etc.
  • I’ve been drinking only a glass of wine or so on weekends
* A reader suggested this to me on Facebook. Stephen and I have both been taking it this month. It tastes like honey. It’s supposedly a superfood and great for fertility. I figure it can’t hurt much. Has lots of B vitamins.


So, I don’t know. Either something or some combination of things is working. Or my body is just being nice this month. I’m not really sure and won’t know until future cycles. I’m hoping my cycle will continue to regulate, and I’ll be interested to see if my luteal phase lengthens at all this month. Since the miscarriage, it’s been around 11 days with a little time on the 12th day before a half day or less of spotting. It’s better than in the fall, so that’s good.

I have a question for those of you who have tried Royal Jelly.

Do you take it your entire cycle? I hear it promotes estrogen. I also hear it’s fine your entire cycle. Other places cite that it’s good throughout pregnancy. Other places say you need to give your digestive system a rest every 15 days. Right now, I decided to take half while I figure it out.

I’ll continue to share my results with seed cycling and other stuff. I hope this is interesting and even helpful to some of you with similar struggles!


And if you’re looking for an easy way to grind your seeds -- use your COFFEE GRINDER (here’s the one we have)! I don’t know why I didn’t start doing this until now. The seeds get really nice + powdery. Perfect for blending into smoothies. My friend Ellie shared that a wonderful way to clean out your grinder is with some uncooked rice.

Happy Wednesday!

Like what you just read? You can subscribe to the feed of these posts or follow us on Twitter or Facebook to be the first to know what the (never home)makers are up to. And we’ll love you forever!

Read more...

I’m Trying // Seed Cycling

>> Thursday, August 20, 2015

In my deep fertility-related internet searches, I came across the practice of seed cycling. Have you guys heard of this? I actually had before. A long while ago, as one of my friend’s moms swore by the practice. The idea is that the female body is ruled by different hormones at different phases in their cycles. Certain seeds can support these hormones, and -- as a result -- “seed cycling” is a practice often promoted by naturopaths.

Before I write more, just note if you suspect you have a major hormone imbalance, it’s best to work with your doctor first. I’ve had mine tested and they’re all in “normal” limits, so I see seed cycling simply as a support of good function. There’s not a lot of scientific proof it even works, but I’ll get to that later.


Hormones at work:


For those of you unfamiliar with your menstrual cycles (I’m way too familiar at this stage), there’s the Follicular Phase (before ovulation, average days 1 throughout 14) and the Luteal Phase (after ovulation, average days 15 through 28). My own cycle isn’t quite this predictable, but you get the gist.

// The Follicular Phase is more estrogen dominant.

In the first half of your cycle, your body fosters and prepares to release the egg. Disruption to the balance of estrogen can result in anovulation (skipped ovulation), late ovulation, or even painful ovulation.

// The Luteal Phase features progesterone on center stage.

This half of your cycle is all about preparing the uterine lining for implantation and supporting possible pregnancy. Too much progesterone can lead to intense PMS symptoms. Too little can inhibit pregnancy or lead to mid-cycle spotting (indication of many things, but often a premature breakdown of the lining).

What do seeds have to do with it? 


Supposedly, you can balance estrogen and progesterone by eating certain foods. I write supposedly with some weight here; I have only just begun my own adventure trying this stuff out. But you’ll find plenty of happy women who are convinced the seeds worked major magic to lessen PMS symptoms and even boost their fertility.

// Flax and pumpkin seeds contain a hefty dose of omega-3 fatty acids. Flax contains something called lignans, which can actually block excess estrogen. There’s actually a lot of zinc in the pumpkin seeds that helps with progesterone production, but the flax counteracts and balances.

// Sunflower and sesame seeds give your body a mix of selenium and zinc. The work together to promote hormone balance between estrogen and progesterone in the second half of your cycle.

The most research on this topic has been done on flax. For example, a study published by the Journal of Clinical Endocrinology and Metabolism (in the early 1990s) focused on the consumption of flax and the menstrual cycle. Though researchers did not discover a link between eating flax and a longer luteal phase, the "LP progesterone/estradiol ratios were significantly higher during the flax cycles.”

Interesting.


What you consume:


Follicular Phase (approximately days 1 through 14, or before O)

  • 1 tablespoon ground flax seeds + 1 tablespoon ground pumpkin seeds per day.

Luteal Phase (approximately days 15 through 28, or after O)

  • 1 tablespoon ground sunflower kernels + 1 tablespoon ground sesame seeds per day.

Now, if your cycles are terribly irregular or even absent, you are supposed to start with the Follicular Phase seeds in conjunction with the new moon. I’ve read a few places that if this works for you (or at all), you can expect to see changes around the 3-month mark.

Toss your seeds into smoothies, make tasty energy chunks with them, sprinkle them on toast with honey, or stir them into morning oatmeal. Whatever you do, consume them raw and ground for the best absorption. You should ideally avoid the seeds that don’t correspond with your hormone needs during the opposite part of each cycle.

Seriously?!


I don’t know, you guys. It sounds a bit nutty (seedy?) to me, too. 

At the same time, I do think food and what we consume can have an impact on our bodies -- menstrual cycles included. There’s such a link between the inside and out, the inner workings and our external environment. What we put into our bodies has power. To me, this whole seed cycling thing falls in the category of couldn’t really hurt, why not try?

And -- really -- so far the major impact seed cycling has had on me is helping to keep my diet healthy. It’s making me think more about the foods I’m consuming. So, I guess that’s helpful regardless.

Resources:


If you’re interested in reading more about this seed cycling practice, check out some of these sites. I’ve only given you the short and sweet version.

What do you think?


I’d love to know if any of you have tried seed cycling before. Did you like it? Is it all hype? Leave a note in the comments. I’ll be sure to let you know what results -- if any -- I experience in my little experiment.

Like what you just read? You can subscribe to the feed of these posts or follow us on Twitter or Facebook to be the first to know what the (never home)makers are up to. And we’ll love you forever!

Read more...

Reusable Food Wrap

>> Tuesday, August 4, 2015

I’m researching an article on beeswax, and I found something really awesome to do with the stuff. This tip to make beeswax fabric comes from Mother Earth News -- you may never need plastic wrap again! Oh, and this project is incredibly easy and adorable to boot.

Take a look. It’s yet another way to eliminate the use of plastics in your home!


BEESWAX FABRIC FOOD WRAP 


What you need . . .
  • A couple ounces of grated beeswax
  • 100% cotton fabric (I washed + dried + ironed mine first)
  • Tin foil
  • Baking sheet
  • Clothespins (optional, to hang and set)
  • Pinking shears (optional, to keep from fraying)

Method . . .
  1. Preheat your oven to 170 degrees Fahrenheit. 
  2. Sprinkle grated wax over fabric. 
  3. Bake for around 10 minutes -- until everything has melted and absorbed into the fabric.
  4. Then remove immediately (I used my fingers, but a clothespin works well too) so it doesn’t stick to the pan.
  5. I did find that this project is forgiving. I didn’t add enough beeswax to my first one, so I added a bit more and just left in the oven until everything melted.
  6. Let cool before using.


This food wrap is easy to fold and secure. It forms with the warmth from your hands and even sticks a bit like cling wrap. Honestly, I’m super impressed and can’t wait to make more to lee in my stash. Beeswax is amazing stuff, isn’t it?

I’ll be sure to report back on how this ends up working in the long run. The author of the original tutorial said her batch was going strong several weeks after she made them. Just rinse with cool water -- not hot -- to clean. Use them for sandwiches, cheeses, leftover bowls, and all other stuff you need to cover.

And don’t miss . . .


Related Posts


Cleaning With Baking Soda Basics
Cleaning With Vinegar Basics
Homesteading Stuff You Can Buy at the $1 Store
DIY Natural Lotion Cubes
10 Smart Ways to Use Epsom Salts
Our Composting Arrangement
Powerful DIY Laundry Detergent
5 Green Cleaners That Work
5-Minute Homemade Deodorant
8 Ways We've Eliminated Plastics
Cleaning Produce The Natural Way
Chemical-Free Clean With Castile Soap

* Here’s the image source for the 1800s garden above.

Like what you just read? You can subscribe to the feed of these posts or follow us on Twitter or Facebook to be the first to know what the (never home)makers are up to. And we’ll love you forever!

Read more...

Composting

>> Tuesday, June 23, 2015

We had a pretty good composting operation set up at our old house. So, when we moved last year, we knew we wanted to start up again. It took us a while to get started, but we finally installed our new backyard composter a couple months ago. Here’s some notes on how we organize the process.


#1: Garbage Bowl


We started off with a Garbage Bowl in the kitchen to collect all our organic food scraps. You can use anything for this bowl, but there are also specific garbage bowls on the market. The idea here is making it easy to save the scraps from the trash while you’re cooking. After a while, it becomes mindless.


Usually we try to keep our food scraps chopped up pretty small because they decompose faster that way. Sometimes a spoiled apple or something bigger sneaks in, though. I know that some people prefer to keep their bits + pieces in the freezer, especially during the cold months.

#2: Indoor Bin


We also have a small compost collector in our kitchen which is the staging area before everything heads outdoors. We cook a lot with a lot of whole foods, so we need multiple options. You can buy containers with carbon filters to keep your kitchen smelling nice. Since we take ours out daily, I found a cute galvanized ice bucket (+ scoop) with a plastic bin in it. It works great and looks nice.


#3: Outdoor Bin


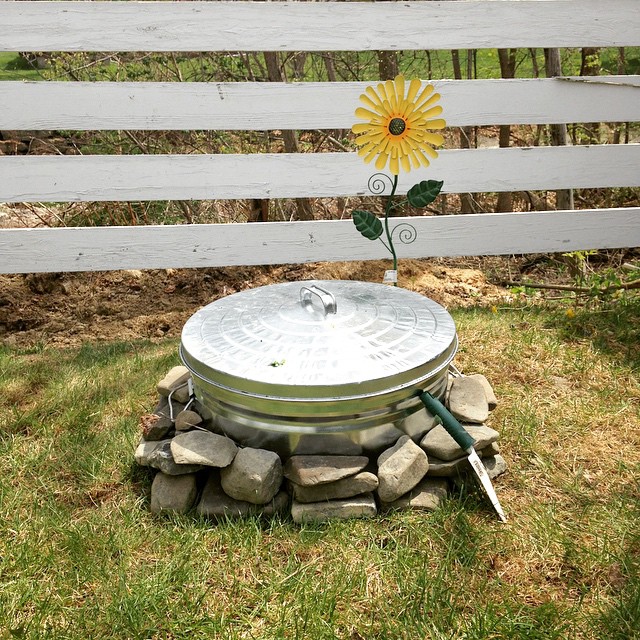
From there, everything goes into our outdoor composter. We bought a galvanized garbage can, drilled holes into the bottom half, dug a deep hole in the yard, and snugged it in. The holes allow worms to enter and break the food down. It was also one of the least expensive (and more attractive) composter solutions I have come across.

#4: Starter


To get our compost started, we actually bought some compost starter this year at the suggestion of a friend. It fast forwards the microorganism activity and breaks down the food scraps faster. We happened to have a lot of veggie and fruit scraps in a short period of time, so it would have taken a while to break all that down otherwise.

#5: What’s Inside


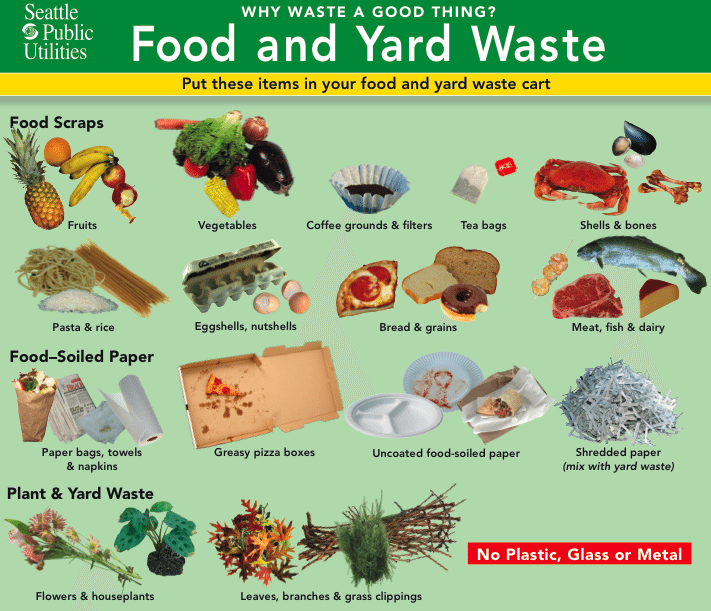
We compost everything from fruit and veggie scraps to eggshells to Stephen’s endless supply of coffee grounds. Yard waste -- grass clippings, leaves, etc. -- too. If you’re new, here’s a great chart for the DOs and DON’Ts of what goes into the bin. After you add a batch of “fresh” scraps, you always want to cover with some brown matter (newspaper, leaves, straw, sawdust, etc.). The brown stuff gives your compost more air and carbon, which are two essentials to the process.

#6: How/When to Use


We have yet to use any of the compost in our garden. You know your batch is “ready” when it’s nice and dark and breaks up easily. It just looks like incredibly rich, awesome soil. The amount of time it takes to get to this point can vary greatly, so be patient. Here’s some more information about using compost.

I’d love to hear about your composting process!

Leave your thoughts in the comments.


Related Posts


Cleaning With Baking Soda Basics
Cleaning With Vinegar Basics
Homesteading Stuff You Can Buy at the $1 Store
DIY Natural Lotion Cubes
10 Smart Ways to Use Epsom Salts
Powerful DIY Laundry Detergent
5 Green Cleaners That Work
5-Minute Homemade Deodorant
8 Ways We've Eliminated Plastics
Cleaning Produce The Natural Way
Chemical-Free Clean With Castile Soap

Like what you just read? You can subscribe to the feed of these posts or follow us on Twitter or Facebook to be the first to know what the (never home)makers are up to. And we’ll love you forever!

Read more...

Homesteading // Spring Is Near

>> Friday, March 13, 2015

We had over two feet of snow on the ground just a few days ago. It’s melted to less than six inches, and I’m starting to see brown blades of grass peeking out. Along with the earth’s thawing, my own body and mind are warming up to the idea of being outdoors again. After the winter we’ve had, it doesn’t even seem real that we’ll soon be able to walk around without all the bulk. And I certainly have a lot I want to do with our “land” (errr, backyard) and there are tons of other projects that extend indoors as well.

I plan to share some of our spring goals soon, but I thought I’d first give you an update on how we did with our winter homesteading goals . . .


Research Chickens: I did some good reading about chickens and feel like I have a handle on the things that are involved with finding them, making a place for them to live, caring for them, etc. That being said, I think this year isn’t the time to get started with the endeavor because our attention is definitely sucked in too many other places. My conclusion is that raising backyard chickens isn’t something to take lightly, so I think we’re going to push out the timeline a couple years.

Make Soap: Instead of making soap, I opted to get friendly with beeswax, making candles and ornaments, and all different types of lip balms and salves (like Natural Vapor Rub). I’m even considering making the ornaments for sale next year because I had so much fun and friends + family seemed to really like them. Since I had spent a chunk of money on getting supplies for these projects, I figured I’d wait on the soap stuff -- maybe I’ll add this one to my spring list.

Make Cheese: I did make cheese! Just not mozzarella. We love Indian food, so in an effort to stop eating out as often, I tried making paneer at home using this recipe. It worked out pretty well, but didn’t hold together quite as I had hoped. It kind of reminded me of when I tried making it a few years ago except it was in more solid form. Overall, I’m excited to try some different cheeses.

Plan Garden: This year I’m going to stick to the confines of our current raised bed garden which is about 6 feet by 10 feet. I found a nice garden layout guide that I’m going to loosely follow. Right now I’m starting my seeds indoors versus buying plants like we’ve done in the past. I’ll be honest, I’m worried nothing will grow indoors or that the cats will eat any sprigs that do pop up. Only time will tell! At least the seeds were all 50% off.

Knitting, Etc.: I had a lot of fun knitting with my Martha Stewart Loom Kit this winter. I made two hats for myself, one for Stephen, and a hat and cowl set that Ada wore to school most every day. It was sort of amazing that we all actually wore the stuff I made because I’ve knitted in the past but just never finished anything. I think I’ll probably slow on the knitting when we’re outdoors more, but I’d like to extend my skills next year into some more intricate stitches and projects.


And don’t miss . . .


Related Posts


Cleaning With Baking Soda Basics
Cleaning With Vinegar Basics
Homesteading Stuff You Can Buy at the $1 Store
DIY Natural Lotion Cubes
10 Smart Ways to Use Epsom Salts
Powerful DIY Laundry Detergent
5 Green Cleaners That Work
5-Minute Homemade Deodorant
8 Ways We've Eliminated Plastics
Cleaning Produce The Natural Way
Chemical-Free Clean With Castile Soap

* Here’s the image source for the 1800s garden above.

Like what you just read? You can subscribe to the feed of these posts or follow us on Twitter or Facebook to be the first to know what the (never home)makers are up to. And we’ll love you forever!

Read more...

5 Vegetarian Foods To Boost Immunity

>> Wednesday, March 4, 2015

Over the last half a year, I’ve been sick more times than I can count. And I’ve probably had a bug more times in this short period than in the last five years combined. Some friends and family have commented on my predicament, and the best I can do is explain that this first year of exposure to germs through preschool is kicking our butts. I highly underestimated how crazy things can get when you leave that bubble of being at home most of the time.

Rather than dwell on the misfortunate of having 18 other kids (their siblings, their families, etc.) and their sniffles and fevers to worry about, I’m being proactive. Diet has a powerful impact on how our bodies operate and deal with germs and sickness. So, I’m incorporating more and more immune-boosting foods into our everyday lives. The next time we get a letter saying we’ve been exposed to STREP or something else, I’ll take a deep breath and know at least we’re doing all we can do to prevent the worst from festering.


Yogurt


I’ve been meaning to write more about our dairy intake these days. Yogurt is one of those foods we always have on hand, though the exact type changes from week to week. We’ll do plain non-fat, Greek, Icelandic style, etc. All for those probiotics that keep the gut and intestinal tract happy. I spent a good part of my life hating yogurt, so if you have trouble with the taste or texture, try adding it to a smoothie.

I also love kefir, which is a yogurt-like beverage you can find at most stores. Get this: We can even get a delicious kefir at our local Aldi on the cheap. (Here’s more about shopping at Aldi.) The name comes from the Turkish word "keif" which means good feeling. In the bottle, you’ll unlock probiotics, calcium, tryptophan (making it a great before bed treat), protein, B vitamins, and even phosphorus.

Oats


Ada loves eating “mush” each morning, so we’ve gotten into quite an oats habit over here. And it’s a good thing, since oats contain tons of soluble fiber that lowers cholesterol and helps to fight inflammation. In a study conducted by the University of Illinois, lab rats were fed diets with different fiber content (soluble versus insoluble) and then injected with illness. Those rats who ate the soluble fiber diets recovered from sickness 50 percent faster than the others. Impressive findings.

Garlic


I remember several years back when taking garlic pills was all the rage. It may still be a popular supplement, but adding garlic to your diet has some major benefits. It’s actually an immunity-boosting superstar! Why? Well -- along with calcium and potassium -- it contains 100 sulfuric compounds that work to wipe out bacteria and infection. Chives, leeks, onions, and shallots have similar benefits -- so add these guys to your cooking routine for better health. Plus, it just tastes good.

Sweet Potatoes


I’ll admit I had some sweet potato fatigue -- especially when they became a staple of the most popular diets around these days. But we’re adding them back to our weekly cart because (fad or not), they pack some major nutrition. Sweet potatoes contain phytonutrient beta carotene, which your body turns into vitamin A -- fighting off infection and bolstering the immune system. Pumpkins and carrots pack a similar punch, but sweet potatoes also contain a nice dose of vitamin C.

Miso


Just like kefir, miso is one of those living cultured foods with innumerable benefits for the immune system. Fermented foods -- like miso, kefir, kimchee, sauerkraut, etc. -- increase antibodies and create antioxidants to fight off free radicals. Not only that, they also help with digestion. Now, when you’re purchasing these foods, you want to make sure they aren’t pasteurized or processed, which basically kills off all the benefit. The same goes with using in cooking. For example, if you’re making miso soup, don’t boil the miso (it will kill the good stuff). Instead, simmer it to help release all the good enzymes.

+   +   +   +   +   +   +

I’ll be back someday soon with some recipes that incorporate these ingredients. But I’d love to know what you’ve done to keep your family’s immune systems strong during cold and flu season. We also take multivitamins and try to get in lots of greens and other fruits and veggies. I’ve noticed a huge number of pluses since I started my green smoothie routine again. Here are some tips of blending the best green smoothie ever. I’m off to make mine now . . .

Happy Wednesday!

Like what you just read? You can subscribe to the feed of these posts or follow us on Twitter or Facebook to be the first to know what the (never home)makers are up to. And we’ll love you forever!

Read more...

Stomach Bug + Natural Pedialyte

>> Wednesday, February 25, 2015

Ada woke up from her nap a few days ago and promptly vomited the entire contents of her stomach. Around 15 minutes later, whatever else was left came up. My heart dropped, and I couldn’t remember what to do with the stomach flu. Thankfully she didn’t have a fever and was in generally good spirits.

I ran out to the store immediately to stock Pedialyte for the long night.


WHAT TO DO


Since we haven’t dealt with a stomach bug since, well, infancy, I asked around on Facebook what I should be doing otherwise. My mind tends to blank whenever Ada gets sick. I’m fortunate to have many experienced parent and doctor friends who gave me suggestions just when I needed them. Thanks, friends.

Here’s what they told me:

  • Stay away from sugary beverages like juice (exacerbates dehydration by causing diarrhea). 
  • Stick with popsicles, Pedialyte, watered down Gatorade (1:1), coconut water, or plain water between episodes.
  • Don’t worry so much about pushing food until the worst of the vomitting is over. The main concern is dehydration.
  • After sickness has started to wane, try the BRAT diet (bananas, rice, applesauce, toast), though I’ve also read that not all doctors are promoting a modified diet because getting back to normal nutrition is more important. Take it one hour at a time.
  • Call you doctor if you have any questions or see behavior changes or signs of dehydration in your kiddo (not peeing as much, lethargy, etc.). 
  • And here is more information about child vomiting.


NATURAL PEDIALYTE


So, Pedialyte. I poured some of the orange viscous drink in a glass hoping to replenish some lost electrolytes, fluids, and zinc. I eagerly handed the glass to Ada feeling relieved that she’d be getting some of the stuff her body needs to feel better. One sip through a straw later, and the stuff was 100 percent shunned FOR LIFE. She wouldn’t touch it. “Ewwwwww!” said Ada, looking like her stomach was about to turn again.

My friend Rachael had suggested a homemade alternative (for some reason the link isn’t working today -- but hopefully that will change), and at that point I was willing to give anything a try. Here are a few great natural + kid-friendly electrolyte drinks I found across the web.

// RECIPE #1
via Mama Natural

1 c. coconut water + 1/8 to 1/4 tsp. sea salt

// RECIPE #2
via The Reluctant Hippie

1 qt. water + fresh lemon juice + 1/3 c. (raw) honey + 1/4 tsp. salt

// RECIPE #3
via Cute and Peculiar 

1 qt. water + 1/2 tsp. baking soda + 2 tbsp. agave + 1/4 tsp. salt + 1 c. OJ

FREEZE


When all else fails, go with what’s working best. This might be a splash of gatorade in a glass of water. For Ada, popsicles worked best by far, and I’m sure you could freeze most of the homemade Pedialyte recipes if you think your child would more likely ingest them frozen.

We’ve been buying Ruby’s Rockets for a while, and Ada’s been eating those as she gets her appetite back. They’re made with fruits and veggies and contain probiotics. Our favorite flavors are Orbit Orange and Galaxy Green. By the way, I’m not affiliated with the company at all -- and if you click onto their website, there’s a $1 off coupon even I didn’t know about until right now.

Cool!

Hopefully you won’t need much of this info very often, but I do help it gives you some confidence when the dreaded stomach bug strikes your home. The best part? You can use these recipes and tips to replenish yourself if YOU are the one who’s sick. I haven’t caught the bug (yet -- FX), but I’m surely hoping if I do that it will pass as quickly as it did for Ada. She was better the very next day.

What are your tried and true stomach flu remedies?

* Coconut water image from here.

Like what you just read? You can subscribe to the feed of these posts or follow us on Twitter or Facebook to be the first to know what the (never home)makers are up to. And we’ll love you forever!

Read more...

5 Winter Homesteading Goals

>> Thursday, November 20, 2014

Now that winter is almost here, my homesteading projects have slowed considerably. I used to spend quite a bit of time outdoors gathering up our garden’s tomatoes. I’d also spend hours in the kitchen on the weekend making recipes to fill our freezer with or otherwise preserving our CSA foods for the season ahead.

With the cold, we’ve retreated. But that doesn’t mean I’ve stopped my progress toward my goals. Instead, they have shifted to stuff I can do indoors. I’m sure I’ll have more to add to this list, but for right now, I’m trying to keep the focus simple and plain. If you have experience with any of these items, I’d love to hear from you! Sharing knowledge and skills is one of the greatest (and FREE!) gifts we can give one another.


1. Research Chickens


This may be premature, as I haven’t yet checked with our town for local ordinances, but I’d like to consider raising a few backyard chickens. We eat so many eggs each week, though I have read that the price and upkeep of the chickens doesn’t necessarily save lots of money on eggs. I also think the experience would be worth it. There are a lot of pros and cons, so this winter I’d like to do the initial research to see if chickens might be a good fit for our family and our goals. Friends who have chickens (and I know quite a few!), I’ll likely be pecking at your brain for ideas!


2. Make Soap


Along with the DIY Lotion Cubes, Natural Vapor Balm, Homemade Deodorant, Green Cleaning Supplies, and other things I’ve been mixing in the kitchen, I’d like to try my hand at making soap. And after I get the hang of basic soap, I’d love to expand the idea to make my own shampoo bars!


3. Make Cheese


I had everything ready and set to start making cheese in the fall, and the weekend I planned to do it got swallowed up in a house full of sickness. There are few ingredients needed, it’s mostly the time and attention that I need. With so many months indoors, I’m sure I’ll finally get my chance. Here’s the recipe for homemade mozzarella I planned to start with.


4. Plan Garden


We have a small raised bed garden in our new backyard. This year, the previous owners had planed the thing full of mostly cherry tomatoes. We enjoyed them, but next year I’d like to expand and diversify. Several of you have recommended the book Square Foot Gardening, so I’ll be picking up a copy to aid in my education on the matter. I think we’ll still keep the operation somewhat small this year, but hopefully grow as we learn more. Of all veggies, I’m most interested in sprouting up some dinosaur kale!


5. Knitting, Etc.


If you follow my other blog, you know I recently picked up the Martha Stewart Loom and Weaving Kit. Of course, most of my occupation with the thing is just a hobby. But I’d love to learn how to create more than basic scarves and hats. I found this cool mitten tutorial on YouTube, and I even have aspirations of stitching together a sweater someday. Wool is my favorite fiber, and I’d love to create a homemade stock of woolen items for all these chilly months we experience every year. Plus, it’s relaxing!

And don’t miss . . .


Related Posts


Cleaning With Baking Soda Basics
Cleaning With Vinegar Basics
Homesteading Stuff You Can Buy at the $1 Store
DIY Natural Lotion Cubes
10 Smart Ways to Use Epsom Salts
Powerful DIY Laundry Detergent
5 Green Cleaners That Work
5-Minute Homemade Deodorant
8 Ways We've Eliminated Plastics
Cleaning Produce The Natural Way
Chemical-Free Clean With Castile Soap

* Here’s the image source for the 1800s garden above.

Like what you just read? You can subscribe to the feed of these posts or follow us on Twitter or Facebook to be the first to know what the (never home)makers are up to. And we’ll love you forever!

Read more...

Homesteading: Natural Vapor Rub

>> Tuesday, October 21, 2014

You may have noticed that I started writing about essential oils much more frequently in recent months. They’re something that’s always sort of been in my arsenal of home stuff, but the way I use them has broadened much beyond simple defusing. Now, I haven’t gotten into consuming essential oils or learning the specific combinations for medicinal purposes, but I’m slowly educating myself.

Like anything that’s slanted toward the natural -- I’d rather try home remedies and comforts than the store-purchased alternative. It’s also pretty cool when I discover something that actually soothes me. Empowering, I guess. (Note: I gladly take the Z-pack when I get mega-sick. Thank you, modern medicine!)

Though, I’m pretty sure Veggie Pho cures all!


So, along with slowly learning to make my own baking soda deodorant and soft skin lotion cubes, I’ve been venturing deeper into other DIY skincare territory. This time, of a more medicinal nature. I’m a huge fan of vapor rubs for cough and cold. I figured -- like everything else -- this was the kind of thing I could whip up in my own kitchen. And I was right.

There are lots of recipes on the web. Here are just a few.
Of all recipes, I favor the simple beeswax with oil and essential oil combination. I know a popular cure-all blend is Thieves, which was apparently used by these French guys who robbed people during the Plague. At least that sounds mysterious and probably moves oil. Regardless, it’s hailed for fighting germs and helping with chest congestion, etc. The major oils in it are cloves, rosemary, eucalyptus, lemon, cinnamon -- if you’d like to make your own to use in place of the oils in my recipe, go ahead!

I decided to go with two that I already own -- eucalyptus and peppermint -- because they are the stars of my favorite Badger Balm (Breathe Easy). And what’s awesome is that the balm this recipe makes is almost identical in texture and scent, just for a fraction of the price.


DIY VAPOR RUB
Use the smaller essential oil amounts for a baby + kid-strength variety.

What you’ll need . . .
Method . . .
  1. Combine your carrier oil and beeswax in a small, heat-safe bowl. Heat a small pot of hot water on the stovetop and then place your bowl inside to let everything melt together. Mix.
  2. Then take off heat and add your essential oils. Mix.
  3. Pour into a glass container for storage and place in the fridge to harden quickly. You don’t need to store it in there, though. I was just impatient and wanted it to quickly firm up.

I rub this stuff on my chest when I have coughs. I let it linger on my throat when it’s sore. I slather it under my nose when it’s stuffy. I even do that trick of putting it on Ada’s feet when she’s under the weather. At very least, it’s comforting and does provide at least some relief, in my humble opinion and experience.

Have you ever made a balm like this one? 

What’s your favorite combination of ingredients? 

Whenever it comes to homemade stuff, I like to stick to as few ingredients as possible. It keeps the cost down and keeps it simple + easy to remember. I’m also trying to learn more about the use of essential oils during pregnancy. Though I’m not pregnant yet, most of the bottles of oils I have say not to use (or to consult with a physician) if you’re pregnant. Do any of you know more on that topic?

And speaking of homesteading stuff, I also mixed together another 5 gallons of DIY Laundry Detergent today! Now that we’ve moved, it’s working so much better with our new water (it’s a bit harder -- so, go figure!). Instead of the ratio of 1/2 cup borax to 1 cup washing soda, I did 1:1, so I’ll be sure to let you know if it improves or hinders the power.

Like what you just read? You can subscribe to the feed of these posts or follow us on Twitter or Facebook to be the first to know what the (never home)makers are up to. And we’ll love you forever!

Read more...
Related Posts Plugin for WordPress, Blogger...

About This Blog

MyFreeCopyright.com Registered & Protected

© 2009-2014 by the (never home)makers
All content on this blog is copyrighted.

Want to publish our pics, tips, or tricks?
Contact us! [neverhomemaker@gmail.com]

We value transparency. Links on this page may contain affiliates. In addition, please see our disclosure policy regarding sponsored posts.

  © Blogger template Simple n' Sweet by Ourblogtemplates.com 2009

Back to TOP  

Blogging tips